Restoring a Cluster from a GitOps Repository
There are times where you might want to restore a cluster based on the information stored in a GitOps repository. This might be a demo or training environment from a cluster that is no longer available. If you have a cluster configuration that you would like to restore, you can make it easier by saving some items before your cluster expires or is deleted. If you lose your original cluster before you are able to save these items, you can still restore it, but it does add a few steps.
On Original Cluster
Saving Sealed Secret Certificate
Many clients use a Secrets Manager product to maintain their secrets in a vault external to the cluster. In this case, the certificates used to decrypt your secrets will be already stored in that vault, and can be restored to your new cluster. The steps are specific to your Secrets Manager product.
If, instead, you are using Sealed Secrets to store your secrets in your GitOps repo, as described in the tutorials on this site, you can make a backup of the sealed secret operator's certificate before your current cluster expires with the following command.
oc get secret -n sealed-secrets -l sealedsecrets.bitnami.com/sealed-secrets-key -o yaml >master.key
The command above stores the certificate in a master.key file. You can then deploy the certificate to your new cluster, as described below. Once the certificate has been deployed on your new cluster, the sealed secret operator will be able to decrypt your existing sealed secrets. Keep the master.key file in a safe place. Do NOT store it in your GitOps repo because if someone gains access to this file they could decrypt your secrets.
If you did not create a backup of the sealed secret operator's certificate before your cluster expired, then you simply have to re-encrypt those secrets after you install the sealed secret operator in your new cluster. This process is described in detail below.
On New Cluster
High Level Steps
Here are the high level steps to restore a cluster from an existing GitOps repo:
- Create a new cluster
- Install ArgoCD
- Deploy the Infrastructure
- Bootstrap the cluster
- Add the Secrets
- Deploy the Services
- Re-encrypt your Sealed Secrets
- Deploy the Applications
- Post Deployment tasks
Create a new Cluster
To restore your GitOps repo you first need to create an Openshift cluster.
Click to see details on how to use Techzone to create an OpenShift cluster on IBM Cloud
Note
In the steps below you will need to adjust the size and settings of the cluster you create to match your original cluster settings.
OpenShift on IBM Cloud
-
Navigate to the IBM Technology Zone
In your browser, navigate to the IBM Technology Zone to create your cluster.
- You will need to sign-in with your IBM credentials if your browser has not authenticated.
- You will need to read and accept
Terms and conditionsto proceed to the IBM Technology Zone.
-
Reserve a cluster
You can reserve a cluster immediately on IBM Cloud.
Click on the
Reserve nowradio button.Info
It takes between 30 and 60 minutes to provision a cluster. Moreover, once a cluster has been provisioned, by default, it will be deleted after 3 days -- unless you renew it. It can therefore be helpful to schedule the environment to be created later if you are not going to be using it for a while -- such as for a future demonstration or classroom session. Come back and explore the
Schedule for lateroption another time. -
Complete reservation details - step 1
You will be asked to complete your reservations details in two steps.
Firstly, when you make a cluster reservation, you can supply a set of details that describe:
- The cluster name
- The purpose of the reservation from a pre-defined set
- A description, which will appear when you set the purpose of your reservation to
Practice/Self-Education.
Complete the details as follows:
- Type a helpful
Namesuch asMy cluster 1 - Select
Practice/Self-Educationfrom thePurposedrop-down list - Type a helpful
Purpose Descriptionsuch asEducation - Do not select
Preferred Geographyyet; we will do that in a moment - Add some helpful
Notessuch asLearn how to build a cloud native production reference deployment using a CloudPak and OpenShift on IBM Cloud
-
Complete reservation details - step 2
The second step in registration is to specify the physical details of the compute infrastructure for your cluster.
When you make a cluster reservation, you can supply a set of details that describe:
- The cluster's geographical location
- The version of OpenShift Container Platform used by the cluster
- The number of CPUs in the cluster and their memory size
- The number of Kubernetes worker nodes in the cluster
- The OCS storage size for the cluster
- The End date and time for the cluster
Specify the same settings as your original cluster:
- Select your
Preferred Geographysuch asLondon 5,HongKong 2orSan Jose 04. - Under
End date and time, select a date and specify the time along with its time zone. - Select
Worker Node Count - Select
Worker Node Flavorfrom the drop-down list - Select
NFS Sizefrom the drop-down list - Select `OpenShift Version from the drop-down-list
Info
By default, your cluster will be reserved for three days, after which time it will be deleted. This is more than enough time to complete this tutorial. If required, you can increase the cluster lifetime by configuring the
End date and time. Don't do this unless you really need to do so; as you'll learn in the tutorial, the use of GitOps makes it quick and easy to provision a cluster when you need to do so. -
Create the cluster
Check your reservation details and press
Submitwhen you're ready to create the cluster:
Info
The cluster provisioning process will take between 30 and 60 minutes to complete on IBM Cloud.
-
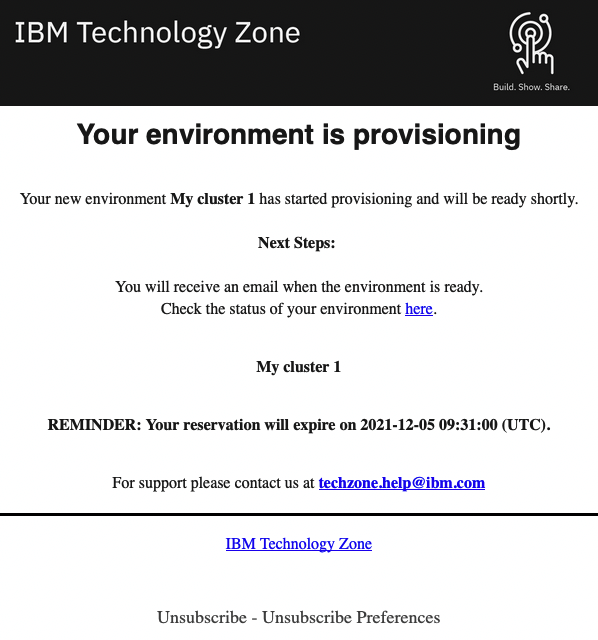
Provisioning email
As the provisioning process starts, you will receive an email to confirm that the provisioning process has started:
-
Checking the cluster provisioning status
You can also view the status of your provisioning request on IBM Technology Zone.
Click on My reservations to see:
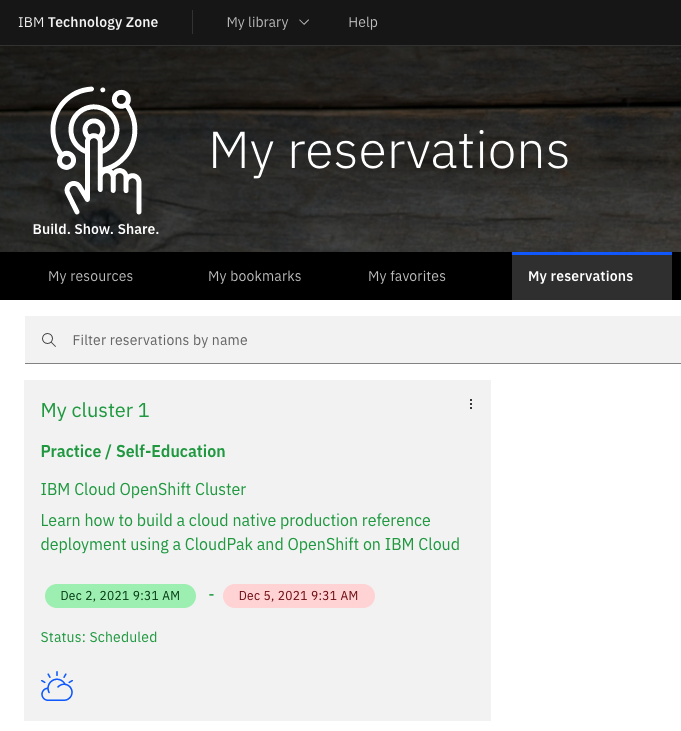
Note:
- The
Statusfield will beReadywhen the cluster has been provisioned. - The creation and expiry date-time for your cluster.
You can return to the reservation at any time to get the details of your cluster.
- The
-
Cluster provisioned email
You will receive another email once your cluster is ready:
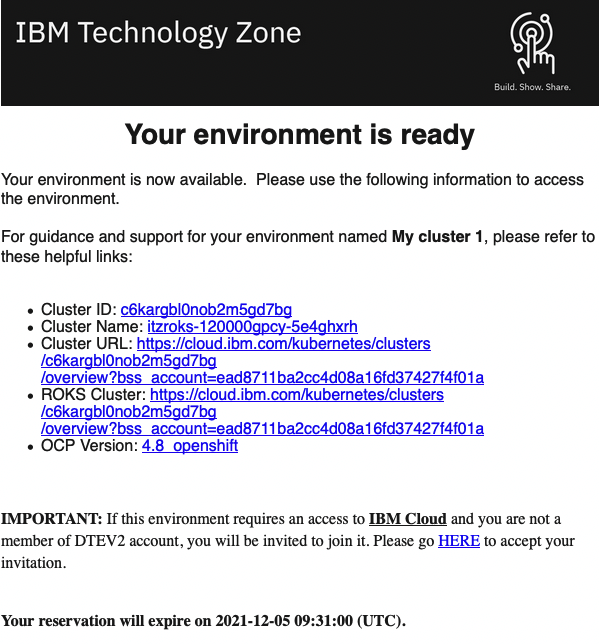
Success
Your cluster is now provisioned and ready to use.
Warning
Note the expiry date-time.
Note
Be sure to read the IMPORTANT: clause at the end of the email. If your cluster has been provisioned to an IBM Cloud account you have not used before, and you have not accepted the invitation to that account, you will not be able to see your cluster when you click on the Cluster URL link in the following step. It is recommended to always click on the HERE link in the clause to see if you need to accept an invitation.
-
Navigate to your cluster
You can use the information in the notification email to access your cluster.
Click on the
Cluster URLlink to login to IBM Cloud and locate your OpenShift cluster: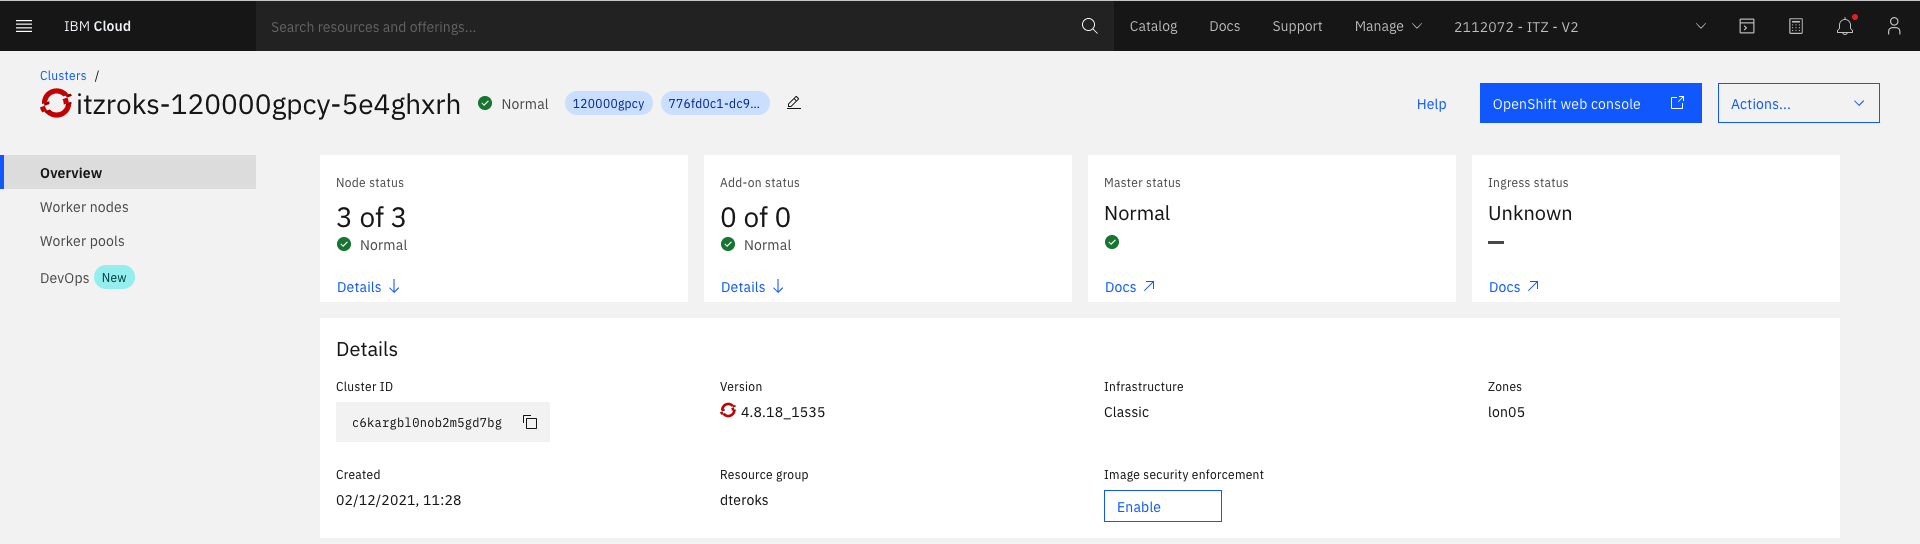
Note:
- The
Cluster IDthat has been assigned by IBM Cloud. - The
Zonematches your requested geography. - The OCP
Versionmatches your requested version of OCP. - The
Node statusidentifies the 3 worker nodes in theNormalstate.
Feel free to explore this web page.
- The
-
Receiving cluster deletion email and extending your cluster's lifetime
When your cluster is within 3 days of deletion, you will receive a daily email:
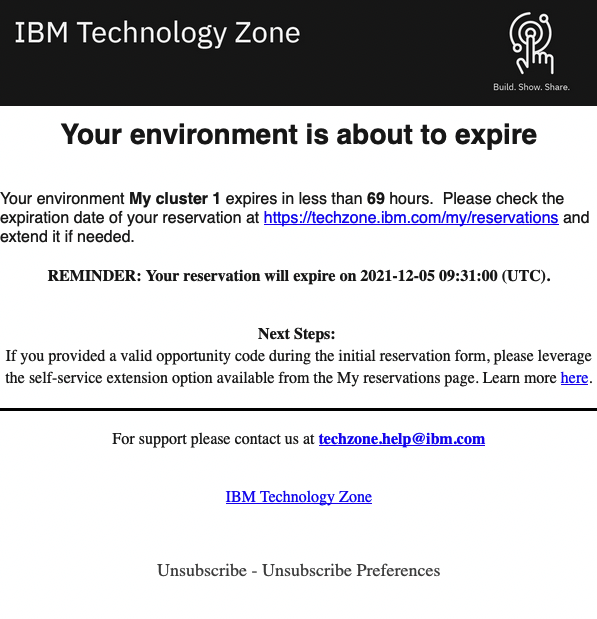
Note:
- You can extend your cluster if required.
- This option may be limited to certain types of reservations.
- The My reservations page allows you to manage your cluster reservation
Install ArgoCD
Once your cluster is created we now need to install ArgoCD.
Click to see details on how to install ArgoCD
Open a terminal window and navigate to the local multi-tenancy-gitops repository of your original cluster.
We will install ArgoCD using the Red Hat OpenShift GitOps operator. We will also configure it with the appropriate access rights to limit the resources it can create in the cluster. In so doing, we ensure that ArgoCD acts like a well-governed administrator of the cluster, only doing what it needs to do. Also, we will customize our ArgoCD instance by adding necessary custom checks.
-
Ensure you're logged in to the cluster
Tip
Ensure your terminal window is in the
multi-tenancy-gitopsfolder.Log into your OCP cluster, substituting the
--tokenand--serverparameters with your values:oc login --token=<token> --server=<server>If you are unsure of these values, click your user ID in the OpenShift web console and select
Copy Login Command.On successful login, you'll see some basic information:
Logged into "https://c100-e.jp-tok.containers.cloud.ibm.com:30749" as "IAM#hperabat@in.ibm.com" using the token provided.

You have access to 63 projects, the list has been suppressed. You can list all projects with 'oc projects'

Using project "default".
This shows some details about your user within this cluster. (This user is different to your GitHub user.)
-
Install ArgoCD into the cluster
We use the Red Hat GitOps operator to install ArgoCD into the cluster. The cloned
multi-tenancy-gitopsrepository contains the YAML necessary to do this. We’ll examine the YAML later; first let’s use it.Issue the following command to create an ArgoCD subscription in your cluster:
oc apply -f setup/ocp4x/The response confirms that the below resources has been created:
clusterrole.rbac.authorization.k8s.io/custom-argocd-cluster-argocd-application-controller created
clusterrolebinding.rbac.authorization.k8s.io/openshift-gitops-argocd-application-controller created
clusterrolebinding.rbac.authorization.k8s.io/openshift-gitops-cntk-argocd-application-controller created
subscription.operators.coreos.com/openshift-gitops-operator created
Most importantly, this command verifies that it has registered a subscription for ArgoCD to be installed in the cluster.
-
Wait for the ArgoCD installation to complete
Installation of ArgoCD is an asynchronous process; that's because while the previous script created the subscription for ArgoCD almost immediately, the installation of the ArgoCD operator takes some time, and the once the operator has been installed, the default instance of ArgoCD also takes a little time to create.
We can now issue two commands which, in turn, will wait for the ArgoCD operator to be installed and for the default instance of ArgoCD to be started.
Issue the following commands:
while ! oc wait crd applications.argoproj.io --timeout=-1s --for=condition=Established  2>/dev/null; do sleep 30; done
while ! oc wait pod --timeout=-1s --for=condition=Ready --all -n openshift-gitops 2>/dev/null; do sleep 30; done
After a while, you should see the following message informing us that operator installation is complete (it may tale a few minutes):
customresourcedefinition.apiextensions.k8s.io/applications.argoproj.io condition metThe ArgoCD operator is now installed and the default instance has been successfully created.
-
ArgoCD
clusterroleandclusterrolebindingArgoCD runs under a dedicated service account. For good governance, we use a custom clusterrole and clusterrolebinding to control the specific operations this service account can perform on different resources in the cluster.
The cluster role and the cluster role binding YAMLs are also setup along with the subscription.
oc get clusterrole custom-argocd-cluster-argocd-application-controller
oc get clusterrolebinding openshift-gitops-argocd-application-controller
oc get clusterrolebinding openshift-gitops-cntk-argocd-application-controller
You'll see the resources are created in the cluster:
$ oc get clusterrole custom-argocd-cluster-argocd-application-controller
NAME                                                  CREATED AT
custom-argocd-cluster-argocd-application-controller   2021-08-27T13:35:13Z

$ oc get clusterrolebinding openshift-gitops-argocd-application-controller
NAME                                             ROLE                                                              AGE
openshift-gitops-argocd-application-controller   ClusterRole/custom-argocd-cluster-argocd-application-controller   8m43s

$ oc get clusterrolebinding openshift-gitops-cntk-argocd-application-controller
NAME                                                  ROLE                                                              AGE
openshift-gitops-cntk-argocd-application-controller   ClusterRole/custom-argocd-cluster-argocd-application-controller   8m45s
The clusterrole
custom-argocd-cluster-argocd-application-controllerdefines a specific set of specific resources that are required by the ArgoCD service account and access rights over them.The cluster role bindings
openshift-gitops-argocd-application-controllerandopenshift-gitops-cntk-argocd-application-controllerbinds the ArgoCD service account to the cluster role above.In combination, these definitions limit ArgoCD to perform the minimum set of operations required to manage the cluster. This is important; it means that ArgoCD behaves as a well governed administrator of the cluster.
We'll also see later in the tutorial how ArgoCD creates resource in the cluster.
-
Delete default ArgoCD instance
As we'll see in a moment, the default instance of ArgoCD, created when we install the operator, isn't sufficient for our tutorial; we have to create a new one. But before we do this, we have to delete the default instance of ArgoCD.
Issue the following command to delete the default ArgoCD instance:
oc delete gitopsservice cluster || trueYou will see the resources being deleted as follows:
gitopsservice.pipelines.openshift.io "cluster" deletedNow that we've deleted the default instance, we can create a customized ArgoCD instance with additional capabilities.
Creating a custom instance
The default instance of ArgoCD provides some built-in health checks for validating standard Kubernetes resources. However, these checks are not sufficient to check the health of the custom resources added by the IBM Cloud Paks; we need to create a custom instance of ArgoCD that implements some IBM Cloud Pak specific health checks.
-
The custom ArgoCD instance
You can explore these custom health checks in the ArgoCD YAML that we'll use to create the new ArgoCD instance:
cat setup/ocp4x/argocd-instance/argocd-instance.yamlNotice, for example, a custom health check for queue managers:
mq.ibm.com/QueueManager:
  health.lua: |
    hs = {}
    if obj.status ~= nil then
      if obj.status.phase ~= nil then
        hs.message = obj.status.phase
        if obj.status.phase == "Running" then
          hs.status = "Healthy"
        else
          hs.status = "Progressing"
        end
        return hs
      end
    end
    hs.status = "Progressing"
    hs.message = "Unknown"
    return hs
This logic is used by ArgoCD to determine when a queue manager is healthy.
You can learn more about the ArgoCD Resource Health here and ArgoCD custom Lua health checks here.
-
Create a custom ArgoCD instance
Now let's create the custom ArgoCD instance using this YAML.
Issue the following command to create a custom ArgoCD instance:
oc apply -f setup/ocp4x/argocd-instance/ -n openshift-gitopsThe response confirms that the below resources has been created:
argocd.argoproj.io/openshift-gitops-cntk createdIssue the below command; it will wait to complete until ArgoCD instance pod is up and running:
while ! oc wait pod --timeout=-1s --for=condition=ContainersReady -l app.kubernetes.io/name=openshift-gitops-cntk-server -n openshift-gitops > /dev/null; do sleep 30; done -
Associate a certificate with the ArgoCD instance
Warning
If you are using the Firefox browser, you will not be able to access the ArgoCD console until a valid certificate has been associated with it. Other browsers are unaffected; you can omit this step if you wish.
Some browsers will not allow you to access the ArgoCD instance unless it has been configured with a valid certificate. The following commands will associate a valid certificate directly with the ArgoCD instance.
mkdir $$tmp$$ cd $$tmp$$ ingress_secret_name=$(oc get ingresscontroller.operator default \ --namespace openshift-ingress-operator \ -o jsonpath='{.spec.defaultCertificate.name}') oc extract secret/$ingress_secret_name -n openshift-ingress oc create secret tls -n openshift-gitops openshift-gitops-cntk-tls --cert=tls.crt --key=tls.key --dry-run=client -o yaml | oc apply -f - cd .. rm -rf $$tmp$$ -
Launch ArgoCD
ArgoCD can be accessed via an OpenShift route. Using a browser, navigate to the URL returned by following command:
oc get route openshift-gitops-cntk-server -n openshift-gitops -o jsonpath='{"https://"}{.spec.host}{"\n"}'This will list the route to the ArgoCD instance we've just created, for example:
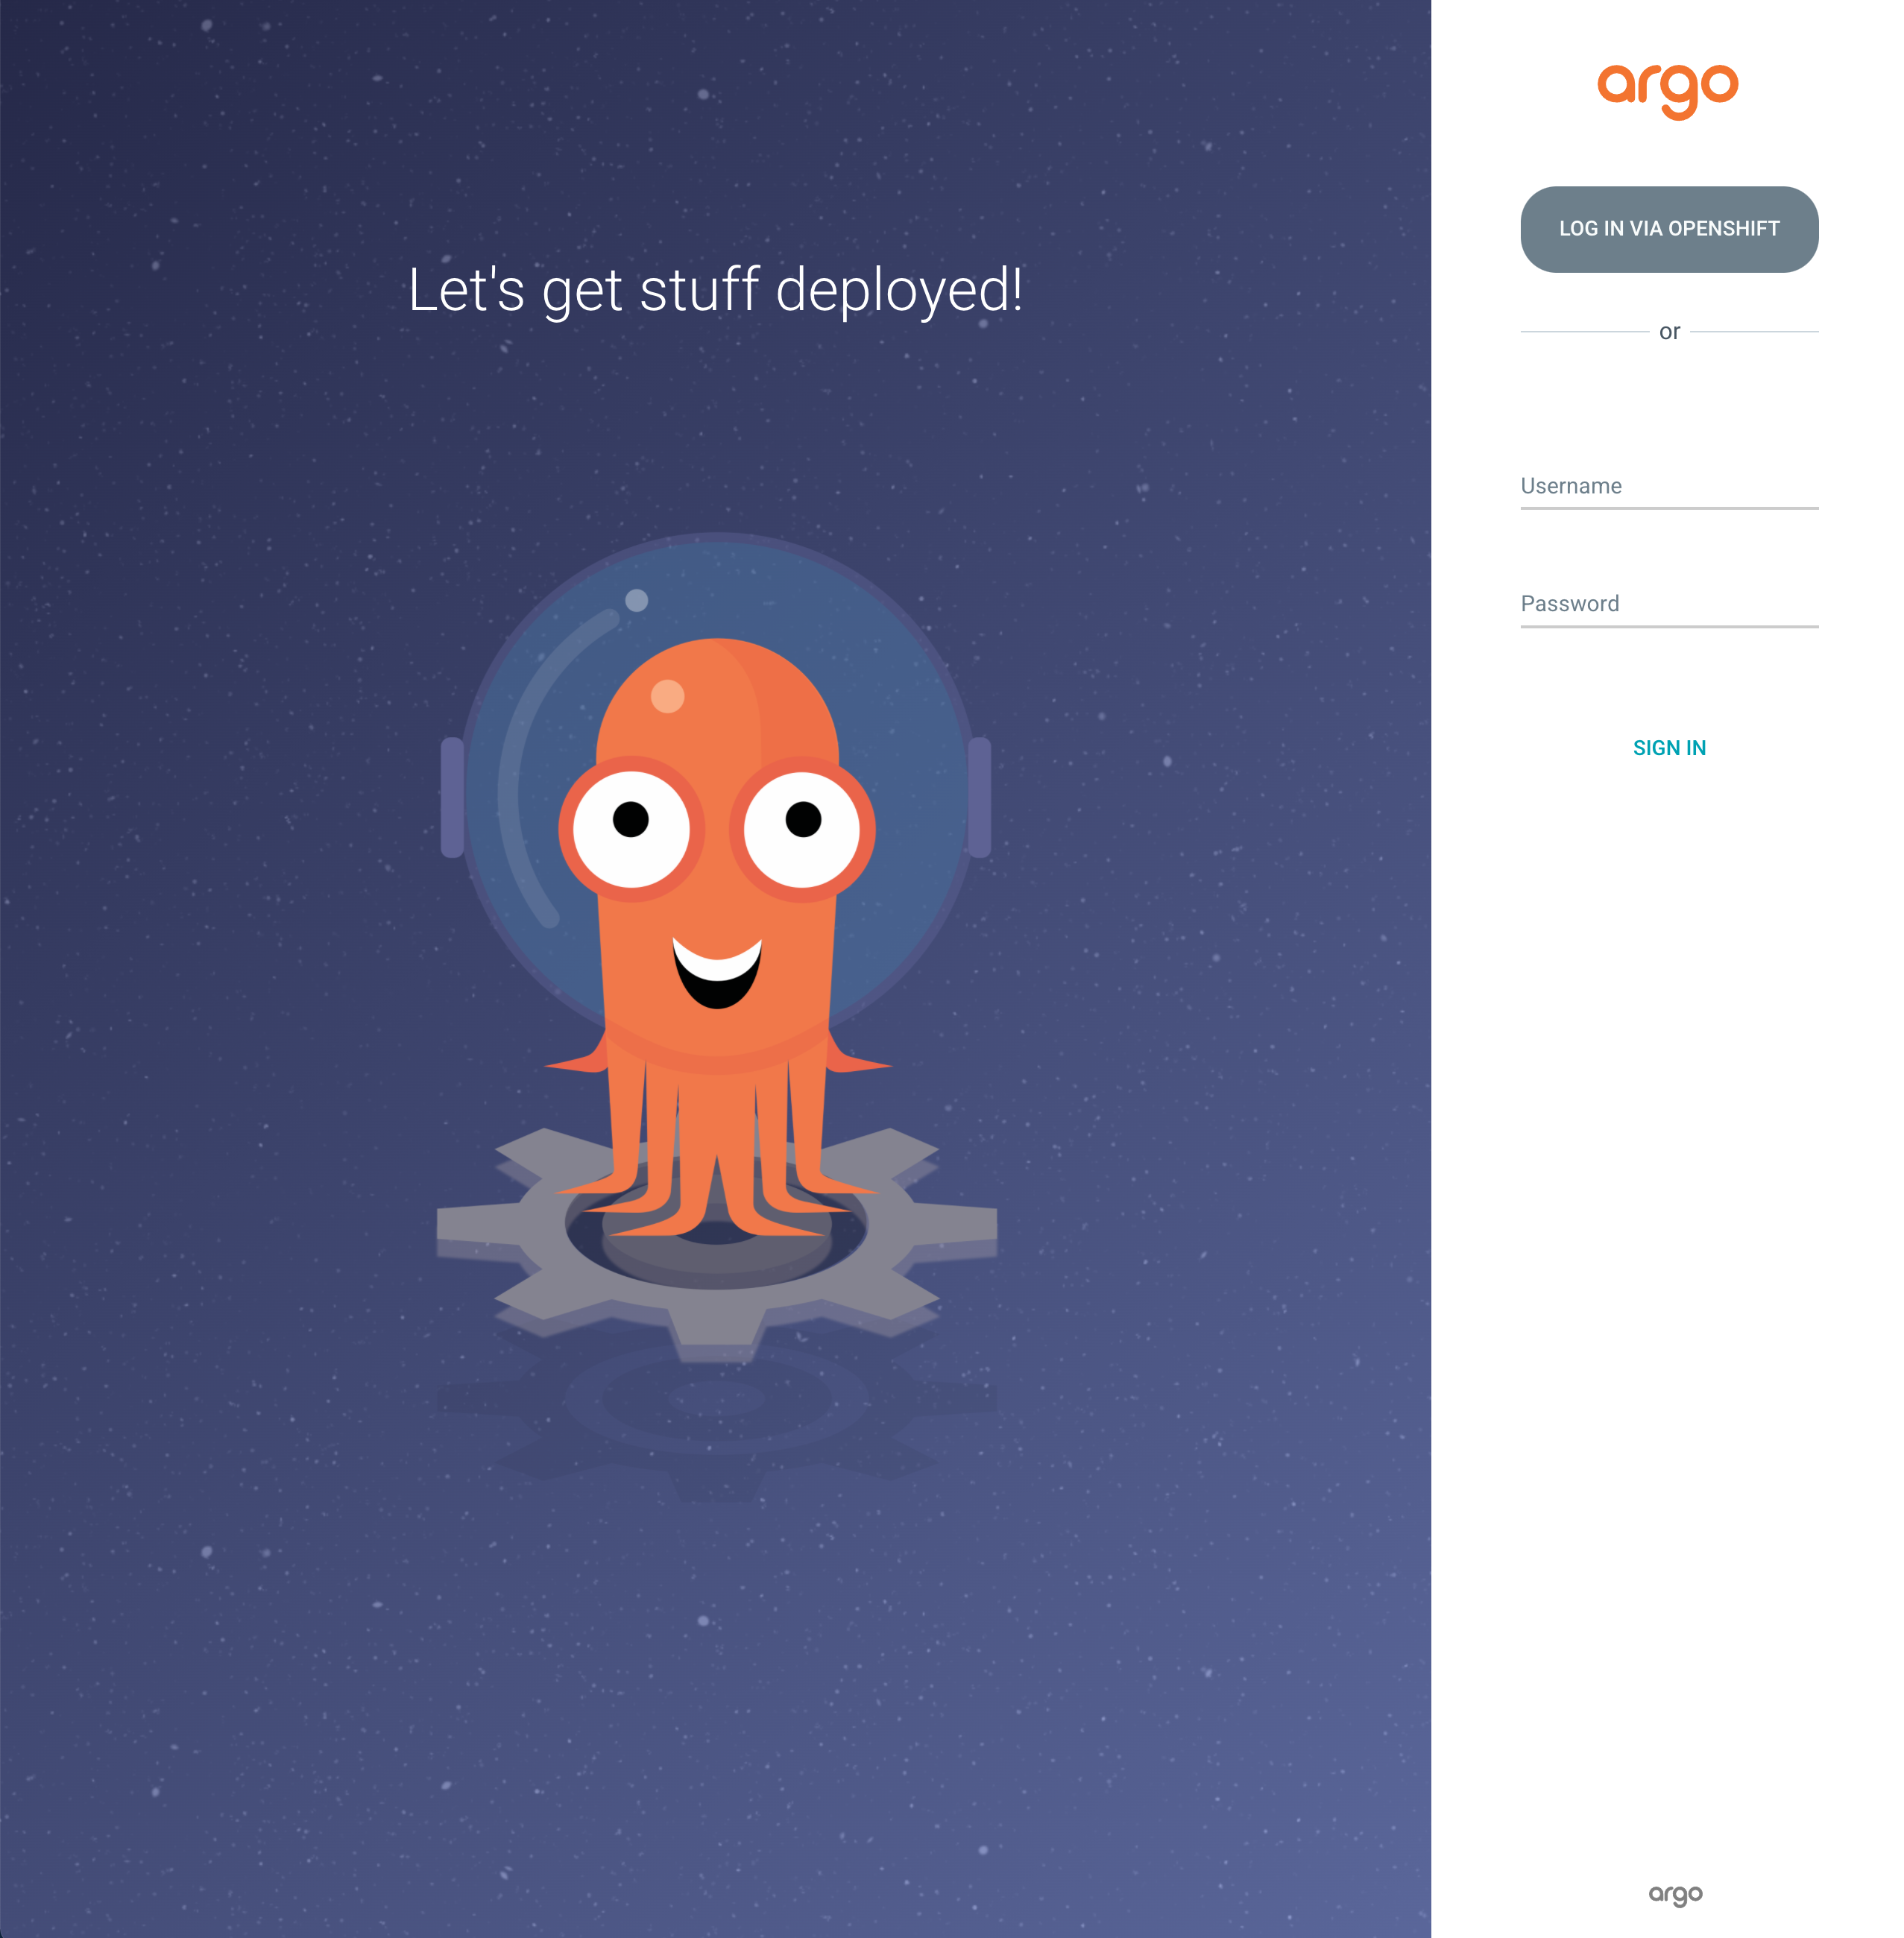
https://openshift-gitops-cntk-server-openshift-gitops.ibmcloud-roks-xxxxx.containers.appdomain.cloudCopy the URL from your terminal output into your browser to launch the ArgoCD web console.
(You can safely ignore any browser certificate warnings.)
You should get to the ArgoCD login page:
-
Login to ArgoCD
Info
When logging into ArgoCD you can select one of two different authentication mechanisms. You can select either mechanism, but if you want to have full access to do things like synching or refreshing ArgoCD Applications, you should use the mechanism that uses administrator credentials (first option below).
You can see that the ArgoCD login page provides two different mechanism for authentication:
-
The first mechanisms uses the ArgoCD service account credentials created at installation time. If you use this mechanism, you will be authenticated as an administrator with all associated privileges. (You don't need administrator privileges to complete the tutorial.)
To log in using the ArgoCD administrator credentials, use admin for the
usernameand retrieve the password from the appropriate Kubernetes secret. Use the following command to retrieve the password:oc extract secret/openshift-gitops-cntk-cluster -n openshift-gitops --keys="admin.password" --to=- -
The second mechanism uses your OpenShift Single Sign On mechanism to authenticate you. If you use this mechanism, you will be authenticated as your user, rather than an administrator, with appropriate permissions. These permissions are sufficient to complete the tutorial, but you will not be able to perform a full range of ArgoCD operations.
You may be prompted to grant the ArgoCD Service Account access your OpenShift user account information details.
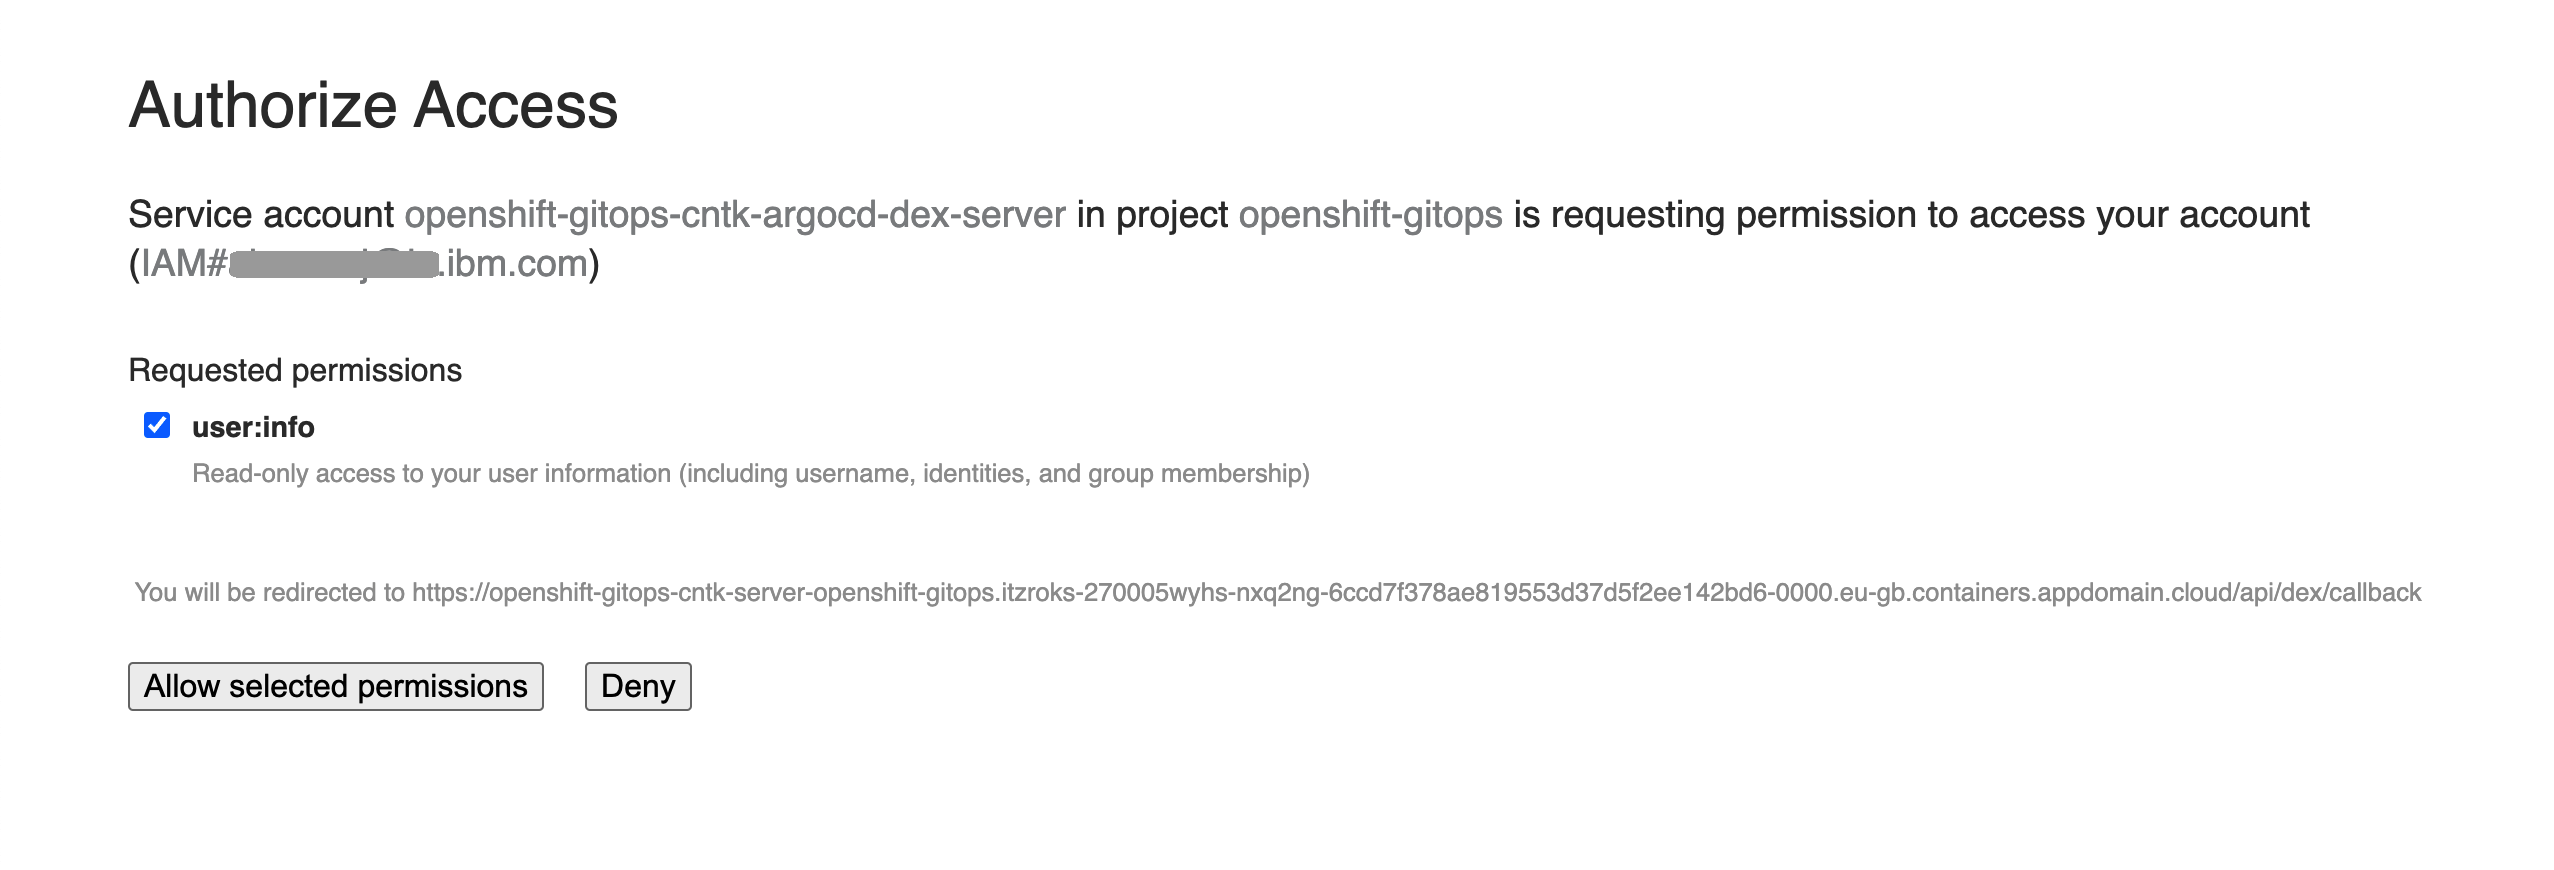
If so, grant access to retrieve your OpenShift user information.
Once the UI launches, you'll see:
See how there are no ArgoCD applications active at the moment.
In the next section of the tutorial, we'll configure ArgoCD to create the ArgoCD applications that will in turn spin up infrastructure, service, and application resources to apply to the cluster.
-
Deploy the Infrastructure
With the cluster and ArgoCD setup, we can now prepare to deploy the environment defined in our GitOps repo. We need to rollout the environment in stages due to the fact we have to configure some things like secrets before the applications are deployed. We will start by deploying the Infrastructure. This will create the namespaces where we will deploy the secrets.
To only deploy the infrastructure, edit the 0-bootstrap/single-cluster/kustomization.yaml and comment out the 2-services/2-services.yaml and 3-apps/3-apps.yaml lines. Push the changes to your GitOps repo.
Click to see details on how to prepare for the deployment of the infrastructure
-
Open
0-bootstrap/single-cluster/kustomization.yamland comment out the2-services/2-services.yamland3-apps/3-apps.yamlas follows:resources: - 1-infra/1-infra.yaml #- 2-services/2-services.yaml #- 3-apps/3-apps.yaml patches: - target: group: argoproj.io kind: Application labelSelector: "gitops.tier.layer=gitops" -
If you used machinesets in your previous cluster then you will need to update the
infrastructureIdin your1-infra/argocd/machinesets.yamlfile for your new clusterspec: destination: namespace: openshift-gitops server: https://kubernetes.default.svc project: infra source: path: machinesets helm: values: | refarch-machinesets: infrastructureId: "UPDATE-THIS-VALUE" # cloudProvider.name set to aws, azure, ibmcloud or vsphere # cloudProvider.managed set to true for ROSA, ARO, ROKS -
Now commit and push changes to your git repository:
git add .
git commit -s -m "Using only infrastructure resources"
git push origin $GIT_BRANCH
which shows that the changes have been made active on GitHub:
Enumerating objects: 9, done.
Counting objects: 100% (9/9), done.
Delta compression using up to 8 threads
Compressing objects: 100% (5/5), done.
Writing objects: 100% (5/5), 456 bytes | 456.00 KiB/s, done.
Total 5 (delta 4), reused 0 (delta 0)
remote: Resolving deltas: 100% (4/4), completed with 4 local objects.
To https://github.com/tutorial-org-123/multi-tenancy-gitops.git
e3f696d..ea3b43f  master -> master
Bootstrap the cluster
Now that you have prepared to deploy the infrastructure only you can bootstrap the cluster.
Click to see details on how to bootstrap the cluster
-
Apply ArgoCD
bootstrap.yamlto the clusterLet's now deploy the
bootstrap-single-clusterArgoCD application to bootstrap the cluster.Issue the following command to apply the bootstrap YAML to the cluster:
oc apply -f 0-bootstrap/single-cluster/bootstrap.yamlKubernetes will confirm that the
bootstrap-single-clusterresource has been created:application.argoproj.io/bootstrap-single-cluster createdNotice that:
-
application.argoproj.ioindicates that this is an ArgoCD application. -
The
bootstrap-single-clusterArgoCD application is now watching the0-bootstrap/single-clusterfolder in ourmulti-tenancy-gitopsrepository on GitHub.
This connects your customized GitOps repository to the instance of ArgoCD running in the cluster. Once connected, ArgoCD will use the contents of this repository to create matching resources in the cluster. It will also keep the cluster synchronized with any changes to the GitOps repository.
-
-
Verify the bootstrap deployment
We can use the command line to verify that the bootstrap ArgoCD application is running.
Issue the the following command:
oc get app/bootstrap-single-cluster -n openshift-gitopsYou should see that the bootstrap application was recently updated:
NAME                       SYNC STATUS   HEALTH STATUS
bootstrap-single-cluster   Synced        Healthy
SYNC STATUSmay temporarily showOutOfSyncorHEALTH_STATUSmay temporarily showMissing; simply re-issue the command to confirm it moves toSyncedandHealthy. -
Using the UI to view the newly deployed ArgoCD applications
We can also use the ArgoCD web console to view the Kubernetes resources deployed to the cluster. Switch back to the web console, refresh the page and you should see the
bootstrap-single-clusterArgoCD application together with three other ArgoCD applications: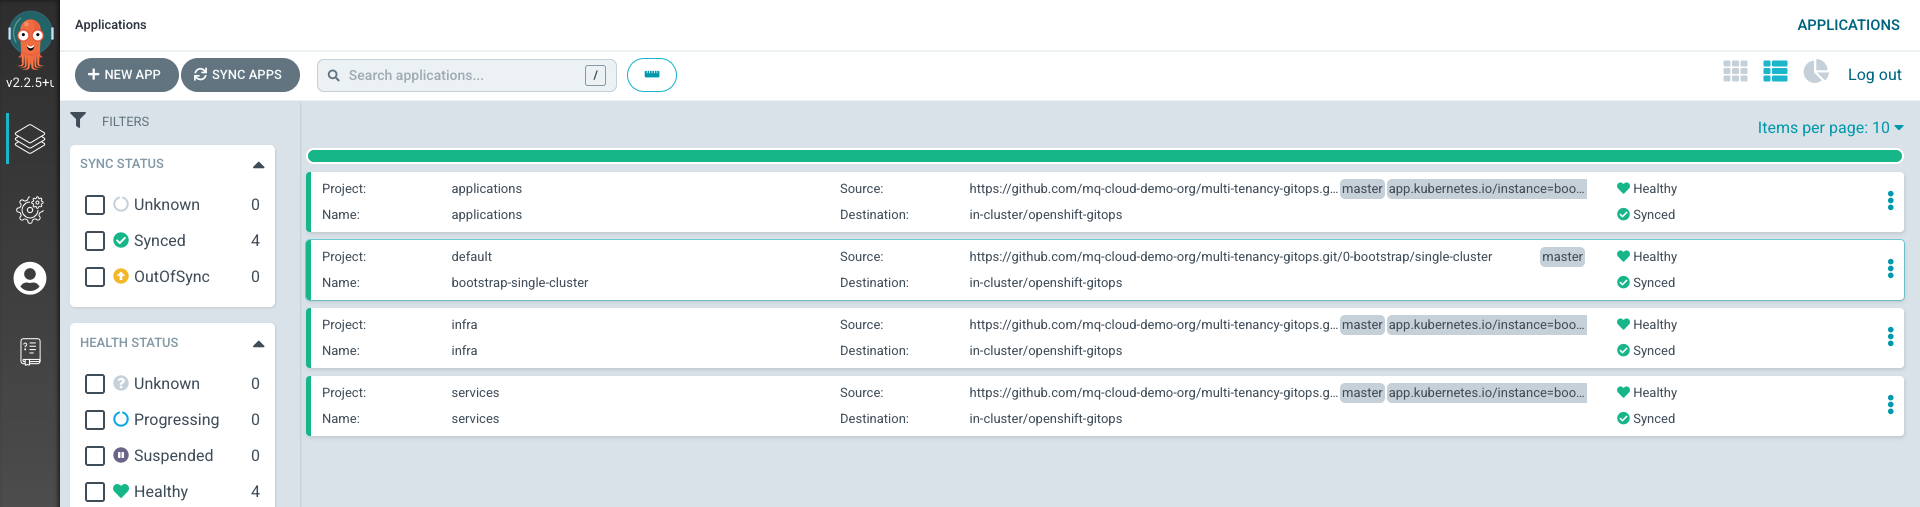
Add the Secrets
Deploying the infrastructure recreates the namespaces for your cluster. Now you can deploy the secrets needed for the components you have installed into those namespaces.
If you are using a Secrets Manager product, your secrets will already be saved there, external from your cluster, and you can restore your secrets from that product. The instructions are specific to the product and are outside the scope of this section.
If you used sealed secrets in your cluster, use the following instructions. The instructions are different depending on whether you saved your sealed secrets certificate before losing your original cluster, or whether you did not.
In All Cases
In all cases, you need to recreate the IBM Entitlement Key secret for the Cloud Pak products you are about to restore. If you have Instana components installed, you will also need to recreate their secrets.
IBM Entitlement Key
The IBM Entitlement Key is required to pull IBM Cloud Pak specific container images from the IBM Entitled Registry. Click for the steps to recreate the entitlement key secret
If you do not know the value of your IBM Entitlement Key, follow these three steps to retrieve it.
- Log in to MyIBM Container Software Library with an IBMid and password associated with the entitled software.
- Select the View library option to verify your entitlement(s).
- Select the Get entitlement key to retrieve the key.
In the following command, replace <entitlement_key> with the value of your IBM Entitlement Key.
export IBM_ENTITLEMENT_KEY=<entitlement_key>
Create a Secret containing the entitlement key in the tools namespace.
oc new-project tools || true
oc create secret docker-registry ibm-entitlement-key -n tools \
--docker-username=cp \
--docker-password="$IBM_ENTITLEMENT_KEY" \
--docker-server=cp.icr.io
The response confirms that the ibm-entitlement-key secret has been created.
secret/ibm-entitlement-key created
Instana Components
Skip this step if you did not have any Instana components installed in your cluster.
Click to see details on how to recreate secrets for any Instana components you have installed
If using the Instana Agent you need to store the agent key in a secret
oc create secret generic instana-agent-key -n instana-agent \
--from-literal=key=<AGENT-KEY>
Note
If you have created a new instance of the Instana Server you need to update the endpointHost with the new IP of the server in the instana-agent.yaml
If you deployed the Instana Robot Shop application you need to store the API Token and the Instana URL in a secret with the following.
oc create secret generic instana-backend -n tools \
--from-literal=API_TOKEN=<API-TOKEN> \
--from-literal=INSTANA_URL=<INSTANA-URL>
And you need to save the Enumeration Key in a secret
oc create secret generic instana-eum-key -n robot-shop \
--from-literal=key=<EUM-KEY>
Note
If you have created a new instance of the Instana Server you need to update the url in the instana-robot-shop.yaml
If You Saved Your Sealed Secret Certificate
If you previously stored the certificate in a master.key file, as described at the beginning of this section, you can restore that certificate to your new cluster with the following commands.
oc project sealed-secrets
oc apply -f master.key
If You Did Not Save Your Sealed Secret Certificate
If you did not store your sealed secret operator certificate in a file from your original cluster, you will need to re-encrypt the secrets and push them to the GitOps repo. These steps will be performed after you restore the services in the next section.
Deploy the Services
With the secrets deployed we can now deploy the Services in our GitOps repo.
To deploy the services edit the 0-bootstrap/single-cluster/kustomization.yaml and uncomment the 2-services/2-services.yaml line. Push the changes to your GitOps repo.
Click to see details on how to deploy the services
-
Open
0-bootstrap/single-cluster/kustomization.yamland uncomment the2-services/2-services.yamlline as follows:resources: - 1-infra/1-infra.yaml - 2-services/2-services.yaml #- 3-apps/3-apps.yaml patches: - target: group: argoproj.io kind: Application labelSelector: "gitops.tier.layer=gitops" -
Push the changes to the GitOps repo
git add .
git commit -s -m "Deploying services"
git push origin $GIT_BRANCH
The changes have now been pushed to your GitOps repository:
Enumerating objects: 9, done.
Counting objects: 100% (9/9), done.
Delta compression using up to 8 threads
Compressing objects: 100% (5/5), done.
Writing objects: 100% (5/5), 431 bytes | 431.00 KiB/s, done.
Total 5 (delta 4), reused 0 (delta 0)
remote: Resolving deltas: 100% (4/4), completed with 4 local objects.
To https://github.com/prod-ref-guide/multi-tenancy-gitops.git
    533602c..85a4c46  master -> master
This change to the GitOps repository can now be used by ArgoCD.
-
The
bootstrap-single-clusterapplication detects the change and resyncsOnce these changes to our GitOps repository are seen by ArgoCD, it will resync the cluster to the desired new state.
Switch to the ArgoCD UI Applications view to see the start of this resync process:
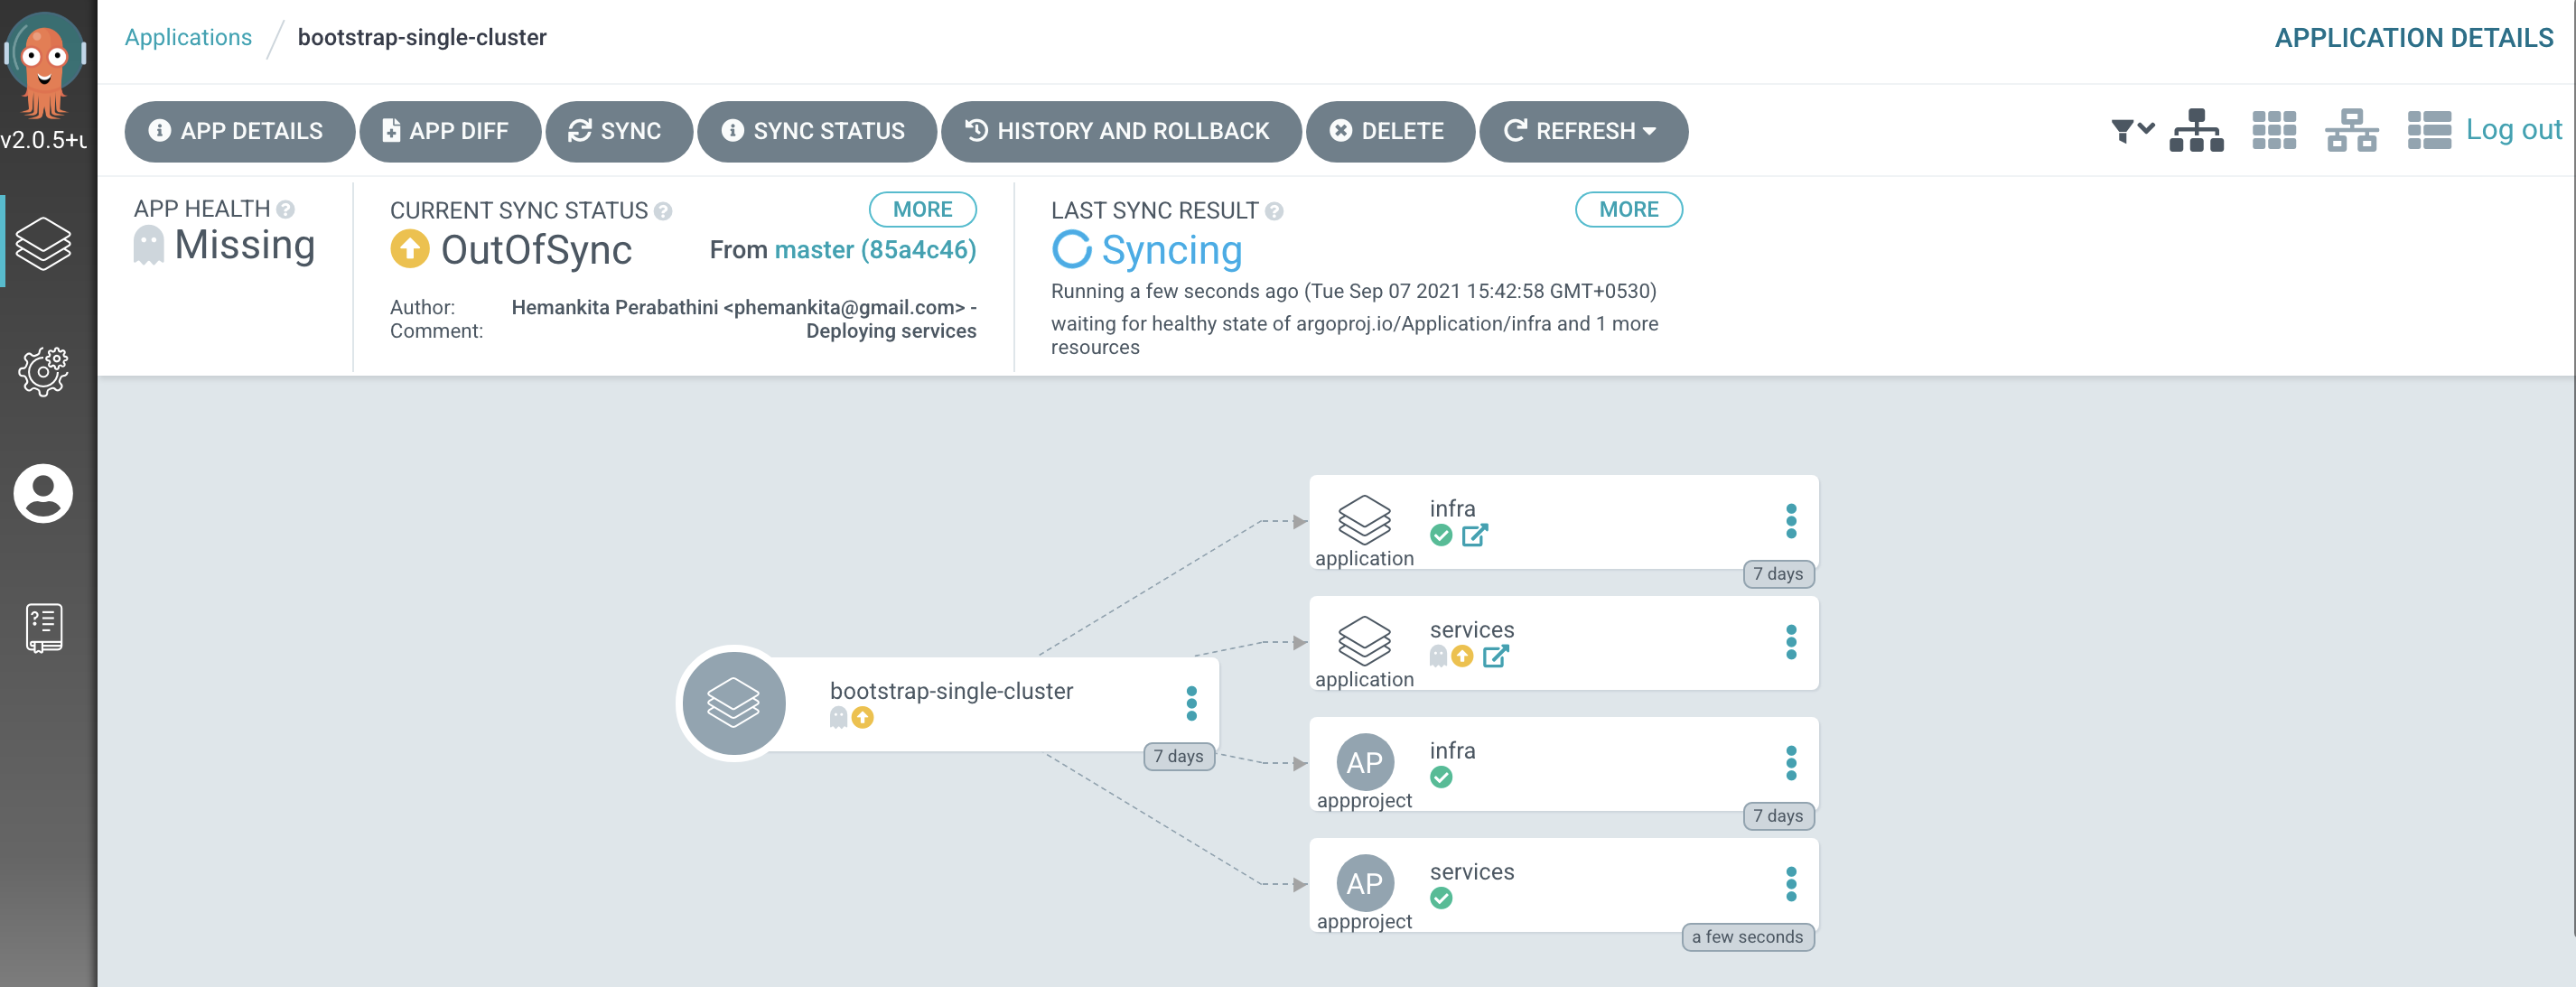
Notice how the
bootstrap-single-clusterapplication has detected the changes and is automatically synching the cluster.(You can manually
syncthebootstrap-single-clusterArgoCD application in the UI if you don't want to wait for ArgoCD to detect the change.)
Note
If you deploy services like artifactory that generated their own passwords and use sealed secrets to access them you will have to re-encrypt the new password and store it in your GitOps repo.
Re-encrypt your Sealed Secrets
The instructions in this section only need to be done if you did not save your sealed secrets certificate from your original cluster. If you did save it, your secrets have already been deployed and you can skip to the next section on your applications.
The steps to re-encrypt your sealed secrets are specific to which Cloud Pak component you have deployed. Please click and follow the appropriate section below.
For the Cloud Pak for Integration IBM App Connect Enterprise Tutorial you will need to re-encrypt the following
-
For the Build Configuration you need the
ace config deployment keys,ace infra deployment key,GitHub access tokenandMachine User's access tokensealed secretes as described in the Create sealed secrets section -
For the Build Integration Server you need the
create customer deployment keyssealed secrete as described in the Create sealed secrets section -
For the Continuous Update you need the
webhook tokensealed secrete as described in the Deploy Secret Token section
For the Cloud Pak for Integration IBM MQ Tutorial you will need to re-encrypt the following
-
IBM Entitlement Keyas described in the Configure connection to the IBM Entitled Registry section. -
GitHub access credentialsas described in the Configure the pipeline for QM1 source repository section, starting with Step 3.
For the Cloud Pak for Integration IBM API Connect Tutorial you will need to re-encrypt the following
-
IBM Entitlement Keyas described in the Configure access to IBM Entitled Registry section. -
GitHub Personal Access Tokenas described in the GitHub Personal Access Token section. -
Provider Organizationas described in the Provider Organization section.
Deploy the Applications
With the Services deployed and secrets re-encrypted, we can now deploy the Applications in our GitOps repo.
To deploy the applications edit the 0-bootstrap/single-cluster/kustomization.yaml and uncomment the 3-apps/3-apps.yaml line. Push the changes to your GitOps repo.
Click to see details on how to deploy the services
-
Open
0-bootstrap/single-cluster/kustomization.yamland uncomment the3-apps/3-apps.yamlline as follows:resources: - 1-infra/1-infra.yaml - 2-services/2-services.yaml - 3-apps/3-apps.yaml patches: - target: group: argoproj.io kind: Application labelSelector: "gitops.tier.layer=gitops" -
Push the changes to the GitOps repo
git add .
git commit -s -m "Deploying Apps"
git push origin $GIT_BRANCH
The changes have now been pushed to your GitOps repository:
Enumerating objects: 9, done.
Counting objects: 100% (9/9), done.
Delta compression using up to 8 threads
Compressing objects: 100% (5/5), done.
Writing objects: 100% (5/5), 431 bytes | 431.00 KiB/s, done.
Total 5 (delta 4), reused 0 (delta 0)
remote: Resolving deltas: 100% (4/4), completed with 4 local objects.
To https://github.com/prod-ref-guide/multi-tenancy-gitops.git
    533602c..85a4c46  master -> master
This change to the GitOps repository can now be used by ArgoCD.
-
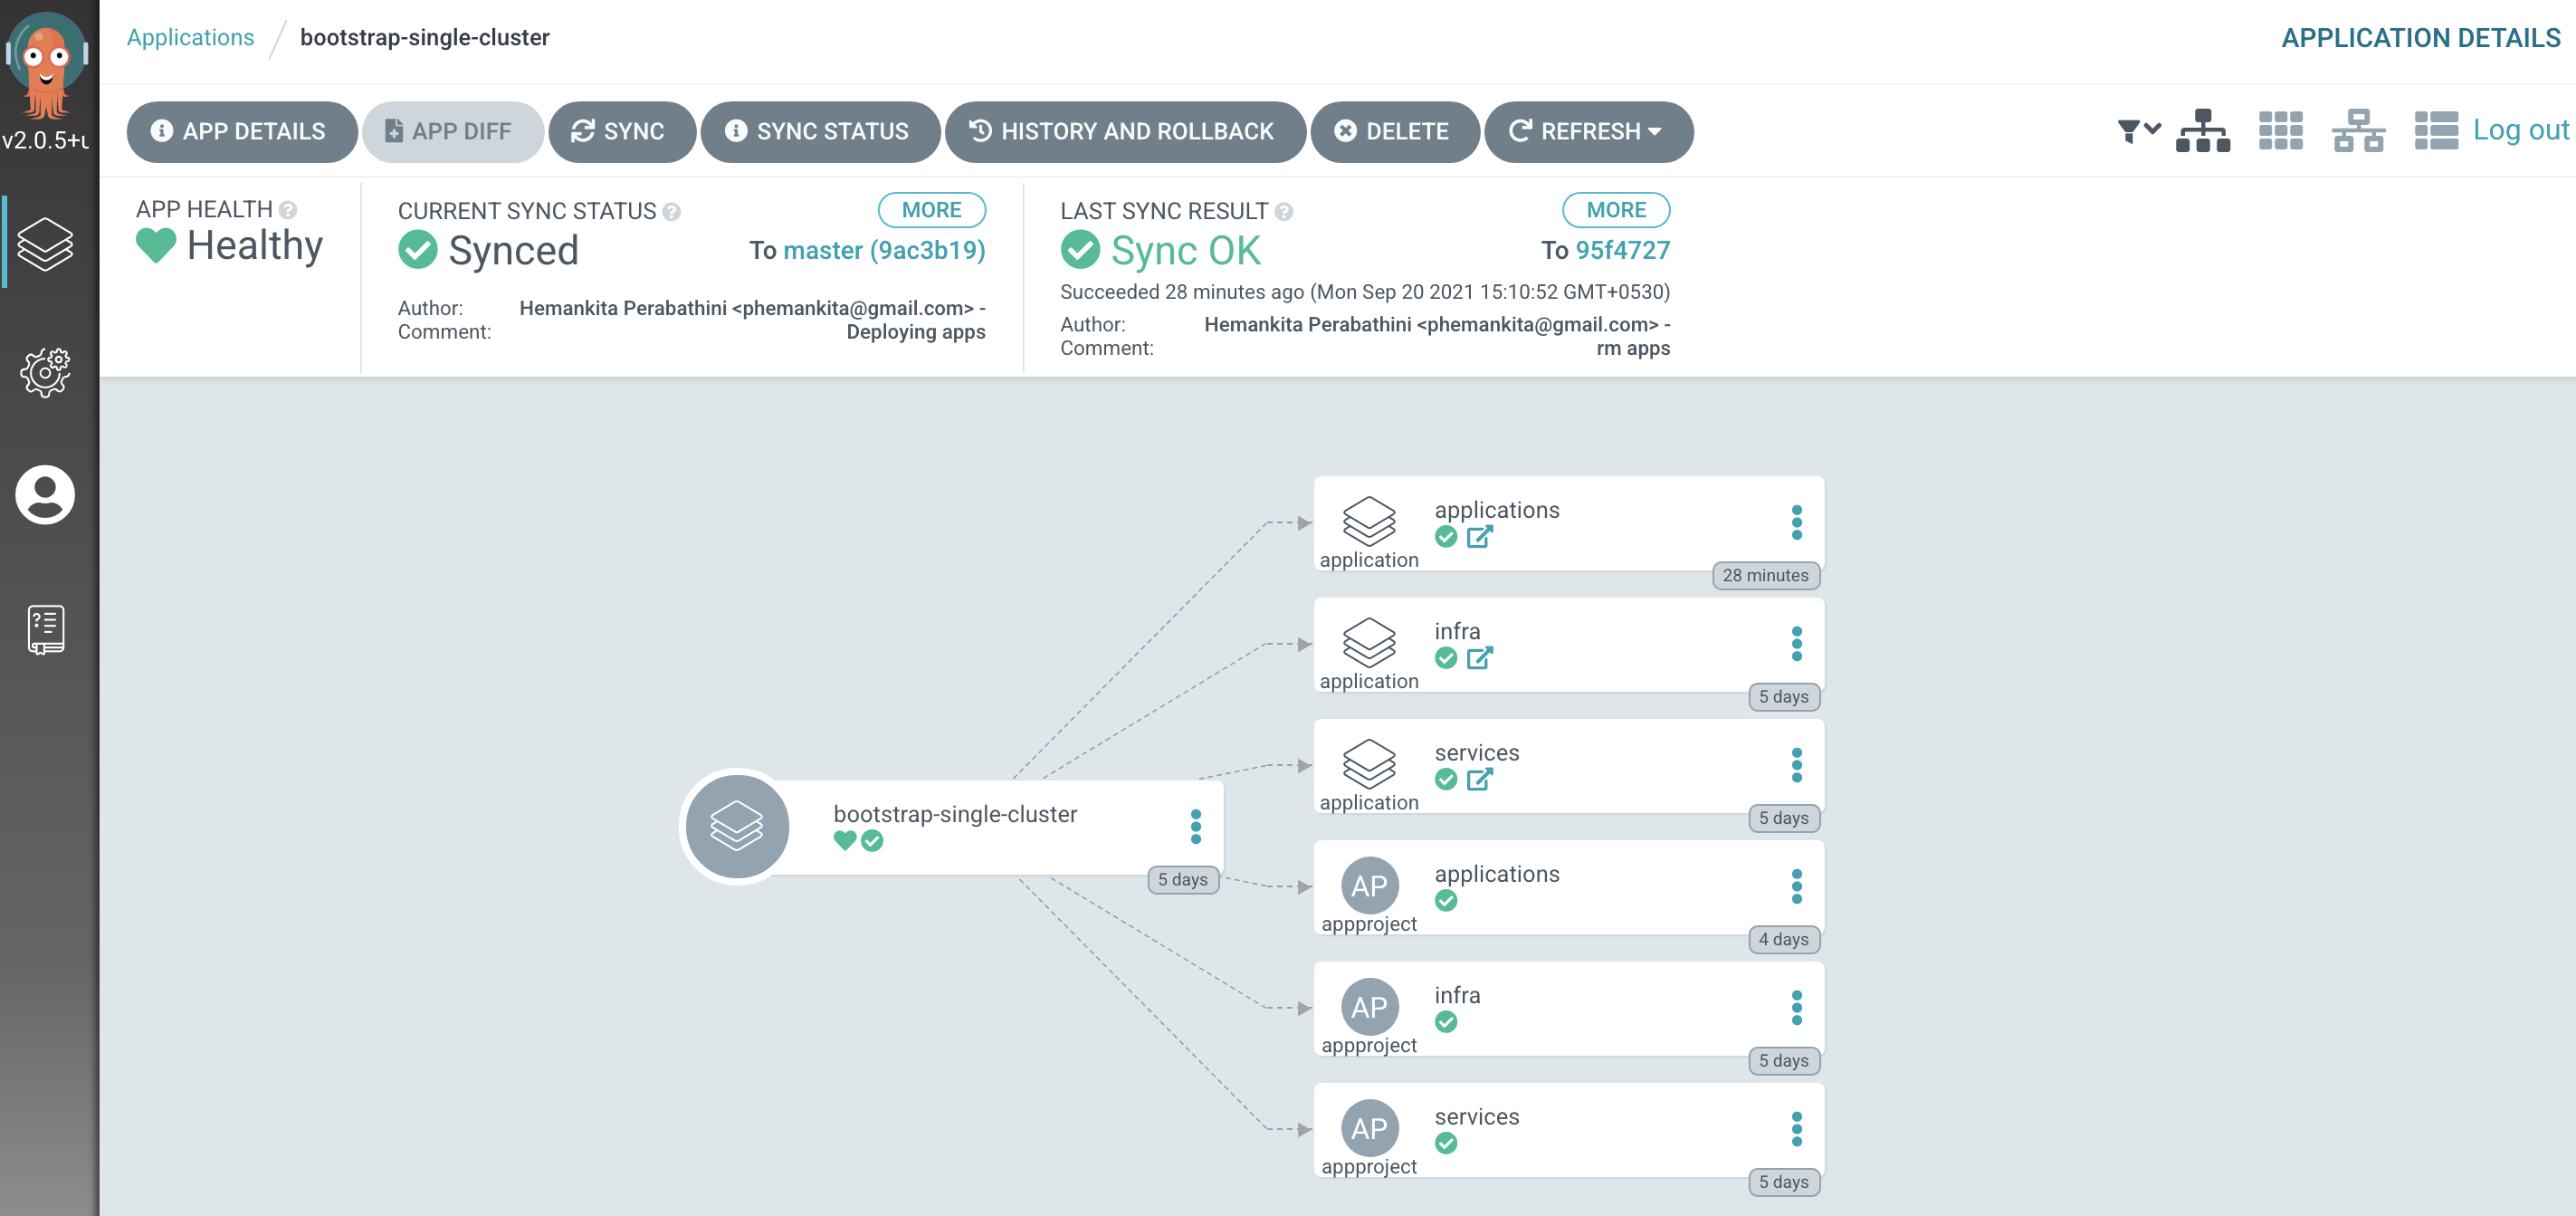
The
bootstrap-single-clusterapplication detects the change and resyncsOnce these changes to our GitOps repository are seen by ArgoCD, it will resync the cluster to the desired new state.
Switch to the ArgoCD UI Applications view to see the changes:
Post Deployment tasks
After the applications are deployed there are some clean-up tasks to perform dependant on which tutorial your environment is based on.
Update Webhooks
Any Webhook you created to trigger a process in your cluster will have to be modified for the new cluster host. For example, in the MQ Tutorial you create a Webhook to start the Tekton pipeline anytime a change is pushed to the MQ-Infra repo.
Click to see details on how to update the webhooks
-
You can find the Webhook for the repo under
Settings->Webhooks
-
Click
Editand change thePayload URLto the host of your cluster. You can find the cluster host with the commandecho http://$(oc get route el-cnkt-event-listener -n ci -o jsonpath='{.spec.host}')Copy and paste the host into the
Payload URLfield.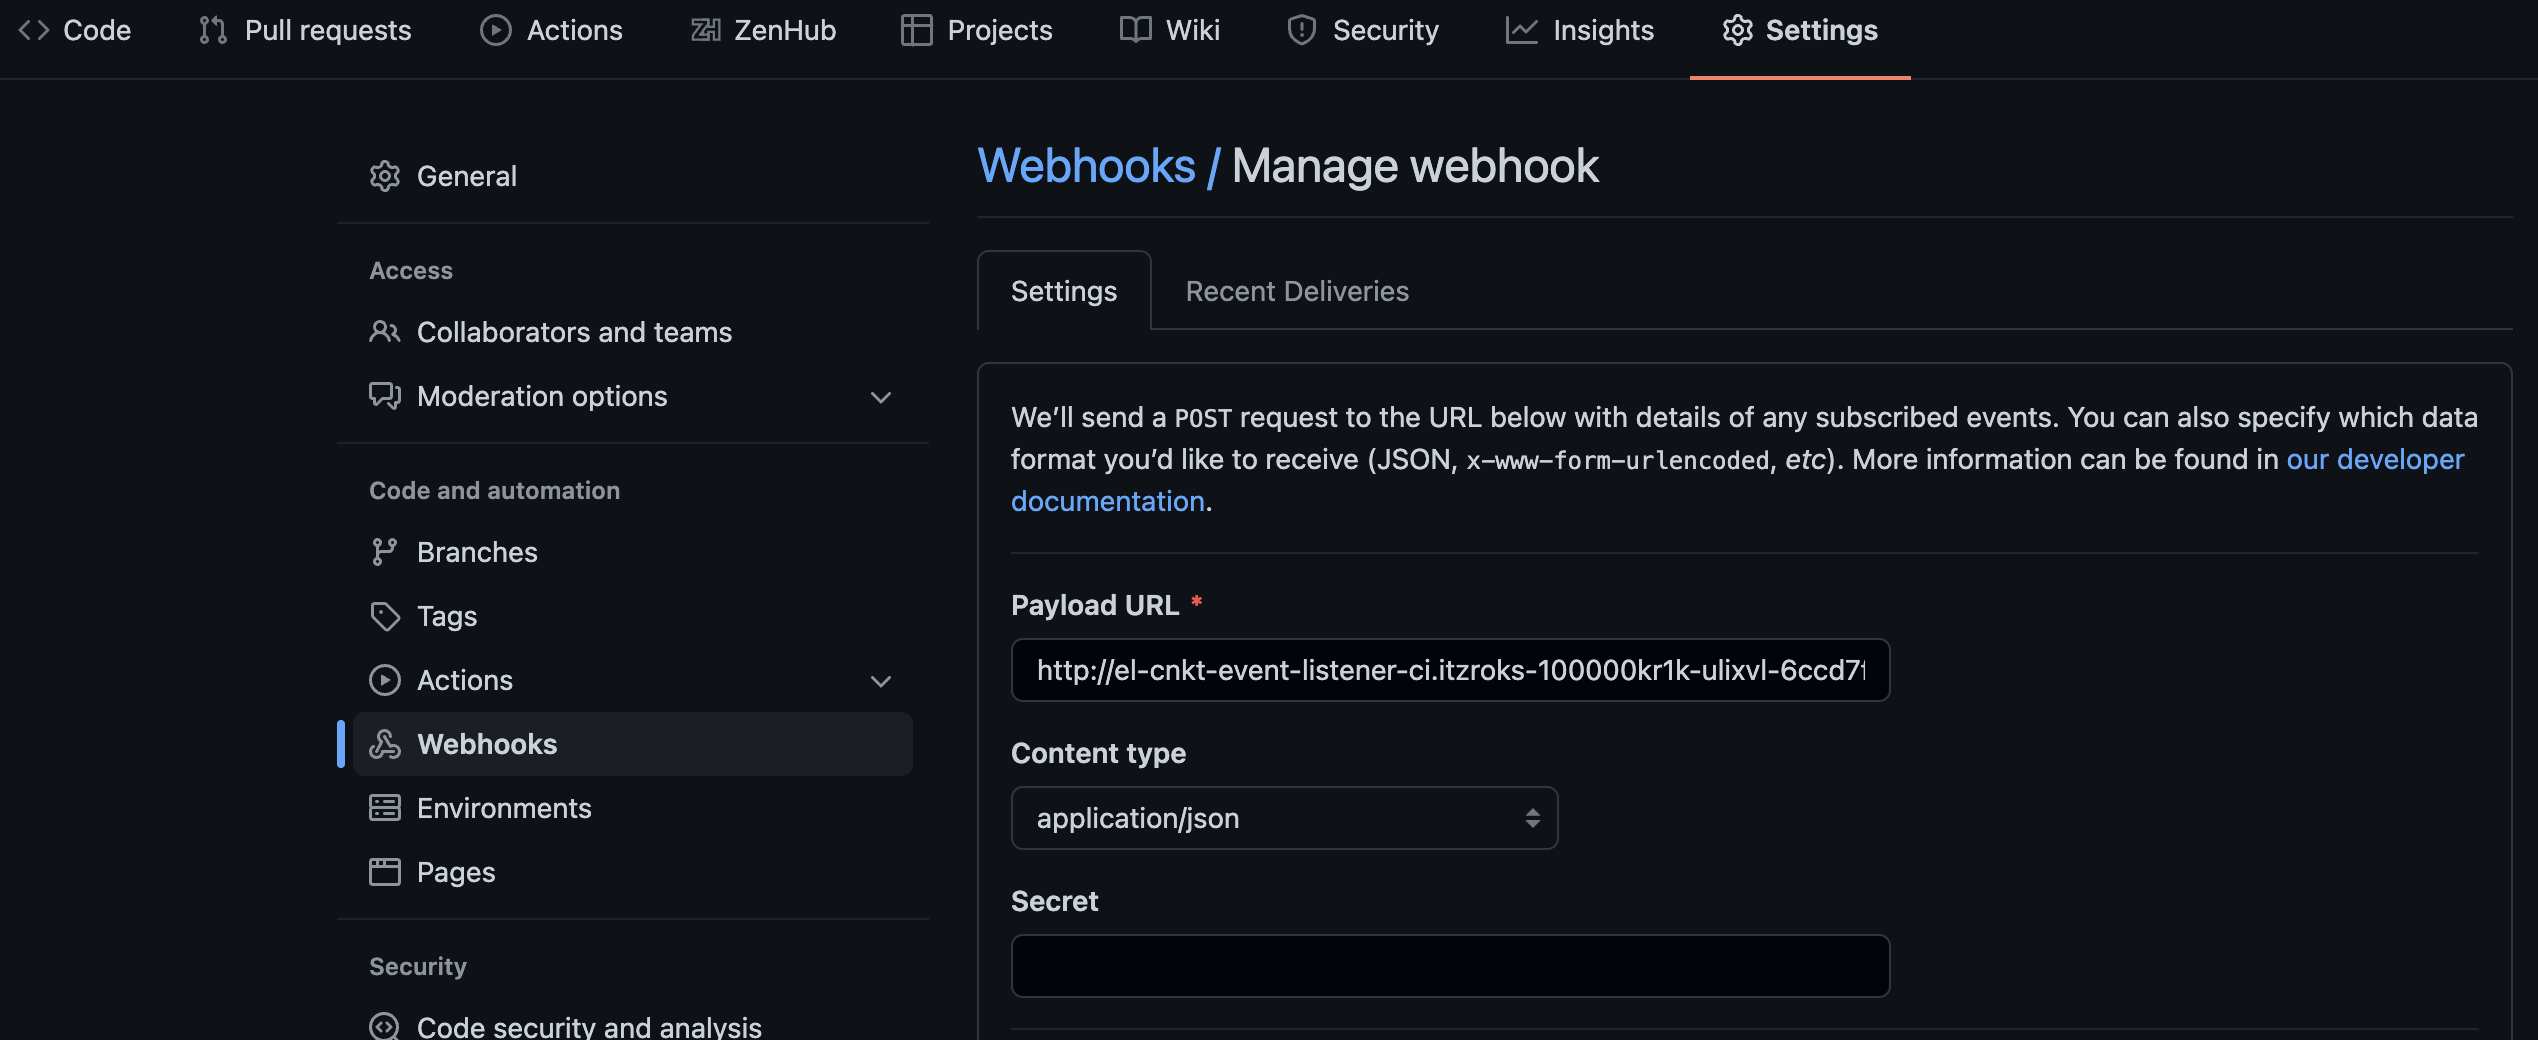
-
Scroll to the bottom of the page and click Update Webhook
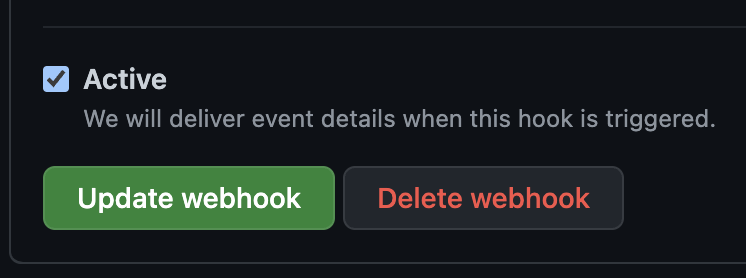
Now any changes to this repo triggers the webhook.
Congratulations!
You've recreated the cluster from your GitOps repositories.