Sterling Control Center Monitor Quickstart
Introduction
The instructions in this section will walk you through the steps necessary for setting up a demo environment that can be quickly shown to customers to showcase the art of the possible.
This demo in no way removes the need for following the tutorial style instructions that are documented in other sections of this guide. The instructions below will set up a pre-canned application demo environment to show to the customers.
Pre-requisites
Create a custom Git Organization
Create a new Git Organization to host the different GitOps repositories.
Note
Make sure you do not populate your GitHub organization with cloned repositories. The GitHub organization must be empty and will be populated automatically by the environment provisioning.
Instructions:
-
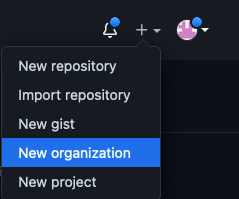
Log in to http://github.com and select the option to create a New organization.
-
Click on
Create a free organizationplan. -
Complete the wizard by filling in the
Organization account nameandContact emailfields. Select theMy personal accountbullet and complete the verification step and click Next. -
Skip the step to add members to the Organization.
-
Complete the
Welcome to GitHubquestionnaire and click Submit. -
Congratulations, you have successfully created a new Github Organization.
Note
Please ensure your GitHub organization is Public and not Private.
Create a Git Personal Access Token (PAT)
Create a new Git Personal Access Token with the appropriate scopes. This will be required to run the application pipelines or to set up webhooks.
Instructions:
-
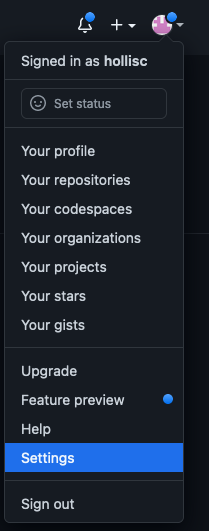
Log in to http://github.com and click on Settings.
-
Select Developer settings and click on Personal access tokens.
-
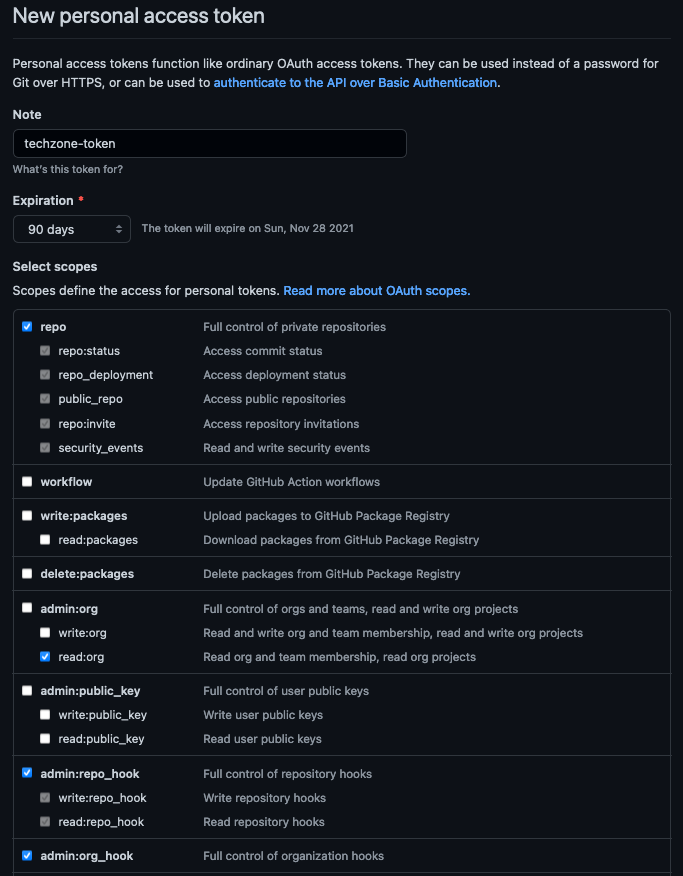
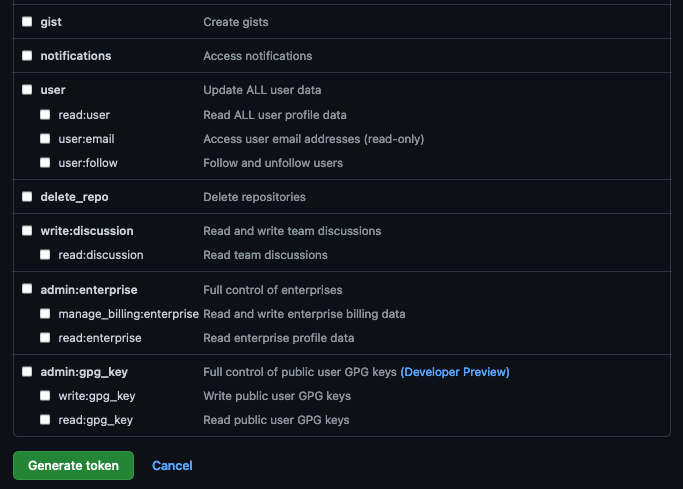
Provide a name for the token, set the
Expirationto 90 days ,set the following scopes and click Generate token.GitHub Personal Access Token scopes
-
Copy and save the Personal Access Token. You will not be able to retrieve this value again later.
Red Hat OpenShift on IBM Cloud cluster with GitOps Configuration
Create the cluster
-
Provision a Red Hat OpenShift on IBM Cloud cluster with GitOps Configuration from IBM Technology Zone. Select the
OpenShift + GitOps Configurationtile. -
Click the Reserve now radio button.
-
Provide a name for the cluster, select Practice / Self-Education for the purpose and choose the region to provision the cluster.
-
Once a Preferred Geography has been selected, provide the appropriate Worker Node Count and Worker Node Flavor values based on the requirements for this quickstart listed in the note below. Finally, click Submit.
Note
For this IBM App Connect Enterprise Quickstart we recommend you to request the Red Hat OpenShift on IBM Cloud cluster with GitOps Configuration with the following size:
- Worker Node Count = 3
- Worker Node Flavor = 8 CPU x 32 GB
Use the cluster
You will receive an email once the cluster provisioning is complete. The email will contain details on the cluster including the ArgoCD Console URL and admin credentials. This same information can also be found on the My reservations from IBM Technology Zone.
Once your cluster is ready, proceed to the next step to select resources to deploy.
Install required CLIs
- Install the Github CLI (version 1.14.0+)
-
Install the OpenShift CLI
oc(version 4.7 or 4.8)-
Log into your OCP cluster, substituting the
--tokenand--serverparameters with your values:oc login --token=<token> --server=<server>If you are unsure of these values, click your user ID in the OpenShift web console and select
Copy login command.
-
-
Install the kubeseal CLI
The kubeseal utility uses asymmetric crypto to encrypt secrets that only the controller can decrypt. These encrypted secrets are encoded in a SealedSecret resource which can safely be checked into your gitops repo. The controller will decrypt the secretes and install into your cluster.
Select resources to deploy
This recipe is for deploying Sterling Control Center Monitor (SCCM) in the sccm namespace. This recipe also assumes you've already deployed the Sterling File Gateway recipe - either b2bi-nonprod and b2bi-prod, or both.
In particular, these infra resources are assumed to have already been deployed (aside from the B2Bi specific resources):
- argocd/namespace-sealed-secrets.yaml
- argocd/daemonset-sync-global-pullsecret.yaml
Infrastructure - kustomization.yaml (in multi-tenancy-gitops repository)
-
Edit the Infrastructure layer
${GITOPS_PROFILE}/1-infra/kustomization.yaml, un-comment the following lines, commit and push the changes and synchronize theinfraApplication in the ArgoCD console.cd multi-tenancy-gitops/0-bootstrap/single-cluster/1-infraIn,
kustomization.yaml:- argocd/namespace-sccm.yaml - argocd/serviceaccounts-sccm.yaml - argocd/sccm-clusterwide.yaml💡 NOTE
Commit and Push the changes formulti-tenancy-gitops
Services - instances folder (in multi-tenancy-gitops-services repository)
NOTE: This recipe can be implemented using a combination of storage classes. Not all combination will work, but the following table lists the storage classes that have been tested successfully:
| Component | Access Mode | IBM Cloud | OCS/ODF |
| --- | --- | --- | --- |
| DB2 | RWO | ibmc-block-gold | ocs-storagecluster-cephfs |
| PEM | RWX | managed-nfs-storage | ocs-storagecluster-cephfs |
-
Clone the services repo for GitOps: open a terminal window and clone the
multi-tenancy-gitops-servicesrepository under your Git Organization.git clone git@github.com:${GIT_ORG}/multi-tenancy-gitops-services.git -
Generate the yaml files for the SCCM pre-requisite components which includes the secrets and PVCs required by the SCCM helm chart.
NOTE: Make sure you are logged into your OpenShift cluster before proceeding.-
Go to the
instances/ibm-sccm-setupdirectory:cd multi-tenancy-gitops-services/instances/ibm-sccm-setup -
Generate the pre-requisite yaml files for SCCM (this includes keystore and truststore files using a self-signed certificate for demo purposes which is used by SCCM to secure connections with the SCCM engine, including between the web console and the browser; refer: https://www.ibm.com/docs/en/control-center/6.2.1.0?topic=securing-configuring-secure-connections):
CC_DB_PASSWORD=db2inst1 \
ADMIN_USER_PASSWORD=password \
JMS_PASSWORD=password \
KEYSTORE_PASSWORD=password \
TRUSTSTORE_PASSWORD=password \
EMAIL_PASSWORD=password \
USER_KEY=password \
KEY_ALIAS=self \
./ibm-sccm-prereqs.sh
As part of creating the self-signed certificate for the JKS files required by SCCM, you will be prompted for the following (respond as follows):
Enter keystore password: password

Trust this certificate? [no]: y
If the script runs successfully, it will generate the following files: - ibm-sccm-input-pvc.yaml - ibm-sccm-keystore-jks.yaml - ibm-sccm-pvc.yaml - ibm-sccm-secret.yaml
💡 NOTE
Add the generated files to the repository, and Commit and Push the changes formulti-tenancy-gitops-services -
Services - kustomization.yaml (in multi-tenancy-gitops repository)
-
Deploy the DB2 and pre-requisite resources for SCCM in the main
multi-tenancy-gitopsrepository-
Edit the Services layer
${GITOPS_PROFILE}/2-services/kustomization.yamlby uncommenting the following lines to install the pre-requisites for SCCM.# SCCM - argocd/instances/ibm-sccm-db2.yaml - argocd/instances/ibm-sccm-setup.yaml -
(Optional) If necessary, modify the DB2 storage class for the environment that you use, the files are in
${GITOPS_PROFILE}/2-services/argocd/instances. Editibm-sccm-db2.yamlto change the storageClassName if necessary.
💡 NOTE
Commit and Push the changes formulti-tenancy-gitopsand Refresh the ArgoCD applicationservices.Make sure that the sterling toolkit pod does not throw any error. Wait for 5-10 minutes until the database is fully initialized.
Push the changes & sync ArgoCD and make sure db2 database script completes successfully (check db2-0 pod Logs).
-
Services - instances folder (in multi-tenancy-gitops-services repository)
-
Generate values.yaml file for the SCCM Helm Chart in the
multi-tenancy-gitops-servicesrepo; note that the default storage class is usingmanaged-nfs-storage- if you are installing on ODF, setRWX_STORAGECLASS=ocs-storagecluster-cephfs.:In order to deploy SCCM, SMTP settings are required which SCCM uses for sending emails triggered by system events based on business rules (refer: https://www.ibm.com/docs/en/control-center/6.2.1.0?topic=settings-configuring-smtp-email-messages).cd multi-tenancy-gitops-services/instances/ibm-sccmADMIN_EMAIL_ADDRESS=<change_me> \ EMAIL_HOST_NAME=<change_me> \ EMAIL_PORT=<change_me> \ EMAIL_USER=<change_me> \ EMAIL_RESPOND=<change_me> \ CC_ADMIN_EMAIL_ADDRESS=<change_me> \ KEY_ALIAS=self \ ./ibm-sccm-overrides-values.shFor example:
ADMIN_EMAIL_ADDRESS=no.reply@gmail.com \
EMAIL_HOST_NAME=smtp.gmail.com \
EMAIL_PORT=465 \
EMAIL_USER=no.reply@gmail.com \
EMAIL_RESPOND=no.reply@gmail.com \
CC_ADMIN_EMAIL_ADDRESS=no.reply@gmail.com \
KEY_ALIAS=self \
./ibm-sccm-overrides-values.sh
💡 NOTE
Add the generated values.yaml file to the repository, and Commit and Push the changes formulti-tenancy-gitops-services
Services - kustomization.yaml (in multi-tenancy-gitops repository)
-
Edit the Services layer
${GITOPS_PROFILE}/2-services/kustomization.yamlby uncommenting the following line to install SCCM, commit and push the changes and Refresh theservicesApplication in the ArgoCD console:# SCCM - argocd/instances/ibm-sccm.yaml💡 NOTE
Commit and Push the changes formulti-tenancy-gitopsand Refresh the ArgoCD applicationservices. This will take around 10-15 mins including all the database setup and application startup. Make sure sccm pod starts successfully (check ibm-sccm-ibm-sccm-0 pod Logs indicate at the end -> ---Configuration Completed---).
Services - instances folder (in multi-tenancy-gitops-services repository)
⚠️ Warning:
If you decided to scale the pods or upgrade the version you should do the following steps:This is to prevent running the setup job again
- Step 1:
cd multi-tenancy-gitops-services/instances/ibm-sccm - Step 2:
- Inside
values.yaml, find & setdbInit: "false" - Commit and push the changes for the
multi-tenancy-gitops-servicesrepo.
Validation
-
Retrieve the Sterling Control Center Monitor console URL.
oc get route -n sccm ibm-sccm-ibm-sccm -o template --template='https://{{.spec.host}}' -
Log in with the default credentials: User ID:
adminPassword:password💡 NOTE
Since we used a self-signed certificate, you may need to use a browser that allows connection to a site with a self-signed certificate such as Firefox