Restricted Networks
OpenShift in Restricted Network Environments
When your OpenShift cluster is unable to reach the internet directly, its considered to be in a Restricted Network Environment. One common scenario is a cluster that is completely disconnected from the internet, commonly referred as an AirGapped or Disconnected Environment. Another type of restricted network occurs when access to the internet is restricted via an Enterprise Proxy. Certain configuration steps need to be taken in both scenarios.
Warning
This guide assumes you have an existing container image registry, protected with a TLS certificate signed by a Custom CA. The process of creating your own container image registry is outside of the scope of this document.
Disconnected Environments
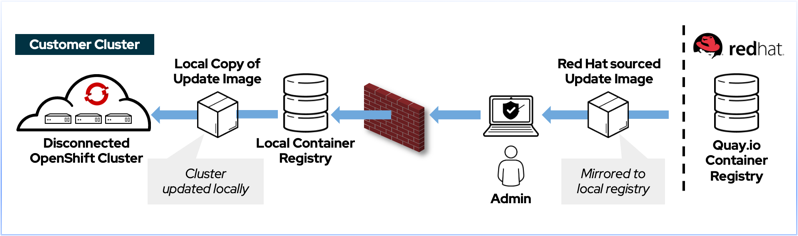
This video describes automation developed by the Production Deployment Guides team to make it easier to deploy in restricted network environments.
Preparing your OpenShift Container Platform Local Container Registry
Before mirroring your OpenShift Container Platform components, please create the following registry namespaces/projects in your Local Container Registry
- ocp4
- olm
Mirroring of the OpenShift Platform components
Note
These steps were obtained from Red Hat's official documentation on mirroring images for a disconnected installation
Update your local pull-secret with your registry credentials
-
Download your
registry.redhat.iopull secret from the Pull Secret page on the Red Hat OpenShift Cluster Manager site and save it to a.jsonfile. -
Generate the base64-encoded user name and password or token for your mirror registry:
$ echo -n username:password |base64 dXNlcm5hbWU6cGFzc3dvcmQ= -
Make a copy of your pull secret in JSON format:
cat pull-secret | jq . > /tmp/pull-secretThe contents of the file resemble the following example:
{ "auths": { "cloud.openshift.com": { "auth": "b3BlbnNo...", "email": "you@example.com" }, "quay.io": { "auth": "b3BlbnNo...", "email": "you@example.com" }, "registry.connect.redhat.com": { "auth": "NTE3Njg5Nj...", "email": "you@example.com" }, "registry.redhat.io": { "auth": "NTE3Njg5Nj...", "email": "you@example.com" } } } -
Edit the new file and add a section that describes your registry to it:
 "auths": {
   "myimageregistry.example.com:8443": {
     "auth": "dXNlcm5hbWU6cGFzc3dvcmQ=",   # from Step 2
     "email": "you@example.com"
 },
Warning
If no port is specified, port 443 is assumed.
Error
Do NOT include https://, docker:// or http:// in the registry name
The file should now resemble the following example:
{
 "auths": {
   "myimageregistry.example.com:8443": {
     "auth": "dXNlcm5hbWU6cGFzc3dvcmQ=",   # from Step 2
     "email": "you@example.com"
   },
   "cloud.openshift.com": {
     "auth": "b3BlbnNo...",
     "email": "you@example.com"
   },
   "quay.io": {
     "auth": "b3BlbnNo...",
     "email": "you@example.com"
   },
   "registry.connect.redhat.com": {
     "auth": "NTE3Njg5Nj...",
     "email": "you@example.com"
   },
   "registry.redhat.io": {
     "auth": "NTE3Njg5Nj...",
     "email": "you@example.com"
   }
 }
}
Mirror OpenShift Container Platform
$ LOCAL_SECRET_JSON='/path/to/pull-secret.txt'
$ PRODUCT_REPO='openshift-release-dev'
$ RELEASE_NAME="ocp-release"
$ OCP_RELEASE=4.6.17
$ ARCHITECTURE=x86_64
$ LOCAL_REGISTRY=myimageregistry.example.com:8443
$ LOCAL_REPOSITORY=ocp4/openshift4
$ oc adm release mirror -a ${LOCAL_SECRET_JSON} --insecure \
 --from=quay.io/${PRODUCT_REPO}/${RELEASE_NAME}:${OCP_RELEASE}-${ARCHITECTURE} \
 --to=${LOCAL_REGISTRY}/${LOCAL_REPOSITORY} \
 --to-release-image=${LOCAL_REGISTRY}/${LOCAL_REPOSITORY}:${OCP_RELEASE}-${ARCHITECTURE}
Error
Do NOT include https://, docker:// or http:// in the LOCAL_REGISTRY variable string
The output will resemble something similar to this:
info: Mirroring 121 images to myimageregistry.example.com:8443/ocp4/openshift4 ...
myimageregistry.example.com:8443/
  ocp4/openshift4
    manifests:
      sha256:011b6819853dd51f795ac875b6ab338f6d85e9b31fa4fb8b5c7b2d580d9266bf -> 4.6.17-ironic-static-ip-manager
...

Success
Update image:  myimageregistry.example.com:8443/ocp4/openshift4:4.6.17-x86_64
Mirror prefix: myimageregistry.example.com:8443/ocp4/openshift4

To use the new mirrored repository to install, add the following section to the install-config.yaml:

imageContentSources:
- mirrors:
  - myimageregistry.example.com:8443/ocp4/openshift4
  source: quay.io/openshift-release-dev/ocp-release
- mirrors:
  - myimageregistry.example.com:8443/ocp4/openshift4
  source: quay.io/openshift-release-dev/ocp-v4.0-art-dev


To use the new mirrored repository for upgrades, use the following to create an ImageContentSourcePolicy:

apiVersion: operator.openshift.io/v1alpha1
kind: ImageContentSourcePolicy
metadata:
  name: example
spec:
  repositoryDigestMirrors:
  - mirrors:
    - myimageregistry.example.com:8443/ocp4/openshift4
    source: quay.io/openshift-release-dev/ocp-release
  - mirrors:
    - myimageregistry.example.com:8443/ocp4/openshift4
    source: quay.io/openshift-release-dev/ocp-v4.0-art-dev
Deploy your Cluster
Obtain installation program
To create the installation program that is based on the content that you mirrored, extract it and pin it to the release:
If your mirror host does not have Internet access, run the following command:
$ oc adm release extract -a ${LOCAL_SECRET_JSON} \
--command=openshift-install \
"${LOCAL_REGISTRY}/${LOCAL_REPOSITORY}:${OCP_RELEASE}"
If the local container registry is connected to the mirror host, run the following command:
$ oc adm release extract -a ${LOCAL_SECRET_JSON} \
--command=openshift-install \
"${LOCAL_REGISTRY}/${LOCAL_REPOSITORY}:${OCP_RELEASE}-${ARCHITECTURE}"
Validate version of the extracted openshift-install binary
$ ./openshift-install version
openshift-install 4.6.17
built from commit 8a1ec01353e68cb6ebb1dd890d684f885c33145a
release image quay.io/openshift-release-dev/ocp-release@sha256:a7b23f38d1e5be975a6b516739689673011bdfa59a7158dc6ca36cefae169c18
Create your install-config.yaml file
$ openshift-install create install-config --dir=mycluster
...
INFO Install-Config created in: mycluster
Update your install-config.yaml, add the following at the bottom, as instructed by the oc adm release mirror command from previous steps.
...
imageContentSources:
- mirrors:
  - myimageregistry.example.com:8443/ocp4/openshift4
  source: quay.io/openshift-release-dev/ocp-release
- mirrors:
  - myimageregistry.example.com:8443/ocp4/openshift4
  source: quay.io/openshift-release-dev/ocp-v4.0-art-dev
...
If your container registry is using certificates signed by an internal CustomCA, you will need to include the CustomCA certificate as well under additionalTrustBundle:
...
additionalTrustBundle: |
  -----BEGIN CERTIFICATE-----
  MIIGBzCCA++gAwIBAgIUZs95kGNRFr+cK+RoJG0PPhDwYP4wDQYJKoZIhvcNAQEL
  BQAwgZIxCzAJBgNVBAYTAlVTMRcwFQYDVQQIDA5Ob3J0aCBDYXJvbGluYTEQMA4G
  A1UEBwwHUmFsZWlnaDEMMAoGA1UECgwDSUJNMSQwIgYDVQQLDBtHVE0gQXNzZXRz
  IGFuZCBBcmNoaXRlY3R1cmUxJDAiBgNVBAMMG0dUTSBBc3NldHMgYW5kIEFyY2hp
  dGVjdHVyZTAeFw0yMTAzMTAxOTI5NDdaFw0yMzEyMjkxOTI5NDdaMIGSMQswCQYD
  VQQGEwJVUzEXMBUGA1UECAwOTm9ydGggQ2Fyb2xpbmExEDAOBgNVBAcMB1JhbGVp
  Z2gxDDAKBgNVBAoMA0lCTTEkMCIGA1UECwwbR1RNIEFzc2V0cyBhbmQgQXJjaGl0
  ZWN0dXJlMSQwIgYDVQQDDBtHVE0gQXNzZXRzIGFuZCBBcmNoaXRlY3R1cmUwggIi
  MA0GCSqGSIb3DQEBAQUAA4ICDwAwggIKAoICAQC20LOBFQA/hUCmOXTSZ5HZYBnP
  lV41KJCya22FkkbpIyP59eABaaKHDoItqz3DDXf5fCcq0TZFVd3LjiItTusB3cE9
  mvvJqs89NLsMAXa7KTCwGpWObokFrhHP4/dFhUN3RBfj1HLr/F1hQg3XKSzto+OL
  ZRzqASYVvWsjyXWByKRb1fZJorMk7JbzRQbM7yzUFZwAc+T4sQXRUwctRm5e/mtw
  8uUkAzxUaj70mpeTkq6ijjj55yULK9F1LYj33pKPCLrRznRDKFFHy84W3xQmbbf6
  wbcPxbaZ3njlaur9b/7S7KZAFjEhig7H27PnCEgLXmQI6OQj8DaQFcMI/DqTti3P
  QgDV8c9sdpGX4xk/d+yL+B+RyY/Z3vCF1bDVaftLdySXWDBS6D5354L5Qkh1Xkeh
  1otwkqaIC0DF7mjmRmCiujR7YIYDiJIQ0QTGZxyvbZJvd+RmTyLJx+jK5YO7VAY8
  dZ/7A9G/1G0FRsnb4pF8Rxy+5SxPjC+UOamraYesHdthkgy5Cq0T8wj7SDSg2Psr
  H8W5v5lfEF0NXdOtoRKpA4f5eY//WBz08X+xfJUmqF3tE38PuheRRUYeAc+4pPqP
  /Qtd4gZKWZ+kmorq9YuYejfbkcO0NgrAkDVOiUBWYiZ6COhnBcsitKo6LjCTwP6D
  N3531Ly/lhPXgox4swIDAQABo1MwUTAdBgNVHQ4EFgQUxdok6FNYGgwwFJ32XjSr
  41NIcZ4wHwYDVR0jBBgwFoAUxdok6FNYGgwwFJ32XjSr41NIcZ4wDwYDVR0TAQH/
  BAUwAwEB/zANBgkqhkiG9w0BAQsFAAOCAgEAhEDxuczzQQCH0cXIFzc/Ljfsrm+k
  tMZlltYV+1FQ4Xy2sngAbMkOxpswgOf1LqFT687vxecxWskugA6GHj6N0LjPZjtf
  fgM5GnVqk8F/q2EsTBDQcvJTQj9JDr4OC50FvFwReOvwg/ivVTucvQfxVCOKRzBN
  g9TNUbCIPzHXrxm6pUR2iHLktcQaVmqNX9JaV9RrrjZKD/VqyMU3wNmlKHOm3pk3
  HfbycNkOmZBVVMjpR5U8DdQmjQSntA2niDvS3WYOIJpIAzeTiwCuWuAZgr1F4lMV
  qXpuTA1GywYg36/qBB+KfQ2gVgifBYu2vzDq7ZqrC5IIkWOXmetbgST2TzCoRVHm
  dRlA2ajXe78F36RuiVQQwGZIQfbZDI4mTlGnGNgHcMUZFlruAZOjDGI14/ZBFX7B
  TI0uJOc6n8KAInJx2Anr04fjUvYOrqq6QMvpBbfQeHg/eDt6Xqo8s6AHgptBvB2g
  5TAArFeBC/HOj8oihPVo+LhJG7T6HV/DjoY4swo9p7wfX7oVVNHNqZGDTQgqdPn5
  QR4eMkZDycnHmPYzMouUyGLgS/nGNgDhGuwYMudxRRY0bf5cR3vJu/p65Y7iEA5L
  08+f7KOxtj7LCfykKGbC97flS2WxMiV8w79eSUFMxIoI+oMsL7H28frgGzq6zak5
  rveE8YHbgb5i6CE=
  -----END CERTIFICATE-----
imageContentSources:
- mirrors:
  - myimageregistry.example.com:8443/ocp4/openshift4
  source: quay.io/openshift-release-dev/ocp-release
- mirrors:
  - myimageregistry.example.com:8443/ocp4/openshift4
  source: quay.io/openshift-release-dev/ocp-v4.0-art-dev
...
Warning
Pay attention to the indentation of the certificate in additionalTrustBundle
Create your cluster
$ openshift-install create cluster --dir mycluster
...
INFO Install complete!
INFO To access the cluster as the system:admin user when using 'oc', run 'export KUBECONFIG=/home/user/mycluster/refarch/auth/kubeconfig'
INFO Access the OpenShift web-console here: https://console-openshift-console.apps.mycluster.example.com
INFO Login to the console with user: "kubeadmin", and password: "xxxxx-xxxxx-xxxxx-xxxxx"
...
Mirror RedHat Operator Catalog (OperatorHub)
-
Build the catalog for redhat-operators. Match the tag of the redhat-operator-index in the --from flag to the major and minor versions of the OpenShift Container Platform cluster (for example, 4.6).
oc adm catalog build --appregistry-org redhat-operators \ --from=registry.redhat.io/redhat/redhat-operator-index:v4.6 \ --to=${LOCAL_REGISTRY}/olm/redhat-operators:v4.6 \ --registry-config=${LOCAL_SECRET_JSON} \ --filter-by-os="linux/amd64" --insecure using registry.redhat.io/redhat/redhat-operator-index:v4.6 as a base image for building ... Uploading ... 8.094MB/s Pushed sha256:a392de24e5b294d15b3ceedcc1779a5cc5e81db7f007dc414351c6c18b38fff4 to myimageregistry.example.com:8443/olm/redhat-operators:v4.6 -
Mirror the catalog for redhat-operators. This process can take anywhere from 1-5 hours. Make sure you have at least 300Gb of storage available for the operator catalog in your image registry.
oc adm catalog mirror ${LOCAL_REGISTRY}/olm/redhat-operators:v4.6 ${LOCAL_REGISTRY}/olm \
--registry-config=${LOCAL_SECRET_JSON} --insecure
using database path mapping: /:/tmp/737754181
wrote database to /tmp/737754181
using database at: /tmp/737754181/bundles.db
...
info: Planning completed in 10m52.67s
sha256:a392de24e5b294d15b3ceedcc1779a5cc5e81db7f007dc414351c6c18b38fff4 myimageregistry.example.com:8443/olm/redhat-operators:v4.6
...
wrote mirroring manifests to manifests-redhat-operators-1615353468
2.1 Optionally, you can choose to prune the Operator Catalog to mirror only specific operators. To do so, you need to
podman,gprcurlandopminstalled on your system.Run the source index image that you want to prune in a container. For example:
podman run -p50051:50051 -it registry.redhat.io/redhat/redhat-operator-index:v4.6In a separate terminal session, use the gprcurl command to get a list of the packages provided by the index:
grpcurl -plaintext localhost:50051 api.Registry/ListPackages > packages.outInspect the packages.out file and identify which package names from this list you want to keep in your pruned index. Run the following command to prune the source index of all but the specified packages
opm index prune -f registry.redhat.io/redhat/redhat-operator-index:v4.6 \
  -p advanced-cluster-management,jaeger-product,quay-operator \
  -t myimageregistry.example.com:8443/olm/redhat-operator-index:v4.6
And finally, push your index image to your registry
podman push <target_registry>:<port>/<namespace>/redhat-operator-index:v4.6 -
Disable the default OperatorSources by adding disableAllDefaultSources:true to the spec file for the Operator Hub.
oc login https://api.mycluster.example.com:6443 -u kubeadmin -p xxxx-xxxx-xxxx-xxxx oc patch OperatorHub cluster --type json -p '[{"op": "add", "path": "/spec/disableAllDefaultSources", "value": true}]' -
If you're using an insecure registry, add it to the list of insecure registries.
oc edit image.config.openshift.io/clusterAdd the following to the
specsection.spec: registrySources: insecureRegistries: - myimageregistry.example.com:8443Error
Do NOT include https://, docker:// or http:// in the registry name.
-
Apply the
imageContentSourcePolicy.yamlandimageCatalog.yamlfile created from step 2 to your cluster and validate the results.$ cd manifests-redhat-operators-1615353468 $ oc create -f imageContentSourcePolicy.yaml -f catalogSource.yaml imagecontentsourcepolicy.operator.openshift.io/redhat-operators created catalogsource.operators.coreos.com/redhat-operators created $ oc get pods,catalogsource -n openshift-markerplace NAME READY STATUS RESTARTS AGE pod/marketplace-operator-5d59977875-wgbdd 1/1 Running 0 110m pod/redhat-operators-4zdl5 1/1 Running 0 38s NAME DISPLAY TYPE PUBLISHER AGE catalogsource.operators.coreos.com/redhat-operators grpc 38sWarning
If you are using Red Hat OpenShift Container Platform version 4.7 or earlier, then this step might cause your cluster nodes to drain and restart sequentially to apply the configuration changes.
Upgrading your Cluster
To upgrade your cluster, first determine what your target upgrades should be.
Follow Red Hat's documentation to determine what your next version is.
Follow a similar process as creating your original platform mirror, and set OCP_RELEASE to your determined target version.
You also need to pass the --apply-release-image-signature flag so the cluster can validate the hashes of the new version.
If your cluster is completely airgapped, you can instead pass the --release-image-signature-to-dir flag which will create a ConfigMap for you that you can apply directly to the cluster.
Mirror OpenShift Container Platform (Upgrade)
$ LOCAL_SECRET_JSON='/path/to/pull-secret.txt'
$ PRODUCT_REPO='openshift-release-dev'
$ RELEASE_NAME="ocp-release"
$ OCP_RELEASE=4.6.32
$ ARCHITECTURE=x86_64
$ LOCAL_REGISTRY=myimageregistry.example.com:8443
$ LOCAL_REPOSITORY=ocp4/openshift4
$ oc adm release mirror -a ${LOCAL_SECRET_JSON} --insecure \
 --from=quay.io/${PRODUCT_REPO}/${RELEASE_NAME}:${OCP_RELEASE}-${ARCHITECTURE} \
 --to=${LOCAL_REGISTRY}/${LOCAL_REPOSITORY} \
 --to-release-image=${LOCAL_REGISTRY}/${LOCAL_REPOSITORY}:${OCP_RELEASE}-${ARCHITECTURE} \
 --apply-release-image-signature --release-image-signature-to-dir ./release-manifest-${OCP_RELEASE}
info: Mirroring 121 images to myimageregistry.example.com:8443/ocp4/openshift4 ...
myimageregistry.example.com:8443/
  ocp4/openshift4
    manifests:
...

Success
Update image:  myimageregistry.example.com:8443/ocp4/openshift4:4.6.32-x86_64
Mirror prefix: myimageregistry.example.com:8443/ocp4/openshift4
To use the new mirrored repository for upgrades, use the following to create an ImageContentSourcePolicy:
apiVersion: operator.openshift.io/v1alpha1
kind: ImageContentSourcePolicy
metadata:
  name: example
spec:
  repositoryDigestMirrors:
  - mirrors:
    - myimageregistry.example.com:8443/ocp4/openshift4
    source: quay.io/openshift-release-dev/ocp-release
  - mirrors:
    - myimageregistry.example.com:8443/ocp4/openshift4
    source: quay.io/openshift-release-dev/ocp-v4.0-art-dev
configmap/sha256-47df4bfe1cfd6d63dd2e880f00075ed1d37f997fd54884ed823ded9f5d96abfc created
Upgrade to target version
Apply the ImageContentSourcePolicy from the previous command and update your cluster.
apiVersion: operator.openshift.io/v1alpha1
kind: ImageContentSourcePolicy
metadata:
  name: myimageregistry-mirror
spec:
  repositoryDigestMirrors:
  - mirrors:
    - myimageregistry.example.com:8443/ocp4/openshift4
    source: quay.io/openshift-release-dev/ocp-release
  - mirrors:
    - myimageregistry.example.com:8443/ocp4/openshift4
    source: quay.io/openshift-release-dev/ocp-v4.0-art-dev
DIGEST=$(jq .metadata.name < release-manifest-${OCP_RELEASE}/signature-sha256-*.yaml |awk -F\- '{print $1":"$2}')
oc adm upgrade --allow-explicit-upgrade --to-image=quay.io/openshift-release-dev/ocp-release@${DIGEST}
Upgrade process can take a while. Validate cluster is ready by running checking the cluster ClusterVersion
$ oc get clusterversion
NAME      VERSION   AVAILABLE   PROGRESSING   SINCE   STATUS
version   4.6.32    True        False         6d17h   Cluster version is 4.6.32
Post Deployment Configuration
Disable the Insights Operator
oc extract secret/pull-secret -n openshift-config --to=.
This will create a .dockerconfigfile with your Pull Secret. Remove the cloud.redhat.com entry from the file
"cloud.openshift.com":{"auth":"<hash>","email":"<email_address>"}
Update the Global Pull Secret in your cluster
oc set data secret/pull-secret -n openshift-config --from-file=.dockerconfigjson=.dockerconfigjson
This update is rolled out to all nodes, which can take some time depending on the size of your cluster. During this time, nodes are drained and pods are rescheduled on the remaining nodes.
Configure NTP Servers
Your cluster is unable to reach the default RedHat NTP servers to synchronize its time. If you deploy OpenShift Container Storage, you may see the operator in a Warning state on the OpenShift main Dashboard.

Patch OCS to deploy the Ceph Tools pod. On inspection, it will complain about clock skew on ceph mon pods. You will need to configure your cluster to talk to your local NTP servers.
$ oc patch OCSInitialization ocsinit -n openshift-storage --type json --patch '[{ "op": "replace", "path": "/spec/enableCephTools", "value": true }]'
$ oc exec -it rook-ceph-tools-7ddd664854-j8ccj -- ceph -s
  cluster:
    id:     e05bb2fc-c757-4496-b9ad-a064e7c0b815
    health: HEALTH_WARN
            clock skew detected on mon.b, mon.c
. . .
-
Create a
chrony.conffile with your NTP Server. Replacevistime.rtp.raleigh.ibm.comwith your NTP server.server vistime.rtp.raleigh.ibm.com iburst driftfile /var/lib/chrony/drift makestep 1.0 3 rtcsync logdir /var/log/chrony -
base64 encode it
$ cat chrony.conf|base64 -w0 ICAgIHNlcnZlciB2aXN0aW1lLnJ0cC5yYWxlaWdoLmlibS5jb20gaWJ1cnN0CiAgICBkcmlmdGZpbGUgL3Zhci9saWIvY2hyb255L2RyaWZ0CiAgICBtYWtlc3RlcCAxLjAgMwogICAgcnRjc3luYwogICAgbG9nZGlyIC92YXIvbG9nL2Nocm9ueQo= -
Create a
chrony-master-machineconfig.yamland achrony-worker-machineconfig.yamlapiVersion: machineconfiguration.openshift.io/v1 kind: MachineConfig metadata: labels: machineconfiguration.openshift.io/role: master ## << replace this with "worker" for the worker machineconfig name: 99-masters-chrony-configuration spec: config: ignition: config: {} security: tls: {} timeouts: {} version: 3.1.0 networkd: {} passwd: {} storage: files: - contents: source: data:text/plain;charset=utf-8;base64,ICAgIHNlcnZlciB2aXN0aW1lLnJ0cC5yYWxlaWdoLmlibS5jb20gaWJ1cnN0CiAgICBkcmlmdGZpbGUgL3Zhci9saWIvY2hyb255L2RyaWZ0CiAgICBtYWtlc3RlcCAxLjAgMwogICAgcnRjc3luYwogICAgbG9nZGlyIC92YXIvbG9nL2Nocm9ueQo= ## << the base64 encoded chrony.conf from step2 mode: 420 overwrite: true path: /etc/chrony.conf osImageURL: "" -
Create the MachineConfigs. Your cluster nodes will restart one by one until they all have the new configuration.
$ oc create -f chrony-master-machineconfig.yaml -f chrony-worker-machineconfig.yaml machineconfig.machineconfiguration.openshift.io/99-masters-chrony-configuration created machineconfig.machineconfiguration.openshift.io/99-workers-chrony-configuration created -
Your storage cluster is now healthy
$ oc exec -it rook-ceph-tools-7ddd664854-8nl82 -- ceph -s
  cluster:
    id:     e05bb2fc-c757-4496-b9ad-a064e7c0b815
    health: HEALTH_OK
...
Mirroring CloudPak Container Images
To mirror your CloudPak container images using the IBM-PAK Plugin, download the latest release and follow the install instructions.
Create Registry Namespaces
If your private registry doesn't automatically create registry namespaces, you need to create them manually. Consult your CloudPak documentation for more information. Some common registry namespaces needed are:
- cp
- cpopen
- opencloudio
Set up Environment Variables
export CASE_NAME=ibm-cp-integration
export CASE_VERSION=3.0.1
Note
To obtain the CASE_NAME, CASE_VERSION and CASE_INVENTORY_SETUP for each CloudPak, please refer to IBM: Product CASE to Application Version
Download your CASE components
Warning
Ensure you have adequate storage in your $OFFLINEDIR. When using oc ibm-pak, this variable points to ~/.ibm-pak by default.
oc ibm-pak get $CASE_NAME --version $CASE_VERSION
Downloading and extracting the CASE ...
- Success
Retrieving CASE version ...
- Success
Validating the CASE ...
[warn] - Validation warning found in inventory/operator/resources.yaml: Multiple media types specifed for single-platform images. The media types for images in a single resources.yaml should match. Found media types: [application/vnd.docker.distribution.manifest.v2 application/vnd.oci.image.manifest.v1]
Validating the signature for the ibm-cp-integration CASE...
- Success
Creating inventory ...
- Success
Finding inventory items
- Success
Resolving inventory items ...
Parsing inventory items
Validating the signature for the ibm-cp-common-services CASE...
Validating the signature for the ibm-auditlogging CASE...
Validating the signature for the ibm-cert-manager CASE...
Validating the signature for the ibm-cs-commonui CASE...
Validating the signature for the ibm-crossplane-bundle CASE...
Validating the signature for the ibm-events-operator CASE...
Validating the signature for the ibm-cs-healthcheck CASE...
Validating the signature for the ibm-cs-iam CASE...
Validating the signature for the ibm-cpp CASE...
Validating the signature for the ibm-zen CASE...
Validating the signature for the ibm-licensing CASE...
Validating the signature for the ibm-management-ingress CASE...
Validating the signature for the ibm-cs-mongodb CASE...
Validating the signature for the ibm-cs-monitoring CASE...
Validating the signature for the ibm-platform-api-operator CASE...
Validating the signature for the ibm-automation-foundation-core CASE...
Validating the signature for the ibm-datapower-operator CASE...
Validating the signature for the ibm-apiconnect CASE...
Validating the signature for the ibm-cloud-native-postgresql CASE...
Validating the signature for the ibm-appconnect CASE...
Validating the signature for the ibm-aspera-hsts-operator CASE...
Validating the signature for the ibm-cloud-databases-redis CASE...
Validating the signature for the ibm-mq CASE...
Validating the signature for the ibm-integration-asset-repository CASE...
Validating the signature for the ibm-integration-platform-navigator CASE...
Validating the signature for the ibm-integration-operations-dashboard CASE...
Validating the signature for the ibm-eventstreams CASE...
- Success
Download of CASE: ibm-cp-integration, version: 3.0.1 is complete
Generate Mirror Manifests
If the host where you're running these commands has access to both the internet and the private image registry, then then issue the below command to generate the following files:
images-mapping.txtwhich contains a mapping of source image and destination image separated by = andimage-content-source-policy.yamlwhich defines ImageContentSourcePolicy
export LOCAL_REGISTRY=myimageregistry.example.com:8443
oc ibm-pak generate mirror-manifests $CASE_NAME $LOCAL_REGISTRY --version $CASE_VERSION
ibm-cs-iam-1.15.0  done
ibm-automation-foundation-core-1.3.7  done
ibm-cp-common-services-1.15.0  done
ibm-cloud-native-postgresql-4.0.9  done
ibm-cs-monitoring-1.15.0  done
ibm-management-ingress-1.15.0  done
ibm-licensing-1.16.0  done
ibm-cs-mongodb-1.14.0  done
ibm-cs-healthcheck-1.15.0  done
ibm-integration-platform-navigator-1.7.0  done
ibm-cloud-databases-redis-1.5.2  done
ibm-platform-api-operator-1.15.0  done
ibm-events-operator-4.2.0  done
ibm-integration-operations-dashboard-2.6.0  done
ibm-appconnect-5.0.0  done
ibm-crossplane-bundle-1.8.0  done
ibm-integration-asset-repository-1.5.0  done
ibm-aspera-hsts-operator-1.5.0  done
ibm-apiconnect-4.0.0  done
ibm-cs-commonui-1.17.0  done
ibm-eventstreams-1.6.4  done
ibm-datapower-operator-1.6.0  done
ibm-zen-2.10.0  done
ibm-cp-integration-3.0.1  done
ibm-cpp-1.6.0  done
ibm-mq-2.0.0  done
ibm-cert-manager-1.15.0  done
ibm-auditlogging-1.16.0  done
Generating mirror manifests of CASE: ibm-cp-integration, version: 3.0.1 is complete
If you want to save the images to your filesystem to later move into your AirGap environment, then issue the below command to generate the following files:
images-mapping-to-filesystem.txtimages-mapping-from-filesystem.txtimage-content-source-policy.yaml
export LOCAL_REGISTRY=myimageregistry.example.com:8443
oc ibm-pak generate mirror-manifests $CASE_NAME file://local --version $CASE_VERSION --final-registry $LOCAL_REGISTRY
Note
If you do not know the value of the final registry where the images will be mirrored, you can provide a placeholder value of TARGET_REGISTRY. For example: oc ibm-pak generate mirror-manifests $CASE_NAME file://local --version $CASE_VERSION --final-registry TARGET_REGISTRY. Note that TARGET_REGISTRY used without any environment variable expansion is just a plain string that you will replace later with the actual image registry URL when it is known to you.
Tip
To minimize the number of registry namespaces needed, you can mirror everything to a top level registry namespace by including it in your LOCAL_REGISTRY variable. For example, if you have a private registry called myimageregistry.example.com running on port 8443, you would set the LOCAL_REGISTRY variable to myimageregistry.example.com:8443/myregistry.
export LOCAL_REGISTRY=myimageregistry.example.com:8443/myregistry
Authenticating the Registries
export REGISTRY_AUTH_FILE=~/auth.json
export ENTITLEMENT_KEY="eyJh..."
export LOCAL_REGISTRY=myimageregistry.example.com:8443
export LOCAL_REGISTRY_USERNAME=admin
export LOCAL_REGISTRY_PASSWORD=passw0rd
podman login cp.icr.io -u cp -p "$ENTITLEMENT_KEY"
podman login $LOCAL_REGISTRY -u $LOCAL_REGISTRY_USERNAME -p $LOCAL_REGISTRY_PASSWORD
$ podman login cp.icr.io -u cp -p "$ENTITLEMENT_KEY"
Login Succeeded!
$ podman login $LOCAL_REGISTRY -u $LOCAL_REGISTRY_USERNAME -p $LOCAL_REGISTRY_PASSWORD
Login Succeeded!
Note
Use cp as the username of cp.icr.io and your IBM Entitlement Key as the password
Mirroring the Images
If the host where you're running these commands has access to both the internet and the private image registry, then then issue the below command mirror the images
export LOCAL_REGISTRY=myimageregistry.example.com:8443
oc image mirror \
  -f ~/.ibm-pak/data/mirror/$CASE_NAME/$CASE_VERSION/images-mapping.txt \
  --filter-by-os '.*' -a $REGISTRY_AUTH_FILE --insecure \
  --skip-multiple-scopes --max-per-registry=1
If you are following the Filesystem path then issue the below command to mirror the images to your filesystem first.
oc image mirror \
  -f ~/.ibm-pak/data/mirror/$CASE_NAME/$CASE_VERSION/images-mapping-to-filesystem.txt \
  --filter-by-os '.*' -a $REGISTRY_AUTH_FILE --insecure \
  --skip-multiple-scopes --max-per-registry=1
This will create a v2 folder in the current directory where all the images are copied. For example, in the previous section if provided file://local as input during oc ibm-pak generate mirror-manifests then the preceding command will create a subdirectory local under v2 and copy the images under it.
Move the following items to another host behind the firewall with access to the private image registry:
- v2 folder
- The file referenced in
$REGISTRY_AUTH_FILEin the previous step ~/.ibm-pak/data/mirror/$CASE_NAME/$CASE_VERSION/images-mapping-from-filesystem.txt
Note
If you used the placeholder value of TARGET_REGISTRY as a parameter to --final-registry at the time of generating mirror manifests, then before running the following command, find and replace the placeholder value of TARGET_REGISTRY in the file images-mapping-from-filesystem.txt, with the actual registry where you want to mirror the images.
export CASE_NAME=ibm-cp-integration
export CASE_VERSION=3.0.1
export REGISTRY_AUTH_FILE=~/auth.json
oc image mirror \
  -f ~/.ibm-pak/data/mirror/$CASE_NAME/$CASE_VERSION/images-mapping-from-filesystem.txt \
  -a $REGISTRY_AUTH_FILE --from-dir=${V2_DIR} \--filter-by-os '.*' --insecure \
  --skip-multiple-scopes --max-per-registry=1
$V2_DIR refers to the parent directory on the file system where the v2 directory was copied to.
Update the global image pull secret
Update the global image pull secret for your Red Hat OpenShift cluster. Follow the steps in Updating the global cluster pull secret. The documented steps in the link enable your cluster to have proper authentication credentials in place to pull images from your LOCAL_REGISTRY as specified in the image-content-source-policy.yaml which you will apply to your cluster in the next step.
Create the ImageContentSourcePolicy
Warning
If you are using Red Hat OpenShift Container Platform version 4.7 or earlier, then this step might cause your cluster nodes to drain and restart sequentially to apply the configuration changes.
Warning
If your target registry is insecure, you must add it to the cluster's insecureRegistries list
oc patch image.config.openshift.io/cluster --type=merge \
  -p '{"spec":{"registrySources":{"insecureRegistries":["'${LOCAL_REGISTRY}'"]}}}'
Note
If you used the placeholder value of TARGET_REGISTRY as a parameter to --final-registry at the time of generating mirror manifests, then before running the following command, find and replace the placeholder value of TARGET_REGISTRY in the file ~/.ibm-pak/data/mirror/$CASE_NAME/$CASE_VERSION/image-content-source-policy.yaml, with the actual registry where you want to mirror the images.
oc apply -f ~/.ibm-pak/data/mirror/$CASE_NAME/$CASE_VERSION/image-content-source-policy.yaml
Monitor the cluster node status with the following command:
oc get MachineConfigPool
$ oc get MachineConfigPool -w
NAME     CONFIG                                             UPDATED   UPDATING   DEGRADED   MACHINECOUNT   READYMACHINECOUNT   UPDATEDMACHINECOUNT   DEGRADEDMACHINECOUNT   AGE
master   rendered-master-53bda7041038b8007b038c08014626dc   True      False      False      3              3                   3                     0                      10d
worker   rendered-worker-b54afa4063414a9038958c766e8109f7   True      False      False      3              3                   3                     0                      10d
Wait for all MachineConfigPools to be in UPDATED=True before proceeding.
Install Catalog Sources
export NAMESPACE=cp4i
oc create ns $NAMESPACE
export CASE_INVENTORY_SETUP=operator
oc ibm-pak launch $CASE_NAME --version $CASE_VERSION \
  --action install-catalog --inventory $CASE_INVENTORY_SETUP --namespace $NAMESPACE \
  --args "--registry $LOCAL_REGISTRY --recursive --inputDir ~/.ibm-pak/data/cases/$CASE_NAME/$CASE_VERSION"
Note
To obtain the CASE_NAME, CASE_VERSION and CASE_INVENTORY_SETUP for each CloudPak, please refer to IBM: Product CASE to Application Version
oc apply -f ~/.ibm-pak/data/cases/$CASE_NAME/$CASE_VERSION/catalog-sources.yaml
If a cloudpak has architecture specific images, an additional YAML file will be created. The file will be named catalog-sources-<architecture>.yaml and will be placed in the same directory as the catalog-sources.yaml file.
oc apply -f ~/.ibm-pak/data/mirror/${CASE_NAME}/${CASE_VERSION}/catalog-sources-linux-${ARCH}.yaml
where ARCH is the architecture of the target cluster.
Create Registry Namespaces
If your private registry doesn't automatically create registry namespaces, you need to create them manually. Consult your CloudPak documentation for more information. Some common registry namespaces needed are:
- cp
- cpopen
- opencloudio
Set up Environment Variables
export CASE_NAME=ibm-cp-integration
export CASE_VERSION=2.3.0
export CASE_INVENTORY_SETUP=operator
export OFFLINEDIR=/path/to/offline
export CASE_REPO_PATH=https://github.com/IBM/cloud-pak/raw/master/repo/case
export ENTITLEMENT_KEY="ey..."
Note
To obtain the CASE_NAME, CASE_VERSION and CASE_INVENTORY_SETUP for each CloudPak, please refer to IBM: Product CASE to Application Version
Warning
Ensure you have adequate storage in your $OFFLINEDIR
Download Specific Components (if required)
If you want to install a specific component of a CloudPak, override the CASE_ARCHIVE and CASE_INVENTORY_SETUP variables for your specific component.
Example:
export CASE_ARCHIVE=ibm-integration-platform-navigator-1.2.0.tgz
export CASE_INVENTORY_SETUP=platformNavigatorOperator
Download CloudPak Components
$ cloudctl case save \
  --repo $CASE_REPO_PATH \
  --case $CASE_NAME \
  --version $CASE_VERSION \
  --outputdir $OFFLINEDIR
Downloading and extracting the CASE ...
- Success
Retrieving CASE version ...
- Success
Validating the CASE ...
[warn] - Validation warning found in inventory/operator/resources.yaml: Multiple media types specifed for single-platform images. The media types for images in a single resources.yaml should match. Found media types: [application/vnd.docker.distribution.manifest.v2 application/vnd.oci.image.manifest.v1]
Validating the signature for the ibm-cp-integration CASE...
- Success
Creating inventory ...
- Success
Finding inventory items
- Success
Resolving inventory items ...
Parsing inventory items
Validating the signature for the ibm-cp-common-services CASE...
Validating the signature for the ibm-auditlogging CASE...
Validating the signature for the ibm-cert-manager CASE...
Validating the signature for the ibm-cs-commonui CASE...
Validating the signature for the ibm-events-operator CASE...
Validating the signature for the ibm-cs-healthcheck CASE...
Validating the signature for the ibm-cs-iam CASE...
Validating the signature for the ibm-zen CASE...
Validating the signature for the ibm-licensing CASE...
Validating the signature for the ibm-management-ingress CASE...
Validating the signature for the ibm-cs-mongodb CASE...
Validating the signature for the ibm-cs-monitoring CASE...
Validating the signature for the ibm-platform-api-operator CASE...
Validating the signature for the ibm-automation-foundation-core CASE...
Validating the signature for the ibm-datapower-operator-cp4i CASE...
Validating the signature for the ibm-apiconnect CASE...
Validating the signature for the ibm-datapower-operator-prod CASE...
Validating the signature for the ibm-appconnect CASE...
Validating the signature for the ibm-couchdb CASE...
Validating the signature for the ibm-aspera-hsts-operator CASE...
Validating the signature for the ibm-cloud-databases-redis CASE...
Validating the signature for the ibm-mq CASE...
Validating the signature for the ibm-integration-asset-repository CASE...
Validating the signature for the ibm-integration-platform-navigator CASE...
Validating the signature for the ibm-integration-operations-dashboard CASE...
- Success
Configure Registry Credentials
You need to configure credentials for your local registry and cp.icr.io
Credentials for Local Registry
cloudctl case launch \
  --case $OFFLINEDIR/${CASE_NAME}-${CASE_VERSION}.tgz \
  --inventory $CASE_INVENTORY_SETUP \
  --action configure-creds-airgap \
  --args "--registry ${LOCAL_REGISTRY} --user username --pass password"
Welcome to the CASE launcher
Attempting to retrieve and extract the CASE from the specified location
[✓] CASE has been retrieved and extracted
Attempting to validate the CASE
[✓] CASE has been successfully validated
Attempting to locate the launch inventory item, script, and action in the specified CASE
[✓] Found the specified launch inventory item, action, and script for the CASE
Attempting to check the cluster and machine for required prerequisites for launching the item
[WARNING]: Unable to create a REST API connection to the cluster due to the following error: Unable to get cluster auth tokens due to the following error: Error: stat ./auth/kubeconfig: no such file or directory (found in getting the kubernetes config).  Ensure that you are logged into the cluster with the appropriate role to perform this launch action.
Checking for required prereqs...
No requires section specified.
Required prereqs result: OK
Checking user permissions...
No user rules specified.
[✓] Cluster and Client Prerequisites have been met for the CASE
Running the CASE operator launch script with the following action context: configureCredsAirgap
Executing inventory item operator, action configureCredsAirgap : launch.sh
-------------Configuring authentication secret-------------
[INFO] Creating registry authencation secret for myimageregistry.example.com:8443
[INFO] Registry secret created in /home/ncolon/.airgap/secrets/myimageregistry.example.com:8443.json
[INFO] Done
[✓] CASE launch script completed successfully
OK
Credentials for IBM Registry
cloudctl case launch \
  --case $OFFLINEDIR/${CASE_NAME}-${CASE_VERSION}.tgz \
  --inventory $CASE_INVENTORY_SETUP \
  --action configure-creds-airgap \
  --args "--registry cp.icr.io --user cp --pass $ENTITLEMENT_KEY"
Warning
Its ok to get [WARNING]: Unable to create a REST API connection in the commands above
Authenticate to your airgapped cluster
oc login https://api.mycluster.example.com:6443 -u kubeadmin -p xxxx-xxxx-xxxx-xxxx
oc login --token=sha256~AAAAA....BBBBB --server=https://api.mycluster.example.com:6443
Warning
do not use export KUBECONFIG=path/to/kubeconfig as some items may not replicate correctly.
Create a namespace for your CloudPak
export NAMESPACE=cp4i
oc create namespace $NAMESPACE
Mirror CloudPak images to Local Repository
Create environment variables with the local Docker registry connection information
export CASE_NAME=ibm-cp-integration
export CASE_VERSION=2.2.2
export CASE_ARCHIVE=${CASE_NAME}-${CASE_VERSION}.tgz
export CASE_INVENTORY_SETUP=operator
export OFFLINEDIR=/path/to/offline
export OFFLINEDIR_ARCHIVE=offline.tgz
export CASE_REPO_PATH=https://github.com/IBM/cloud-pak/raw/master/repo/case
export CASE_LOCAL_PATH=$OFFLINEDIR/$CASE_ARCHIVE
export LOCAL_DOCKER_REGISTRY_HOST=myimageregistry.example.com:8443
export LOCAL_DOCKER_REGISTRY_PORT=443
export LOCAL_DOCKER_REGISTRY=$LOCAL_DOCKER_REGISTRY_HOST:$LOCAL_DOCKER_REGISTRY_PORT
export LOCAL_DOCKER_USER=username
export LOCAL_DOCKER_PASSWORD=password
Warning
If you are installing only a single capability, you must run commands similar to the example below to adjust the environment variables for the capability you need to install below (in this example, only Platform Navigator).
Warning
if your registry runs on port 443, you don't need to include it on $LOCAL_DOCKER_REGISTRY_HOST
export CASE_ARCHIVE=ibm-integration-platform-navigator-2.3.0.tgz
export CASE_INVENTORY_SETUP=platformNavigatorOperator
export CASE_LOCAL_PATH=$OFFLINEDIR/${CASE_NAME}-${CASE_VERSION}.tgzexport
Mirror contents
cloudctl case launch \
  --case $OFFLINEDIR/${CASE_NAME}-${CASE_VERSION}.tgz \
  --inventory $CASE_INVENTORY_SETUP \
  --action mirror-images \
  --args "--registry $LOCAL_DOCKER_REGISTRY --inputDir $OFFLINEDIR"
...
info: Planning completed in 130ms
sha256:9df1f3d5b16df5d8753a78d8f7bd60f72d47135e139185464cbe7c8edb9ded61 myimageregistry.example.com:8443/cpopen/ibm-common-service-catalog
sha256:31d1b593d7601c69c8a02985b7326766aec68a6379dfea69fbc2c07a6251020a myimageregistry.example.com:8443/cpopen/ibm-common-service-catalog
sha256:27c45813f3dfe62aa654db36c4f01a34ed189b330c52823fcddbd605ee890a87 myimageregistry.example.com:8443/cpopen/ibm-common-service-catalog
sha256:cc5f6fa46af38278f565ca22ff13ae8a2cd0ae60303d5d3be5dd9395bf4b3771 myimageregistry.example.com:8443/cpopen/ibm-common-service-catalog:latest
info: Mirroring completed in 110ms (0B/s)
[✓] CASE launch script completed successfully
Create ImageCatalogSourcePolicy
$ cloudctl case launch \
  --case $OFFLINEDIR/${CASE_NAME}-${CASE_VERSION}.tgz \
  --inventory $CASE_INVENTORY_SETUP \
  --action configure-cluster-airgap \
  --namespace $NAMESPACE \
  --args "--registry $LOCAL_DOCKER_REGISTRY --user $LOCAL_DOCKER_USER --pass $LOCAL_DOCKER_PASSWORD --inputDir $OFFLINEDIR"
...
[INFO] Generating image content source policy
...
---
apiVersion: operator.openshift.io/v1alpha1
kind: ImageContentSourcePolicy
metadata:
  name: ibm-cp-integration
spec:
  repositoryDigestMirrors:
  - mirrors:
    - myimageregistry.example.com:8443/cp/apic
    source: cp.icr.io/cp/apic
  - mirrors:
    - myimageregistry.example.com:8443/cp/appc
    source: cp.icr.io/cp/appc
  - mirrors:
    - myimageregistry.example.com:8443/cp/datapower
    source: cp.icr.io/cp/datapower
  - mirrors:
    - myimageregistry.example.com:8443/cp/icp4i/aspera
    source: cp.icr.io/cp/icp4i/aspera
  - mirrors:
    - myimageregistry.example.com:8443/cp/icp4i
    source: cp.icr.io/cp/icp4i
  - mirrors:
    - myimageregistry.example.com:8443/cp/icp4i/od
    source: cp.icr.io/cp/icp4i/od
  - mirrors:
    - myimageregistry.example.com:8443/cp
    source: cp.icr.io/cp
  - mirrors:
    - myimageregistry.example.com:8443/ibmcom
    source: docker.io/ibmcom
  - mirrors:
    - myimageregistry.example.com:8443/cpopen
    source: icr.io/cpopen
  - mirrors:
    - myimageregistry.example.com:8443/opencloudio
    source: quay.io/opencloudio
---
[INFO] Applying image content source policy
oc apply -f "/tmp/airgap_image_policy_z2Hgmp9a8"
imagecontentsourcepolicy.operator.openshift.io/ibm-cp-integration created
[✓] CASE launch script completed successfully
OK
Warning
If you are using Red Hat OpenShift Container Platform version 4.7 or earlier, then this step might cause your cluster nodes to drain and restart sequentially to apply the configuration changes.
Install Catalog Sources
cloudctl case launch \
  --case $OFFLINEDIR/${CASE_ARCHIVE} \
  --inventory ${CASE_INVENTORY_SETUP} \
  --action install-catalog \
  --namespace ${NAMESPACE} \
  --args "--registry ${LOCAL_DOCKER_REGISTRY} --inputDir $OFFLINEDIR --recursive"
$ oc get pod -n openshift-marketplace
NAME                                                 READY   STATUS             RESTARTS   AGE
appconnect-operator-catalogsource-cwzn7              1/1     Running            0          7m20s
aspera-operators-nvqvf                               1/1     Running            0          96m
couchdb-operator-catalog-jtmfz                       1/1     Running            0          96m
ibm-apiconnect-catalog-wm5xd                         1/1     Running            0          96m
ibm-automation-foundation-core-catalog-wz5jq         1/1     Running            0          7m39s
ibm-cloud-databases-redis-operator-catalog-zs2qd     1/1     Running            0          96m
ibm-cp-integration-catalog-bw64z                     1/1     Running            0          6m35s
ibm-datapower-operator-catalog-nl95s                 1/1     Running            0          72s
ibm-integration-asset-repository-catalog-g94xt       1/1     Running            0          6m52s
ibm-integration-operations-dashboard-catalog-z62p6   1/1     Running            0          6m37s
ibm-integration-platform-navigator-catalog-pfvhg     1/1     Running            0          6m41s
ibmmq-operator-catalogsource-2hfz6                   1/1     Running            0          96m
marketplace-operator-67cb5b6d45-pqmcz                1/1     Running            0          99m
opencloud-operators-5hjfp                            1/1     Running            0          96m
redhat-operators-pnlh5                               1/1     Running            0          103m
Proxy Environments
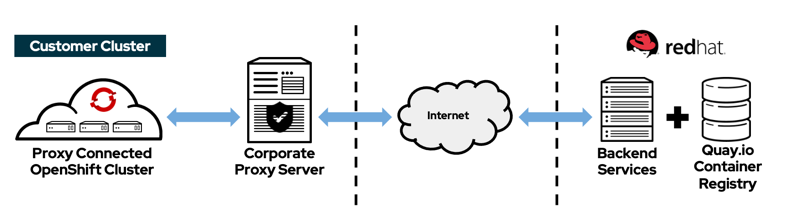
When installing OpenShift in an environment where an Enterprise Proxy controls access to public resources, you need to make the installer proxy aware. The proxy needs to allow traffic to the following endpoints
Additionally, if you're deploying in a Public Cloud Provider, the proxy needs to allow access to multiple cloud management endpoints so that the OpenShift operators can interact with your cloud provider.
Configure Proxy at Install Time
To configure your proxy at install time, first generate your install-config.yaml file
$ openshift-install create install-config --dir=mycluster
...
INFO Install-Config created in: mycluster
Add the following proxy information at the bottom
proxy:
  httpProxy: http://useranme:password@myproxy.example.com:3128
  httpsProxy: http://useranme:password@myproxy.example.com:3128
  noProxy: CIDR,IPAddress,hostname,.internal.example.com
If the customer Enterprise Proxy solution also intercepts SSL/TLS traffic and injects its own TLS certificate on any outbound https request (also known as a Man-In-The-Middle SSL Proxy), you also need to add the CustomCA certificate used by the proxy TLS certificate
...
proxy:
  httpProxy: http://myproxy.example.com:3128
  httpsProxy: http://myproxy.example.com:3128
  noProxy: CIDR,IPAddress,hostname,.internal.example.com
additionalTrustBundle: |
  -----BEGIN CERTIFICATE-----
  MIIGBzCCA++gAwIBAgIUZs95kGNRFr+cK+RoJG0PPhDwYP4wDQYJKoZIhvcNAQEL
  BQAwgZIxCzAJBgNVBAYTAlVTMRcwFQYDVQQIDA5Ob3J0aCBDYXJvbGluYTEQMA4G
  A1UEBwwHUmFsZWlnaDEMMAoGA1UECgwDSUJNMSQwIgYDVQQLDBtHVE0gQXNzZXRz
  IGFuZCBBcmNoaXRlY3R1cmUxJDAiBgNVBAMMG0dUTSBBc3NldHMgYW5kIEFyY2hp
  dGVjdHVyZTAeFw0yMTAzMTAxOTI5NDdaFw0yMzEyMjkxOTI5NDdaMIGSMQswCQYD
  VQQGEwJVUzEXMBUGA1UECAwOTm9ydGggQ2Fyb2xpbmExEDAOBgNVBAcMB1JhbGVp
  Z2gxDDAKBgNVBAoMA0lCTTEkMCIGA1UECwwbR1RNIEFzc2V0cyBhbmQgQXJjaGl0
  ZWN0dXJlMSQwIgYDVQQDDBtHVE0gQXNzZXRzIGFuZCBBcmNoaXRlY3R1cmUwggIi
  MA0GCSqGSIb3DQEBAQUAA4ICDwAwggIKAoICAQC20LOBFQA/hUCmOXTSZ5HZYBnP
  lV41KJCya22FkkbpIyP59eABaaKHDoItqz3DDXf5fCcq0TZFVd3LjiItTusB3cE9
  mvvJqs89NLsMAXa7KTCwGpWObokFrhHP4/dFhUN3RBfj1HLr/F1hQg3XKSzto+OL
  ZRzqASYVvWsjyXWByKRb1fZJorMk7JbzRQbM7yzUFZwAc+T4sQXRUwctRm5e/mtw
  8uUkAzxUaj70mpeTkq6ijjj55yULK9F1LYj33pKPCLrRznRDKFFHy84W3xQmbbf6
  wbcPxbaZ3njlaur9b/7S7KZAFjEhig7H27PnCEgLXmQI6OQj8DaQFcMI/DqTti3P
  QgDV8c9sdpGX4xk/d+yL+B+RyY/Z3vCF1bDVaftLdySXWDBS6D5354L5Qkh1Xkeh
  1otwkqaIC0DF7mjmRmCiujR7YIYDiJIQ0QTGZxyvbZJvd+RmTyLJx+jK5YO7VAY8
  dZ/7A9G/1G0FRsnb4pF8Rxy+5SxPjC+UOamraYesHdthkgy5Cq0T8wj7SDSg2Psr
  H8W5v5lfEF0NXdOtoRKpA4f5eY//WBz08X+xfJUmqF3tE38PuheRRUYeAc+4pPqP
  /Qtd4gZKWZ+kmorq9YuYejfbkcO0NgrAkDVOiUBWYiZ6COhnBcsitKo6LjCTwP6D
  N3531Ly/lhPXgox4swIDAQABo1MwUTAdBgNVHQ4EFgQUxdok6FNYGgwwFJ32XjSr
  41NIcZ4wHwYDVR0jBBgwFoAUxdok6FNYGgwwFJ32XjSr41NIcZ4wDwYDVR0TAQH/
  BAUwAwEB/zANBgkqhkiG9w0BAQsFAAOCAgEAhEDxuczzQQCH0cXIFzc/Ljfsrm+k
  tMZlltYV+1FQ4Xy2sngAbMkOxpswgOf1LqFT687vxecxWskugA6GHj6N0LjPZjtf
  fgM5GnVqk8F/q2EsTBDQcvJTQj9JDr4OC50FvFwReOvwg/ivVTucvQfxVCOKRzBN
  g9TNUbCIPzHXrxm6pUR2iHLktcQaVmqNX9JaV9RrrjZKD/VqyMU3wNmlKHOm3pk3
  HfbycNkOmZBVVMjpR5U8DdQmjQSntA2niDvS3WYOIJpIAzeTiwCuWuAZgr1F4lMV
  qXpuTA1GywYg36/qBB+KfQ2gVgifBYu2vzDq7ZqrC5IIkWOXmetbgST2TzCoRVHm
  dRlA2ajXe78F36RuiVQQwGZIQfbZDI4mTlGnGNgHcMUZFlruAZOjDGI14/ZBFX7B
  TI0uJOc6n8KAInJx2Anr04fjUvYOrqq6QMvpBbfQeHg/eDt6Xqo8s6AHgptBvB2g
  5TAArFeBC/HOj8oihPVo+LhJG7T6HV/DjoY4swo9p7wfX7oVVNHNqZGDTQgqdPn5
  QR4eMkZDycnHmPYzMouUyGLgS/nGNgDhGuwYMudxRRY0bf5cR3vJu/p65Y7iEA5L
  08+f7KOxtj7LCfykKGbC97flS2WxMiV8w79eSUFMxIoI+oMsL7H28frgGzq6zak5
  rveE8YHbgb5i6CE=
  -----END CERTIFICATE-----
...
Warning
Pay attention to the indentation of the certificate in additionalTrustBundle
Warning
The httpProxy and httpsProxy parameters always begin with http://; https:// is not supported.
Note
The Proxy object status.noProxy field is populated with the values of the networking.machineNetwork[].cidr, networking.clusterNetwork[].cidr, and networking.serviceNetwork[] fields from your installation configuration. For installations on Amazon Web Services (AWS), Google Cloud Platform (GCP), Microsoft Azure, and Red Hat OpenStack Platform (RHOSP), the Proxy object status.noProxy field is also populated with the instance metadata endpoint (169.254.169.254).
Configure or Update the Proxy on an Existing Cluster
If you didn't configure the proxy at install time, your Cluster Wide Proxy object will have an empty configuration
apiVersion: config.openshift.io/v1
kind: Proxy
metadata:
  name: cluster
spec:
  trustedCA:
    name: ""
status:
If your proxy uses a certificate signed by a customCA, you will first need to create a ConfigMap with the proxy certificate
apiVersion: v1
data:
  ca-bundle.crt: |
    <MY_PEM_ENCODED_CERTS>
kind: ConfigMap
metadata:
  name: user-ca-bundle
  namespace: openshift-config
Note
You can skip this step if the proxy certificate is signed by a known authority
Once created, you can then edit your Cluster Wide Proxy and configure any necessary fields
oc edit proxy/cluster
apiVersion: config.openshift.io/v1
kind: Proxy
metadata:
  name: cluster
spec:
  httpProxy: http://<username>:<pswd>@<ip>:<port>
  httpsProxy: http://<username>:<pswd>@<ip>:<port>
  noProxy: 192.168.100.0/24,10.0.0.1,mydatabase.example.com,.mydomain.example.com
  readinessEndpoints:
  - http://site1.example.com
  - https://site2.example.com
  - https://www.google.com
  trustedCA:
    name: user-ca-bundle