OpenShift Golden Topology
Overview
A highly available, resilient deployment starts with a solid physical infrastructure foundation that embeds all these principles. The topology described bellow provides prescriptive guidance on how to achieve these principles at the Network, Compute and Storage layer of your cluster. All implementation details are handled with YAML so we can leverage Infrastructure as Code/GitOps processes to automate the experience.
Networking
We start by deploying our cluster into a single region with multiple availability zones.
By deploying into multiple AZs, we provide physical redundancy of our infrastructure into physically separated resources.
We depend on external Network Services like DHCP and DNS to provide initial cluster connectivity and configuration.
Finally, Load Balancers are used to provide access to the management and application endpoints of our cluster.
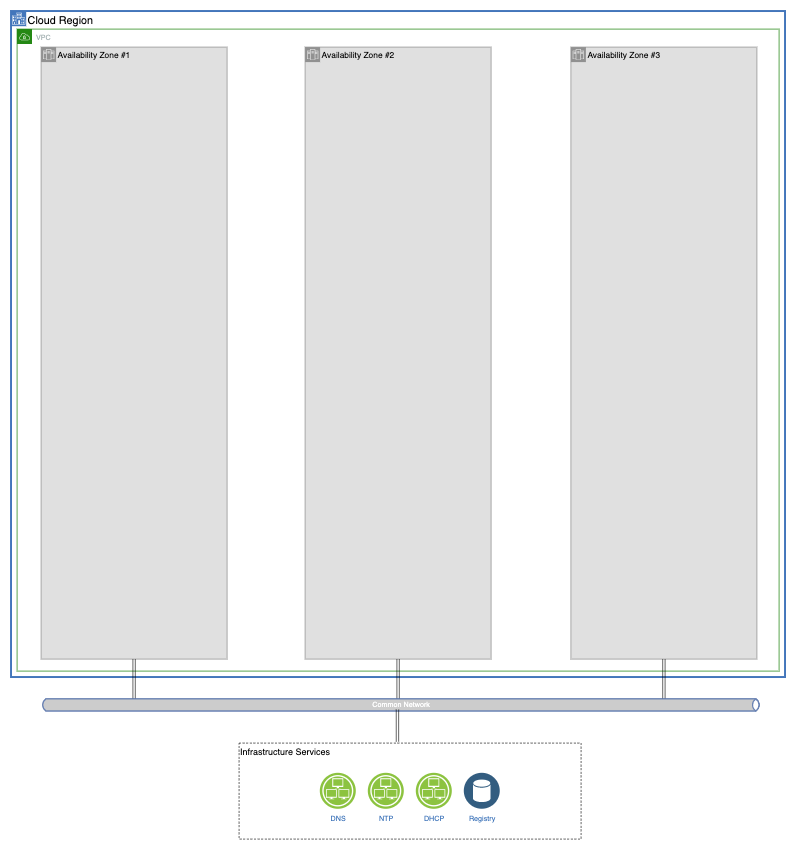
Regions
A region is defined as an actual real-life geographical location where your cloud resources are located. They could be public cloud regions or your on-prem datacenters. An OpenShift cluster should only span a single region. Stretch clusters are not recommended, no matter the latency between these regions, to avoid ETCD database corruption.
Note
If you need to spread your application workload across multiple regions, the use of a Geographical LoadBalancer is recommended.
Availability Zones
An availability zone (AZ) is defined as physical locations in your region that are physically separated and connected with private, low latency, high throughput and redundant network connections.
Note
You should deploy your OpenShift cluster to at least 3 AZs, one master per zone and workers spread across them.
Note
Create a per-zone MachineSets for each type of server you want to have. This increases your Cluster redundancy. If you're not using MachineSets, make sure you create one master and one worker per zone.
Network Services
When deploying OpenShift, certain network services need to pre in place prior to deployment
-
DHCP: DHCP is required to provide initial network connectivity to your nodes so it can download its ignition configuration file
-
DNS: DNS is required to provide information on LoadBalancer endpoints for configuration
-
NTP: Time Synchronization across all cluster nodes is critical due to the use of TLS certificates across the platform. By default they will reach out to Red Hat NTP servers, but can be configured to use internal enterprise NTP servers.
-
Container Image Registry: If you're deploying in an environment that has connectivity to the internet, the cluster will use public container image registries provided by Red Hat (quay.io) or IBM (cp.icr.io). If you're deploying in a Restricted Network environment, you need to mirror the platform, operatorhub and cloudpak container images to a local image repository.
In a public cloud environment, DHCP and DNS are for the most part handled automatically by your cloud provider, and are configured when deploying your OpenShift Cluster with IPI. When deploying On-Prem, you need to provide these services in your infrastructure.
Warning
Avoid creating a bastion server that also serves as a DHCP/DNS server to provide these services for the cluster. Production level clusters require production-level backing services.
LoadBalancers
To spread workload and API traffic to your nodes, there are 3 endpoints to consider
-
API: LoadBalances Cluster API traffic to all masters on port 6443
- DNS CNAME or A record
- Points api.cluster_name.base_domain to the IP Address of this LoadBalancer
-
API-INT: LoadBalances Cluster API traffic to all masters and bootstrap server on port 6443 and 22623
- DNS CNAME or A record
- Points api-int.cluster_name.base_domain to the IP Address this LoadBalancer
-
APPS: LoadBalances HTTP/HTTPS traffic to all worker nodes on port 80 and 443.
- DNS WILDCARD CNAME or A record
- Points *.apps.cluster_name.base_domain to the IP Address this LoadBalancer
Warning
The API-INT endpoint contains sensitive cluster information. Split API and API-INT into separate load balancers, and place adequate traffic filters on API-INT so its only accessible from the cluster members CIDR range.
OpenShift SDN
When sizing your cluster, be aware of the networking section in your install-config.yaml cluster definition. The default values are shown bellow:
networking:
clusterNetwork:
    - cidr: 10.128.0.0/14
    hostPrefix: 23
machineNetwork:
    - cidr: 192.168.100.0/24
networkType: OpenShiftSDN
serviceNetwork:
    - 172.30.0.0/16
Error
These values CAN NOT be changed after deployment. A cluster rebuild is necessary if these values need to be changed, so plan ahead.
Warning
Make sure there's no overlap between any of the CIDR ranges and external resources (databases, mainframes, etc) that need to be accessed from within the cluster.
networking.clusterNetwork.cidr: The CIDR range for pods in the OpenShift SDN.networking.clusterNetwork.hostPrefix: Defines the mask for cluster network for pods within a node. Controls the maximum number of pods that can be placed on a single nodenetworking.machineNetwork.cidr: The CIDR range for OpenShift nodes in your network.networking.serviceNetwork: The CIDR range for services in the OpenShift SDNnetworking.networkType: The CNI plugin to use for the OpenShift SDN.
The networking.clusterNetwork parameters control how many nodes per cluster and pods per node you can have. With the default values, you can host up to 512 nodes and 510 pods per node.
nodesPerCluster: 2^(hostPrefix - cidrMask)podsPerNode: 2^(32 - hostPrefix) - 2
hostPrefix: 23       = 512 nodes in cluster
node1: 10.128.0.0/23 = 510 pods
node2: 10.128.2.0/23
node3: 10.128.4.0/23
...
| clusterNetwork.cidr | clusterNetwork.hostPrefix | nodesPerCluster | podsPerNode |
|---|---|---|---|
| 10.128.0.0/14 | 23 | 512 | 510 |
| 10.128.0.0/14 | 24 | 1024 | 254 |
| 10.128.0.0/12 | 23 | 2048 | 510 |
Compute
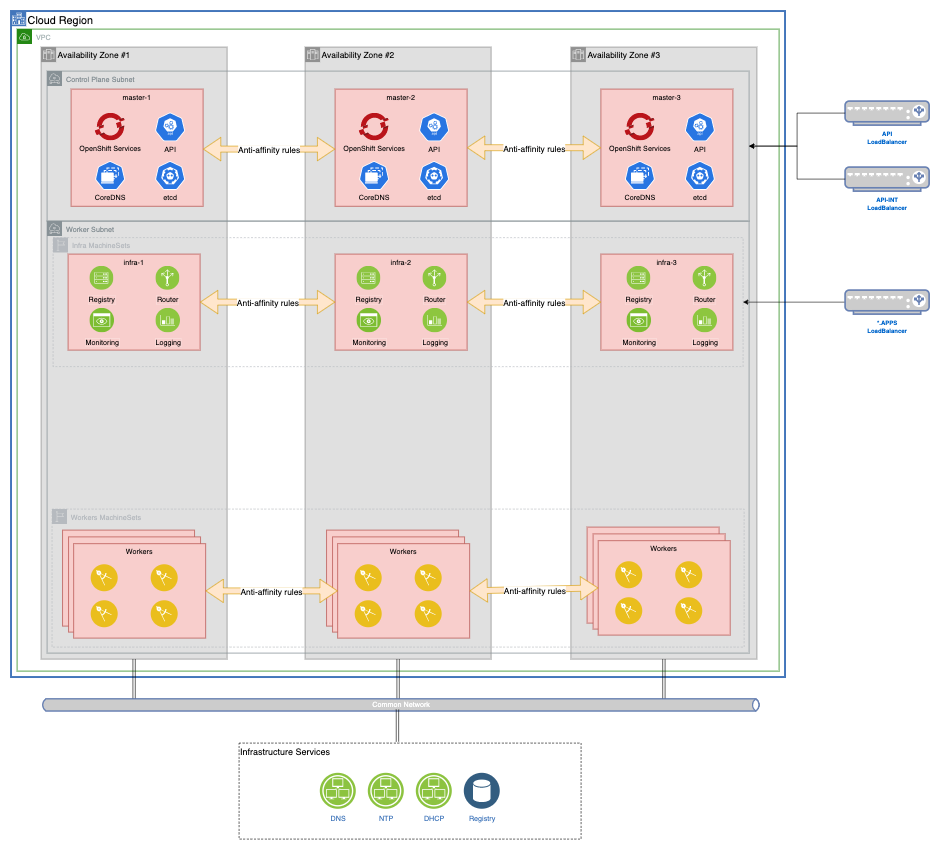
Control Plane
A good initial size for your masters is 3 nodes with 8CPU and 32GB memory. Since master nodes are deployed as static Machines objects, replacing them down the line is a complex task. The following outlines Red Hat's recommended Control Plane sizing. Oversizing them at deployment will ensure you have a cluster that can scale past your original estimates if needed.
| Number of worker nodes | CPU cores | Memory (GB) | Storage (GB) |
|---|---|---|---|
| 25 | 4 | 16 | 120 |
| 100 | 8 | 32 | 120 |
| 250 | 16 | 96 | 120 |
Note
Spread your Control Plane nodes across multiple Availability Zones in your Region to provide resiliency to your cluster. Control Plane nodes should be deployed on a separate subnet within the machineNetwork CIDR range.
Warning
Storage for Control Plane nodes should provide at least 500 IOPS to minimize etcd latency.
Compute Nodes
Any node that is not a Control Plane node is considered a Compute (or Worker) node. They should be deployed as MachineSets to ensure High Availability and scalability
Note
Compute nodes should be deployed on a separate subnet within the machineNetwork CIDR range.
Create a MachineSet per Availability Zone per Compute Node type (Infrastructure, Storage, CloudPak).
Infrastructure Nodes
Warning
If you're running on a MANAGED platform like ROKS, ROSAor ARO, it is the Cloud Providers responsibility to manage these resources for you.
Do not deploy Infrastructure Nodes on Managed Platforms. Skip to Storage
You should deploy at least 3 nodes to host the OpenShift infrastructure components with 4CPU and 16GB memory. They are deployed on the worker subnet.
Infrastructure Nodes allow customers to isolate infrastructure workloads for 2 primary purposes:
-
To prevent incurring billing costs against subscription counts
-
To separate maintenance and management
The following outlines Red Hat's recommended Infrastructure Node sizing
| Compute Nodes | CPU | Memory (GB) | CPU (Cluster Logging Enabled) | Memory (GB) (Cluster Logging Enabled) |
|---|---|---|---|---|
| 25 | 4 | 16 | 4 | 64 |
| 100 | 8 | 32 | 8 | 128 |
| 250 | 16 | 128 | 16 | 128 |
| 500 | 32 | 128 | 32 | 192 |
They are deployed as MachineSets with one MachineSet per Availability Zone. The MachineSet definition should include the following taints to ensure no non-infrastructure component is deployed on these nodes.
| Key | Value | Effect |
|---|---|---|
| infra | "" | NoSchedule |
Note
Since MachineSets can be modified, you can start with smaller sized nodes and scale as your cluster grows.
Warning
Infrastructure Nodes do not draw against your OpenShift Licensing Subscription. The use of taints ensures that only infrastructure components run on these nodes.
The following components are considered infrastructure components
- Image Registry
- Ingress Controller
- Monitoring
- Metrics
- Cluster Logging
- Service Brokers
- Red Hat Quay
- Red Hat OpenShift Data Foundation (previously Red Hat OpenShift Container Storage)
- Red Hat Advanced Cluster Management
- Red Hat Advanced Cluster Security
- Red Hat OpenShift Gitops
- Red Hat OpenShift Pipelines
Warning
Cluster Logging is not deployed by default. If you're deploying it, take into account the increased capacity requirements outlined on the sizing table
Warning
RedHat OpenShift Data Foundation should not be deployed on infrastructure nodes. The use of dedicated storage nodes is recommended.
Placement of these components is controlled with a combination of nodeSelectors and tolerations for each of the above deployments.
Image Registry
oc patch configs.imageregistry.operator.openshift.io/cluster --type=merge \
-p '{"spec": {"nodeSelector": {"node-role.kubernetes.io/infra": ""},"tolerations": [{"effect":"NoSchedule", "key": "infra", "value": ""}]}}'
Ingress Controller
oc patch ingresscontroller/default -n openshift-ingress-operator --type=merge \
-p '{"spec": {"nodePlacement": {"nodeSelector": {"matchLabels": {"node-role.kubernetes.io/infra": ""}},"tolerations": [{"effect": "NoSchedule", "key": "infra", "value": ""}]}}}’
Monitoring
Create a openshift-monitoring-configmap.yaml file with the following ConfigMap and apply it to your cluster.
apiVersion: v1
kind: ConfigMap
metadata:
  name: cluster-monitoring-config
  namespace: openshift-monitoring
data:
  config.yaml: |+
    alertmanagerMain:
      nodeSelector:
        node-role.kubernetes.io/infra: ""
      tolerations:
      - key: infra
        value: ""
        effect: NoSchedule
    prometheusK8s:
      nodeSelector:
        node-role.kubernetes.io/infra: ""
      tolerations:
      - key: infra
        value: ""
        effect: NoSchedule
    prometheusOperator:
      nodeSelector:
        node-role.kubernetes.io/infra: ""
      tolerations:
      - key: infra
        value: ""
        effect: NoSchedule
    grafana:
      nodeSelector:
        node-role.kubernetes.io/infra: ""
      tolerations:
      - key: infra
        value: ""
        effect: NoSchedule
    k8sPrometheusAdapter:
      nodeSelector:
        node-role.kubernetes.io/infra: ""
      tolerations:
      - key: infra
        value: ""
        effect: NoSchedule
    kubeStateMetrics:
      nodeSelector:
        node-role.kubernetes.io/infra: ""
      tolerations:
      - key: infra
        value: ""
        effect: NoSchedule
    telemeterClient:
      nodeSelector:
        node-role.kubernetes.io/infra: ""
      tolerations:
      - key: infra
        value: ""
        effect: NoSchedule
    openshiftStateMetrics:
      nodeSelector:
        node-role.kubernetes.io/infra: ""
      tolerations:
      - key: infra
        value: ""
        effect: NoSchedule
    thanosQuerier:
      nodeSelector:
        node-role.kubernetes.io/infra: ""
      tolerations:
      - key: infra
        value: ""
        effect: NoSchedule
oc apply -f openshift-monitoring-config.yaml
Cluster Logging
oc patch ClusterLogging instance --type=merge \
-p '{"spec": {"curation": {"curator": {"nodeSelector": {"node-role.kubernetes.io/infra": ""}}},"logStore": {"elasticsearch": {"nodeSelector": {"node-role.kubernetes.io/infra": ""}}},"visualization": {"kibana": {"nodeSelector": { "node-role.kubernetes.io/infra": ""}}}}}'
Storage
By default, OpenShift will provide a ReadWriteOnce storage class leveraging the Cloud Provider storage infrastructure. For any storage requirements that can't be met with the cloud provider native storage, the recommended solution is to deploy OpenShift Data Foundation/OpenShift Data Foundation.
OCS handles data replication between multiple storage nodes, so your data will always be available regardless of any Availability Zone issues. If a ReadWriteMany storage class is required for your workloads, the use of OpenShift Data Foundation is recommended.
You should deploy at least 3 nodes with 16CPU and 64GB memory.

Watch this video for an introduction to the various types of storage available in a Kubernetes cluster.
Storage Nodes
They are deployed on the worker subnet as MachineSets with one MachineSet per Availability Zone, and one replica per AZ. The MachineSet definition should include the following taints and labels to ensure no non-storage component is deployed on these nodes. If additional storage is needed in the future, you can Storage MachineSets as needed.
Taints
| Key | Value | Effect |
|---|---|---|
| node.ocs.openshift.io/storage | true | NoSchedule |
Labels
| Label | Value |
|---|---|
| cluster.ocs.openshift.io/openshift-storage | "" |
Note
Add taints and labels in the MachineSet definition to minimize manual configuration steps
OpenShift Data Foundation will provide the following StorageClasses
| Storage Class | ReadWriteOnce | ReadWriteMany | ObjectBucket |
|---|---|---|---|
| ocs-storagecluster-ceph-rbd | ✅ | ❌ | ❌ |
| ocs-storagecluster-cephfs | ✅ | ✅ | ❌ |
| openshift-storage.noobaa.io | ❌ | ❌ | ✅ |
Deploying OpenShift Data Foundation / OpenShift Container Storage
Note
Use OpenShift Data Foundation for OpenShift version 4.9 and above
Use OpenShift Container Storage for OpenShift version 4.8.x and under
-
Create the
openshift-storagenamespace.apiVersion: v1 kind: Namespace metadata: labels: openshift.io/cluster-monitoring: "true" name: openshift-storage spec: {} -
Create an
OperatorGroupthat will grant necessary RBAC permissions.apiVersion: operators.coreos.com/v1 kind: OperatorGroup metadata: annotations: olm.providedAPIs: BackingStore.v1alpha1.noobaa.io,BucketClass.v1alpha1.noobaa.io,CephBlockPool.v1.ceph.rook.io,CephClient.v1.ceph.rook.io,CephCluster.v1.ceph.rook.io,CephFilesystem.v1.ceph.rook.io,CephNFS.v1.ceph.rook.io,CephObjectRealm.v1.ceph.rook.io,CephObjectStore.v1.ceph.rook.io,CephObjectStoreUser.v1.ceph.rook.io,CephObjectZone.v1.ceph.rook.io,CephObjectZoneGroup.v1.ceph.rook.io,CephRBDMirror.v1.ceph.rook.io,NooBaa.v1alpha1.noobaa.io,OCSInitialization.v1.ocs.openshift.io,ObjectBucket.v1alpha1.objectbucket.io,ObjectBucketClaim.v1alpha1.objectbucket.io,StorageCluster.v1.ocs.openshift.io name: openshift-storage-operatorgroup spec: targetNamespaces: - openshift-storage -
Create the OCS subscription in the openshift-storage namespace
apiVersion: operators.coreos.com/v1alpha1 kind: Subscription metadata: name: odf-operator labels: operators.coreos.com/ocs-operator.openshift-storage: "" spec: channel: stable-4.10 installPlanApproval: Automatic name: odf-operator source: redhat-operators sourceNamespace: openshift-marketplace -
Deploy a
StorageClusterinstance. Modifyspec.storageDeviceSets.dataPVCTemplate.spec.storageClassNameto the default RWO storage class available in your cluster andspec.storageDeviceSets.dataPVCTemplate.spec.resources.requests.storageto the size that you need. ODF will attach a disk of this size to each Storage Node. The maximum supported disk size is4Tib. If your storage solution requires additional capacity, you can increasespec.storageDeviceSets.countand ODF will attach more disks to your Storage Nodes. Use the ODF Sizing Tool to determine how many Storage Nodes, and how many disks each storage node needs.apiVersion: ocs.openshift.io/v1 kind: StorageCluster metadata: name: ocs-storagecluster spec: externalStorage: {} storageDeviceSets: - config: {} count: 1 dataPVCTemplate: metadata: creationTimestamp: null spec: accessModes: - ReadWriteOnce resources: requests: storage: 512Gi storageClassName: thin volumeMode: Block status: {} name: ocs-deviceset placement: {} portable: true replica: 3 resources: {} -
Deploy a
StorageSysteminstance.apiVersion: odf.openshift.io/v1alpha1 kind: StorageSystem metadata: name: ocs-storagecluster-storagesystem namespace: openshift-storage spec: kind: storagecluster.ocs.openshift.io/v1 name: ocs-storagecluster namespace: openshift-storage -
Since we added additional taints to the Infrastructure and Storage Nodes, we need to configure some OpenShift Data Foundation components to tolerate those taints.
kind: ConfigMap
apiVersion: v1
metadata:
name: rook-ceph-operator-config
namespace: openshift-storage
data:
CSI_LOG_LEVEL: "5"
CSI_PLUGIN_TOLERATIONS: |
  - effect: NoSchedule
    key: infra
    operator: Equal
    value: ""
  - effect: NoSchedule
    key: node.ocs.openshift.io/storage
    operator: Exists
CSI_PROVISIONER_TOLERATIONS: |2-
  - key: node.ocs.openshift.io/storage
    operator: Equal
    value: "true"
    effect: NoSchedule
-
Create the
openshift-storagenamespace.apiVersion: v1 kind: Namespace metadata: labels: openshift.io/cluster-monitoring: "true" name: openshift-storage spec: {} -
Create an
OperatorGroupthat will grant necessary RBAC permissions.apiVersion: operators.coreos.com/v1 kind: OperatorGroup metadata: annotations: olm.providedAPIs: BackingStore.v1alpha1.noobaa.io,BucketClass.v1alpha1.noobaa.io,CSIAddonsNode.v1alpha1.csiaddons.openshift.io,CephBlockPool.v1.ceph.rook.io,CephBucketNotification.v1.ceph.rook.io,CephBucketTopic.v1.ceph.rook.io,CephClient.v1.ceph.rook.io,CephCluster.v1.ceph.rook.io,CephFilesystem.v1.ceph.rook.io,CephFilesystemMirror.v1.ceph.rook.io,CephFilesystemSubVolumeGroup.v1.ceph.rook.io,CephNFS.v1.ceph.rook.io,CephObjectRealm.v1.ceph.rook.io,CephObjectStore.v1.ceph.rook.io,CephObjectStoreUser.v1.ceph.rook.io,CephObjectZone.v1.ceph.rook.io,CephObjectZoneGroup.v1.ceph.rook.io,CephRBDMirror.v1.ceph.rook.io,NamespaceStore.v1alpha1.noobaa.io,NetworkFence.v1alpha1.csiaddons.openshift.io,NooBaa.v1alpha1.noobaa.io,NooBaaAccount.v1alpha1.noobaa.io,OCSInitialization.v1.ocs.openshift.io,ObjectBucket.v1alpha1.objectbucket.io,ObjectBucketClaim.v1alpha1.objectbucket.io,ReclaimSpaceCronJob.v1alpha1.csiaddons.openshift.io,ReclaimSpaceJob.v1alpha1.csiaddons.openshift.io,StorageCluster.v1.ocs.openshift.io,StorageConsumer.v1alpha1.ocs.openshift.io,StorageSystem.v1alpha1.odf.openshift.io,VolumeReplication.v1alpha1.replication.storage.openshift.io,VolumeReplicationClass.v1alpha1.replication.storage.openshift.io name: openshift-storage-operatorgroup spec: targetNamespaces: - openshift-storage -
Create the OCS subscription in the openshift-storage namespace
apiVersion: operators.coreos.com/v1alpha1 kind: Subscription metadata: name: ocs-operator labels: operators.coreos.com/ocs-operator.openshift-storage: "" spec: channel: stable-4.8 installPlanApproval: Automatic name: ocs-operator source: redhat-operators sourceNamespace: openshift-marketplace -
Deploy a
StorageClusterinstance. Modifyspec.storageDeviceSets.dataPVCTemplate.spec.storageClassNameto the default RWO storage class available in your cluster andspec.storageDeviceSets.dataPVCTemplate.spec.resources.requests.storageto the size that you need. OCS will attach a disk of this size to each Storage Node. The maximum supported disk size is4Tib. If your storage solution requires additional capacity, you can increasespec.storageDeviceSets.countand OCS will attach more disks to your Storage Nodes. Use the ODF Sizing Tool to determine how many Storage Nodes, and how many disks each storage node needs.apiVersion: ocs.openshift.io/v1 kind: StorageCluster metadata: name: ocs-storagecluster spec: externalStorage: {} storageDeviceSets: - config: {} count: 1 dataPVCTemplate: metadata: creationTimestamp: null spec: accessModes: - ReadWriteOnce resources: requests: storage: 512Gi storageClassName: thin volumeMode: Block status: {} name: ocs-deviceset placement: {} portable: true replica: 3 resources: {} -
Since we added additional taints to the Infrastructure and Storage Nodes, we need to configure some OpenShift Data Foundation components to tolerate those taints.
kind: ConfigMap
apiVersion: v1
metadata:
name: rook-ceph-operator-config
namespace: openshift-storage
data:
CSI_LOG_LEVEL: "5"
CSI_PLUGIN_TOLERATIONS: |
    - effect: NoSchedule
      key: infra
      operator: Equal
      value: ""
    - effect: NoSchedule
      key: node.ocs.openshift.io/storage
      operator: Exists
CSI_PROVISIONER_TOLERATIONS: |2-
    - key: node.ocs.openshift.io/storage
      operator: Equal
      value: "true"
      effect: NoSchedule
Tradeoffs and Considerations
While the guidelines presented here are based on a robust production system, there are scenarios where deploying this system is not possible. Bellow are some considerations that you should be aware of when deviating from this Golden Topology.
Network
Availability Zones
You can deploy OpenShift into a single Availability Zone if your Cloud Provider Region does not have multiple zones. If you do so, you should take into account that if the zone becomes unavailable, your whole cluster will be unavailable.
Network Services
When deploying into an On-Prem environment, your datacenter may not have DHCP services available. In this case, the use of static IP addresses is required. You will have to deploy using a custom UPI installation. Since MachineSets require DHCP to dynamically allocate IP addresses to the machines, you will not be able to deploy your additional nodes as MachineSets. This will slow down the process of scaling up your cluster significantly.
Stretch Clusters
Deploying a cluster that spans multiple On-Prem datacenters is not recommended, but exceptions can be obtained with Red Hat's approval. If your production architecture requires a stretch cluster, you should consult with your Red Hat representative.
LoadBalancers
You can host all 3 endpoints on a single LoadBalancer if needed. Be aware that port 22623 contains sensitive cluster credentials that, if accessed, could compromise the security of your cluster. Make sure you have access control policies in place to prevent unauthorized access.
Compute
Shared Infrastructure Nodes and Storage Nodes
You can host your infrastructure components on the same nodes as your storage solution. However, be aware of the following limitations:
- You still need to "make room" for the infrastructure and storage pods. This means that your nodes should be at least 20 vCPUs and 80GB memory. This is an uncommon compute flavor in cloud providers, with the next closest one being 32 vCPUs and 128GB memory.
- While you only need 3 storage nodes to deploy OpenShift Data Foundation, you may need more than 3 infrastructure nodes if you're hosting certain infrastructure components (logging, monitoring, etc).
Storage
Alternate Storage Solutions
This Guide recommends the use of OpenShift Data Foundation to deploy your storage solution. If you need to use another storage solution, consider the following:
- The solution may not be portable across your Hybrid Cloud Environment.
- Support for your storage solution will likely be provided by a third party vendor. Troubleshooting an issue may become harder.
- Refer to the OpenShift Storage Documentation and your storage solution's documentation for more information and compatibility.