Production Deployment Guide for OpenShift on Azure
Golden Topology
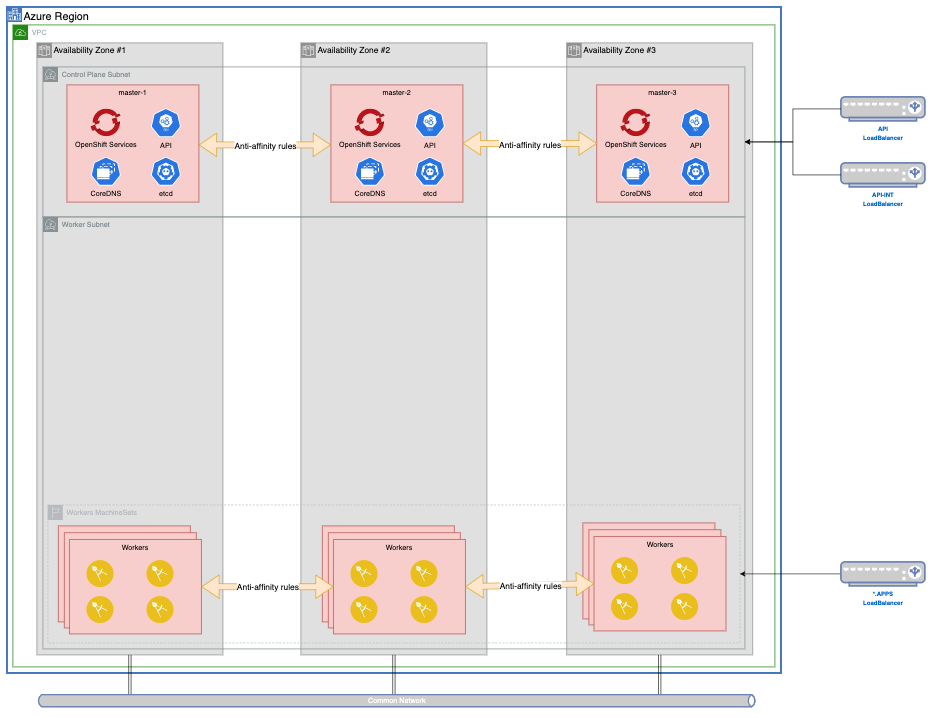
Before reading this document, familiarize yourself with the Golden Topology section of this Production Deployment Guide. Unless otherwise stated, all the items in that section apply to the Cluster Infrastructure we will provision on Azure.
Read Red Hat's documentation on Installing a cluster quickly on Azure to deploy a cluster with no modifications.
Deploying a cluster with openshift-install will provide the following topology.
MachineSets
The following templates can be used to generate your infrastructure, cloudpak and storage MachineSets
Note
Click on each tab above for sample yamls to create your infrastructure
Infrastructure MachineConfigPool
apiVersion: machineconfiguration.openshift.io/v1
kind: MachineConfigPool
metadata:
  name: infra
spec:
  machineConfigSelector:
    matchExpressions:
    - key: machineconfiguration.openshift.io/role
      operator: In
      values:
      - worker
      - infra
  nodeSelector:
    matchLabels:
      node-role.kubernetes.io/infra: ""
Infrastructure MachineSet
Create 3 Infrastructure MachineSets, the $region, $zone and $clusterid variables in the sample below. zone should be 1 2 and 3, respectively, on each machineset yaml file. The default node type is Standard_D4s_v3 (4CPU, 16GB mem), if your infrastructure needs are bigger, you can increase it to a bigger node type, or increase the replica count per Availability Zone. To obtain your Cluster ID, you can run the following command.
$ oc get -o jsonpath='{.status.infrastructureName}{"\n"}' infrastructure cluster
If you Bring Your Own Network, update lines 48, 57 and 61
If you Bring Your Own Resource Group, update lines 41 and 56.
1 2 3 4 5 6 7 8 9 10 11 12 13 14 15 16 17 18 19 20 21 22 23 24 25 26 27 28 29 30 31 32 33 34 35 36 37 38 39 40 41 42 43 44 45 46 47 48 49 50 51 52 53 54 55 56 57 58 59 60 61 62 | |
Infrastructure Component Placement
Follow the Golden Topology Guidelines to control placement of infrastructure components.
Storage MachineConfigPool
apiVersion: machineconfiguration.openshift.io/v1
kind: MachineConfigPool
metadata:
  name: storage
spec:
  machineConfigSelector:
    matchExpressions:
    - key: machineconfiguration.openshift.io/role
      operator: In
      values:
      - worker
      - storage
  nodeSelector:
    matchLabels:
      cluster.ocs.openshift.io/openshift-storage: ""
      node-role.kubernetes.io/storage: ""
Storage MachineSet
Create 3 Storage MachineSets, replacing the region, $zone and $clusterid variables in the sample below. zone should be 1 2 and 3, respectively, on each machineset yaml file. The default node type is Standard_D16s_v3 (16CPU, 64GB mem), To obtain your Cluster ID, you can run the following command.
$ oc get -o jsonpath='{.status.infrastructureName}{"\n"}' infrastructure cluster
If you Bring Your Own Network, update lines 49, 58 and 62
If you Bring Your Own Resource Group, update lines 42 and 57.
1 2 3 4 5 6 7 8 9 10 11 12 13 14 15 16 17 18 19 20 21 22 23 24 25 26 27 28 29 30 31 32 33 34 35 36 37 38 39 40 41 42 43 44 45 46 47 48 49 50 51 52 53 54 55 56 57 58 59 60 61 62 63 | |
CloudPak MachineConfigPool
apiVersion: machineconfiguration.openshift.io/v1
kind: MachineConfigPool
metadata:
  name: cp4x
spec:
  machineConfigSelector:
    matchExpressions:
    - key: machineconfiguration.openshift.io/role
      operator: In
      values:
      - worker
      - cp4x
  nodeSelector:
    matchLabels:
      node-role.kubernetes.io/cp4x: ""
CloudPak Tuned Configuration
apiVersion: tuned.openshift.io/v1
kind: Tuned
metadata:
  name: cp4x-tuned
  namespace: openshift-cluster-node-tuning-operator
spec:
  profile:
  - name: cp4x-tuned
    data: |
      [main]
      summary=Tune Kernel parameters on OpenShift Worker Nodes running CloudPak workloads
      [sysctl]
      kernel.shmall = 33554432
      kernel.shmmax = 68719476736
      kernel.shmmni = 16384
      kernel.sem = 250 1024000 100 16384
      kernel.msgmax = 65536
      kernel.msgmnb = 65536
      kernel.msgmni = 32768
      vm.max_map_count = 262144
  recommend:
  - match:
    - label: node-role.kubernetes.io/cp4x
    priority: 10
    profile: cp4x-tuned
CloudPak ContainerRuntimeConfig
apiVersion: machineconfiguration.openshift.io/v1
kind: ContainerRuntimeConfig
metadata:
  name: cp4x-containerruntimeconfig
spec:
  machineConfigPoolSelector:
    matchLabels:
      limits-crio: cp4x-containerruntimeconfig
  containerRuntimeConfig:
    pidsLimit: 12288
CloudPak MachineSet
Create 3 Storage MachineSets, replacing the region, $zone and $clusterid variables in the sample below. zone should be 1 2 and 3, respectively, on each machineset yaml file. The default node type is Standard_D8s_v3 (8CPU, 32GB mem) and can be modified on line 56. To obtain your Cluster ID, you can run the following command.
$ oc get -o jsonpath='{.status.infrastructureName}{"\n"}' infrastructure cluster
If you Bring Your Own Network, change lines 44, 53 and 57.
If you Bring Your Own Resource Group, change line 37 and 52.
1 2 3 4 5 6 7 8 9 10 11 12 13 14 15 16 17 18 19 20 21 22 23 24 25 26 27 28 29 30 31 32 33 34 35 36 37 38 39 40 41 42 43 44 45 46 47 48 49 50 51 52 53 54 55 56 57 58 | |
Storage
In a default OpenShift deployment on Azure, you will have a single storage class called managed-premium which only provides ReadWriteOnce (RWO) access modes.
$ oc get storageclass
NAME                        PROVISIONER                RECLAIMPOLICY   VOLUMEBINDINGMODE      ALLOWVOLUMEEXPANSION   AGE
managed-premium (default)   kubernetes.io/azure-disk   Delete          WaitForFirstConsumer   true                   34h
This storage class will consume azure-disk resources from a Storage Account in the cluster resource group.
If your CloudPak workloads require a ReadWriteMany (RWX) compatible storage class, the recommended solution is to use OpenShift Container Storage.
Installation Scenarios
The recommended method for installing OpenShift into Azure is using an Installer Provisioned Infrastructure Deployment. It is a solid foundation that encompass most of the best practices and recommendations outlined in the Golden Topology. The installation process is fully supported by IBM and Red Hat, and you won't need to manage and maintain additional code assets to deploy your cluster.
Customers requirements may prevent you from using an unmodified OpenShift installation in Azure. Below are some of the most common customer requests, as well as ways of handling. All these methods begin with the same process
$ openshift-install create install-config
? SSH Public Key /Users/ncolon/.ssh/openshift_rsa.pub
? Platform azure
? azure subscription id ceb9d1a9-d0e8-46f9-a404-f2635fba6829
? azure tenant id fcf67057-50c9-4ad4-98f3-ffca64add9e9
? azure service principal client id a10be0dd-d46f-4592-9a2c-31d1c0bbecbe
? azure service principal client secret [? for help] **********************************
INFO Saving user credentials to "/Users/ncolon/.azure/osServicePrincipal.json"
INFO Credentials loaded from file "/Users/ncolon/.azure/osServicePrincipal.json"
? Region centralus
? Base Domain azure.ibm-gtmaa.dev
? Cluster Name mycluster
? Pull Secret [? for help] ***************************
INFO Install-Config created in: .
Once you've modified your install-config.yaml to fit your needs, create your manifests files.
$ openshift-install create manifests
INFO Credentials loaded from file "/Users/ncolon/.azure/osServicePrincipal.json"
INFO Consuming Install Config from target directory
INFO Manifests created in: manifests and openshift
Once you've modified your manifests files, you can proceed to create your OpenShift Cluster.
$ openshift-install create cluster
Below is a sample install-config.yaml file for an Azure OpenShift Cluster.
apiVersion: v1
baseDomain: azure.ibm-gtmaa.dev
compute:
- architecture: amd64
  hyperthreading: Enabled
  name: worker
  platform: {}
  replicas: 3
controlPlane:
  architecture: amd64
  hyperthreading: Enabled
  name: master
  platform: {}
  replicas: 3
metadata:
  creationTimestamp: null
  name: mycluster
networking:
  clusterNetwork:
  - cidr: 10.128.0.0/14
    hostPrefix: 23
  machineNetwork:
  - cidr: 10.0.0.0/16
  networkType: OpenShiftSDN
  serviceNetwork:
  - 172.30.0.0/16
platform:
  azure:
    baseDomainResourceGroupName: ncolon-openshift4-rg
    cloudName: AzurePublicCloud
    outboundType: Loadbalancer
    region: centralus
publish: External
pullSecret: '{"auths":{...}}'
sshKey: |
  ssh-rsa AAAAB3N...
Node Sizing
Control Plane Nodes
The default control plane node size and count in an unmodified IPI installation is 3 Standard_D8s_v3 nodes with a 1024Gb disk. You can configure the node size by modifying the compute section of your install-config.yaml.
...
controlPlane:
  architecture: amd64
  hyperthreading: Enabled
  name: master
  platform:
    azure:
      type: Standard_D16s_v3
      osDisk:
        diskSizeGB: 1024
        diskType: Premium_LRS
  replicas: 3
...
Warning
Only 3 replicas are supported for HA
Warning
IOPS Performance on Azure is tied to disk size as well as type. In order to meet the performance requirements of the ETCD database on the control plane nodes, a minimum of 1024Gb disk size is recommended, as well as using the Premium_LRS storage tier.
For a complete list of available platform.azure.type options, check out Azure's documentation. The recommended series is the General Purpose Compute D-Series, with a minimum spec of Standard_D8s_v3 for production.
Compute Nodes
The default worker node size and count in an unmodified IPI installation is 3 Standard_D2s_v3 nodes with a 128Gb disk. You can configure the node size by modifying the compute section of your install-config.yaml
...
compute:
- architecture: amd64
  hyperthreading: Enabled
  name: worker
  platform:
    azure:
      type: Standard_D8s_v3
      osDisk:
        diskSizeGB: 512
        diskType: Premium_LRS
  replicas: 5
...
For a complete list of available platform.azure.type options, check out Azure's documentation. The recommended series is the General Purpose Compute D-Series, but your workload requirements may dictate another series. If your workloads require GPU intensive tasks, take a look at the N-Series GPU Enabled Virtual Machines.
Private Endpoints
An unmodified OpenShift installation will provision publicly facing LoadBalancers for api and *.apps (api-int is ALWAYS private). If your customer requires private endpoints, modify your install-config.yaml by appending publish: Internal to it. The api and *.apps LoadBalancers will be created within your VNET CIDR range on the master and worker subnets
...
sshKey: |
  ssh-rsa AAAAB3N...
publish: Internal
Warning
There are limitations on how Azure VMs can reach the internet. They either have to
-
Have a Public IP address attached to them
-
Your VNET provides alternate ways of reaching the internet
-
The VMs are connected to a LoadBalancer with a public IP address(although no traffic is send their way)
When you deploy a cluster with publish: Internal, OpenShift operators will create a LoadBalancer with a public IP address (scenario 3 above) listening on port 27627. The loadbalancer is created as a service called outbound-provider in the openshift-config-managed Namespace.
Bring Your Own Resource Group
Customers may wish to use a pre-existing resource group as the target for OpenShift components. This can be achieved by setting the platform.azure.resourceGroupName configuration parameter in install-config.yaml
...
platform:
  azure:
    baseDomainResourceGroupName: os4-common
    cloudName: AzurePublicCloud
    outboundType: Loadbalancer
    region: centralus
    resourceGroupName: example-rg
...
Warning
The resource group used MUST be empty, and will be deleted when the cluster is destroyed
Bring Your Own Network
Customers may wish to use their pre-existing VNET infrastructure as the target for OpenShift networking environment. This can be achieved by setting the networkResourceGroupName, virtualNetwork, controlPlaneSubnet and computeSubnet configuration parameters in the platform.azure section of install-config.yaml
...
platform:
  azure:
    baseDomainResourceGroupName: ncolon-openshift4-rg
    cloudName: AzurePublicCloud
    outboundType: Loadbalancer
    region: centralus
    networkResourceGroupName: my-cluster-vnet-rg
    virtualNetwork: my-vnet
    controlPlaneSubnet: my-master-subnet
    computeSubnet: my-worker-subnet
...
Warning
While deploying into existing VNET and Subnets is a supported scenario, it is the customer's responsibility that there are no policies that prevent OpenShift from deploying, any security groups that block traffic, etc
Only one virtualNetwork is supported per cluster.
Note
You can set your controlPlaneSubnet and computeSubnet to the same if your customer requires a flat network in their VNET.
User Defined Routing
If absolutely no public endpoints can be present in the deployment of OpenShift on the customer's VNET, the scenario described on Private Endpoints is not enough. You also need to set the platform.azure.outboundType flag to UserDefinedRouting. This will instruct the OpenShift operators not to create the Public LoadBalancer listening on port 27627.
...
platform:
  azure:
    baseDomainResourceGroupName: ncolon-openshift4-rg
    cloudName: AzurePublicCloud
    outboundType: UserDefinedRouting
    region: centralus
...
Warning
This configuration parameter assumes that connectivity to the internet is somehow provided by the VNET infrastructure, via proxies, routing through customer on-prem network connected via ExpressRoute, or any other mechanisms in place. It is the customer's responsibility to provide the necessary connectivity to the internet so OpenShift can download its required installation artifacts.
Bring Your Own DNS
Customers may not wish to use Azure DNS Zones (public or private), opting instead to use their existing Enterprise DNS servers. This can be achieved by modifying the manifests/cluster-dns-02-config.yml DNS configuration manifest. Remove the spec.privateZone and spec.publicZone sections in the file. When done editing, the file should look like this:
apiVersion: config.openshift.io/v1
kind: DNS
metadata:
  creationTimestamp: null
  name: cluster
spec:
  baseDomain: mycluster.azure.ibm-gtmaa.dev
status: {}
Warning
By disabling this feature of the DNS Operator, the cluster will no longer be able to update DNS for you as LoadBalancers are created during installation. As the installation progresses, you will need to pay VERY close attention to the loadbalancers created in your cluster resource group.
 The first loadbalancer that gets created is
 <cluster_id>-internal. You need to update your DNS records so that api-int.<cluster_name>.<base_domain> points to this LoadBalancer. This happens very early in the deployment process, and the OpenShift master nodes will not boot up until this record is created.
The next loadbalancer created is <cluster_id>. It hosts the endpoints for api and *.apps. During the first phase of OpenShift deployment (pre-bootstrapping), the LoadBalancer will consist of a single IP address, public or private. During the second phase of OpenShift deployment (post-bootstrapping) a 2nd IP address will be created by the OpenShift Ingress Operator, and it will have a long random character name.

In the example above, you would point the DNS record api.<cluster_name>.<base_domain> to the public-lb-ip-v4 and *.apps.<cluster_name>.<base_domain> to the random character IP address.
In the extreme case that your customer does not allow wildcard DNS entries on their Enterprise DNS servers, the following DNS records MUST be created, pointing to the apps Loadbalancer, instead of *.apps.<cluster_name>.<base_domain>. The cluster will not finish deployment until these records are created.
oauth-openshift.apps.<cluster_name>.<base_domain>
console-openshift-console.apps.<cluster_name>.<base_domain>
downloads-openshift-console.apps.<cluster_name>.<base_domain>
canary-openshift-ingress-canary.apps.<cluster_name>.<base_domain>
alertmanager-main-openshift-monitoring.apps.<cluster_name>.<base_domain>
grafana-openshift-monitoring.apps.<cluster_name>.<base_domain>
prometheus-k8s-openshift-monitoring.apps.<cluster_name>.<base_domain>
thanos-querier-openshift-monitoring.apps.<cluster_name>.<base_domain>
User Provided Infrastructure
If your customer has any requirements that can't be met by the above solutions, we've provided an implementation in terraform. This implementation is meant to be modified to meet your customer needs, and requires working knowledge of terraform. Deploying this implementation with no modifications is the equivalent of running openshift-install create cluster, and should be avoided.