Queue manager storage
Audience: Architects, Application developers, Administrators
Timing: 20 minutes
Overview
In this topic, we will:
- Understand the difference between an ephemeral queue manager and a durable queue manager
- Understand how a queue manager uses stores its messages, transactions and other configuration
- Understand why external storage is important for a queue manager
- Understand how a queue manager uses block storage
- Configure a Queue manager to use external storage
By the end of this topic we'll have a good understanding of how to use external storage to create durable queue managers that are resilient to Kubernetes failures.
Introduction
Up to this point in the tutorial, we have created an ephemeral queue manager. That's because QM01 stores its configuration, queue files and log files on a file system whose lifecycle matches its pod; the file system is created when the pod is created, and is destroyed when the pod is stopped. It means that the messages stored in the queue files and log files are lost whenever the pod is stopped. This is shown in the left hand configuration in the diagram:
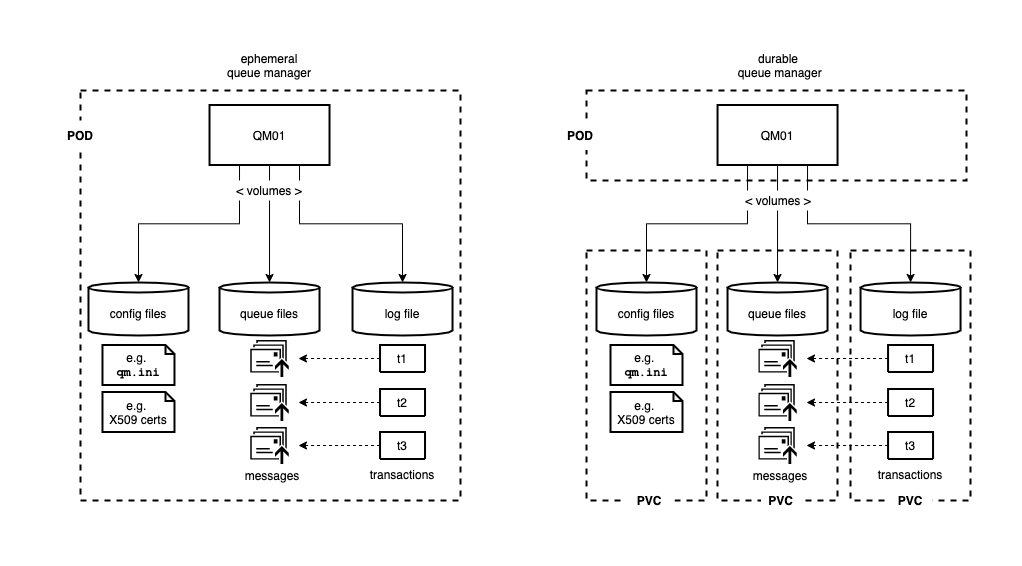
To create a durable queue manager, we place the queue manager its storage into different objects. Specifically, the queue manager remains in the pod, but its storage volumes are each placed in a persistent volume claims (PVC). As we'll see later in the tutorial, these PVCs survive a pod being stopped. Moreover, when a pod is restarted, it can reconnect to its PVCs and everything is restored to the point just before the failure.
Let's explore this in a little more detail.
Config, queue and log files
External storage is important
Why block storage?
Configuring a queue manager
-
Locate your GitOps repository
If necessary, change to the root of your GitOps repository, which is stored in the
$GIT_ROOTenvironment variable.Issue the following command to change to your GitOps repository:
2. Remove the existing queue manager in DEVcd $GIT_ROOT cd multi-tenancy-gitopsAccess the
0-bootstrap/single-cluster/3-apps/kustomization.yaml:cat 0-bootstrap/single-cluster/3-apps/kustomization.yamlOpen
0-bootstrap/single-cluster/3-apps/kustomization.yamland commentargocd/mq/dev.yamlas below:resources: #- argocd/ace/cicd.yaml #- argocd/ace/dev.yaml #- argocd/ace/stage.yaml #- argocd/ace/prod.yaml - argocd/mq/cicd.yaml #- argocd/mq/dev.yaml #- argocd/mq/stage.yaml #- argocd/mq/prod.yaml #- argocd/apic/cicd.yaml #- argocd/apic/dev.yaml #- argocd/apic/stage.yaml #- argocd/apic/prod.yaml #- argocd/apic/single-cluster.yaml #- argocd/apic/multi-cluster-app.yaml #- argocd/apic/multi-cluster-ops.yaml #- argocd/bookinfo/cicd.yaml #- argocd/bookinfo/dev.yaml #- argocd/bookinfo/stage.yaml #- argocd/bookinfo/prod.yaml #- argocd/soapserver/soapserver.yaml #- argocd/cp4a/cp4a.yaml patches: - target: group: argoproj.io kind: Application labelSelector: "gitops.tier.layer=applications" patch: |- - op: add path: /spec/source/repoURL value: https://github.com/prod-ref-guide/multi-tenancy-gitops-apps.git - op: add path: /spec/source/targetRevision value: master -
Push GitOps changes to GitHub
Let’s make these GitOps changes visible to the ArgoCD
bootstrap-single-clusterapplication via GitHub.Add all changes in the current folder to a git index, commit them, and push them to GitHub:
git add . git commit -s -m "Clean up dev queue manager" git push origin $GIT_BRANCHThe changes have now been pushed to your GitOps repository:
Enumerating objects: 11, done. Counting objects: 100% (11/11), done. Delta compression using up to 8 threads Compressing objects: 100% (6/6), done. Writing objects: 100% (6/6), 519 bytes | 519.00 KiB/s, done. Total 6 (delta 5), reused 0 (delta 0) remote: Resolving deltas: 100% (5/5), completed with 5 local objects. To https://github.com/prod-ref-guide/multi-tenancy-gitops.git 41724b3..8317788 master -> master -
Locate the
cipipelines in the web consoleLet's find the queue manager pipeline using the OpenShift web console.
Navigate to
Pipelines->Pipelinesin the left hand pane, and selectProject: ci, to show all pipelines in thecinamespace: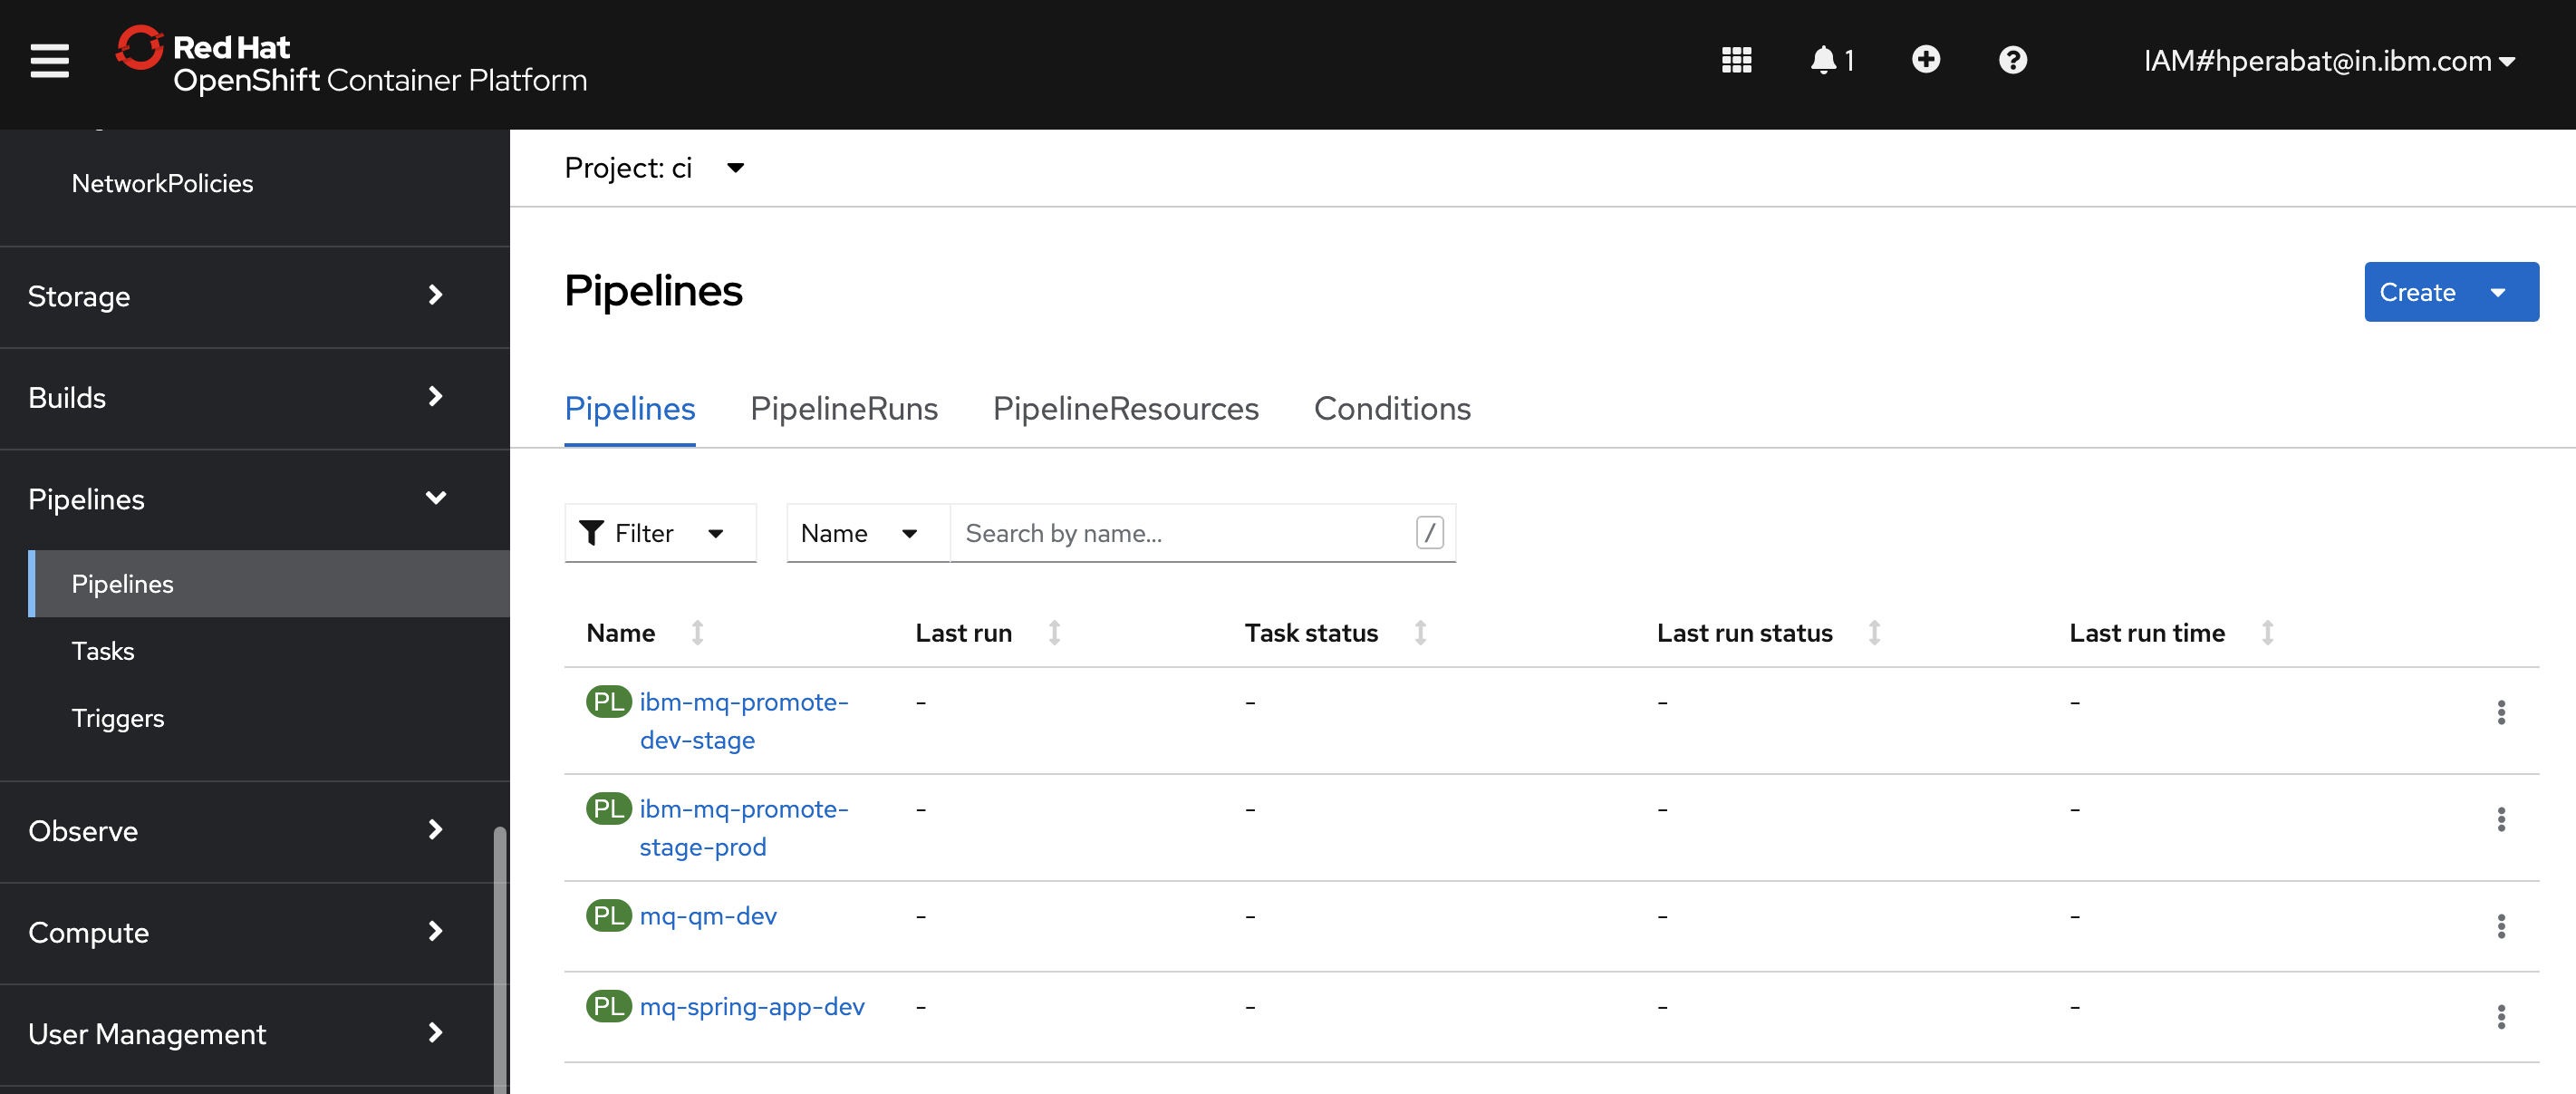
You can see all the pipelines that we installed into the
cinamespace in the previous chapter. We'll use different pipelines for different activities throughout the tutorial.For this topic, we're going to use the
mq-qm-devpipeline. When applied to theQM1source repository, this pipeline will build and test a new instance ofQM1ready for deployment to thedevnamespace. -
The
mq-qm-devqueue manager pipelineSelect the
mq-qm-devpipeline from the list of all pipelines: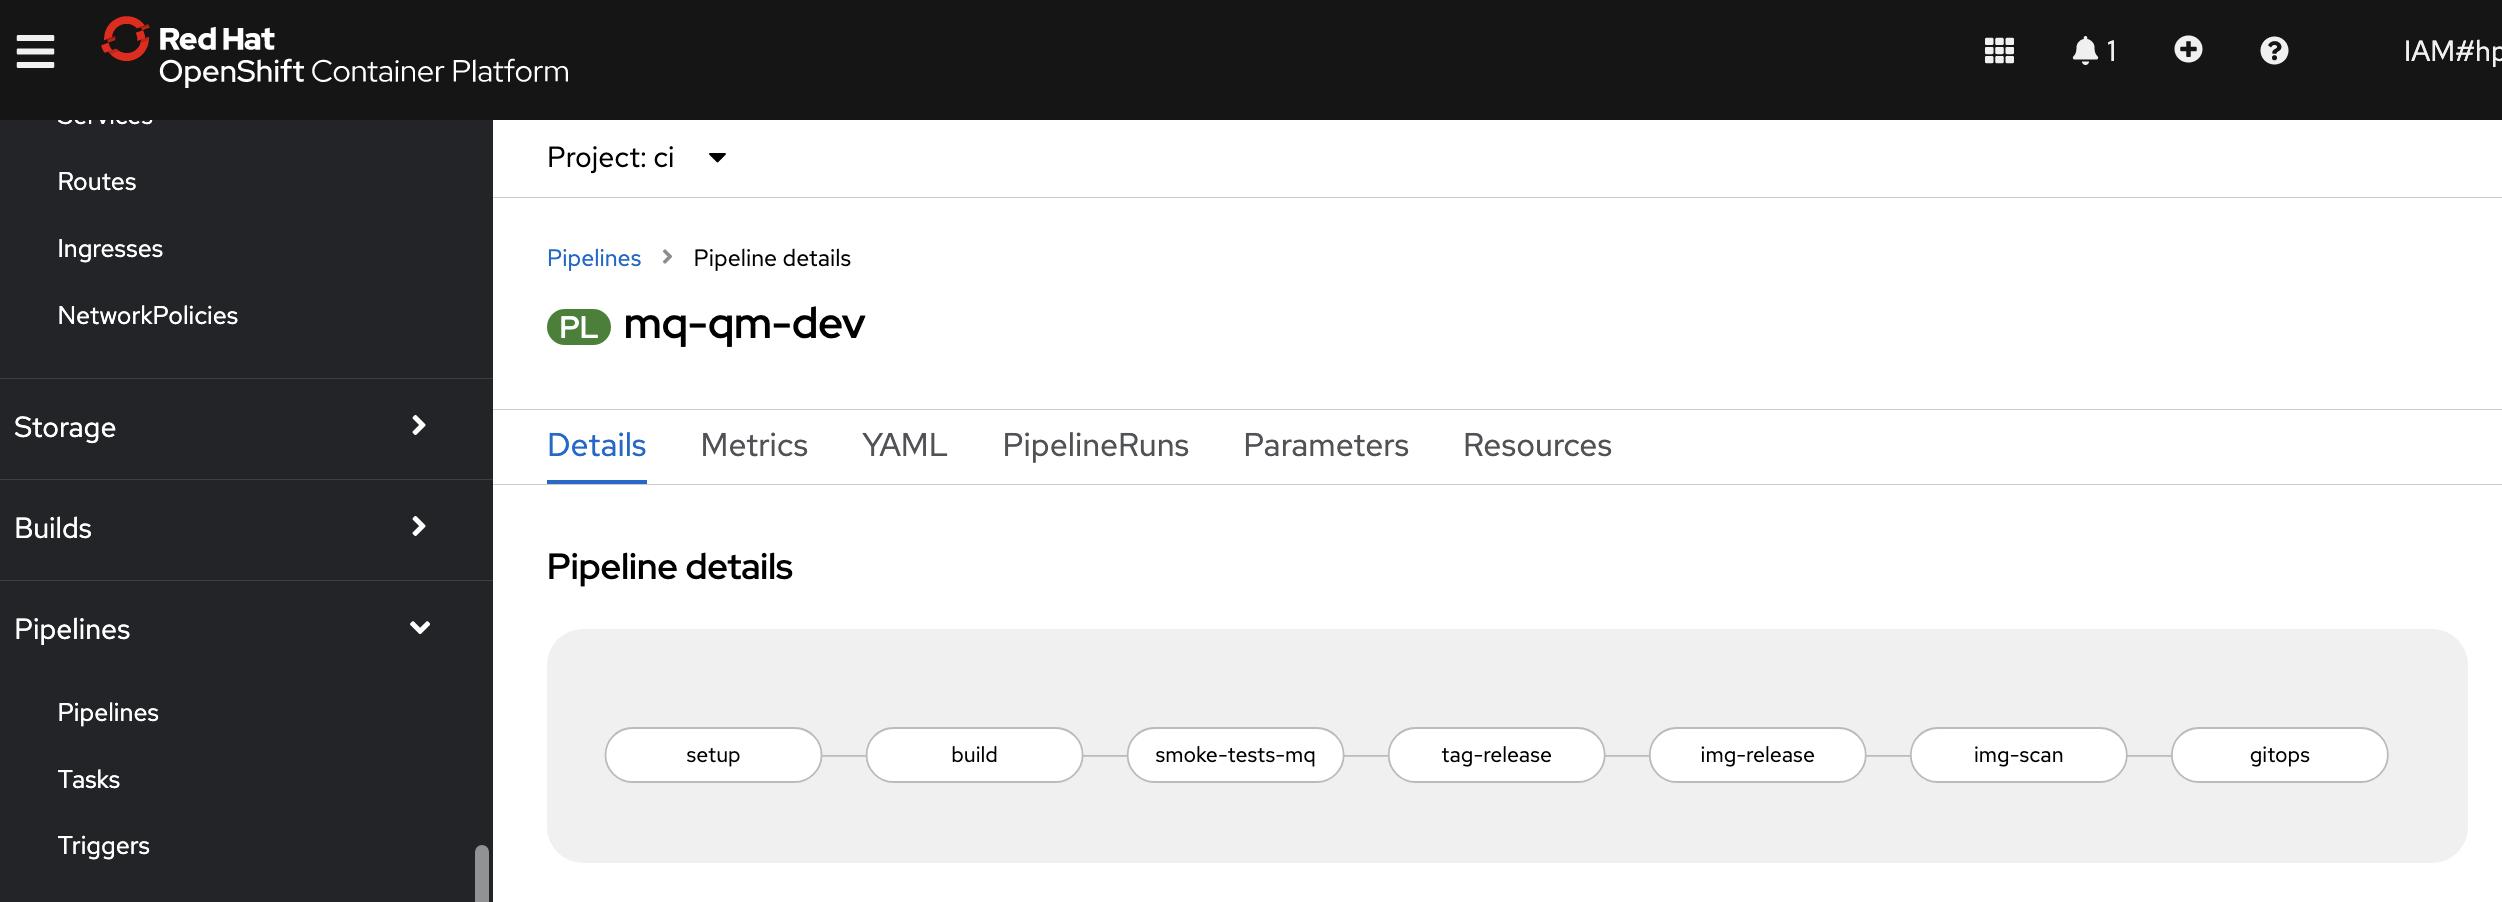
Like all pipelines,
mq-qm-devis composed from a set of tasks:setupbuildsmoke-tests-mqtag-releaseimage-releaseimg-scangitops
The task name often provides a strong hint of each task's specific function. We'll examine some of these tasks in detail as the pipeline runs.
-
The
occommand as an alternative to the Web consoleAs well as using the OpenShift web console, you can also interact with pipeline using the
ocortektoncommands.Ensure you're logged in to cluster, and issue the following command to list the
mq-qm-devpipeline details:oc get pipeline mq-qm-dev -n ciwhich shows a brief summary of the pipeline:
NAME AGE mq-qm-dev 21hYou can get more detail by adding the
-o yamloption; we'll do that later.We use the command line and the web console in the tutorial so that you become familiar with both. As a general rule, you can do the same things in the command line as you can with the web console. The web console tends to be better for simple interactive tasks; the command line tends to be better for scripting and bulk tasks.
-
Configure your pipeline run
Every time we run the
mq-qm-devpipeline, we create a new pipeline run. We can think of a pipeline run as an instance of a pipeline.PipelineandPipelineRunare new custom resources that were added to the cluster when we installed Tekton.In
pipeline detailsview above, you'll see anActionsbutton. SelectStartto configure a pipeline run.You'll be presented with the following dialog:

The supplied arguments allow the user of the pipeline to configure its behavior. For example, a user can use this pipeline with different queue manager source repositories.
Configure the run as follows:
- Set
git-urlto your fork of themq-qm01repository - Set
git-revisiontomaster. (Later in the tutorial, we will use a new branch.) - Set
scan-image: false(temporary fix while issues with UBI are resolved) - Set
storagetotrue.
Hit
Startto start the pipeline run.You can also use the command line to run a pipeline; we'll explore that option later.
- Set
-
Watch a pipeline run executing
The pipeline run has now started.
Notice how the view changes to
Pipeline Run details: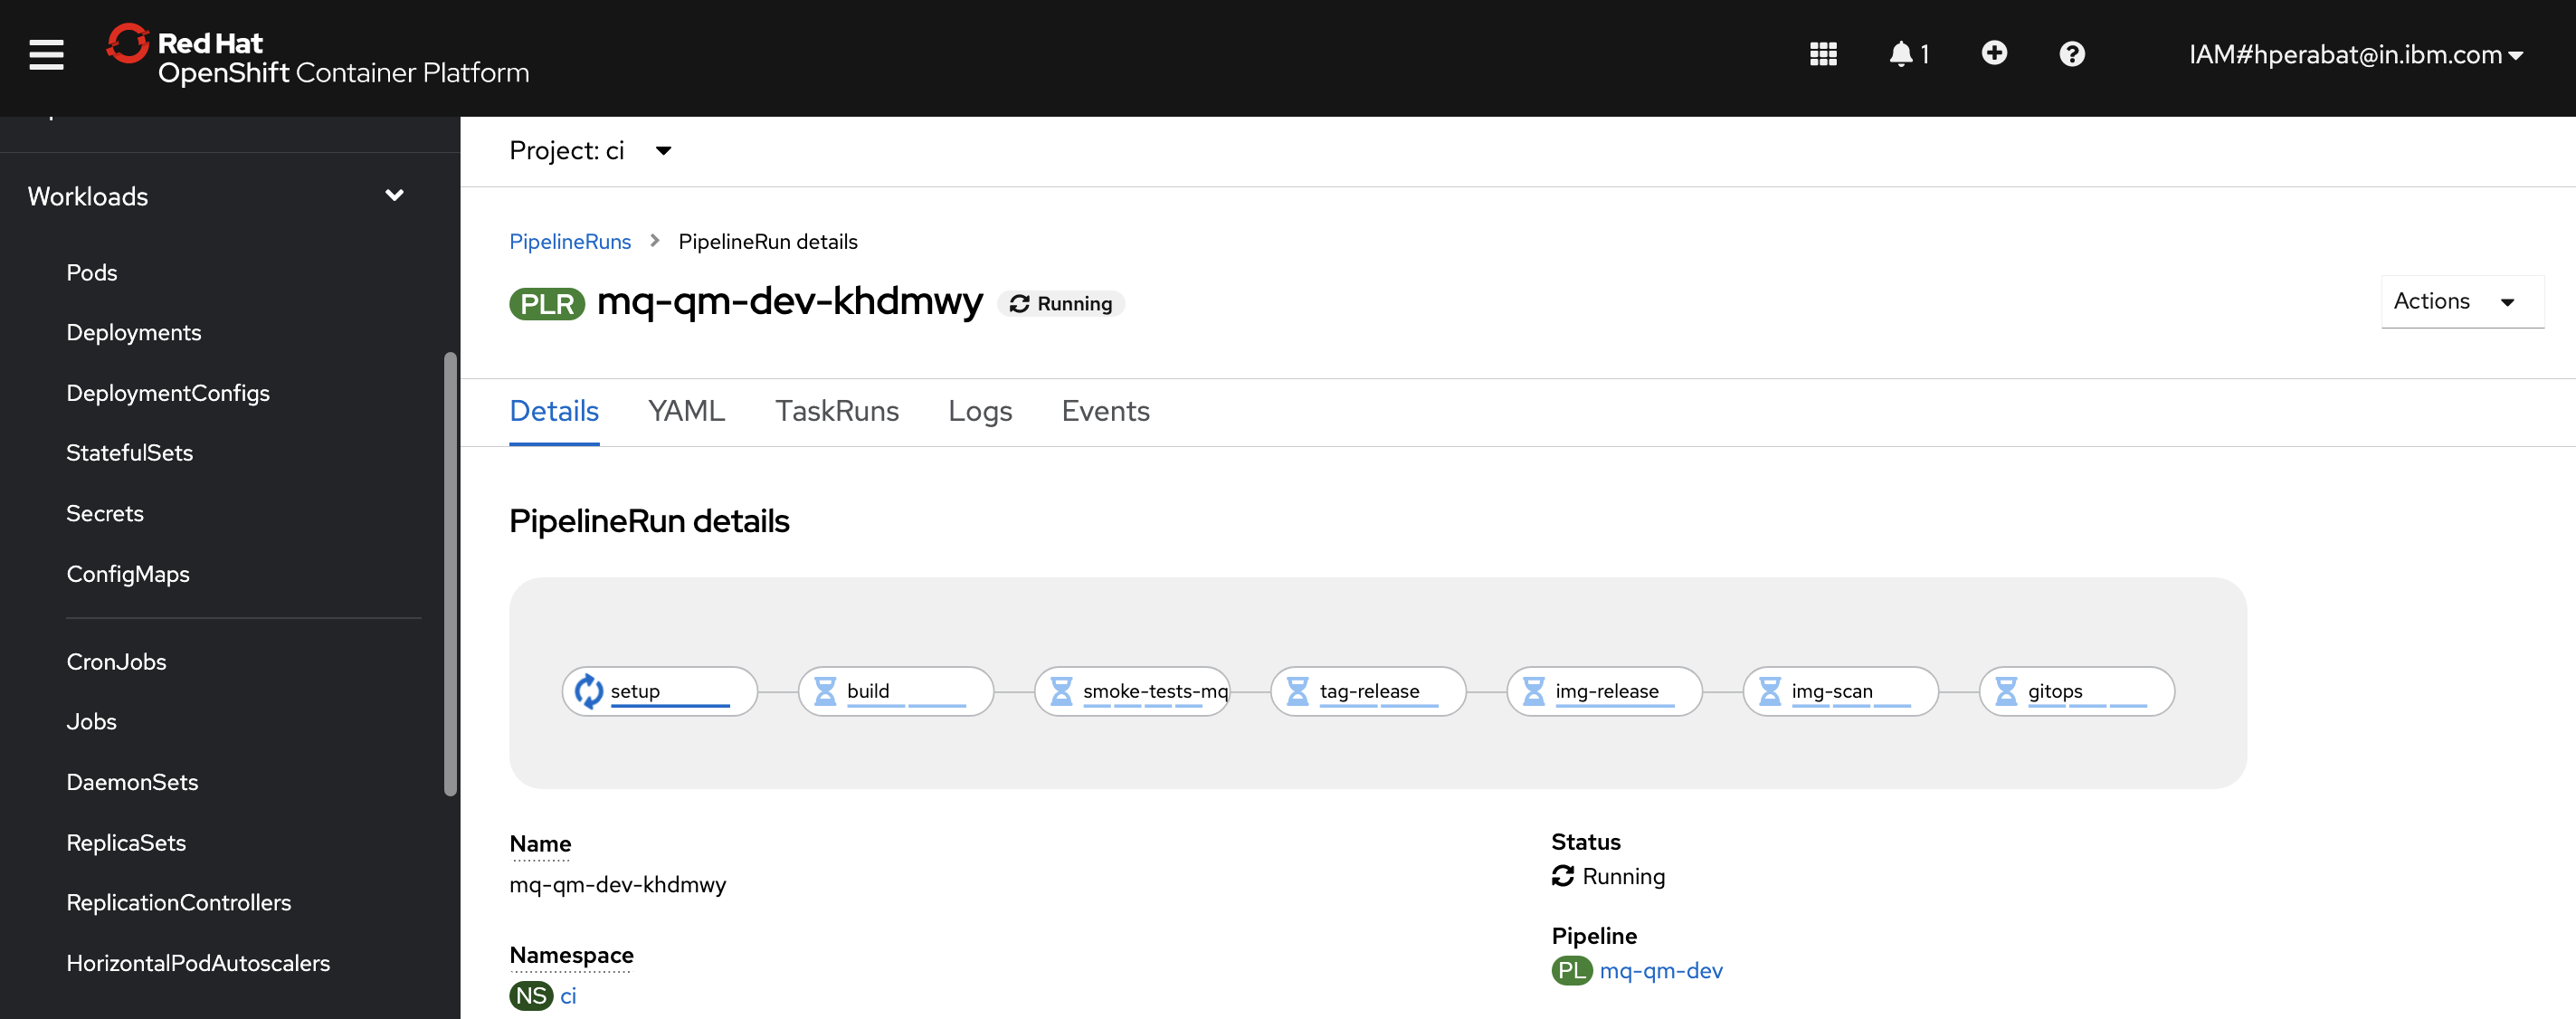
We're now looking at the live output from a pipeline run, rather than the pipeline used to create the run.
Notice that the pipeline run name
mq-qm-dev-khdmwyis based on the pipeline name -- with a unique suffix. Every new pipeline run will have a unique name.See also how the first
setuptask is running, while the remaining tasks are waiting to start.Hover over
setuporbuildtask and you will see the steps that comprise it. -
Watch pipeline steps complete
As the pipeline run proceeds, notice the
buildstep complete and thesmoke-tests-mqstep start: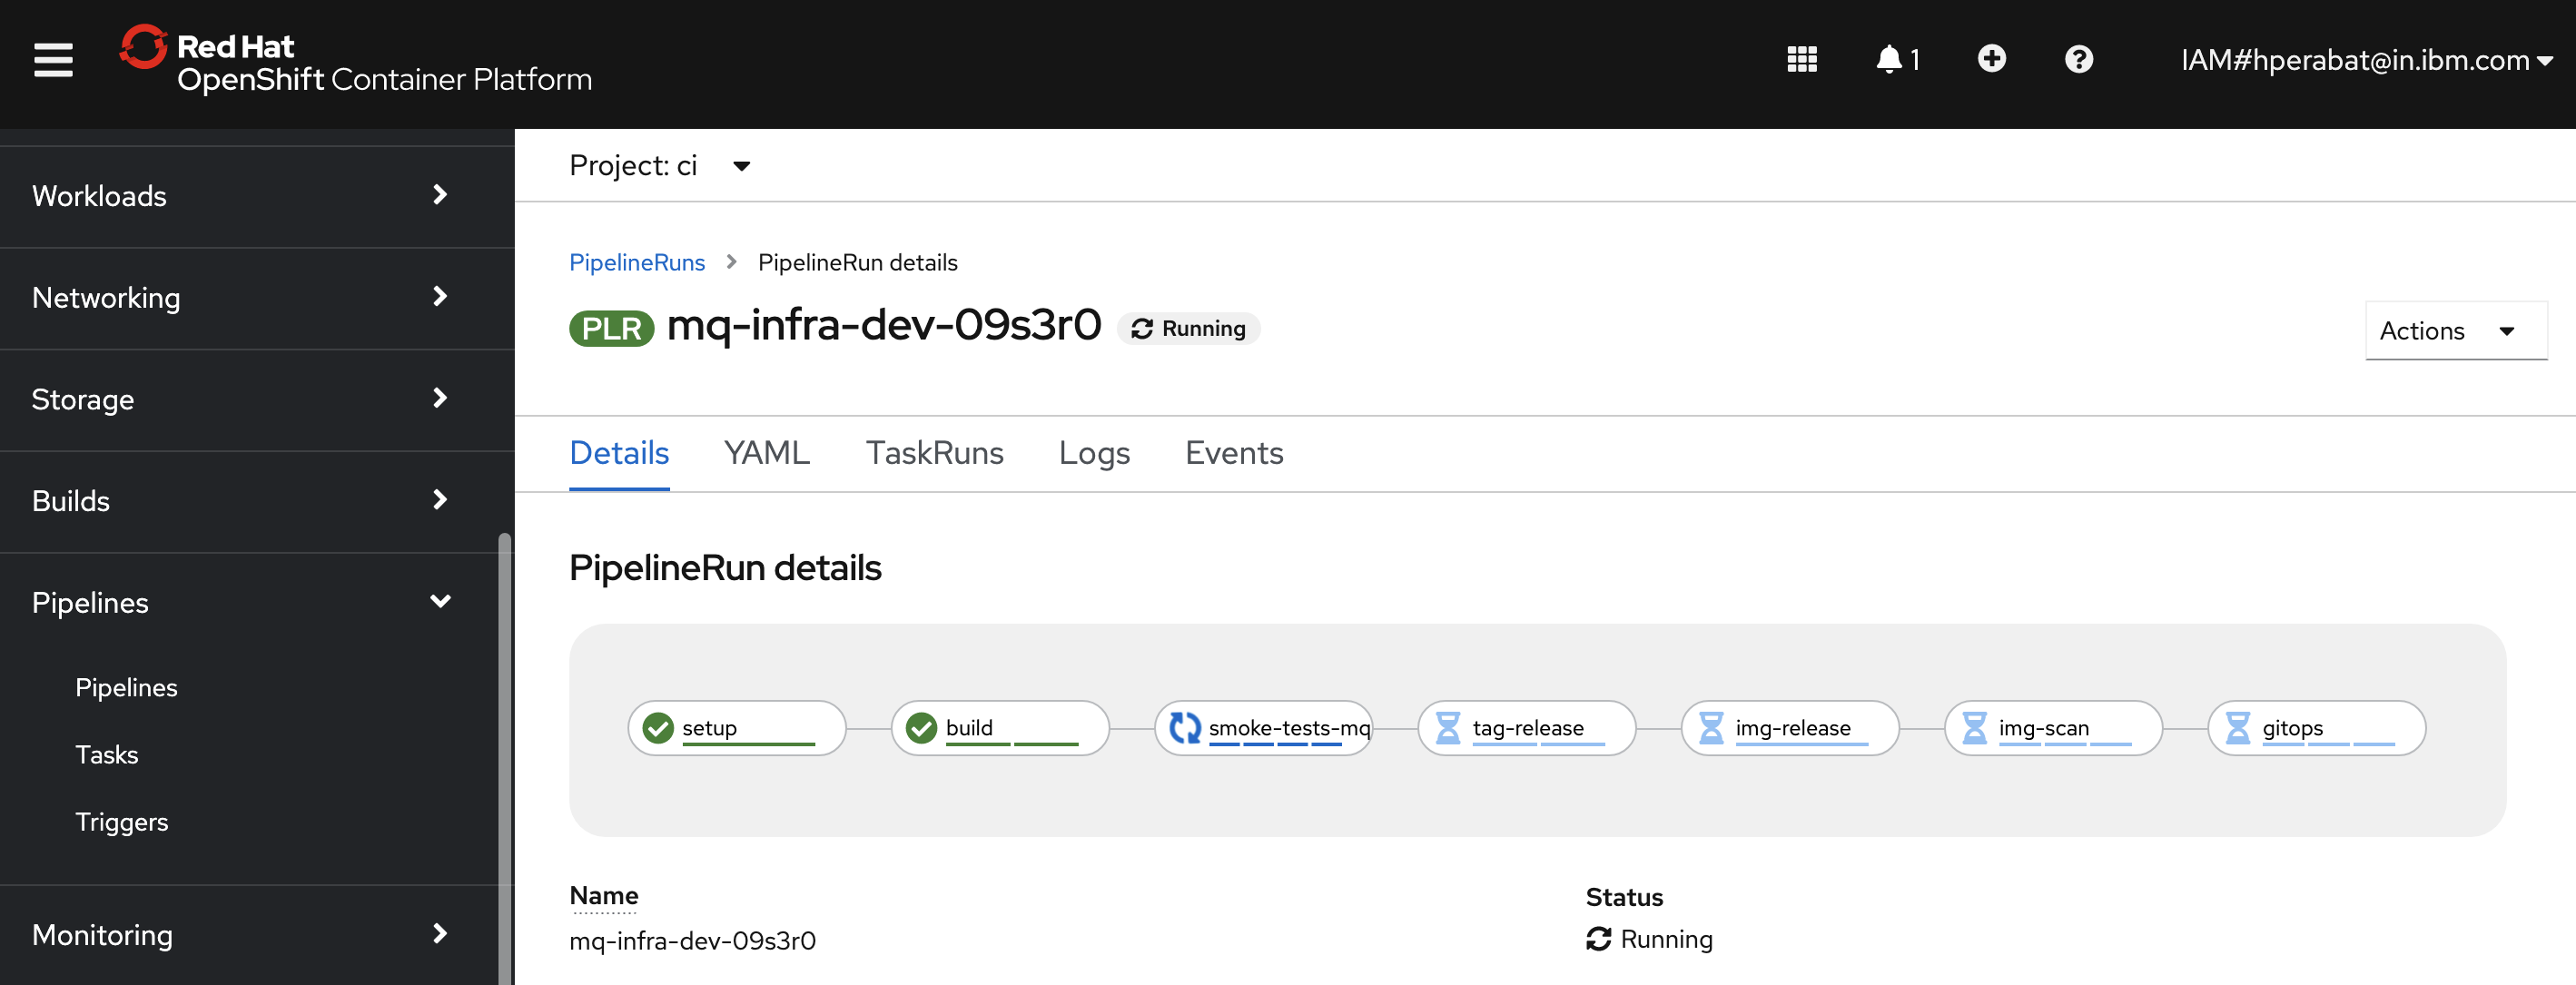
This pipeline will take about 15 minutes to complete. Let us wait for the pipeline completion.
-
Locate your GitOps repository
If necessary, change to the root of your GitOps repository, which is stored in the
$GIT_ROOTenvironment variable.Issue the following command to change to your GitOps repository:
cd $GIT_ROOT cd multi-tenancy-gitops -
Re-deploy the queue manager with storage enabled in DEV
Access the
0-bootstrap/single-cluster/3-apps/kustomization.yaml:cat 0-bootstrap/single-cluster/3-apps/kustomization.yamlOpen
0-bootstrap/single-cluster/3-apps/kustomization.yamland commentargocd/mq/dev.yamlas below:resources: #- argocd/ace/cicd.yaml #- argocd/ace/dev.yaml #- argocd/ace/stage.yaml #- argocd/ace/prod.yaml - argocd/mq/cicd.yaml - argocd/mq/dev.yaml #- argocd/mq/stage.yaml #- argocd/mq/prod.yaml #- argocd/apic/cicd.yaml #- argocd/apic/dev.yaml #- argocd/apic/stage.yaml #- argocd/apic/prod.yaml #- argocd/apic/single-cluster.yaml #- argocd/apic/multi-cluster-app.yaml #- argocd/apic/multi-cluster-ops.yaml #- argocd/bookinfo/cicd.yaml #- argocd/bookinfo/dev.yaml #- argocd/bookinfo/stage.yaml #- argocd/bookinfo/prod.yaml #- argocd/soapserver/soapserver.yaml #- argocd/cp4a/cp4a.yaml patches: - target: group: argoproj.io kind: Application labelSelector: "gitops.tier.layer=applications" patch: |- - op: add path: /spec/source/repoURL value: https://github.com/prod-ref-guide/multi-tenancy-gitops-apps.git - op: add path: /spec/source/targetRevision value: master -
Push GitOps changes to GitHub
Let’s make these GitOps changes visible to the ArgoCD
bootstrap-single-clusterapplication via GitHub.Add all changes in the current folder to a git index, commit them, and push them to GitHub:
git add . git commit -s -m "Redeploy applications in dev" git push origin $GIT_BRANCHThe changes have now been pushed to your GitOps repository:
Enumerating objects: 11, done.
Counting objects: 100% (11/11), done.
Delta compression using up to 8 threads
Compressing objects: 100% (6/6), done.
Writing objects: 100% (6/6), 519 bytes | 519.00 KiB/s, done.
Total 6 (delta 5), reused 0 (delta 0)
remote: Resolving deltas: 100% (5/5), completed with 5 local objects.
To https://github.com/prod-ref-guide/multi-tenancy-gitops.git
   41724b3..8317788  master -> master