Continuous updates
Audience: Architects, Application developers, Administrators
Timing: 50 minutes
Overview
In the previous topic of this chapter, we ran the queue manager pipeline to build a queue manager ready for deployment. We then deployed it using ArgoCD. Finally, we tested it using the MQ web console and MQ command line.
In this topic, we're going to make this integration and deployment processes fully automatic. A change to the queue manager source repository will automatically result in a pipeline run for it. If the pipeline is successful, new queuemanager resources will be built and automatically deployed by ArgoCD into the dev namespace. This deployment will update the previously active instance of QM1. To recap, the whole process will be automatic from end-to-end.
Look at the following diagram:
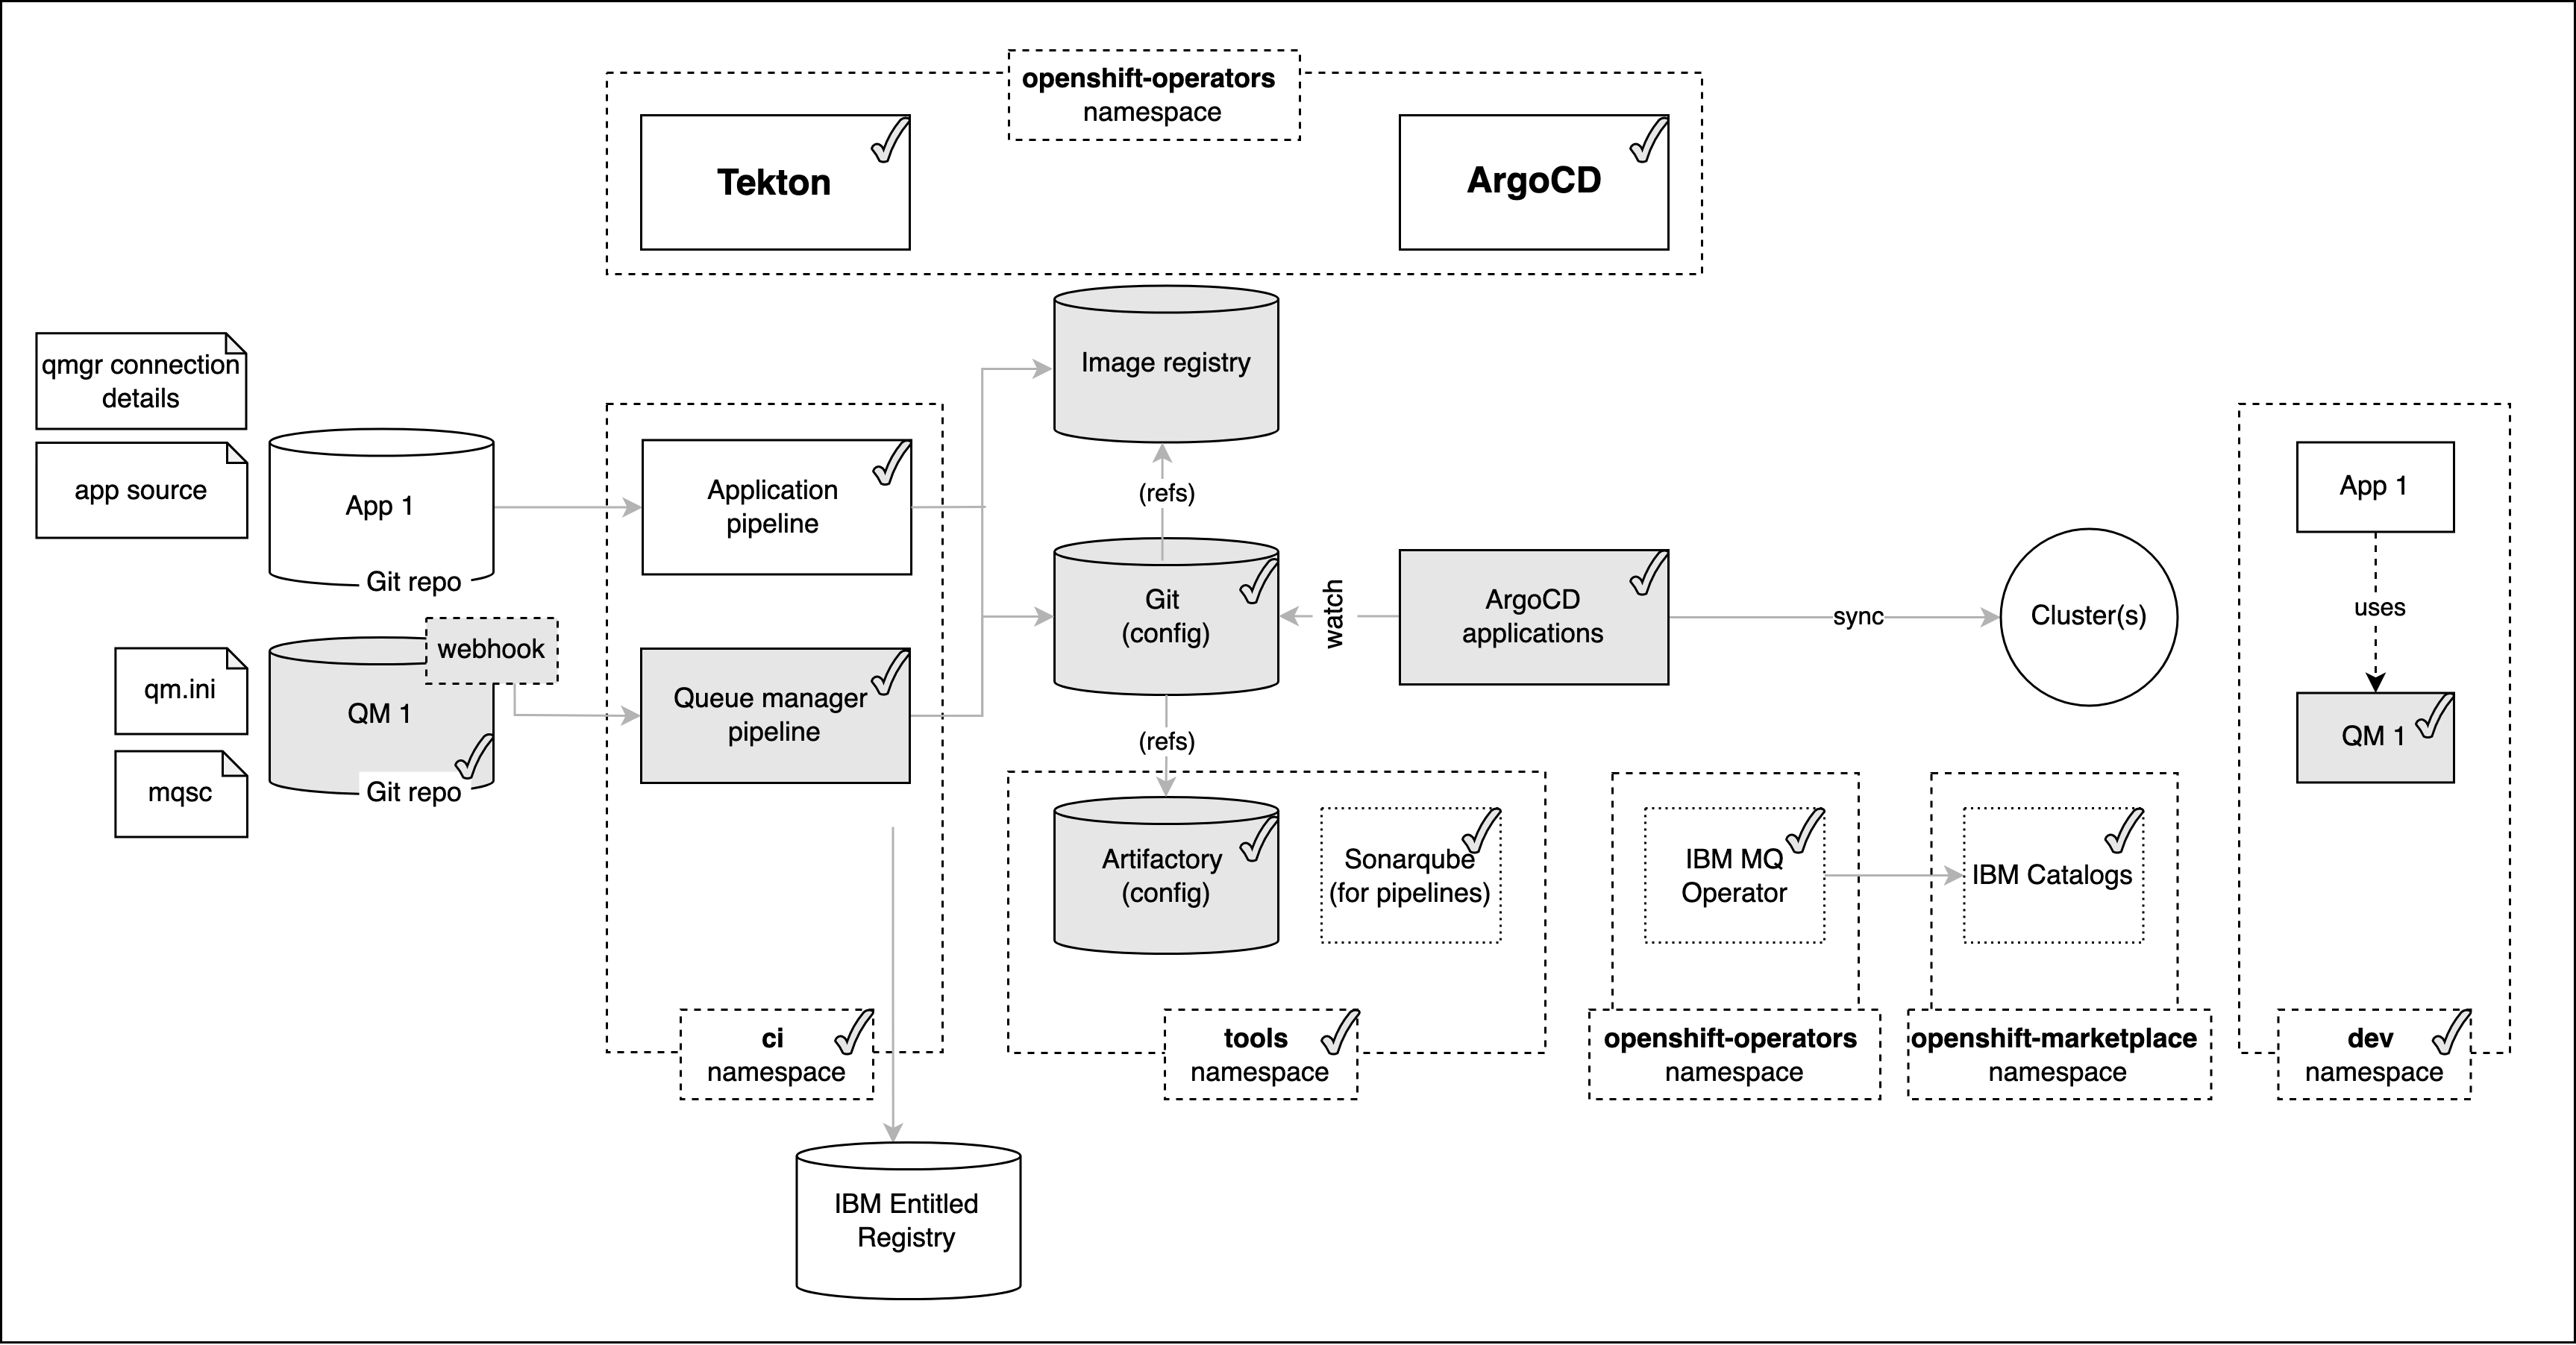
We've already seen most of the highlighted components. Notice that we've added a webhook for the source repository. This web hook will be triggered every time the QM1 repository changes and the notification will cause the queue manager pipeline to run automatically.
As before, a successful pipeline run will result in a new image being stored in the Image registry, and new QueueManager resources in the GitOps repository. The already active ArgoCD application will apply the GitOps queuemanager resources to the cluster resulting in an updated instance of QM1.
In this topic, we're going to:
- Set up a webhook for queue manager source repository.
- Make changes to the queue manager source code and push the updates to the source repository.
- Confirm the new pipeline run and ArgoCD deployment.
- Verify the change made to
QM1.
By the end of this topic we'll have a fully functioning CICD set up in place to deploy the latest changes made to QueueManager to the cluster in an automated fashion.
Pre-requisites
Before attempting this topic, you should have successfully completed the previous topic.
Set up the webhook and its processing
A webhook is useful because it allows a system like GitHub to inform another component -- such as our queue manager pipeline -- that a particular repository owned by a user or organization has changed. Importantly, a webhook provides a loosely coupled interaction; GitHub and our pipeline are unaware of each other -- their interaction is mediated by the webhook and some other components that we'll now set up.
In this topic section we're going to set up the components we need for our webhook:

A GitHub event containing information about the repository change is generated by our webhook and sent to an event listener. In Kubernetes, this event listener comprises a normal route and service front-ending a Tekton eventlistener custom resource. The event listener is driven by the webhook, and runs the pipeline using a Tekton trigger. A trigger has two components, a triggertemplate that specifies the pipeline to run, and a triggerbinding that allows the trigger event data to be presented to the pipeline run in the order it expects.
A webhook design looks a little more complex than directly linking GitHub to our pipeline, but as we'll see, this design is much more flexible. This short article provides a nice overview on how to use webhooks with OpenShift.
Your GitOps apps repository contains a sample event listener. Let's customize this sample with the relevant values for our cluster. We'll then deploy the event listener resources and trigger resources to the cluster using GitOps.
-
Select the GitOps terminal window
Return to the terminal window you're using for the
multi-tenancy-gitops-appsGitOps repository.We're going to make use of a script in the sample GitOps apps repository that makes use of the
$GIT_ORGand$GIT_BRANCH_QM1environment variables you've seen earlier. Previously we used them in themq-qm01terminal window; now we're going to use this in themulti-tenancy-gitops-appsterminal window.Again, make sure in you're in the
multi-tenancy-gitops-appsterminal window.Issue the following command to ensure you're in the correct starting folder:
cd $GIT_ROOT/multi-tenancy-gitops-apps -
Set up the
$GIT_ORGand$GIT_BRANCH_QM1environment variablesLet's set up the environment variables that are used by the customization script.
Replace
<git-org>in the following command with your GitHub user name:export GIT_ORG=<git-org>Then create the
$GIT_BRANCH_QM1environment variable:export GIT_BRANCH_QM1=qm1-$GIT_ORGVerify that your
$GIT_USERand$GIT_BRANCH environmentvariables are set:echo $GIT_ORG echo $GIT_BRANCH_QM1For example:
(base) anthonyodowd/git/multi-tenancy-gitops echo GIT_ORG prod-ref-guide (base) anthonyodowd/git/multi-tenancy-gitops echo GIT_BRANCH_QM1 qm1-prod-ref-guide -
The sample event listener
The GitOps repository contains a template for the event listener.
Issue the following command to view the template of the event listener YAML:
cat mq/environments/ci/eventlisteners/cntk-event-listener.yaml_templateapiVersion: triggers.tekton.dev/v1alpha1 kind: EventListener metadata: labels: app: cnkt-event-listener name: cnkt-event-listener spec: serviceAccountName: pipeline triggers: - name: mq-qm01-dev interceptors: - ref: name: "cel" params: - name: "filter" value: "header.match('X-GitHub-Event', 'push') && body.ref == 'refs/heads/${GIT_BRANCH_QM1}' && body.repository.full_name == '${GIT_ORG}/mq-qm01'" bindings: - ref: cnkt-trigger-binding template: ref: mq-qm-dev # - name: mq-spring-app-dev # interceptors: # - ref: # name: "cel" # params: # - name: "filter" # value: "header.match('X-GitHub-Event', 'push') && body.ref == 'refs/heads/${GIT_BRANCH_SPRING}' && body.repository.full_name == '${GIT_ORG}/mq-spring-app'" # bindings: # - ref: cnkt-trigger-binding # template: # ref: mq-spring-app-devIf you are using OpenShift 4.7, replace the above template with the following:
apiVersion: triggers.tekton.dev/v1alpha1 kind: EventListener metadata: labels: app: cnkt-event-listener name: cnkt-event-listener spec: serviceAccountName: pipeline triggers: - bindings: - kind: TriggerBinding ref: cnkt-trigger-binding interceptors: - cel: filter: header.match('X-GitHub-Event', 'push') && body.ref == 'refs/heads/${GIT_BRANCH_QM1}' && body.repository.full_name == '${GIT_ORG}/mq-qm01' name: mq-qm01-dev template: ref: mq-qm-dev # - bindings: # - kind: TriggerBinding # ref: cnkt-trigger-binding # interceptors: # - cel: # filter: header.match('X-GitHub-Event', 'push') && body.ref == 'refs/heads/${GIT_BRANCH_SPRING}' && body.repository.full_name == '${GIT_ORG}/mq-spring-app' # name: mq-spring-app-dev # template: # ref: mq-spring-app-dev -
Customize the event listeners
Create the YAML for the event listener as follows.
Issue the following command:
cd mq/environments/ci/eventlisteners/
sh ./cntk-event-listener.sh
cd ../../../../
Once, this script is run successfully, you should see a new file named
cntk-event-listener.yaml. -
Exploring the event listener customization
Let's examine a customized event listener in your local clone. We'll see how it maps to our diagram above, and has been customized for our source repository.
Issue the following command:
cat mq/environments/ci/eventlisteners/cntk-event-listener.yamlto show the customized event listener:
apiVersion: triggers.tekton.dev/v1alpha1
kind: EventListener
metadata:
  labels:
    app: cnkt-event-listener
  name: cnkt-event-listener
spec:
  serviceAccountName: pipeline
  triggers:
  - name: mq-qm01-dev
    interceptors:
      - ref:
          name: "cel"
        params:
        - name: "filter"
          value: "header.match('X-GitHub-Event', 'push') && body.ref == 'refs/heads/qm1-GitOps-MQ-23052022' && body.repository.full_name == 'prod-ref-guide/mq-qm01'"
    bindings:
      - ref: cnkt-trigger-binding
    template:
      ref: mq-qm-dev
  # - name: mq-spring-app-dev
  #   interceptors:
  #     - ref:
  #         name: "cel"
  #       params:
  #       - name: "filter"
  #         value: "header.match('X-GitHub-Event', 'push') && body.ref == 'refs/heads/master' && body.repository.full_name == 'prod-ref-guide/mq-spring-app'"
  #   bindings:
  #     - ref: cnkt-trigger-binding
  #   template:
  #     ref: mq-spring-app-dev
If using OpenShift 4.7, it will be as follows:
apiVersion: triggers.tekton.dev/v1alpha1
kind: EventListener
metadata:
  labels:
    app: cnkt-event-listener
  name: cnkt-event-listener
spec:
  serviceAccountName: pipeline
  triggers:
  - bindings:
    - kind: TriggerBinding
      ref: cnkt-trigger-binding
    interceptors:
    - cel:
        filter: header.match('X-GitHub-Event', 'push') && body.ref == 'refs/heads/qm1-GitOps-MQ-23052022' && body.repository.full_name == 'prod-ref-guide/mq-qm01'
    name: mq-qm01-dev
    template:
      ref: mq-qm-dev
  # - bindings:
  #   - kind: TriggerBinding
  #     ref: cnkt-trigger-binding
  #   interceptors:
  #   - cel:
  #       filter: header.match('X-GitHub-Event', 'push') && body.ref == 'refs/heads/qm1-prod-ref-guide' && body.repository.full_name == '${GIT_ORG}/mq-spring-app'
  #   name: mq-spring-app-dev
  #   template:
  #     ref: mq-spring-app-dev
An event listener can produce one or more triggers as specified by the list
spec.triggers:. Our event listener produces a trigger calledmq-qm-dev. This trigger comprises the templatemq-qm-devand template bindingcntk-trigger-binding.It also has an interceptor; the trigger will only be called if
filter:evaluates totrue. Even though we haven't explored interceptors yet,filter value of the interceptor:is clearly filtering GitHubpushevents for theprod-ref-guide/mq-qm01repository, i.e. the source repository forQM1. It was the customization script that made this customization.You can read more about event listeners, triggers and interceptors here.
-
Push GitOps changes to GitHub
Let’s make these GitOps changes and push them.
Add all changes in the current folder to a git index, commit them, and push them to GitHub:
git add .
git commit -s -m "Customizing the mq-qm01 event trigger"
git push origin $GIT_BRANCH
The changes have now been pushed to your GitOps repository:
Enumerating objects: 14, done. Counting objects: 100% (14/14), done. Delta compression using up to 8 threads Compressing objects: 100% (8/8), done. Writing objects: 100% (8/8), 987 bytes | 987.00 KiB/s, done. Total 8 (delta 6), reused 0 (delta 0) remote: Resolving deltas: 100% (6/6), completed with 6 local objects. To https://github.com/prod-ref-guide/multi-tenancy-gitops-apps.git 92922de..3f4be1f master -> master -
Activate the webhook components
Now that we've customized the event listener for our source repository, let's activate all the components necessary to process our webhook: the route, event listener, trigger template and trigger binding.
Open the
kustomization.yamlthat is undermq/environments/ci/. This contains all the resources that belong to thecinamespace.cat mq/environments/ci/kustomization.yamlresources: #- certificates/ci-mq-client-certificate.yaml #- certificates/ci-mq-server-certificate.yaml - configmaps/gitops-repo-configmap.yaml #- eventlisteners/cntk-event-listener.yaml #- triggerbindings/cntk-binding.yaml #- triggertemplates/mq-qm-dev.yaml #- triggertemplates/mq-spring-app-dev.yaml #- pipelines/mq-metric-samples-dev-pipeline.yaml - pipelines/ibm-test-pipeline-for-dev.yaml - pipelines/ibm-test-pipeline-for-stage.yaml #- pipelines/java-maven-dev-pipeline.yaml - pipelines/mq-pipeline-dev.yaml - pipelines/mq-spring-app-dev-pipeline.yaml - roles/custom-pipeline-sa-clusterrole.yaml - roles/custom-pipeline-sa-role.yaml - roles/custom-ci-pipeline-sa-rolebinding.yaml - roles/custom-dev-pipeline-sa-rolebinding.yaml - roles/custom-staging-pipeline-sa-rolebinding.yaml - roles/custom-prod-pipeline-sa-rolebinding.yaml #- routes/cntk-route.yaml #- secrets/artifactory-access-secret.yaml - secrets/git-credentials-secret.yaml - secrets/ibm-entitled-registry-credentials-secret.yaml #- secrets/mq-client-jks-password-secret.yaml - tasks/10-gitops.yaml - tasks/10-gitops-for-mq.yaml - tasks/10-gitops-promotion.yaml - tasks/11-app-name.yaml - tasks/12-functional-tests.yaml - tasks/13-jmeter-performance-test.yaml - tasks/13-cphtestp-performance-test.yaml - tasks/4-smoke-tests-mq.yaml - tasks/4-smoke-tests.yaml - tasks/ibm-build-tag-push-v2-6-13.yaml - tasks/ibm-helm-release-v2-6-13.yaml - tasks/ibm-img-release-v2-6-13.yaml - tasks/ibm-img-scan-v2-6-13.yaml - tasks/ibm-java-maven-test-v2-6-13.yaml - tasks/ibm-setup-v2-6-13.yaml - tasks/ibm-tag-release-v2-6-13.yaml #- tasks/mq-metrics-build-tag-push.yaml # Automated promotion process triggers # - triggertemplates/mq-qm-dev-triggertemplate.yaml # - eventlisteners/mq-qm-dev-eventlistener.yaml # - routes/mq-qm-dev-route.yaml # # - triggertemplates/mq-spring-app-dev-triggertemplate.yaml # - eventlisteners/mq-spring-app-dev-eventlistener.yaml # - routes/mq-spring-app-dev-route.yaml # # - triggertemplates/mq-qm-stage-triggertemplate.yaml # - eventlisteners/mq-qm-stage-eventlistener.yaml # - routes/mq-qm-stage-route.yaml # # - triggertemplates/mq-spring-app-stage-triggertemplate.yaml # - eventlisteners/mq-spring-app-stage-eventlistener.yaml # - routes/mq-spring-app-stage-route.yamlOpen this file in your editor and uncomment the below resources.
- eventlisteners/cntk-event-listener.yaml
- triggerbindings/cntk-binding.yaml
- triggertemplates/mq-qm-dev.yaml
- routes/cntk-route.yaml
You will have the following resources un-commented:
resources: #- certificates/ci-mq-client-certificate.yaml #- certificates/ci-mq-server-certificate.yaml - configmaps/gitops-repo-configmap.yaml - eventlisteners/cntk-event-listener.yaml - triggerbindings/cntk-binding.yaml - triggertemplates/mq-qm-dev.yaml #- triggertemplates/mq-spring-app-dev.yaml #- pipelines/mq-metric-samples-dev-pipeline.yaml - pipelines/ibm-test-pipeline-for-dev.yaml - pipelines/ibm-test-pipeline-for-stage.yaml #- pipelines/java-maven-dev-pipeline.yaml - pipelines/mq-pipeline-dev.yaml - pipelines/mq-spring-app-dev-pipeline.yaml - roles/custom-pipeline-sa-clusterrole.yaml - roles/custom-pipeline-sa-role.yaml - roles/custom-ci-pipeline-sa-rolebinding.yaml - roles/custom-dev-pipeline-sa-rolebinding.yaml - roles/custom-staging-pipeline-sa-rolebinding.yaml - roles/custom-prod-pipeline-sa-rolebinding.yaml - routes/cntk-route.yaml #- secrets/artifactory-access-secret.yaml - secrets/git-credentials-secret.yaml - secrets/ibm-entitled-registry-credentials-secret.yaml #- secrets/mq-client-jks-password-secret.yaml - tasks/10-gitops.yaml - tasks/10-gitops-for-mq.yaml - tasks/10-gitops-promotion.yaml - tasks/11-app-name.yaml - tasks/12-functional-tests.yaml - tasks/13-jmeter-performance-test.yaml - tasks/13-cphtestp-performance-test.yaml - tasks/4-smoke-tests-mq.yaml - tasks/4-smoke-tests.yaml - tasks/ibm-build-tag-push-v2-6-13.yaml - tasks/ibm-helm-release-v2-6-13.yaml - tasks/ibm-img-release-v2-6-13.yaml - tasks/ibm-img-scan-v2-6-13.yaml - tasks/ibm-java-maven-test-v2-6-13.yaml - tasks/ibm-setup-v2-6-13.yaml - tasks/ibm-tag-release-v2-6-13.yaml #- tasks/mq-metrics-build-tag-push.yaml # Automated promotion process triggers # - triggertemplates/mq-qm-dev-triggertemplate.yaml # - eventlisteners/mq-qm-dev-eventlistener.yaml # - routes/mq-qm-dev-route.yaml # # - triggertemplates/mq-spring-app-dev-triggertemplate.yaml # - eventlisteners/mq-spring-app-dev-eventlistener.yaml # - routes/mq-spring-app-dev-route.yaml # # - triggertemplates/mq-qm-stage-triggertemplate.yaml # - eventlisteners/mq-qm-stage-eventlistener.yaml # - routes/mq-qm-stage-route.yaml # # - triggertemplates/mq-spring-app-stage-triggertemplate.yaml # - eventlisteners/mq-spring-app-stage-eventlistener.yaml # - routes/mq-spring-app-stage-route.yaml -
Update the GitOps repository
Let’s commit these changes to make the event listener and trigger resources active in the cluster.
Issue the following command:
git add mq/environments/ci/kustomization.yaml
git commit -s -m "Add qmgr pipeline webhook"
git push origin $GIT_BRANCH
which shows that the changes are pushed to GitHub:
Enumerating objects: 11, done.
Counting objects: 100% (11/11), done.
Delta compression using up to 8 threads
Compressing objects: 100% (6/6), done.
Writing objects: 100% (6/6), 522 bytes | 522.00 KiB/s, done.
Total 6 (delta 5), reused 0 (delta 0)
remote: Resolving deltas: 100% (5/5), completed with 5 local objects.
To https://github.com/prod-ref-guide/multi-tenancy-gitops-apps.git
   e28693e..25f7430  master -> master
This change to the GitOps repository can now be used by ArgoCD.
-
The
apps-mq-rest-ci-1argocd applicationLet's examine the ArgoCD application that manage the applications in ci namespace.
In the ArgoCD UI Applications view, click on the icon for the
apps-mq-rest-ci-1application: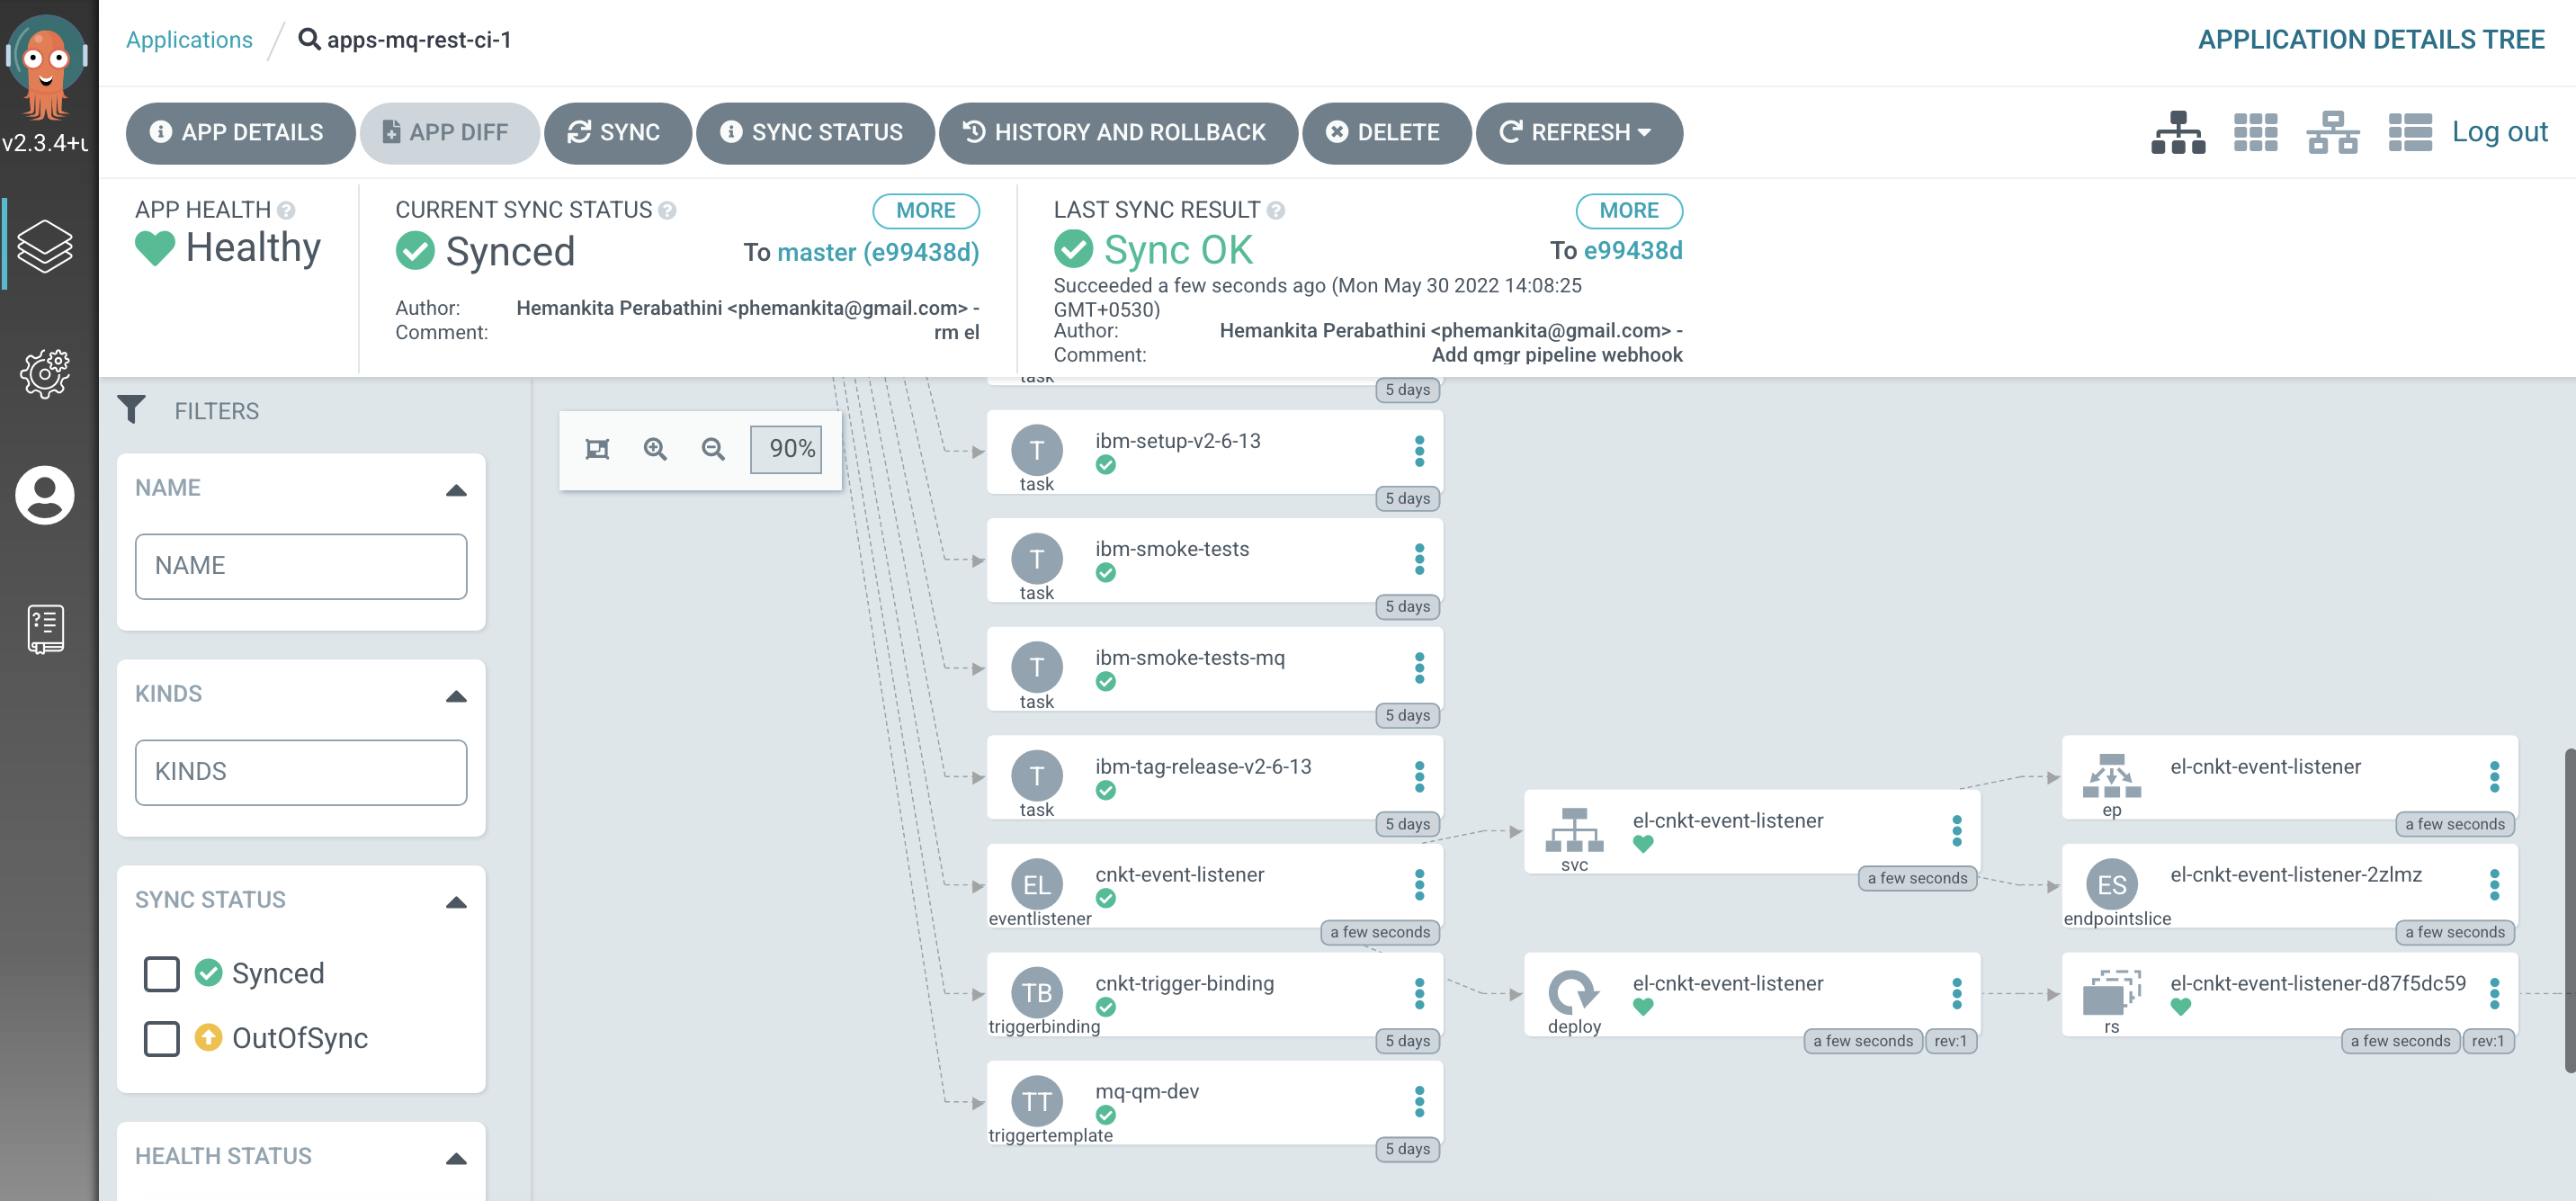
You will see all the necessary configurations. Now, you will see trigger template, trigger binding and event listener we just created under this application.
-
Exploring the
cntk-event-listenerKubernetes resourceLet's spend a few moments exploring the event listener resources.
If you observe the above picture carefully, below are few things to note:
- See how the
eventlistenercustom resource deployed by the ArgoCD application has created a service namedel-cntk-event-listener. The event listener route points to this service. - The event listener runs in a pod, managed by a replicaset, defined by a deployment. It's this pod that will handle the webhook request, and call the trigger if the interceptor
filterevaluates totrue.
- See how the
-
Exploring the resources using the
occommandWe can use also use the
occommand to explore our webhook resources:To view the route that is called by the webhook, issue the following command:
oc get route -n ciTo view the event listener service that is accessed via the route, issue the following command:
oc get eventlistener -n ciTo view the trigger template that is used by the event service to call the
mq-qm-devpipeline, issue the following command:oc get triggertemplate -n ciTo view the trigger binding that is used to marshal the input for the pipeline run, issue the following command:
oc get triggerbinding -n ciYou can explore these resources in more detail by adding the
-o yamloption.For now, it's enough to understand understand that
webhook->route->event listener->trigger template->pipeline.Let's now configure a GitHub webhook to use these components.
-
The GitHub webhook UI
Let's now use the GitHub UI, to configure a webhook that creates an event and sends it to the route whenever the queue manager source repository changes.
We'll configure the webhook using the GitHub UI.
Issue the following command to determine the URL for the UI:
echo https://github.com/${GIT_ORG}/mq-qm01/settings/hooks/newfor example:
https://github.com/prod-ref-guide/mq-qm01/settings/hooks/newCopy the URL into your browser to launch the GitHub webpage to configure a new webhook for your
mq-qm01repository:
We need to complete these details to configure our webhook.
-
Configure the webhook
To configure a webhook, we need to identify the URL it will call when it generates an event, the format of the event, and for which GitHub events we'll generate an event.
Issue the following command to determine the URL of the event listener route:
echo http://$(oc get route el-cnkt-event-listener -n ci -o jsonpath='{.spec.host}')for example:
http://el-cnkt-event-listener-ci.xxxxx.containers.appdomain.cloudHere's a sample webhook configuration:
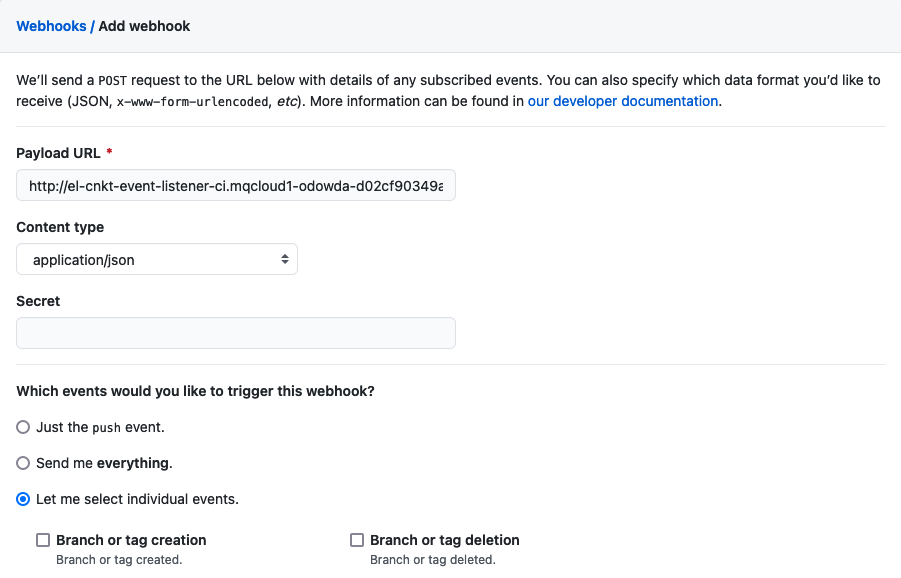
Configure the following arguments:
- Set the Payload URL using the event listener route address.
- Set Content type to
application/json. - Select Let me select individual event
- Select Pull requests and Pushes from the list of available events.

Click on
Add webhookto create the webhook. -
A new webhook has been added
In the GitHub UI, you can see that a new webhook has been added:

Notice the webhook's name and that it's generating and event whenever a
pull-requestorpushis issued against this repository.Let's now make a change to the
QM1source repository and watch the webhook at work.
Making a change to the queue manager QM1
Now that we've configured our webhook, together with the Kubernetes resources to process an event generated by it, let's put it to work.
In this section, we'll add a new queue to QM1using GitOps. To do this, we'll update the QM1 source repository -- adding a the new queue definition to the queue manager MQSC configuration -- and push this change to GitHub. This will trigger a new pipeline run that will build and test our change. If successful, new versions of the queue manager image version and Helm chart will be produced. The GitOps Helm chart will be automatically deployed to the cluster by our ArgoCD application, resulting in an updated deployment for QM1 that contains the new queue definition.
-
Select the
QM1source repository terminal windowWe're going to make changes to the
QM1source repository, so let's make sure we're in the correct terminal window and folder.Return to the terminal window you're using for the
mq-qm01source repository. (Rather than the terminal window you're using for themulti-tenancy-gitops-appsGitOps repository.)Issue the following command to ensure you're in the correct folder.
cd $GIT_ROOT/mq-qm01Issue the following command to ensure that the
$GIT_ORGenvironment variable is set:echo $GIT_ORGwhich will show your configured value, for example:
prod-ref-guide -
Set up environment variable for new Git branch
The sample repository has a single
masterbranch. We're going to create a new branch based onmasterfor our changes.Set the
$GIT_BRANCH_QM1using your$GIT_ORGenvironment variable:export GIT_BRANCH_QM1=qm1-$GIT_ORGthen create a new branch using its value:
git checkout -b $GIT_BRANCH_QM1you'll see something like:
Switched to a new branch 'qm1-prod-ref-guide'Notice how we've created a new branch
$GIT_BRANCH_QM1based on themasterbranch. All changes will be made in$GIT_BRANCH_QM1; whereasmasterwill remain unchanged.Also note that we use
$GIT_BRANCH_QM1to name themq-qm01queue manager branch in contrast to$GIT_BRANCHfor themulti-tenancy-gitops-appsGitOps branch. This helps stop us accidentally promoting a change if we use the wrong terminal window in the tutorial. -
Verify you're on the new branch
We're doing our changes in the
$GIT_BRANCH_QM1branch.Confirm you're on the new branch:
git branchwhich will list all the branches for your local clone of the
mq-qm01repository:master * qm1-prod-ref-guideNote how
*confirms your branch. -
Recap where
QM1resource limits are stored in the source repositoryThe
QM1configuration is completely held within themq-qm01source repository. Let's recall this structure:Issue the following command:
treeto view the folder structure:
.
├── Dockerfile
├── README.md
├── chart
│   └── base
│       ├── Chart.yaml
│       ├── config
│       │   └── config.mqsc
│       ├── security
│       │   └── config.mqsc
│       ├── templates
│       │   ├── NOTES.txt
│       │   ├── _helpers.tpl
│       │   ├── configmap.yaml
│       │   └── qm-template.yaml
│       └── values.yaml
└── kustomize
    ├── base
    │   ├── generic-qmgr
    │   │   ├── kustomization.yaml
    │   │   ├── queuemanager.yaml
    │   │   └── static-definitions.mqsc
    │   └── native-ha-qmgr
    └── components
        ├── dynamic-mqsc
        │   └── generic-qmgr
        │       ├── dynamic-definitions.mqsc
        │       ├── kustomization.yaml
        │       └── queuemanager.yaml
        └── scripts
            ├── kustomization.yaml
            ├── start-mqsc.sh
            └── stop-mqsc.sh
You may recall that the that the
queuemanager.yamlfile has the below resource limits definition.resources: limits: cpu: "1" memory: 1GiThis value is used by the QueueManager template to generate the resource limits. Let us increase these limits now.
-
Update
queuemanager.yamlfileLet's quickly review the current
queuemanager.yamlfile, before we add our new resource limit definitions.Issue the following command:
cat kustomize/base/generic-qmgr/queuemanager.yamlto view the resource limit definitions:
resources: limits: cpu: "1" memory: 1Gi requests: cpu: "1" memory: 1GiUsing your favorite editor, update memory to
2Gi:resources: limits: cpu: "1" memory: 2Gi requests: cpu: "1" memory: 1GiNotice how we've modified the
memoryof the queuemanager from1Gito2Gi. -
Commit change to GitHub
Let's now commit these changes to GitHub.
git add kustomize/base/generic-qmgr/queuemanager.yaml
git commit -s -m "Updated queuemanager definition with new resource limits"
git push origin $GIT_BRANCH_QM1
We see that the changes are pushed to GitHub:
Enumerating objects: 11, done. Counting objects: 100% (11/11), done. Delta compression using up to 8 threads Compressing objects: 100% (5/5), done. Writing objects: 100% (6/6), 527 bytes | 527.00 KiB/s, done. Total 6 (delta 3), reused 0 (delta 0) remote: Resolving deltas: 100% (3/3), completed with 3 local objects. remote: remote: Create a pull request for 'qm1-prod-ref-guide' on GitHub by visiting: remote: https://github.com/prod-ref-guide/mq-qm01/pull/new/qm1-prod-ref-guide remote: To https://github.com/prod-ref-guide/mq-qm01 * [new branch] qm1-prod-ref-guide -> qm1-prod-ref-guide -
GitHub event generated
This push to GitHub should generate a GitHub webhook event for the
mq-qm01repository. We can look at the most recent webhook events.Click on the newly created webhook
http://el-cnkt-event-listener...and select the Recent Deliveries tab.This is one of our sample Deliveries:
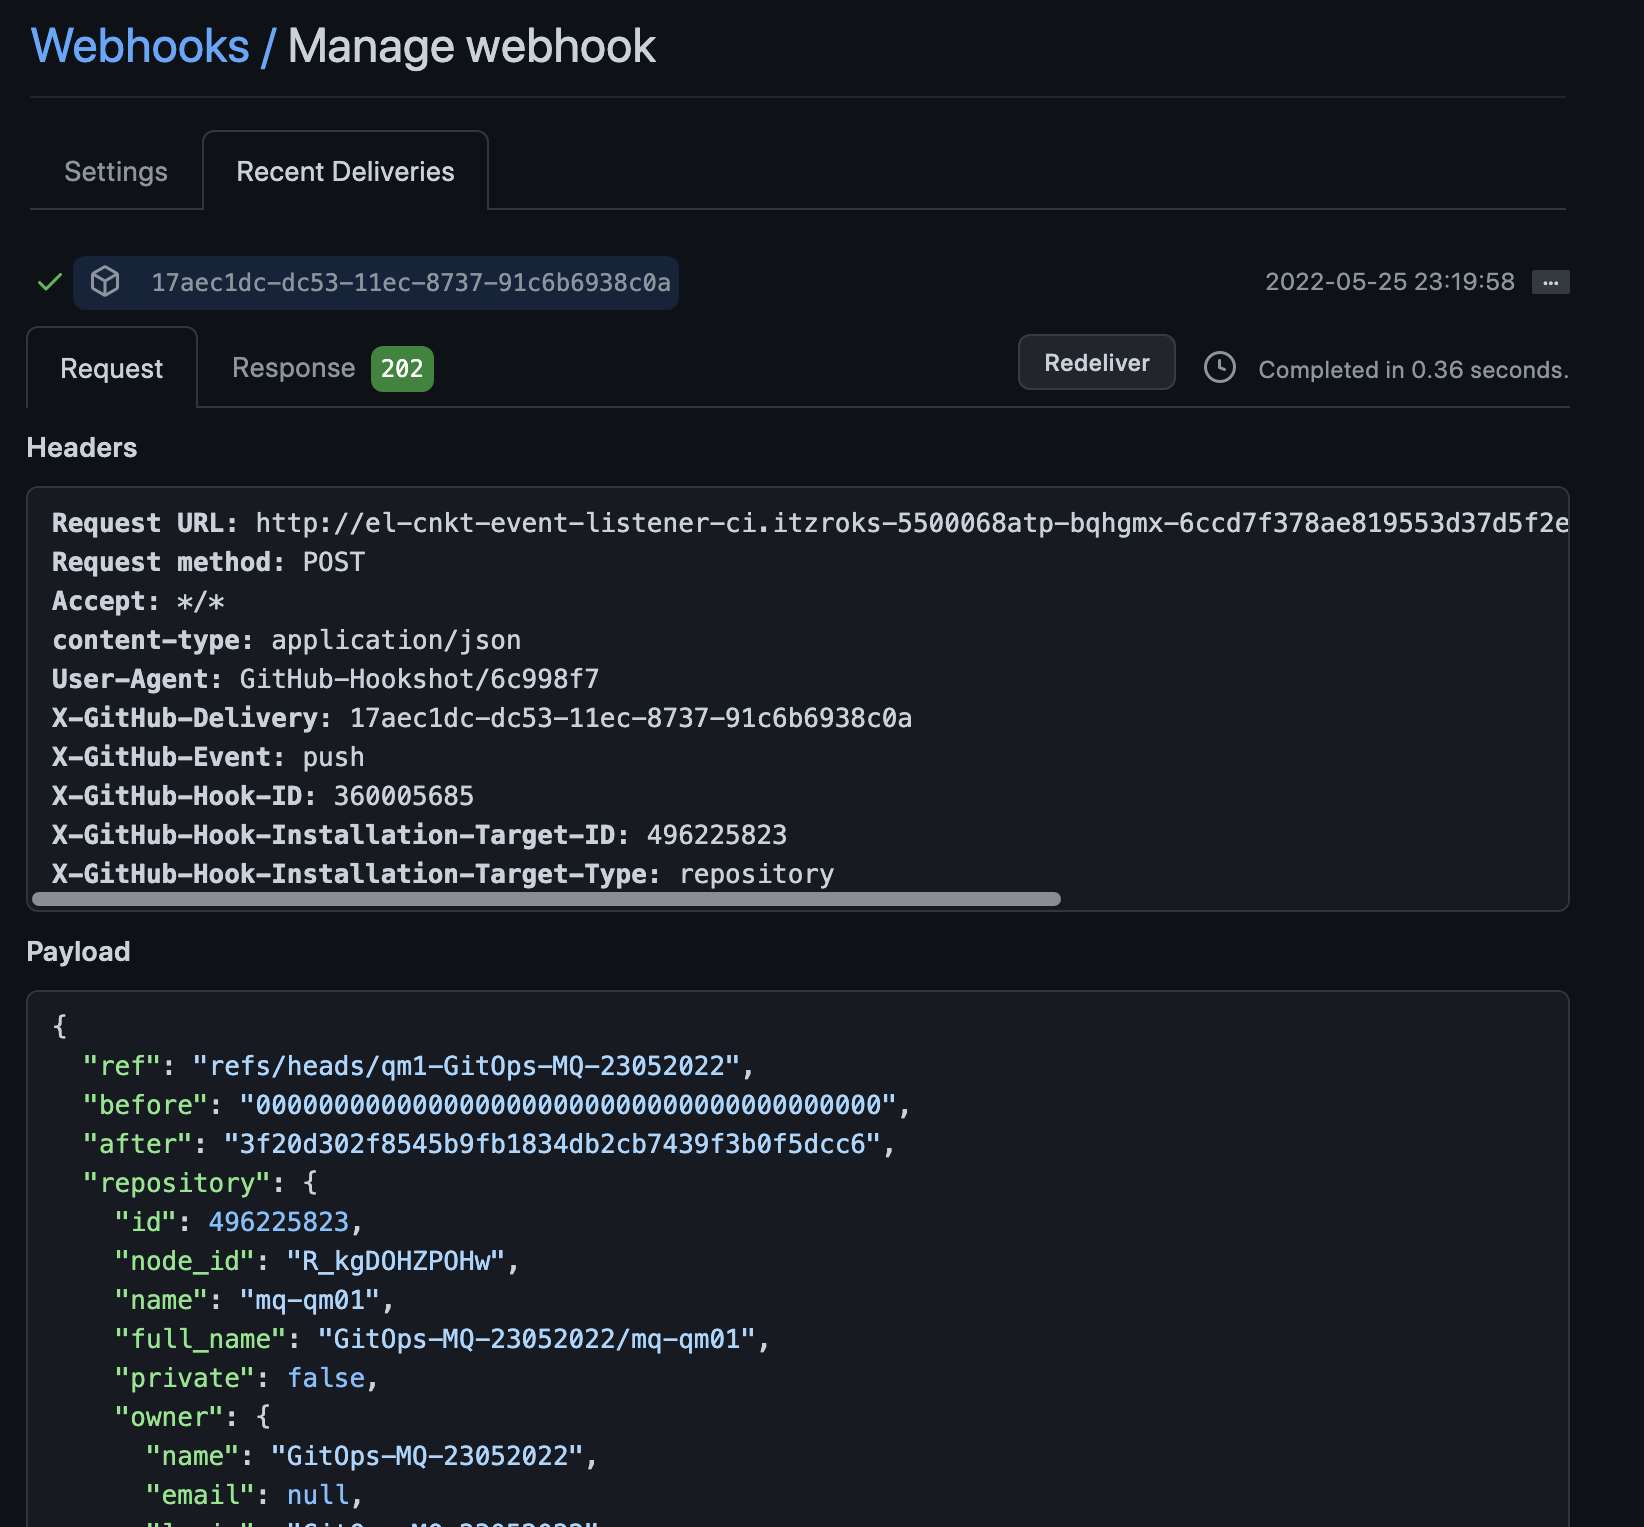
Notice:
- The date and time when the webhook event was generated in the format
yyyy-mm-dd hh:mm:ss - The Request URL header identifies the event. listener
http:://el-cnkt-event-listener... - "ref": "refs/heads/qm1-GitOps-MQ-23052022" identifies the branch that was pushed.
- "repository.full_name": "GitOps-MQ-23052022/mq-qm01" identifies the repository that was changed.
The Recent Deliveries tab can be very helpful to diagnose any issues you might have webhook event generation.
Let's now see how this webhook event is handled by the event listener in the cluster.
- The date and time when the webhook event was generated in the format
-
Event handled in the cluster
Let's have a look at how the GitHub event is processed by the event listener in the cluster. We can look at the event listener logs to see how the event is received and processed using the
oc logscommand.Issue the following command:
oc logs deploy/el-cnkt-event-listener -n cito show the log messages issued by the
el-cnkt-event-listener:{"level":"info","ts":"2022-05-30T08:53:23.172Z","logger":"eventlistener","caller":"resources/create.go:98","msg":"Generating resource: kind: &APIResource{Name:pipelineruns,Namespaced:true,Kind:PipelineRun,Verbs:[delete deletecollection get list patch create update watch],ShortNames:[pr prs],SingularName:pipelinerun,Categories:[tekton tekton-pipelines],Group:tekton.dev,Version:v1beta1,StorageVersionHash:RcAKAgPYYoo=,}, name: mq-qm-dev-","commit":"fbb0fd1","knative.dev/controller":"eventlistener"} {"level":"info","ts":"2022-05-30T08:53:23.172Z","logger":"eventlistener","caller":"resources/create.go:106","msg":"For event ID \"c2f8ccb5-e102-4dd2-b147-f60b0f63516c\" creating resource tekton.dev/v1beta1, Resource=pipelineruns","commit":"fbb0fd1","knative.dev/controller":"eventlistener"}(You can scroll right in the above output.)
Notice:
- Multiple log entries have been issued for the same input event. Notice how the timestamps
"ts":are the same. - The first entry identifies the data generated by the trigger template that will be passed to the pipeline:
- See how
gitrevisionvalue matches that in the webhook"after"value. - See how
gitrepositoryurlvalue matches your fork of themq-qm01repository.
- See how
- The second entry informs us that a new
PipelineRunhas been created for the pipelinemq-qm-dev. - The third entry shows us the
event IDthat the event listener is using for the processing of this webhook event.
The order of these events isn't really important; what's clear is that the pipeline run has been launched based on the webhook notification processes by the event listener.
The
oc logscommand can be very helpful to diagnose any issues you might have with the event listener. - Multiple log entries have been issued for the same input event. Notice how the timestamps
-
The new pipeline run starts
We can now see that our pipeline run has started.
In the OpenShift web console, navigate to
Pipelines->Pipelines. Select themq-qm-devpipeline andProject: ci: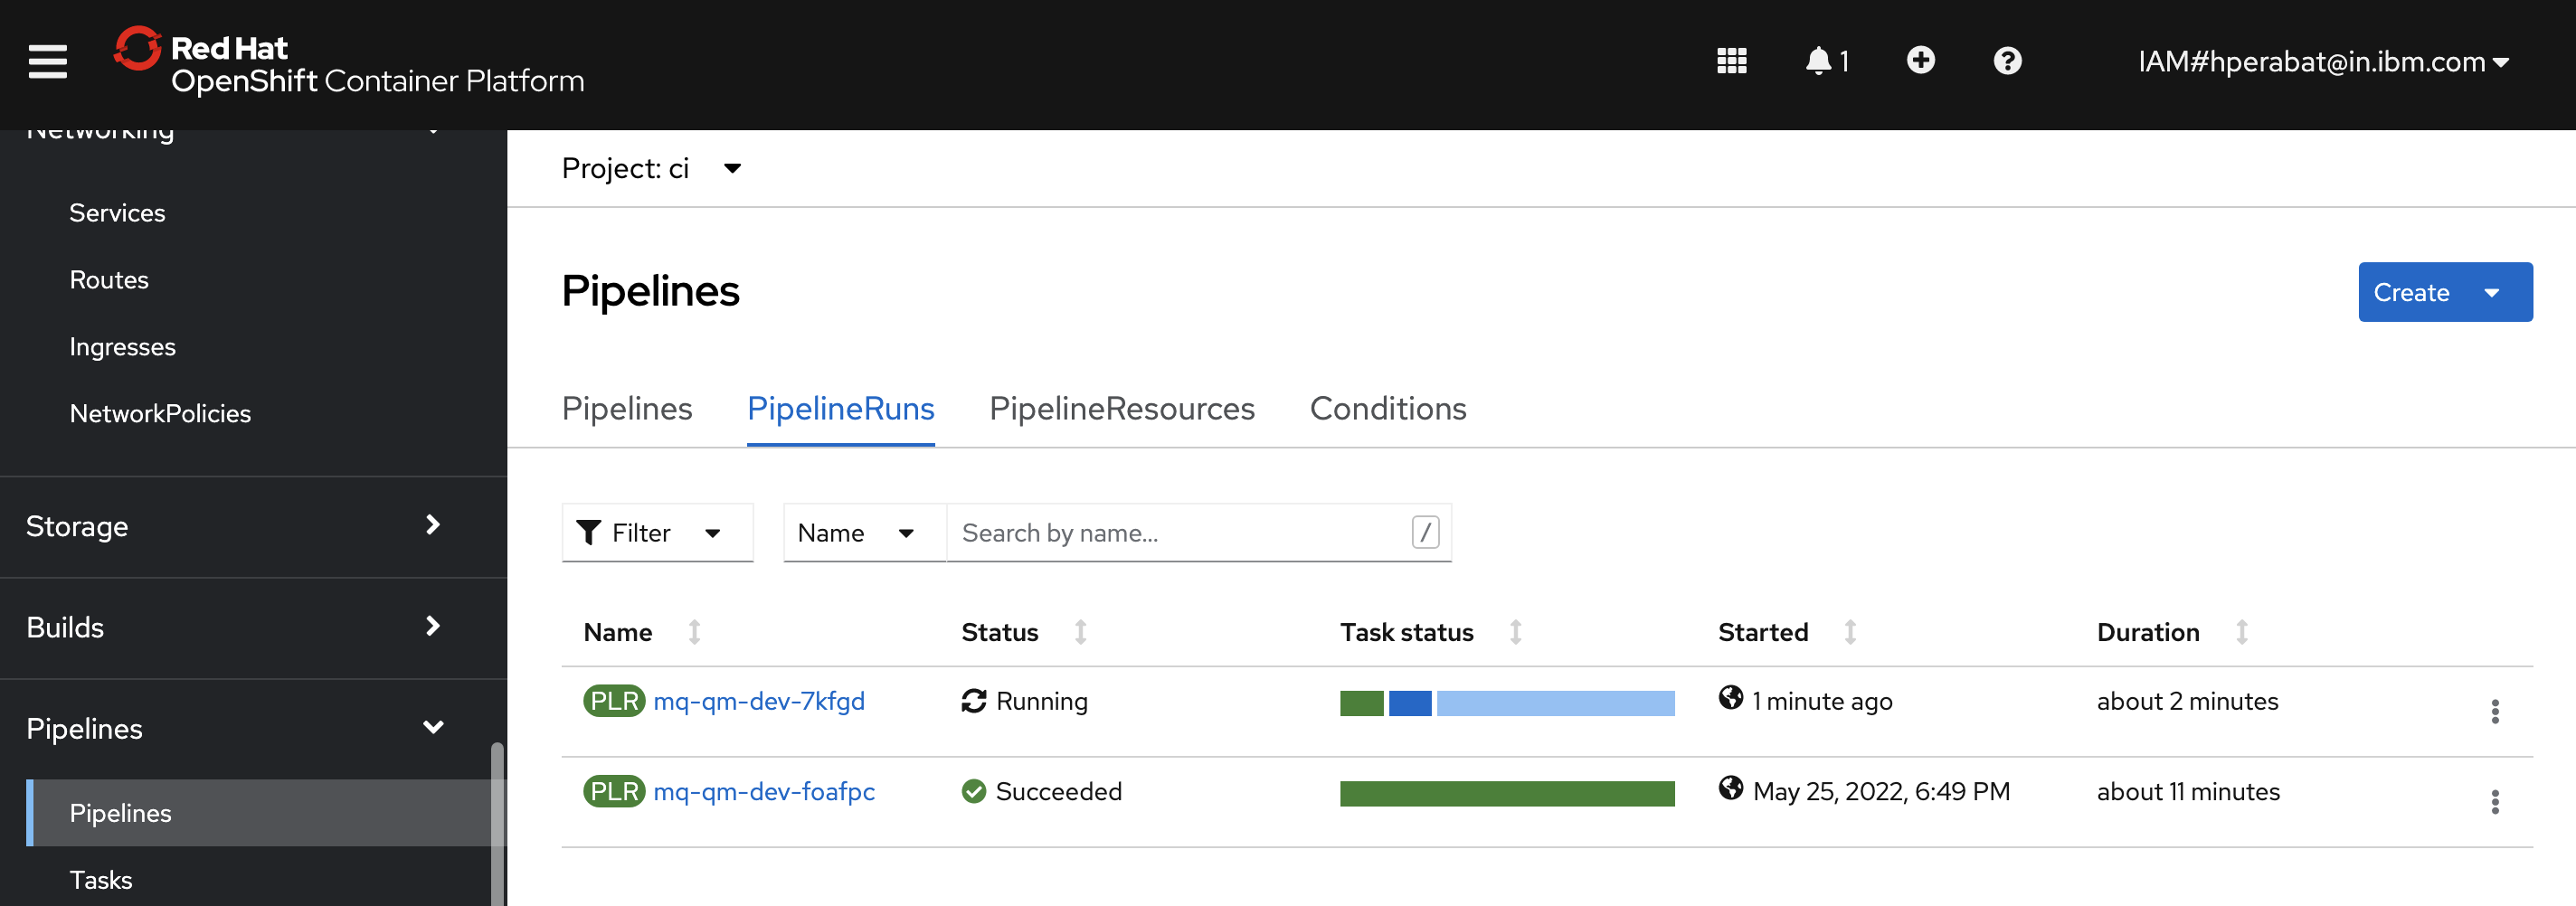
We can see a new pipeline run for
mq-qm-devis in progress.Notice the Labels for this pipeline run:
- See how the tekton event listener
cnkt-event-listeneris identified. - See how the
trigger-eventidallows us to link this pipeline run back to a Tekton event for traceability.
- See how the tekton event listener
Exploring the new pipeline run
Our pipeline run has started and will take a little time to complete.
We already know what our pipeline run will do; in this section we explore how it does it by looking at the build task in more detail.
We'll also review the new and updated resources produced by the pipeline run. These include new versions of the image and GitOps queuemanager resources. We'll see how these combine to reflect the change we made to QM1.
-
Look at pipeline run
Let’s find the queue manager pipeline using the OpenShift web console.
Navigate to
Pipelines->Pipelinesin the left hand pane, and selectProject: ci, to show all pipelines in the ci namespace: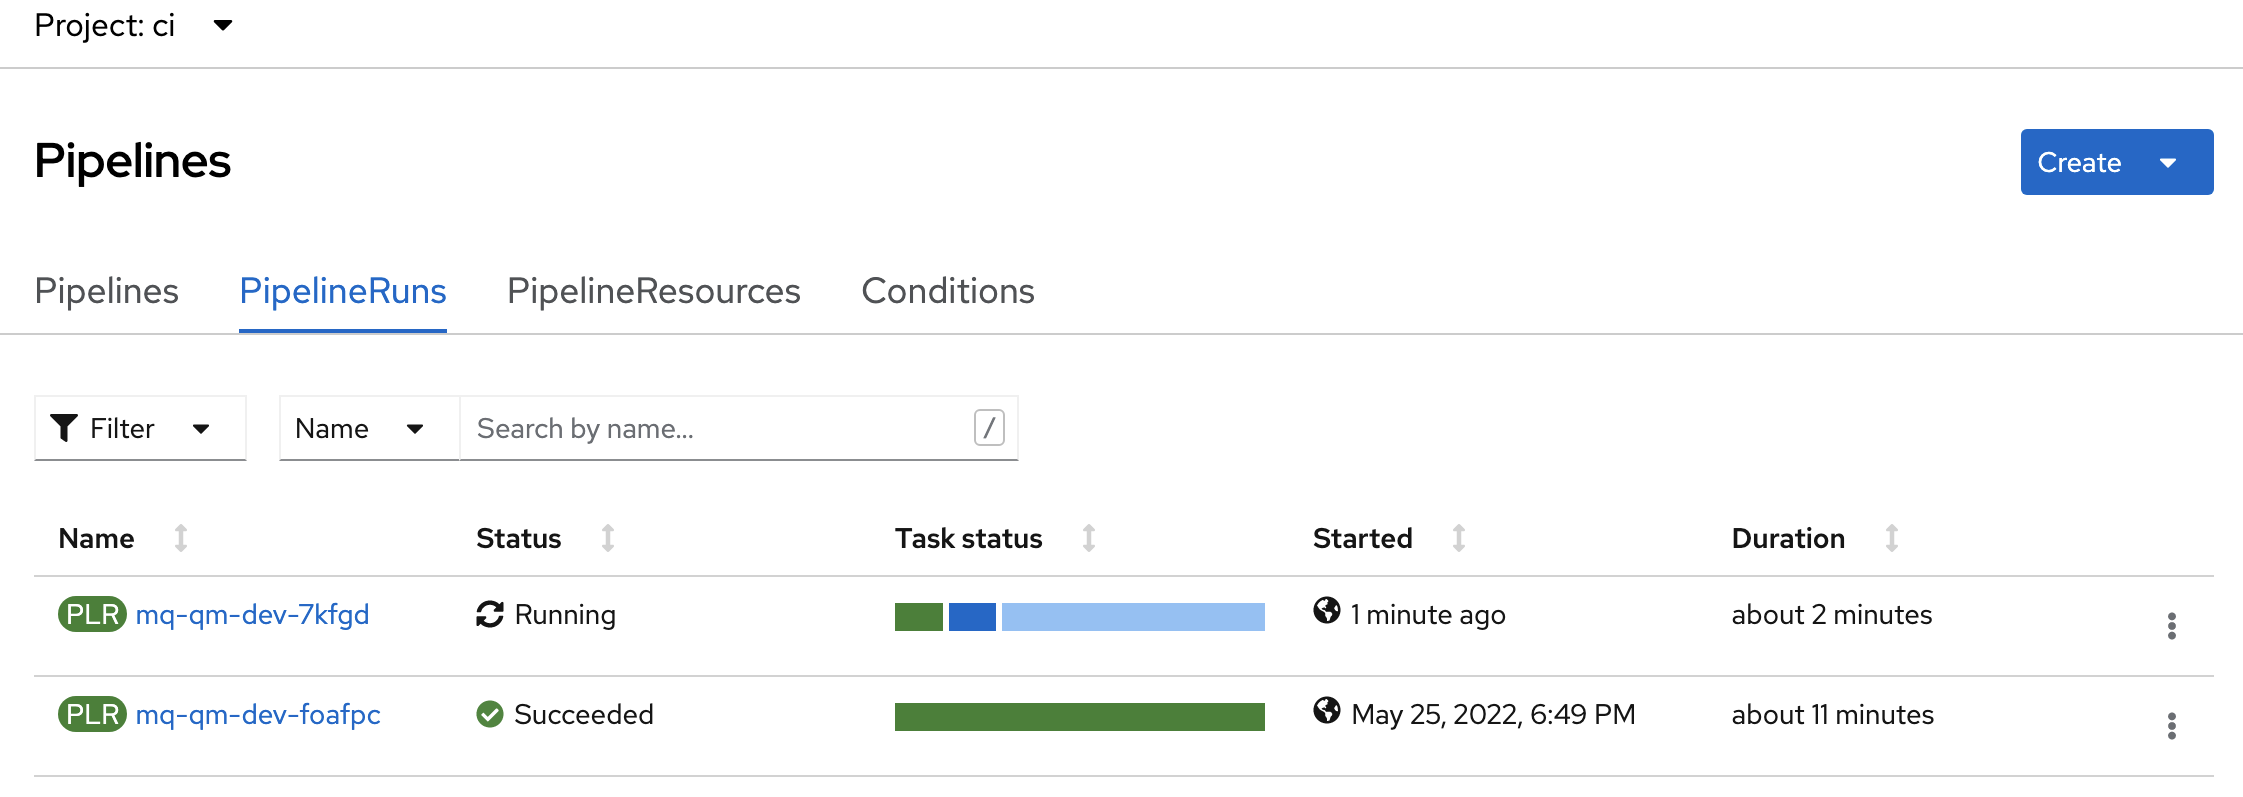
You can see that there is an
mq-qm-devpipeline run in progress. (You may need to scroll through the list of pipelines.) -
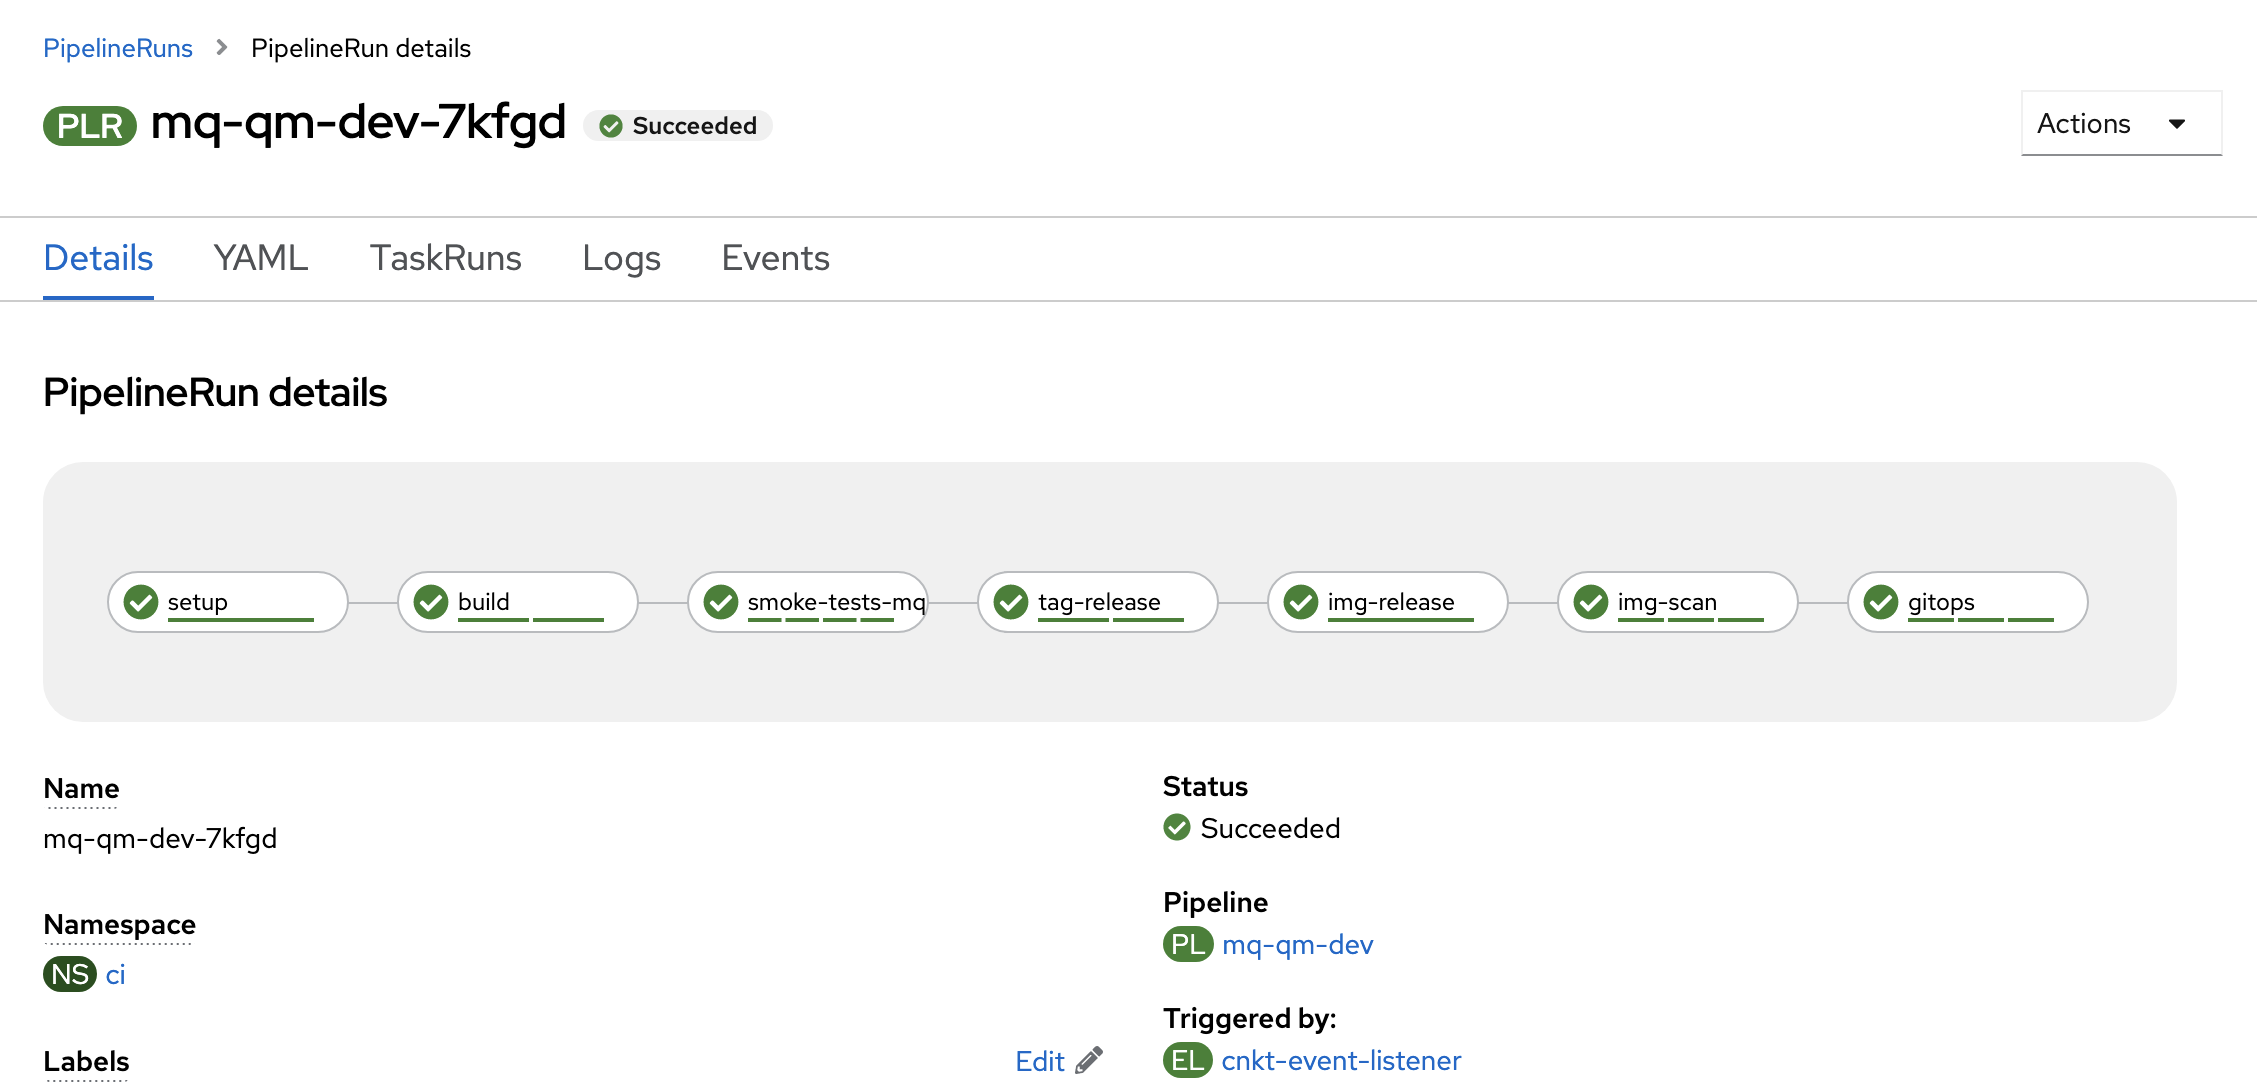
Pipeline tasks run and complete
As before, because we can think of a pipeline run as an instance of a pipeline, we can see the pipeline structure from its run.
In the
Pipelinesview, click on themq-qm-dev-xxxxxpipeline run:
Again, as before, we can see the tasks comprising the run, such as
setup,buildandGitOps. Notice how tasks are in one of three states: completed, in progress or waiting to run. -
See how the
buildtask is implementedWe're going to examine the
buildtask in some detail. Once you see how thebuildtask works, you'll be able to work out how any task works and how to modify it, as well as how to write your own tasks.We'll look at the
buildtask YAML to see how it's implemented. We'll see how it gets its input, how it is coded, how it references secrets and how it interacts with external components, for example storing a new image in the image registry.In the
Pipeline Run detailsview, click on the YAML tab: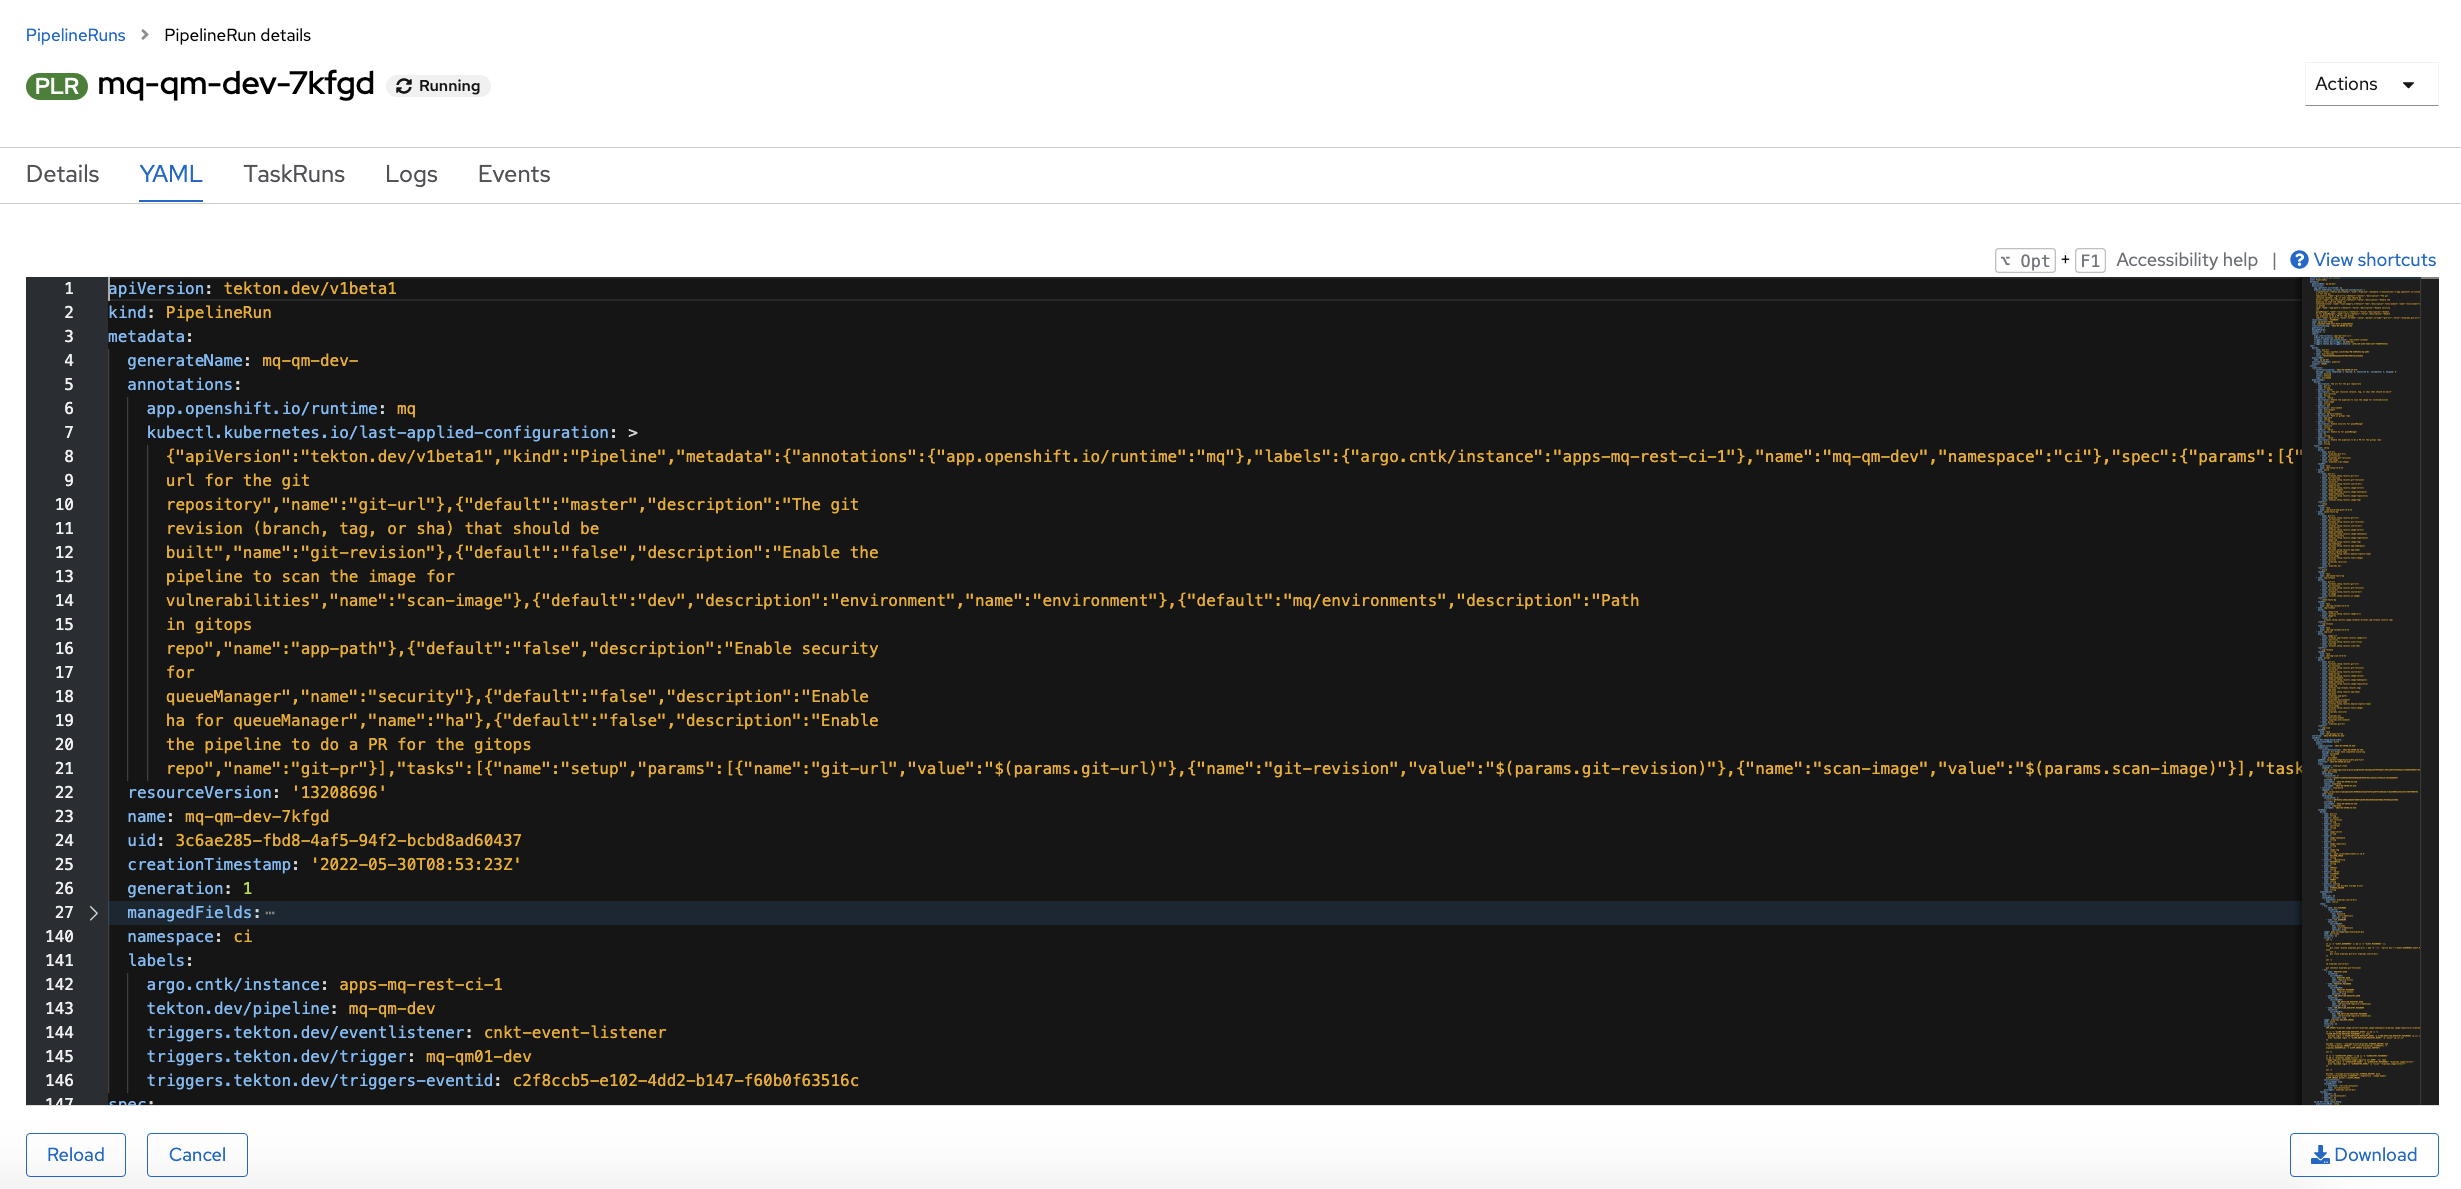
This is the pipeline run YAML. You may recall that a
pipelineYAML has no code defined within it. In contrast, apipelinerunYAML includes all the code that implements each task. It means we can scroll through a single file to see the pipeline run inputs, the task inputs and the code that implements each of the steps within each task. It makes it easy to understand what's happening as the pipeline executes because everything is in one place.We can of course see the same output on the command line.
Issue the following command, replacing
xxxxxwith the current pipeline run identifier:oc get pipelinerun mq-qm-dev-xxxxx -n ci -o yamlwhich will show you all the same information on the command line:
apiVersion: tekton.dev/v1beta1
kind: PipelineRun
metadata:
  annotations:
    app.openshift.io/runtime: mq
      ...
      creationTimestamp: "2022-05-30T08:53:23Z"
      generateName: mq-qm-dev-
   ...
We've only included the beginning of the YAML file, as it's quite large, but you can see that it's the same as the web console YAML file.
-
Exploring the
buildtask YAMLWe can locate the source of the task code in our GitOps source repository.
In the
Pipeline Run detailsYAML tab view, search foribm-build-tag-push-v2-6-13to find where thebuildtask refers to its implementation code.Use
Cmd+Fto search foribm-build-tag-push-v2-6-13:... - name: build params: - name: git-url value: $(tasks.setup.results.git-url) - name: git-revision value: $(tasks.setup.results.git-revision) - name: source-dir value: $(tasks.setup.results.source-dir) - name: image-server value: $(tasks.setup.results.image-server) - name: image-namespace value: $(tasks.setup.results.image-namespace) - name: image-repository value: $(tasks.setup.results.image-repository) - name: image-tag value: $(tasks.setup.results.image-tag) runAfter: - setup taskRef: kind: Task name: ibm-build-tag-push-v2-6-13 - name: smoke-tests-mq ...We've already reviewed this
buildtask definition. Recall that thetaskRefrefers to the taskibm-build-tag-push-v2-6-13which implements the task code forbuild. -
The
buildtask YAML sourceThis
buildtask is just one of many tasks defined in themq-pipeline-dev.yamlfile we explored earlier. Lets have a look at the definition of this task.Issue the following command:
cat mq/environments/ci/tasks/ibm-build-tag-push-v2-6-13.yamlto show
ibm-build-tag-push-v2-6-13among the many YAMLs in this file:apiVersion: tekton.dev/v1beta1 kind: Task metadata: name: ibm-build-tag-push-v2-6-13 annotations: description: Executes logic to build, tag and push a container image using the intermediate sha tag to the image-url app.openshift.io/description: Executes logic to build, tag and push a container image using the intermediate sha tag to the image-url app.openshift.io/vcs-uri: https://github.com/IBM/ibm-garage-tekton-tasks app.openshift.io/vcs-ref: master labels: version: 2.6.13 spec: params: - name: git-url - name: git-revision default: master - name: source-dir default: /source - name: image-server default: "" - name: image-namespace default: "" - name: image-repository default: "" - name: image-tag default: "" - name: BUILDER_IMAGE default: quay.io/buildah/stable:v1.15.0 - name: DOCKERFILE default: ./Dockerfile - name: CONTEXT default: . - name: TLSVERIFY default: "false" - name: FORMAT default: "docker" - name: STORAGE_DRIVER description: Set buildah storage driver default: overlay volumes: - name: varlibcontainers emptyDir: {} - name: source emptyDir: {} stepTemplate: volumeMounts: - name: source mountPath: $(params.source-dir) steps: - name: git-clone image: quay.io/ibmgaragecloud/alpine-git env: - name: GIT_PASSWORD valueFrom: secretKeyRef: name: git-credentials key: password optional: true - name: GIT_USERNAME valueFrom: secretKeyRef: name: git-credentials key: username optional: true script: | set +x if [[ -n "${GIT_USERNAME}" ]] && [[ -n "${GIT_PASSWORD}" ]]; then git clone "$(echo $(params.git-url) | awk -F '://' '{print $1}')://${GIT_USERNAME}:${GIT_PASSWORD}@$(echo $(params.git-url) | awk -F '://' '{print $2}')" $(params.source-dir) else set -x git clone $(params.git-url) $(params.source-dir) fi set -x cd $(params.source-dir) git checkout $(params.git-revision) - name: build image: $(params.BUILDER_IMAGE) workingDir: $(params.source-dir) env: - name: REGISTRY_USER valueFrom: secretKeyRef: name: registry-access key: REGISTRY_USER optional: true - name: REGISTRY_PASSWORD valueFrom: secretKeyRef: name: registry-access key: REGISTRY_PASSWORD optional: true - name: IBM_ENTITLED_REGISTRY_USER valueFrom: secretKeyRef: name: ibm-entitled-registry-credentials key: IBM_ENTITLED_REGISTRY_USER optional: true - name: IBM_ENTITLED_REGISTRY_PASSWORD valueFrom: secretKeyRef: name: ibm-entitled-registry-credentials key: IBM_ENTITLED_REGISTRY_PASSWORD optional: true volumeMounts: - mountPath: /var/lib/containers name: varlibcontainers securityContext: privileged: true script: | APP_IMAGE="$(params.image-server)/$(params.image-namespace)/$(params.image-repository):$(params.image-tag)" if [[ -n "${IBM_ENTITLED_REGISTRY_USER}" ]] && [[ -n "${IBM_ENTITLED_REGISTRY_PASSWORD}" ]]; then buildah login -u ${IBM_ENTITLED_REGISTRY_USER} -p ${IBM_ENTITLED_REGISTRY_PASSWORD} cp.icr.io echo "buildah login -u "${IBM_ENTITLED_REGISTRY_USER}" -p "xxxxx" cp.icr.io" fi buildah --layers --storage-driver=$(params.STORAGE_DRIVER) bud --format=$(params.FORMAT) --tls-verify=$(params.TLSVERIFY) -f $(params.DOCKERFILE) -t ${APP_IMAGE} $(params.CONTEXT) set +x if [[ -n "${REGISTRY_USER}" ]] && [[ -n "${REGISTRY_PASSWORD}" ]] && [[ "$(params.image-server)" != "image-registry.openshift-image-registry.svc:5000" ]]; then buildah login -u "${REGISTRY_USER}" -p "${REGISTRY_PASSWORD}" "$(params.image-server)" echo "buildah login -u "${REGISTRY_USER}" -p "xxxxx" "$(params.image-server)"" fi set -x buildah --storage-driver=$(params.STORAGE_DRIVER) push --tls-verify=$(params.TLSVERIFY) --digestfile ./image-digest ${APP_IMAGE} docker://${APP_IMAGE}Notice how:
spec:contains a list ofparams:as the set of task inputs.name: git-revisionis an example of named input, and it has a default value specified asdefault: master.spec:containsvolumes:andvolumeMounts:that apply to every step.
-
Exploring the
buildtask steps -- configurationWe can explore the
buildtask structure using the output from the OpenShift web console, theoc get pipelineruncommand.Let's spend a few moments understanding how
buildworks; you can review the code using your local editor or the OpenShift web console. We've also included the relevant snippets:steps: - name: git-clone image: quay.io/ibmgaragecloud/alpine-git env: - name: GIT_PASSWORD valueFrom: secretKeyRef: name: git-credentials key: password optional: true - name: GIT_USERNAME valueFrom: secretKeyRef: name: git-credentials key: username optional: true script: | ... - name: build image: $(params.BUILDER_IMAGE) workingDir: $(params.source-dir) env: ... volumeMounts: - mountPath: /var/lib/containers name: varlibcontainers securityContext: privileged: true script: | ...Notice how:
- The
buildtask steps are defined in thesteps:YAML node. - The build task has two steps:
name: git-cloneandname: build. - The
git-clonestep runs in its own container usingimage: quay.io/ibmgaragecloud/alpine-git - The
buildstep runs in its own container using the image specified by the task input variable$(params.BUILDER_IMAGE). Notice this has a default valuequay.io/buildah/stable:v1.15.0 - The
git-clonestep sets up an environment variableGIT_PASSWORDusing the thepasswordkey in thegit-credentialssecret. This allows the task to use the git credentials we configured in this chapter earlier - As required, a step can specify any node from the
spec.containers[]:specification such asworkingDir:,volumeMount:andsecurityContext:. - The code executed in each step container is specified by its
script:.
Let's now see how a
buildstep can be coded to use this configuration. - The
-
Exploring the
buildtask steps -- scriptsWhen the
buildstep container runs, it executes the code specified in itsscript:.Find the
buildstep script in web console pipelinerunYAMLoutput, using theoccommand. We've shown thescript:below:script: | APP_IMAGE="$(params.image-server)/$(params.image-namespace)/$(params.image-repository):$(params.image-tag)" if [[ -n "${IBM_ENTITLED_REGISTRY_USER}" ]] && [[ -n "${IBM_ENTITLED_REGISTRY_PASSWORD}" ]]; then buildah login -u ${IBM_ENTITLED_REGISTRY_USER} -p ${IBM_ENTITLED_REGISTRY_PASSWORD} cp.icr.io echo "buildah login -u "${IBM_ENTITLED_REGISTRY_USER}" -p "xxxxx" cp.icr.io" fi buildah --layers --storage-driver=$(params.STORAGE_DRIVER) bud --format=$(params.FORMAT) --tls-verify=$(params.TLSVERIFY) -f $(params.DOCKERFILE) -t ${APP_IMAGE} $(params.CONTEXT) set +x if [[ -n "${REGISTRY_USER}" ]] && [[ -n "${REGISTRY_PASSWORD}" ]] && [[ "$(params.image-server)" != "image-registry.openshift-image-registry.svc:5000" ]]; then buildah login -u "${REGISTRY_USER}" -p "${REGISTRY_PASSWORD}" "$(params.image-server)" echo "buildah login -u "${REGISTRY_USER}" -p "xxxxx" "$(params.image-server)"" fi set -x buildah --storage-driver=$(params.STORAGE_DRIVER) push --tls-verify=$(params.TLSVERIFY) --digestfile ./image-digest ${APP_IMAGE} docker://${APP_IMAGE}This script will execute within the
step-buildcontainer and will have access to the container environment set up for this step and task. The script makes extensive use of thebuildahcommand; it is often used in combination withskopeoandpodmanas a compatible alternative to thedockercommand for container management. You can learn more about these commands in this short article.See how the script will:
- Use the
buildah logincommand to login to the IBM Entitled Registry using the$IBM_ENTITLED_REGISTRY_USERand$IBM_ENTITLED_REGISTRY_PASSWORDcredentials you set up earlier. It needs this access because the Dockerfile used to build the queue manager image uses an IBM entitled MQ image. - Use the
buildah budcommand to build a queue manager image using the Dockerfile specified in$params.DOCKERFILE. - Use the
buildah pushcommand to store the newly built queue manager image to the cluster image registry. The step does support external registries such asquay.ioif$REGISTRY_USERand$REGISTRY_PASSWORDare set. - Name the queue manager image using the
$APP_IMAGEvariable. See how the name is structured as$(params.image-server)/$(params.image-namespace)/$(params.image-repository):$(params.image-tag)to uniquely identify it. We'll see an example in a moment.
- Use the
-
Linking task output to the
buildlogAs well as reading the script, we can see the actual output generated by the script OpenShift web console.
In the web console, select the
Pipeline Run detailsLogs tab formq-qm-dev-xxxxxand select thebuildtask. Scroll down to theSTEP-BUILDoutput:STEP-BUILD + APP_IMAGE=image-registry.openshift-image-registry.svc:5000/ci/mq-qm01:7851d42 + [[ -n cp ]] + [[ -n eyJ0eXAiOiJKV1QiLCJhbGciOiJIUzI1NiJ9.eyJpc3MiOiJJQk0gTWFya2V0cGxhY2UiLCJpYXQiOjE2NDM2NDQwMzYsImp0aSI6IjE0MzE5Y2M1NmZmNDQ4YWFhNjNkOTg4YzIyNTU1YmU2In0.uNrXc5cHyTnQP0jFeCozCZWQ7EDKMuRtCHHKTPFHq7w ]] + buildah login -u cp -p eyJ0eXAiOiJKV1QiLCJhbGciOiJIUzI1NiJ9.eyJpc3MiOiJJQk0gTWFya2V0cGxhY2UiLCJpYXQiOjE2NDM2NDQwMzYsImp0aSI6IjE0MzE5Y2M1NmZmNDQ4YWFhNjNkOTg4YzIyNTU1YmU2In0.uNrXc5cHyTnQP0jFeCozCZWQ7EDKMuRtCHHKTPFHq7w cp.icr.io Login Succeeded! buildah login -u cp -p xxxxx cp.icr.io + echo 'buildah login -u cp -p xxxxx cp.icr.io' + buildah --layers --storage-driver=overlay bud --format=docker --tls-verify=false -f ./Dockerfile -t image-registry.openshift-image-registry.svc:5000/ci/mq-qm01:7851d42 . STEP 1: FROM cp.icr.io/cp/ibm-mqadvanced-server-integration@sha256:e527f7279954a0abd9e5a50b8287dbdc3fff36aaeacf0335ebc0c4f7a0aab58e Getting image source signatures Copying blob sha256:438fa866f41ed21ff0fc8dda16bc8d485c1f0414c139c09a75ea0cdedf1afce3 Copying blob sha256:017c92b56753eaec127e1b41a953d8a33a88b417447fc61aa4d352f70a52b3c9 ... Copying config sha256:4b5b148ae9a371e193eca6822df5759bf9345e0919191f707492f02f9868f991 Writing manifest to image destination Storing signatures STEP 2: COMMIT image-registry.openshift-image-registry.svc:5000/ci/mq-qm01:7851d42 --> 4b5b148ae9a 4b5b148ae9a371e193eca6822df5759bf9345e0919191f707492f02f9868f991 + set +x + buildah --storage-driver=overlay push --tls-verify=false --digestfile ./image-digest image-registry.openshift-image-registry.svc:5000/ci/mq-qm01:7851d42 docker://image-registry.openshift-image-registry.svc:5000/ci/mq-qm01:7851d42 Getting image source signatures Copying blob sha256:0f5a48e5fc31d2a1e0049b7f3bd3a56a3580def8e70d00d35f60e96da6efd115 Copying blob sha256:cb3bad3be6d9cc880ab03055103749fec0d6058fce545a78a2560d25bbfb81d7 ... Copying config sha256:4b5b148ae9a371e193eca6822df5759bf9345e0919191f707492f02f9868f991 Writing manifest to image destination Storing signaturesThis is the output from the container that runs the
buildstep. You can see the results of thescript:execution. Scripts often use theset +x,set +eoption andechocommands to to generate log output.For example, we can see that the queue manager image name is:
+ APP_IMAGE=image-registry.openshift-image-registry.svc:5000/ci/mq-qm01:7851d42We can also see this image being pushed to the OpenShift image registry:
+ buildah --storage-driver=overlay push --tls-verify=false --digestfile ./image-digest image-registry.openshift-image-registry.svc:5000/ci/mq-qm01:7851d42 docker://image-registry.openshift-image-registry.svc:5000/ci/mq-qm01:7851d42together with its successful completion:
... Copying config sha256:4b5b148ae9a371e193eca6822df5759bf9345e0919191f707492f02f9868f991 Writing manifest to image destination Storing signatures -
Accessing the build task logs using
oc logsEach task in the
mq-qm-dev-xxxxxpipeline run executes in its own pod. Within these pods, each step runs in its own container. This allows us to view thepipelinerunoutput using theoc logscommand.Issue the following command, replacing
xxxxxwith your pipelinerun identifier:oc get pods -n ci | grep mq-qm-dev-xxxxxYou see all the pods used to execute the different tasks in the pipeline run:
mq-qm-dev-7kfgd-build-xx8fj-pod-7jvnr             0/2     Completed   0          33m
mq-qm-dev-7kfgd-gitops-hlzx7-pod-lsprr            0/3     Completed   0          25m
mq-qm-dev-7kfgd-img-release-q89t4-pod-mj94c       0/1     Completed   0          26m
mq-qm-dev-7kfgd-img-scan-nvlmn-pod-92kvw          0/3     Completed   0          26m
mq-qm-dev-7kfgd-setup-d4mtg-pod-hs7ht             0/1     Completed   0          33m
mq-qm-dev-7kfgd-smoke-tests-mq-ss79w-pod-n5p9j    0/4     Completed   0          31m
mq-qm-dev-7kfgd-tag-release-6xdqq-pod-8fs9h       0/2     Completed   0          27m
Notice that:
- the number of pods matches the number of tasks in the
mq-qm-devpipeline. (In the above example, the pipeline run has finished.) - the name of the pod includes the name of the task in the pipeline.
- each step runs in its own container, for example, the
buildpod has0/2containers running.
We can view the logs of any step in a task by viewing its container log.
Issue the following command, substituting the name of the first pod in your list from the previous command:
oc logs mq-qm-dev-7kfgd-build-xx8fj-pod-7jvnr step-build -n cito see the
step-buildlog in thebuildtask:+ APP_IMAGE=image-registry.openshift-image-registry.svc:5000/ci/mq-qm01:7851d42 + [[ -n cp ]] + [[ -n eyJ0eXAiOiJKV1QiLCJhbGciOiJIUzI1NiJ9.eyJpc3MiOiJJQk0gTWFya2V0cGxhY2UiLCJpYXQiOjE2NDM2NDQwMzYsImp0aSI6IjE0MzE5Y2M1NmZmNDQ4YWFhNjNkOTg4YzIyNTU1YmU2In0.uNrXc5cHyTnQP0jFeCozCZWQ7EDKMuRtCHHKTPFHq7w ]] + buildah login -u cp -p eyJ0eXAiOiJKV1QiLCJhbGciOiJIUzI1NiJ9.eyJpc3MiOiJJQk0gTWFya2V0cGxhY2UiLCJpYXQiOjE2NDM2NDQwMzYsImp0aSI6IjE0MzE5Y2M1NmZmNDQ4YWFhNjNkOTg4YzIyNTU1YmU2In0.uNrXc5cHyTnQP0jFeCozCZWQ7EDKMuRtCHHKTPFHq7w cp.icr.io Login Succeeded! buildah login -u cp -p xxxxx cp.icr.io + echo 'buildah login -u cp -p xxxxx cp.icr.io' + buildah --layers --storage-driver=overlay bud --format=docker --tls-verify=false -f ./Dockerfile -t image-registry.openshift-image-registry.svc:5000/ci/mq-qm01:7851d42 . STEP 1: FROM cp.icr.io/cp/ibm-mqadvanced-server-integration@sha256:e527f7279954a0abd9e5a50b8287dbdc3fff36aaeacf0335ebc0c4f7a0aab58e Getting image source signatures Copying blob sha256:438fa866f41ed21ff0fc8dda16bc8d485c1f0414c139c09a75ea0cdedf1afce3 Copying blob sha256:017c92b56753eaec127e1b41a953d8a33a88b417447fc61aa4d352f70a52b3c9 ...See how this is the same output as the web console
Pipeline Run detailsview. - the number of pods matches the number of tasks in the
-
Wait for pipeline run to finish
Return to
Pipeline Run detailsview. If the pipeline run hasn't finished then wait until it does. If it hasn't finished, explore some of the logs of the tasks still running, and see if you can find the step code that they are executing.When the pipeline run completes, you'll see:
The pipeline run is now complete. Let's explore the artifacts that
mq-qm-dev-xxxxxhas updated and created. -
Updated QueueManager resources in GitOps
Let's explore the GitOps QueueManager resources that was updated by the pipeline run.
Issue the following command:
echo https://github.com/$GIT_ORG/multi-tenancy-gitops-apps/blob/$GIT_BRANCH/mq/environments/dev/mq-qm01/queuemanager/queuemanager.yamlto calculate the URL of the GitOps version of the
qm-template.yamlfile, for example:https://github.com/prod-ref-guide/multi-tenancy-gitops-apps/blob/master/mq/environments/dev/mq-qm01/queuemanager/queuemanager.yamlCopy your version of this URL into a browser to see the GitOps version of the
queuemanager.yamlfile that is being accessed by ArgoCD:apiVersion: mq.ibm.com/v1beta1 kind: QueueManager metadata: name: qm1 annotations: argocd.argoproj.io/sync-wave: "300" helm.sh/hook-weight: "300" spec: license: accept: true license: L-RJON-BZFQU2 use: NonProduction queueManager: debug: false imagePullPolicy: IfNotPresent livenessProbe: failureThreshold: 1 initialDelaySeconds: 90 periodSeconds: 10 successThreshold: 1 timeoutSeconds: 5 logFormat: Basic metrics: enabled: true name: QM1 mqsc: - configMap: name: mqsc-configmap items: - static-definitions.mqsc readinessProbe: failureThreshold: 1 initialDelaySeconds: 10 periodSeconds: 5 successThreshold: 1 timeoutSeconds: 3 resources: limits: cpu: "1" memory: 2Gi requests: cpu: "1" memory: 1Gi availability: type: SingleInstance image: "image-registry.openshift-image-registry.svc:5000/ci/mq-qm01:0.0.2" imagePullPolicy: Always storage: persistedData: enabled: false queueManager: type: ephemeral recoveryLogs: enabled: false securityContext: initVolumeAsRoot: false template: pod: containers: - name: qmgr env: - name: MQSNOAUT value: "yes" terminationGracePeriodSeconds: 30 tracing: agent: {} collector: {} enabled: false namespace: "" version: 9.2.3.0-r1 web: enabled: trueNotice:
- the
image:has been updated toimage-registry.openshift-image-registry.svc:5000/ci/mq-qm01:0.0.2. We can clearly see the image tag got updated from0.0.1to0.0.2.
It's the
gitopstask in themq-qm-devpipeline run that updated this QueueManager resource stored in the GitOps repository.You might like to explore the
gitopsstep log inPipeline Run detailLogs tab.When the queue manager ArgoCD application sees that this GitOps QueueManager resource has changed, it will redeploy the QueueManager resources. It will be the combination of the GitOps and QueueManager resources that will define the new queue manager deployment in the the cluster.
- the
-
Viewing the new deployment in ArgoCD
The completion of the
gitopstask results in an update to the GitOps QueueManager resourcequeuemanager.yamlfile to identify the image tag version0.0.2. This change to thequeuemanager.yamlfile will result in thedev-mq-qm01-instanceArgoCD application redeploying the QueueManager resources. Let's explore this change using ArgoCD.In the ArgoCD UI, select the
dev-mq-qm01-instanceArgoCD application: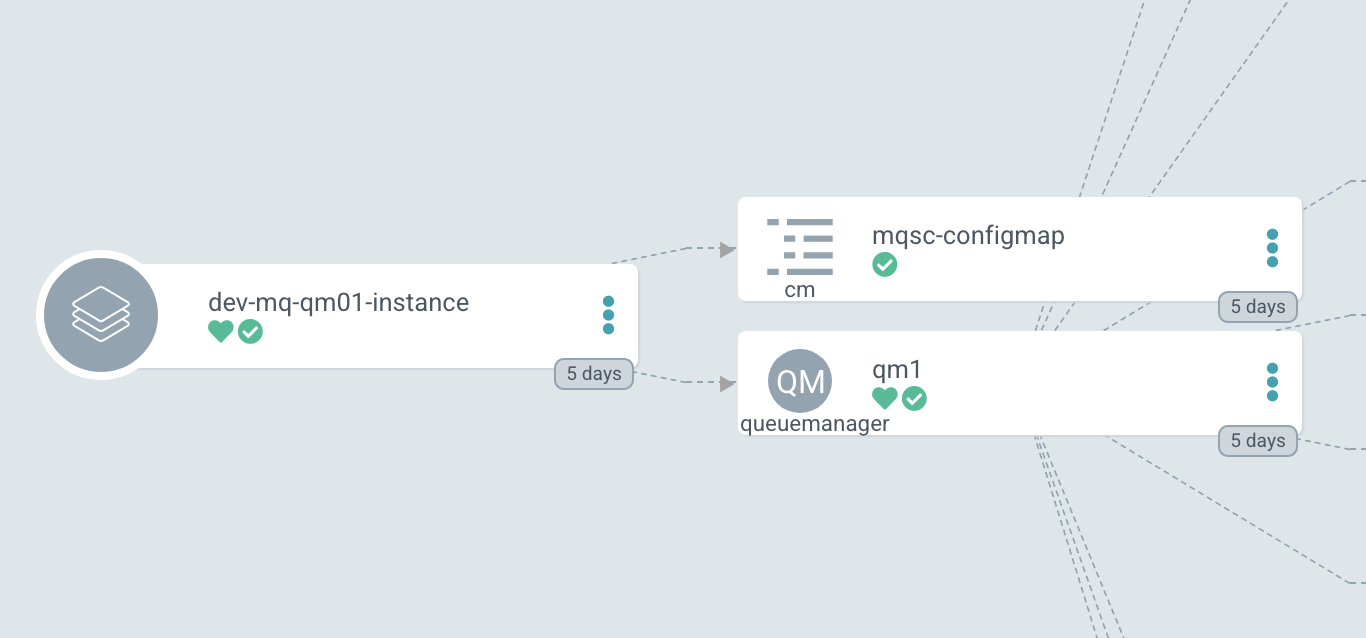
We can see the two components of the queue manager Kubernetes deployment, namely the
queuemanagercustom resource defining the properties ofQM1and theconfigmapcontaining its MQSC configuration.Click on the
qm1queuemanagercustom resource and select the DESIRED MANIFEST tab: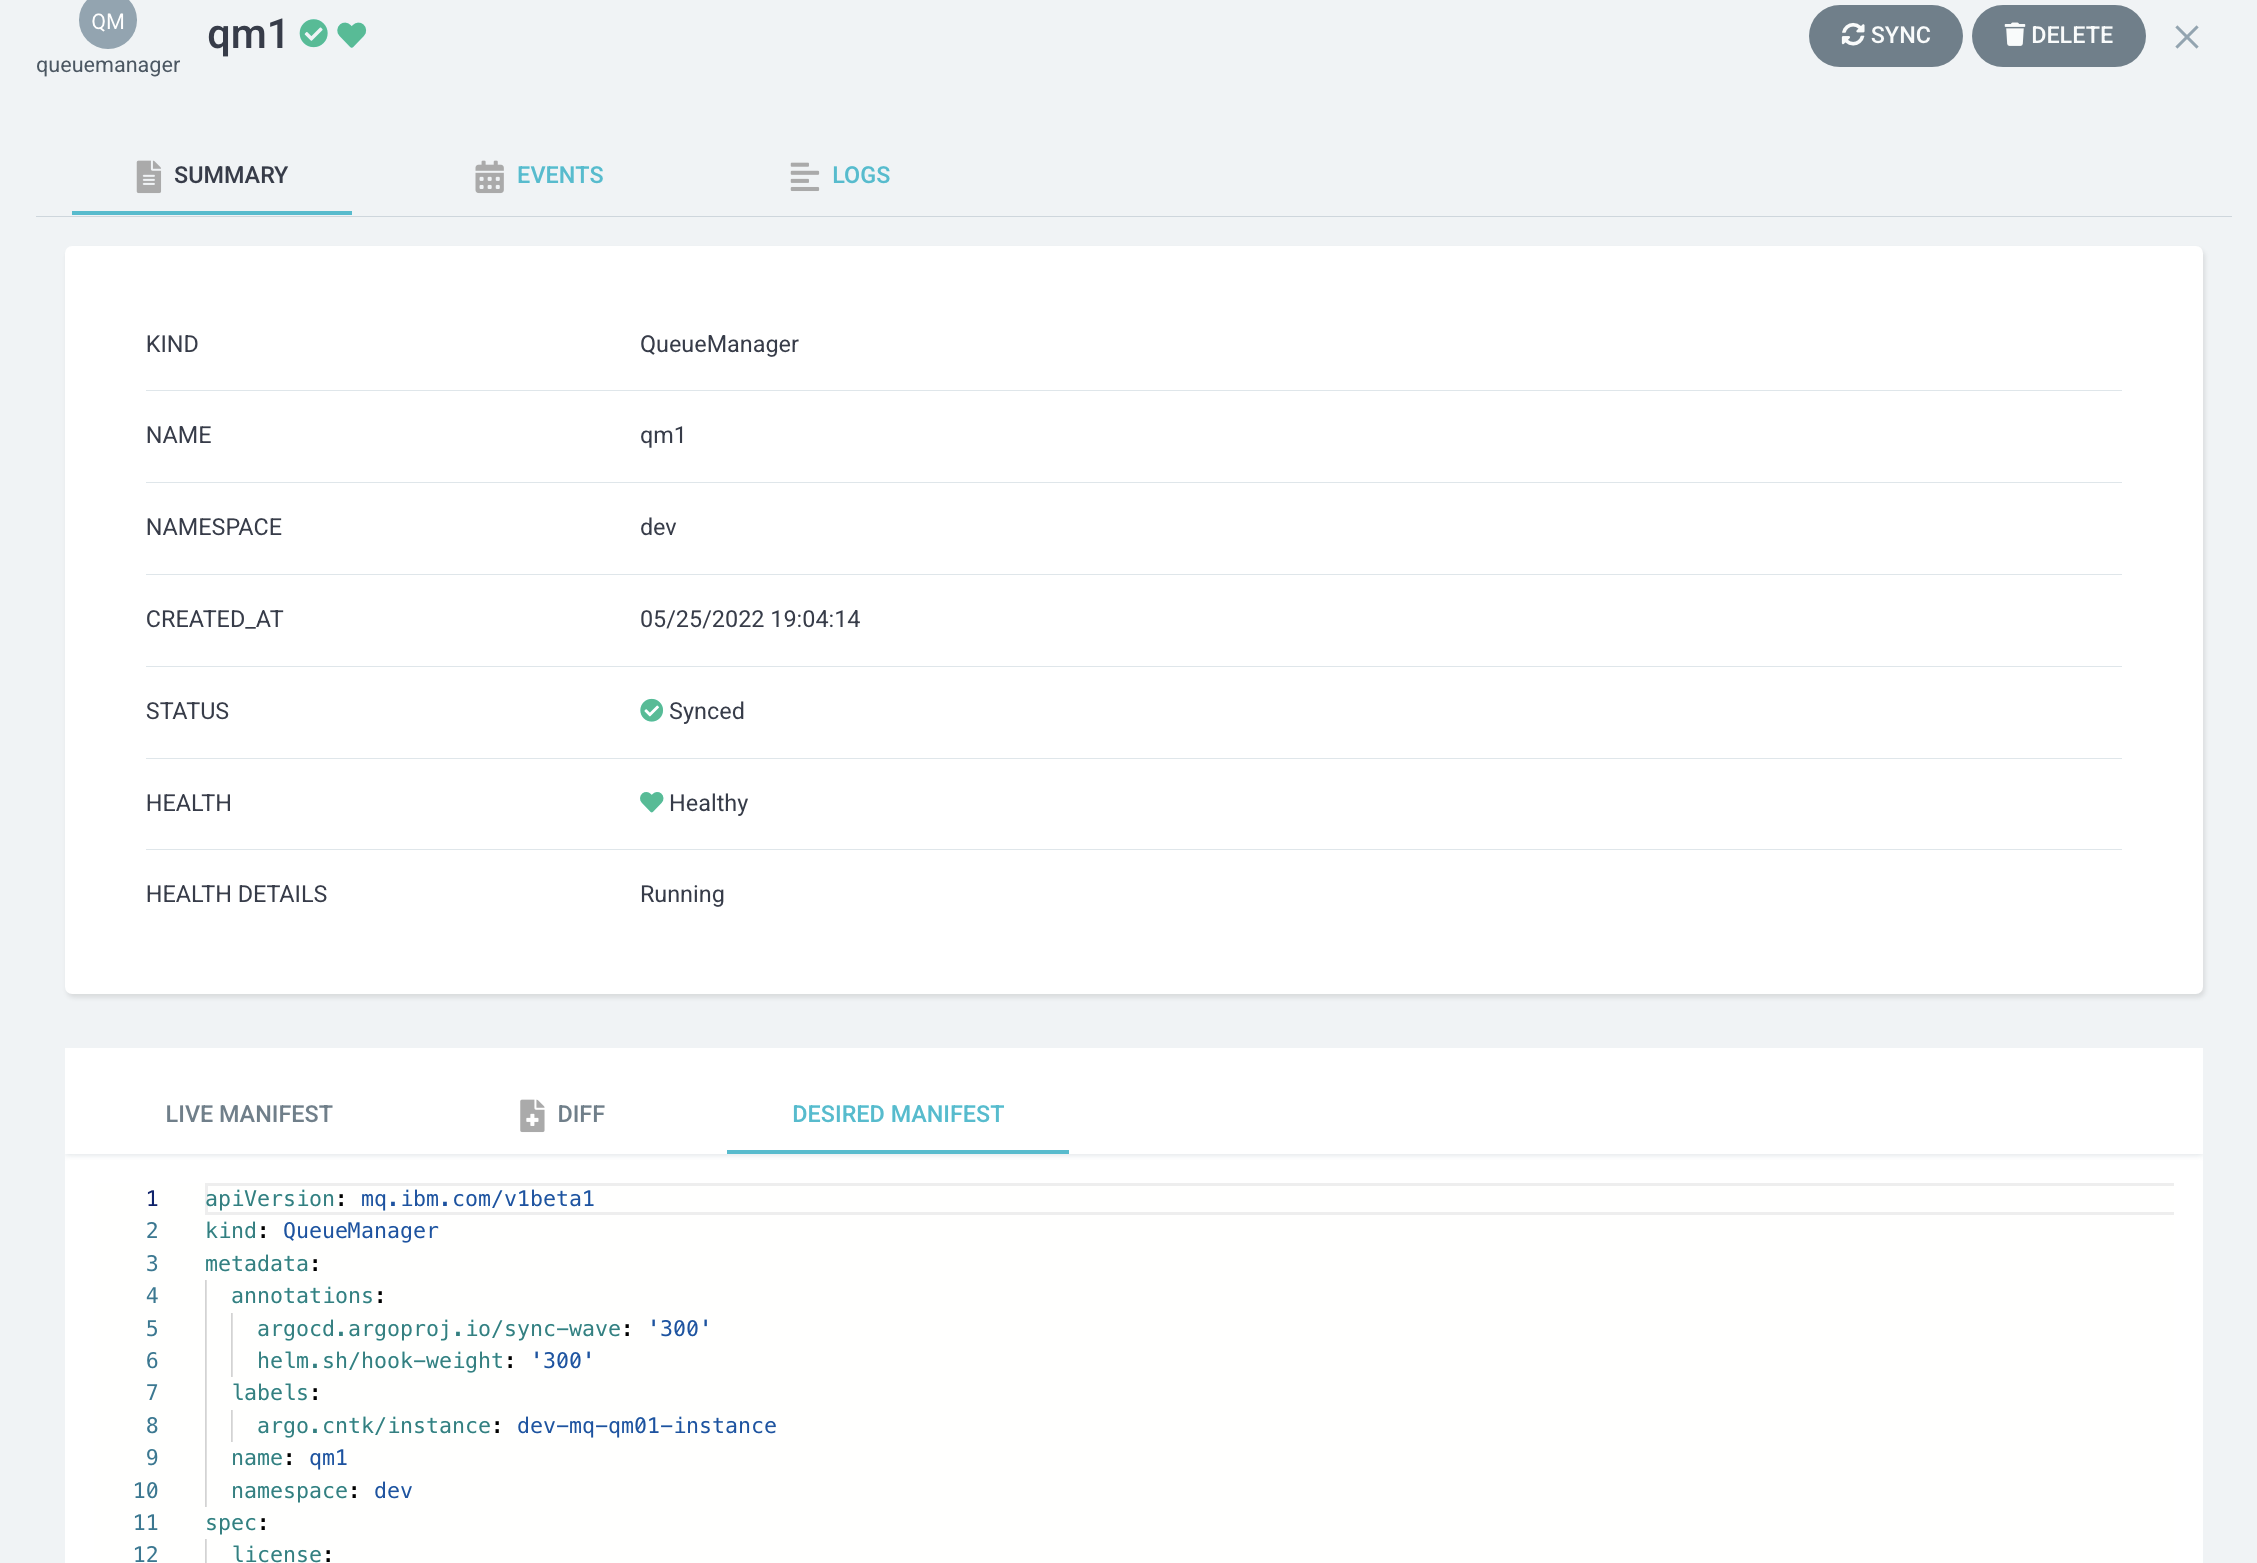
Notice:
- This queue manager uses the newly built container image
image-registry.openshift-image-registry.svc:5000/ci/mq-qm01:0.0.2stored in the OpenShift image registry. - This image was generated by the
buildtask.
Now scroll down a bit:
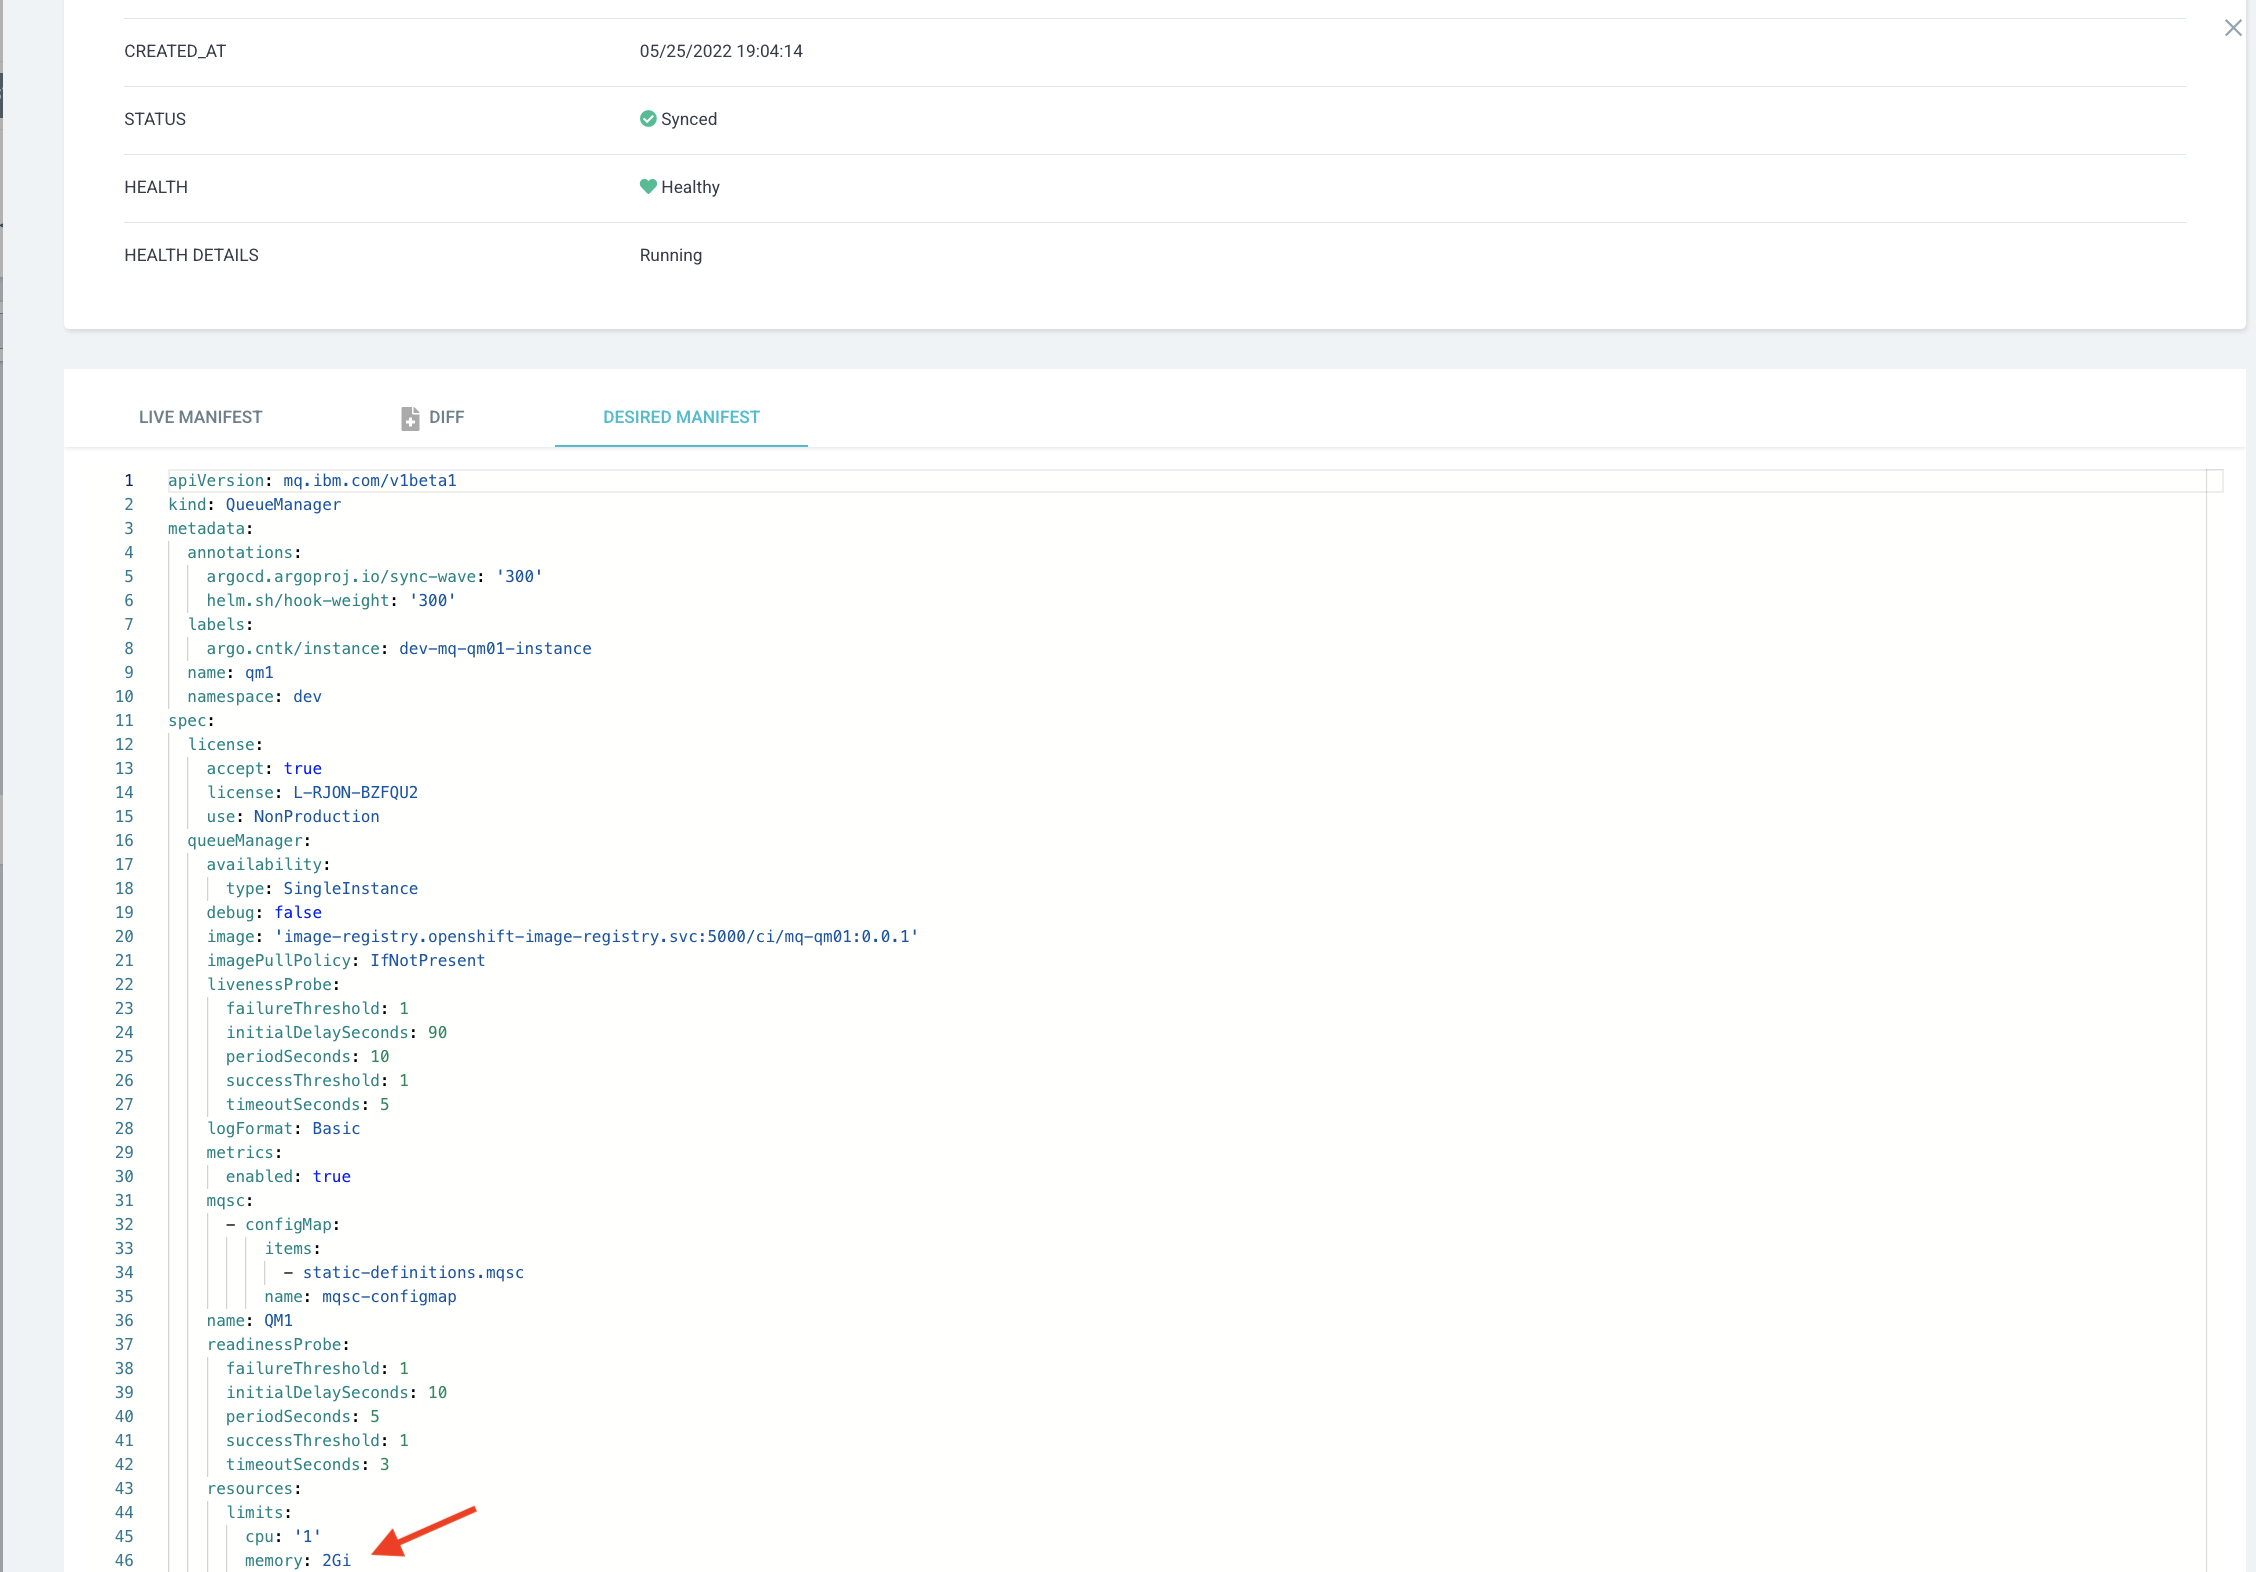
Notice:
- New memory limits of
2Gihas been updated.
Let's now try out the new queue manager.
- This queue manager uses the newly built container image
Verify the updates to QueueManager
Let's now verify and explore the changes we have made to QM1, using both the MQ web console and the oc command.
-
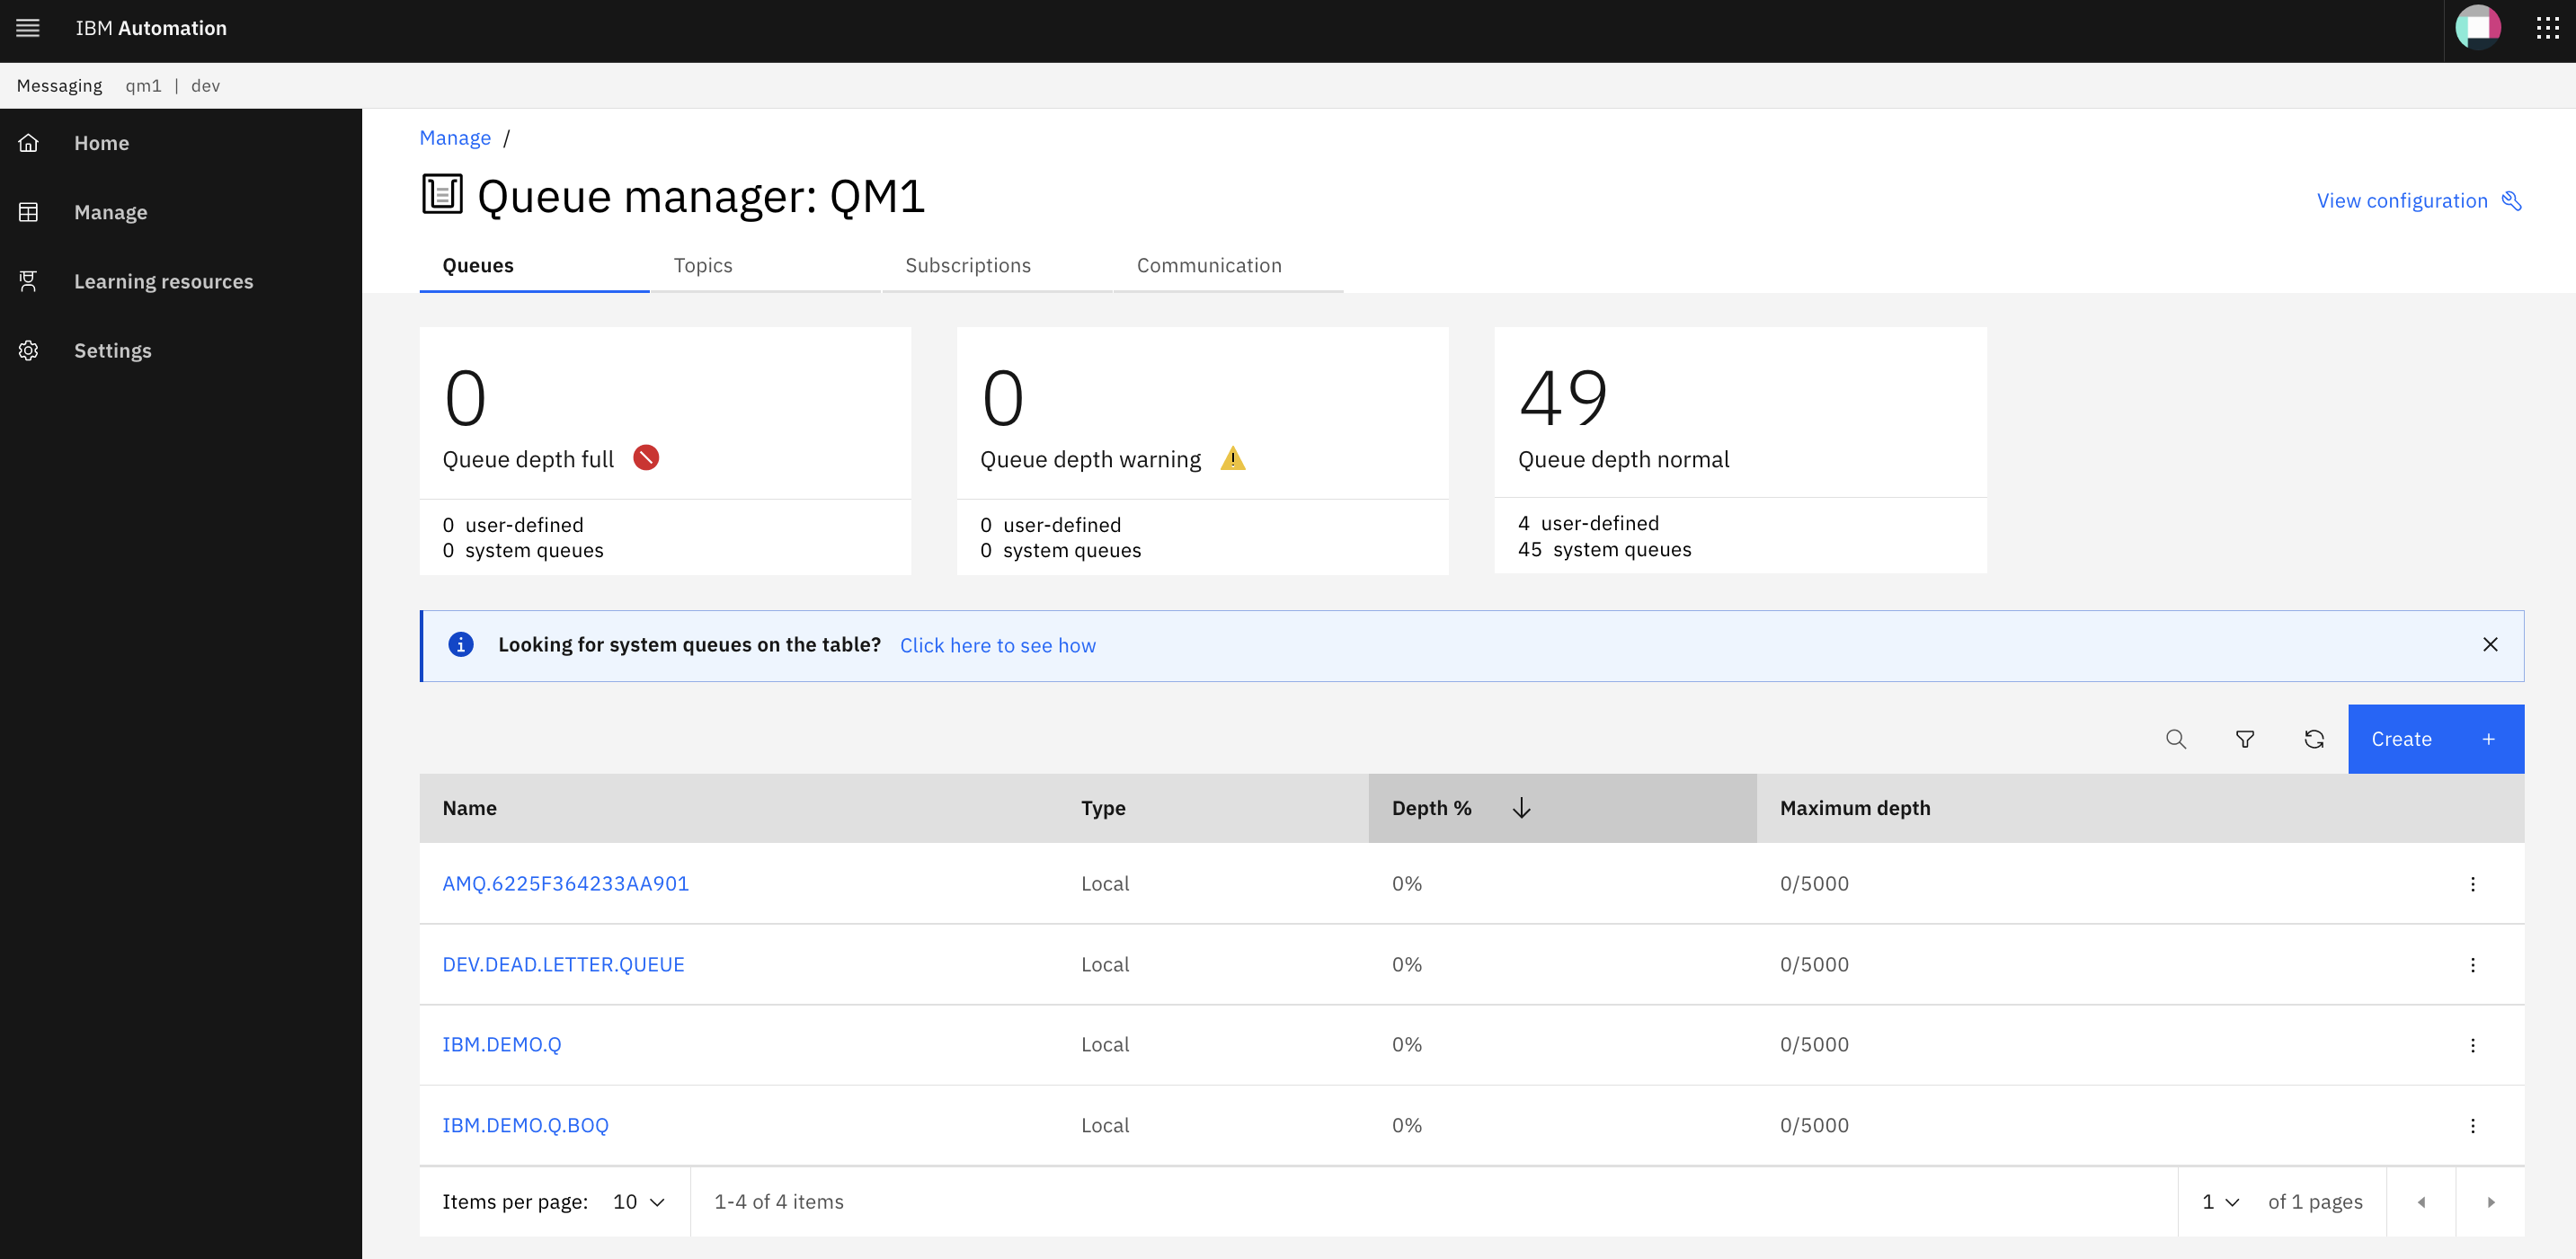
Exploring
QM1with the web consoleSwitch to the MQ web console.
-
Ephemeral queue manager
As we've seen, pods are the fundamental building blocks of Kubernetes. The
QM1queue manager runs in a pod container and when its configuration changes, this pod is replaced by a new one that whose container has an updatedspec:that reflects the updated configuration forQM1. In our scenario this includes a new image.Let's look a little more closely at the
queuemanagercustom resource forQM1to understand what's happening.Issue the following command:
oc get queuemanager qm1 -n dev -o yamlto show the details of the queue manager:
apiVersion: mq.ibm.com/v1beta1
kind: QueueManager
...
spec:
   license:
     accept: true
     license: L-RJON-BN7PN3
     metric: VirtualProcessorCore
     use: NonProduction
   queueManager:
     availability:
       type: SingleInstance
       updateStrategy: RollingUpdate
     debug: false
     image: image-registry.openshift-image-registry.svc:5000/ci/mq-qm01:0.0.2
     imagePullPolicy: IfNotPresent
     livenessProbe:
       failureThreshold: 1
       initialDelaySeconds: 90
       periodSeconds: 10
       successThreshold: 1
       timeoutSeconds: 5
     logFormat: Basic
     metrics:
       enabled: true
     mqsc:
     - configMap:
         items:
         - config.mqsc
         name: mqsc-configmap
     name: QM1
     readinessProbe:
       failureThreshold: 1
       initialDelaySeconds: 10
       periodSeconds: 5
       successThreshold: 1
       timeoutSeconds: 3
     resources:
       limits:
         cpu: "1"
         memory: 1Gi
       requests:
         cpu: "1"
         memory: 1Gi
     route:
       enabled: true
     storage:
       persistedData:
         enabled: false
       queueManager:
         type: ephemeral
       recoveryLogs:
         enabled: false
   securityContext:
     initVolumeAsRoot: false
   template:
     pod:
       containers:
       - env:
         - name: MQSNOAUT
           value: "yes"
         name: qmgr
         resources: {}
   terminationGracePeriodSeconds: 30
   tracing:
     agent: {}
     collector: {}
     enabled: false
     namespace: ""
   version: 9.2.3.0-r1
   web:
     enabled: true
 status:
   adminUiUrl: https://cpd-tools.itzroks-5500068atp-kq42x3-6ccd7f378ae819553d37d5f2ee142bd6-0000.eu-de.containers.appdomain.cloud/integration/messaging/dev/qm1-ibm-mq
   conditions: []
   endpoints:
   - name: ui
     type: UI
     uri: https://cpd-tools.itzroks-5500068atp-kq42x3-6ccd7f378ae819553d37d5f2ee142bd6-0000.eu-de.containers.appdomain.cloud/integration/messaging/dev/qm1-ibm-mq
   name: QM1
   phase: Running
   versions:
     available:
       channels: []
       versions:
       - name: 9.2.3.0-r1
     reconciled: 9.2.3.0-r1
Notice the
spec.queueManager.storage.queueManager.type: ephemeral. As you can see from the API reference for the QueueManager this defines an ephemeral queue manager.An ephemeral queue manager is one whose logs and queue files are defined within the container file system rather than external to it. It means that when the pod is replaced, all the container queue files and log files are lost. That's why our QMID is changed and our message was lost -- they were stored in the file system of the old container. When the pod restarted for the updated queue manager deployment, it was like a new queue manager was being created because the container file system was new.
We rarely use ephemeral queue managers for production work; usually a queue manager stores its queue and log files in a persistent volume using a persistent volume claim that is mounted into the container when the pod starts.
Using a persistent volume means that restarting a pod doesn't affect the long term state of the queue manager -- properties like QMID, together with messages in queues are stored in queue and log files that are preserved in the persistent volume claim that is reattached to a restarted container pod. We'll use persistent volumes in the High Availability chapter.
For now, our use of an ephemeral queue manager has shown nicely how a configuration change results in an updated queue manager deployment resulting in a pod restart for the queue manager.
Congratulations!
You've now got a fully automated CICD process for your queue manager.
You started the chapter by configuring a webhook to generate an event notification whenever the QM1 source repository was changed. You then created an event listener and trigger in your cluster to process these events and start a pipeline run using the data in the event. After updating the QM1 source repository to add a new queue to its MQSC definitions, a pipeline run was triggered automatically.
As the pipeline run progressed, you explored its task logs and how key tasks worked. You explored the detailed structure of the mq-qm-dev pipeline in terms of its tasks and their steps. You explored these task steps produced new and updated artifacts such as a container image and kubernetes resources. You saw how git tags were used to version control these artifacts.
Once the pipeline run completed, you examined the updated queue manager deployment using ArgoCD. You tried out the updated queue manager to confirm that the new queue had been added to QM1. Finally, you explored the concept of an ephemeral queue manager its persistent volume, together with how these combine with Kubernetes pods and containers.
In the next chapter, we're going to create an MQ application that exploits this queue manager.