Deploying and using the queue manager
Audience: Architects, Application developers, Administrators
Timing: 20 minutes
Overview
In the previous topic of this chapter, we ran the queue pipeline using the source repository for QM1. The pipeline successfully built and tested the queue manager as well as creating versioned resources in the image registry and the GitOps repository.
In this topic, you will set up continuous deployment for QM1 that will use the resources created by the pipeline run. We'll examine the activated ArgoCD application that will watch the GitOps folder containing the Helm chart for QM1 and use it and its dependent resources to deploy a running queue manager to the dev namespace in the cluster.
Look at the following diagram:
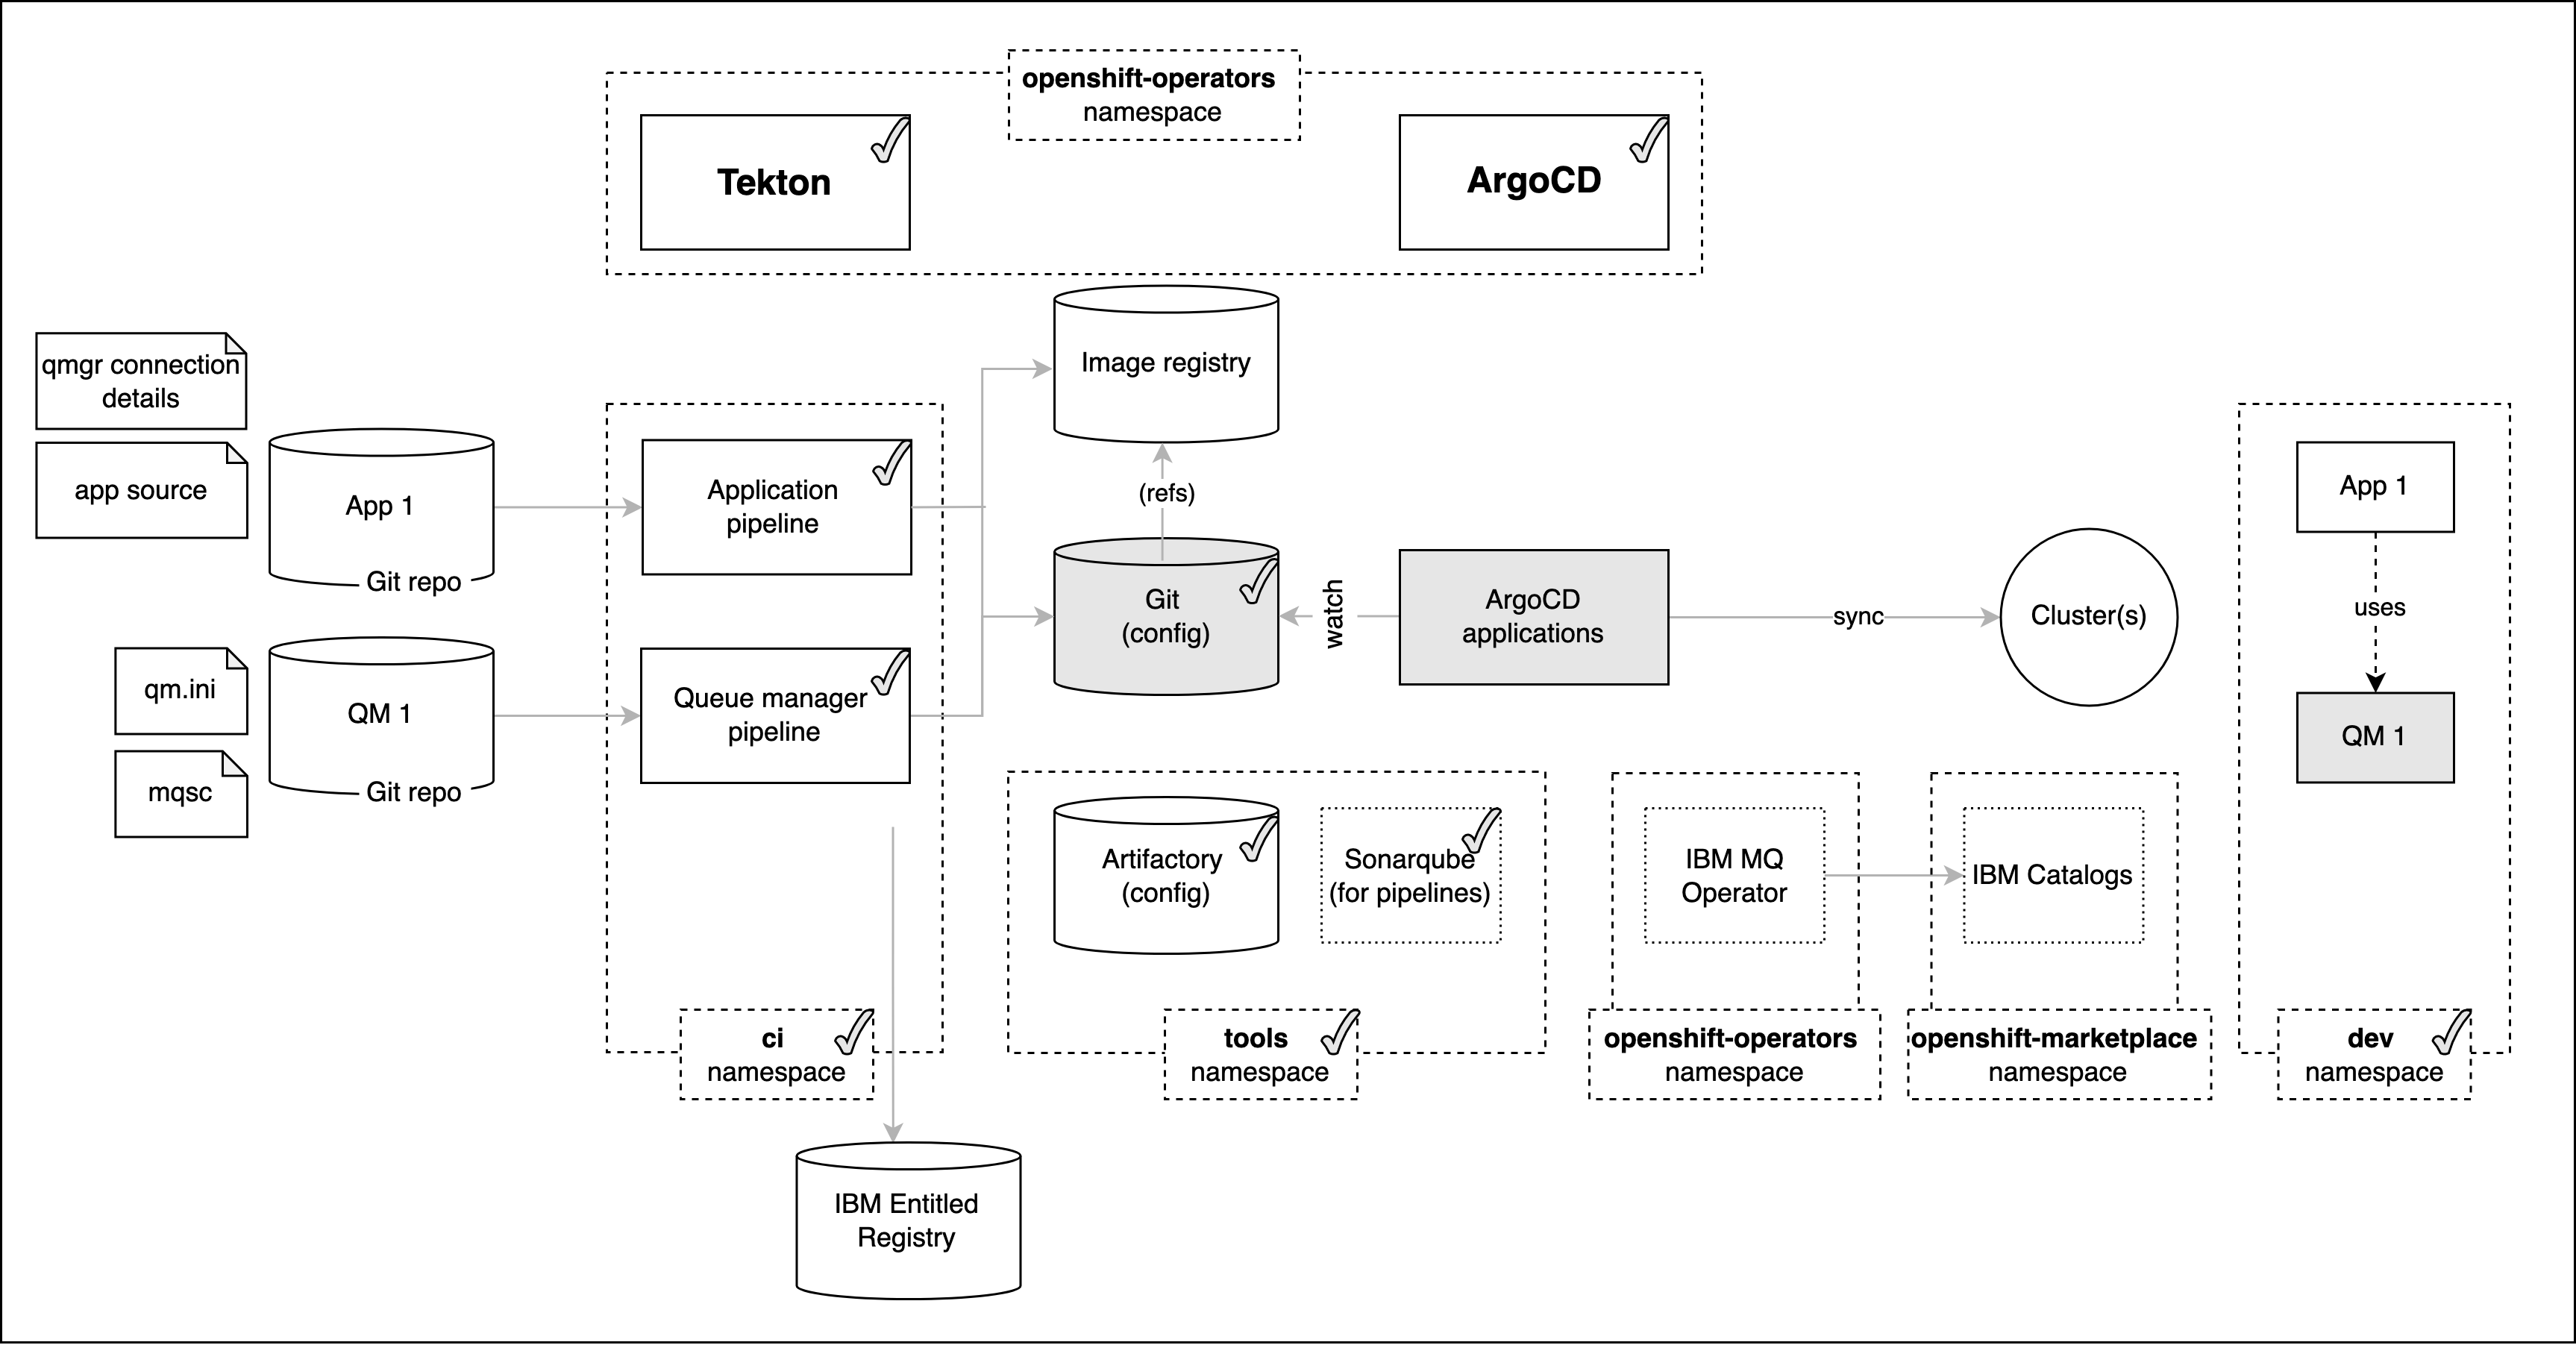
We've highlighted the components we're going to explore in this topic:
- The
GitOps repositoryis used by ArgoCD applications to determine what should be active in the cluster. It contains the latest good deployment configuration forQM1. - An
ArgoCD applicationspecific forQM1will monitor a GitOps folder where its resources are held. Whenever this folder is updated, this ArgoCD application will apply these updates to the cluster, resulting in a new deployment ofQM1. - The instance of
QM1running in the cluster is active development queue manager ready for use by MQ applications under development.
In this topic, we're going to:
- Examine the activated ArgoCD application that deploys the
QM1configuration to the cluster. - Explore the Kubernetes resources that have been deployed to the cluster for
QM1. - Interact with the deployed queue manager
QM1.
By the end of this topic we'll have a fully functioning queue manager deployed to the cluster with which we will have interacted.
Pre-requisites
Before attempting this topic, you should have successfully completed the previous topic.
ArgoCD application for QM1
We're now going to move from the integration of QM1 to its deployment.
The result of our previously successful mq-qm-dev pipeline run was to create the necessary Kubernetes components in a GitOps folder for QM1 deployment.
We're now going to examine the activated ArgoCD application that uses these resources to manage the deployment of QM1 to the dev namespace.
-
The ArgoCD application for
QM1QM1has its deployment to the cluster managed by a dedicated ArgoCD application calleddev-mq-qm01-instance. This follows the separation of concerns pattern where one ArgoCD application manages a set of related Kubernetes resources deployed to a cluster; in this case, all those resources associated with queue managerQM1in thedevnamespace.Make sure you are within the GitOps application repository folder:
cd $GIT_ROOT
cd multi-tenancy-gitops-apps
Issue the following command to show the ArgoCD application details:
cat mq/config/argocd/dev/dev-mq-qm01-instance.yamlwhich shows a YAML file typical of those we've seen before:
apiVersion: argoproj.io/v1alpha1
kind: Application
metadata:
  name: dev-mq-qm01-instance
  annotations:
    argocd.argoproj.io/sync-wave: "300"
  finalizers:
    - resources-finalizer.argocd.argoproj.io
spec:
  destination:
    namespace: dev
    server: https://kubernetes.default.svc
  project: applications
  source:
    path: mq/environments/dev/mq-qm01/
    repoURL: https://github.com/prod-ref-guide/multi-tenancy-gitops-apps.git
    targetRevision: master
  syncPolicy:
    automated:
      prune: true
      selfHeal: true
    syncOptions:
      - Replace=true
The ArgoCD application applies the queuemanager resources to the cluster to instantiate
QM1as a set of cluster resources. -
Look at active
QM1ArgoCD applicationLet's examine
QM1and its Kubernetes resources using the ArgoCD UI.In the ArgoCD UI search the Applications view with the keyword
mq-qm01:(You may need to launch the ArgoCD UI again. Refer to these instructions.)
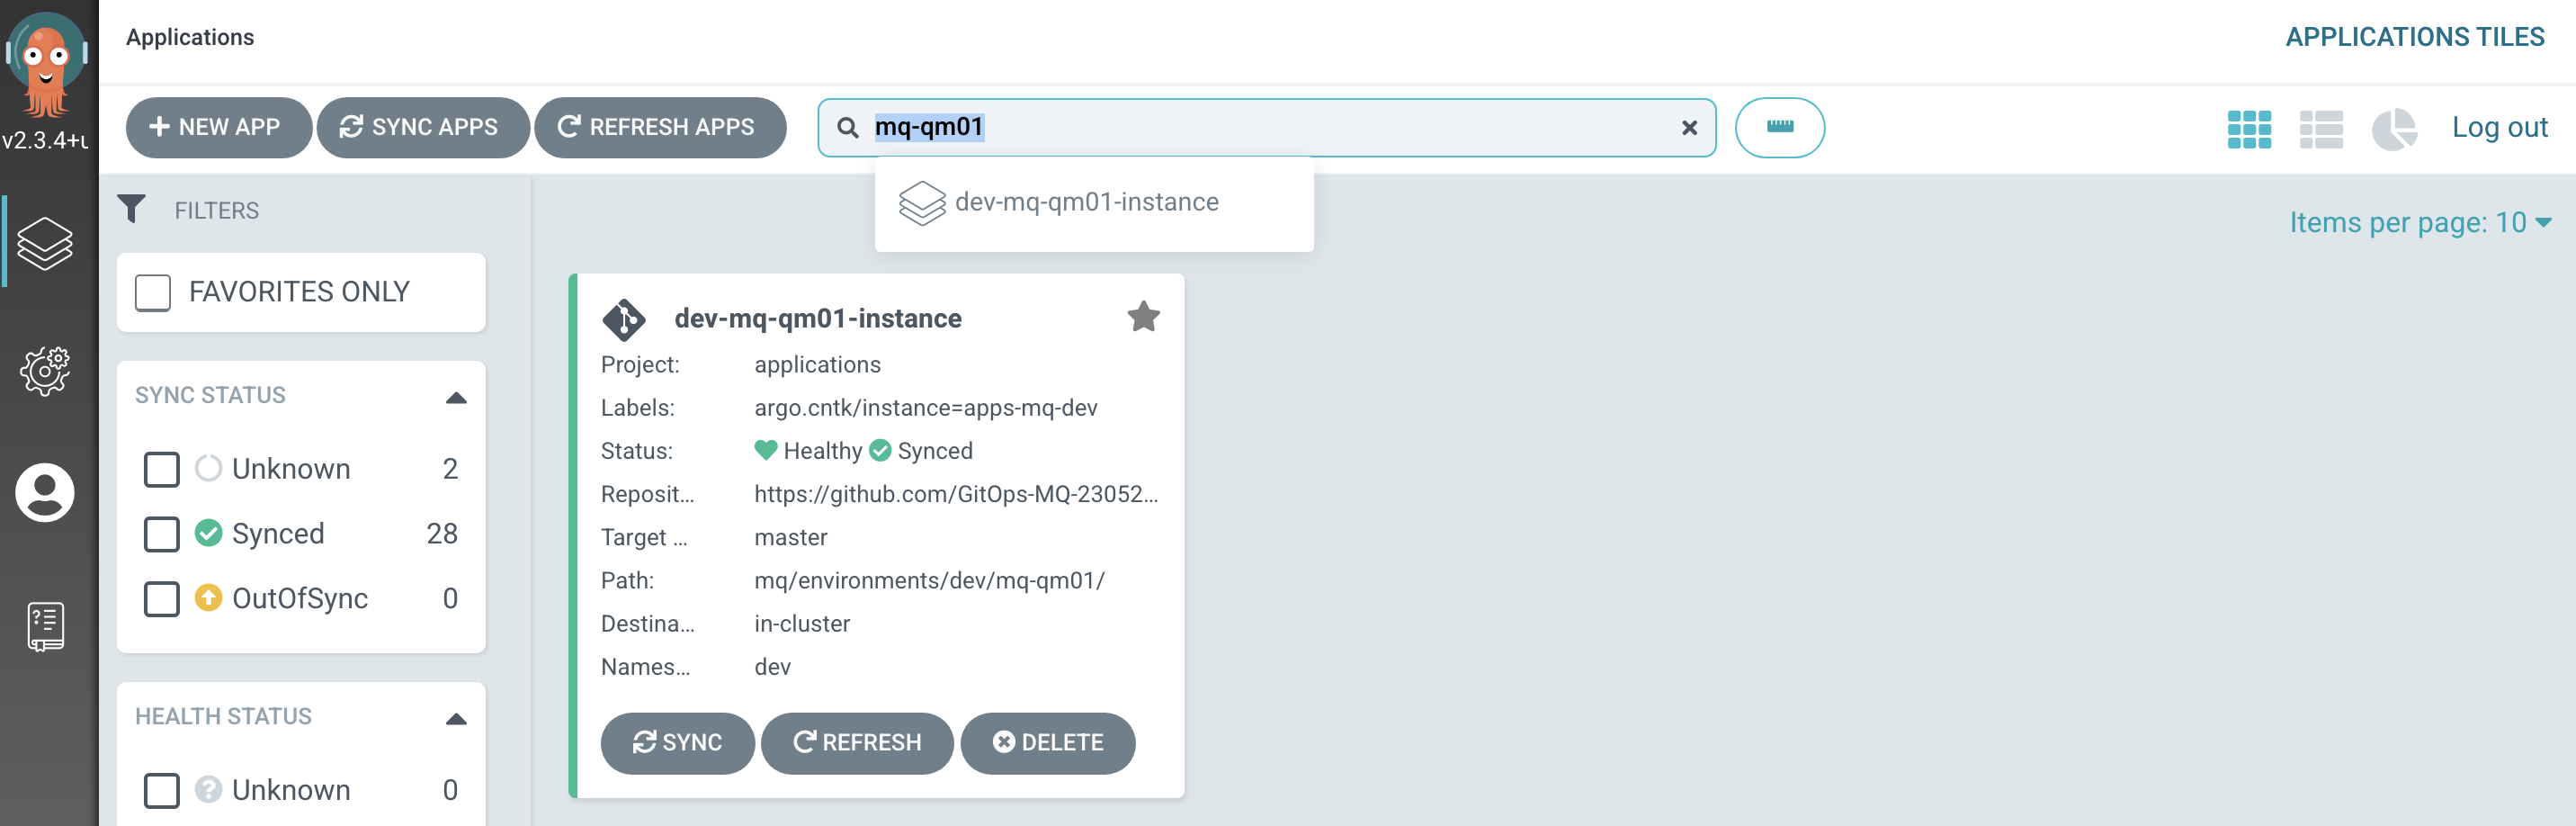
We can now see the below ArgoCD Application:
- A new
dev-mq-qm01-instanceArgoCD application that is managingQM1resources deployed to the cluster.
- A new
-
View the new
QM1Kubernetes resourcesWe can look at the deployed instance of
QM1and its dependent kubernetes resources.Click on the
dev-mq-qm01-instanceArgoCD application: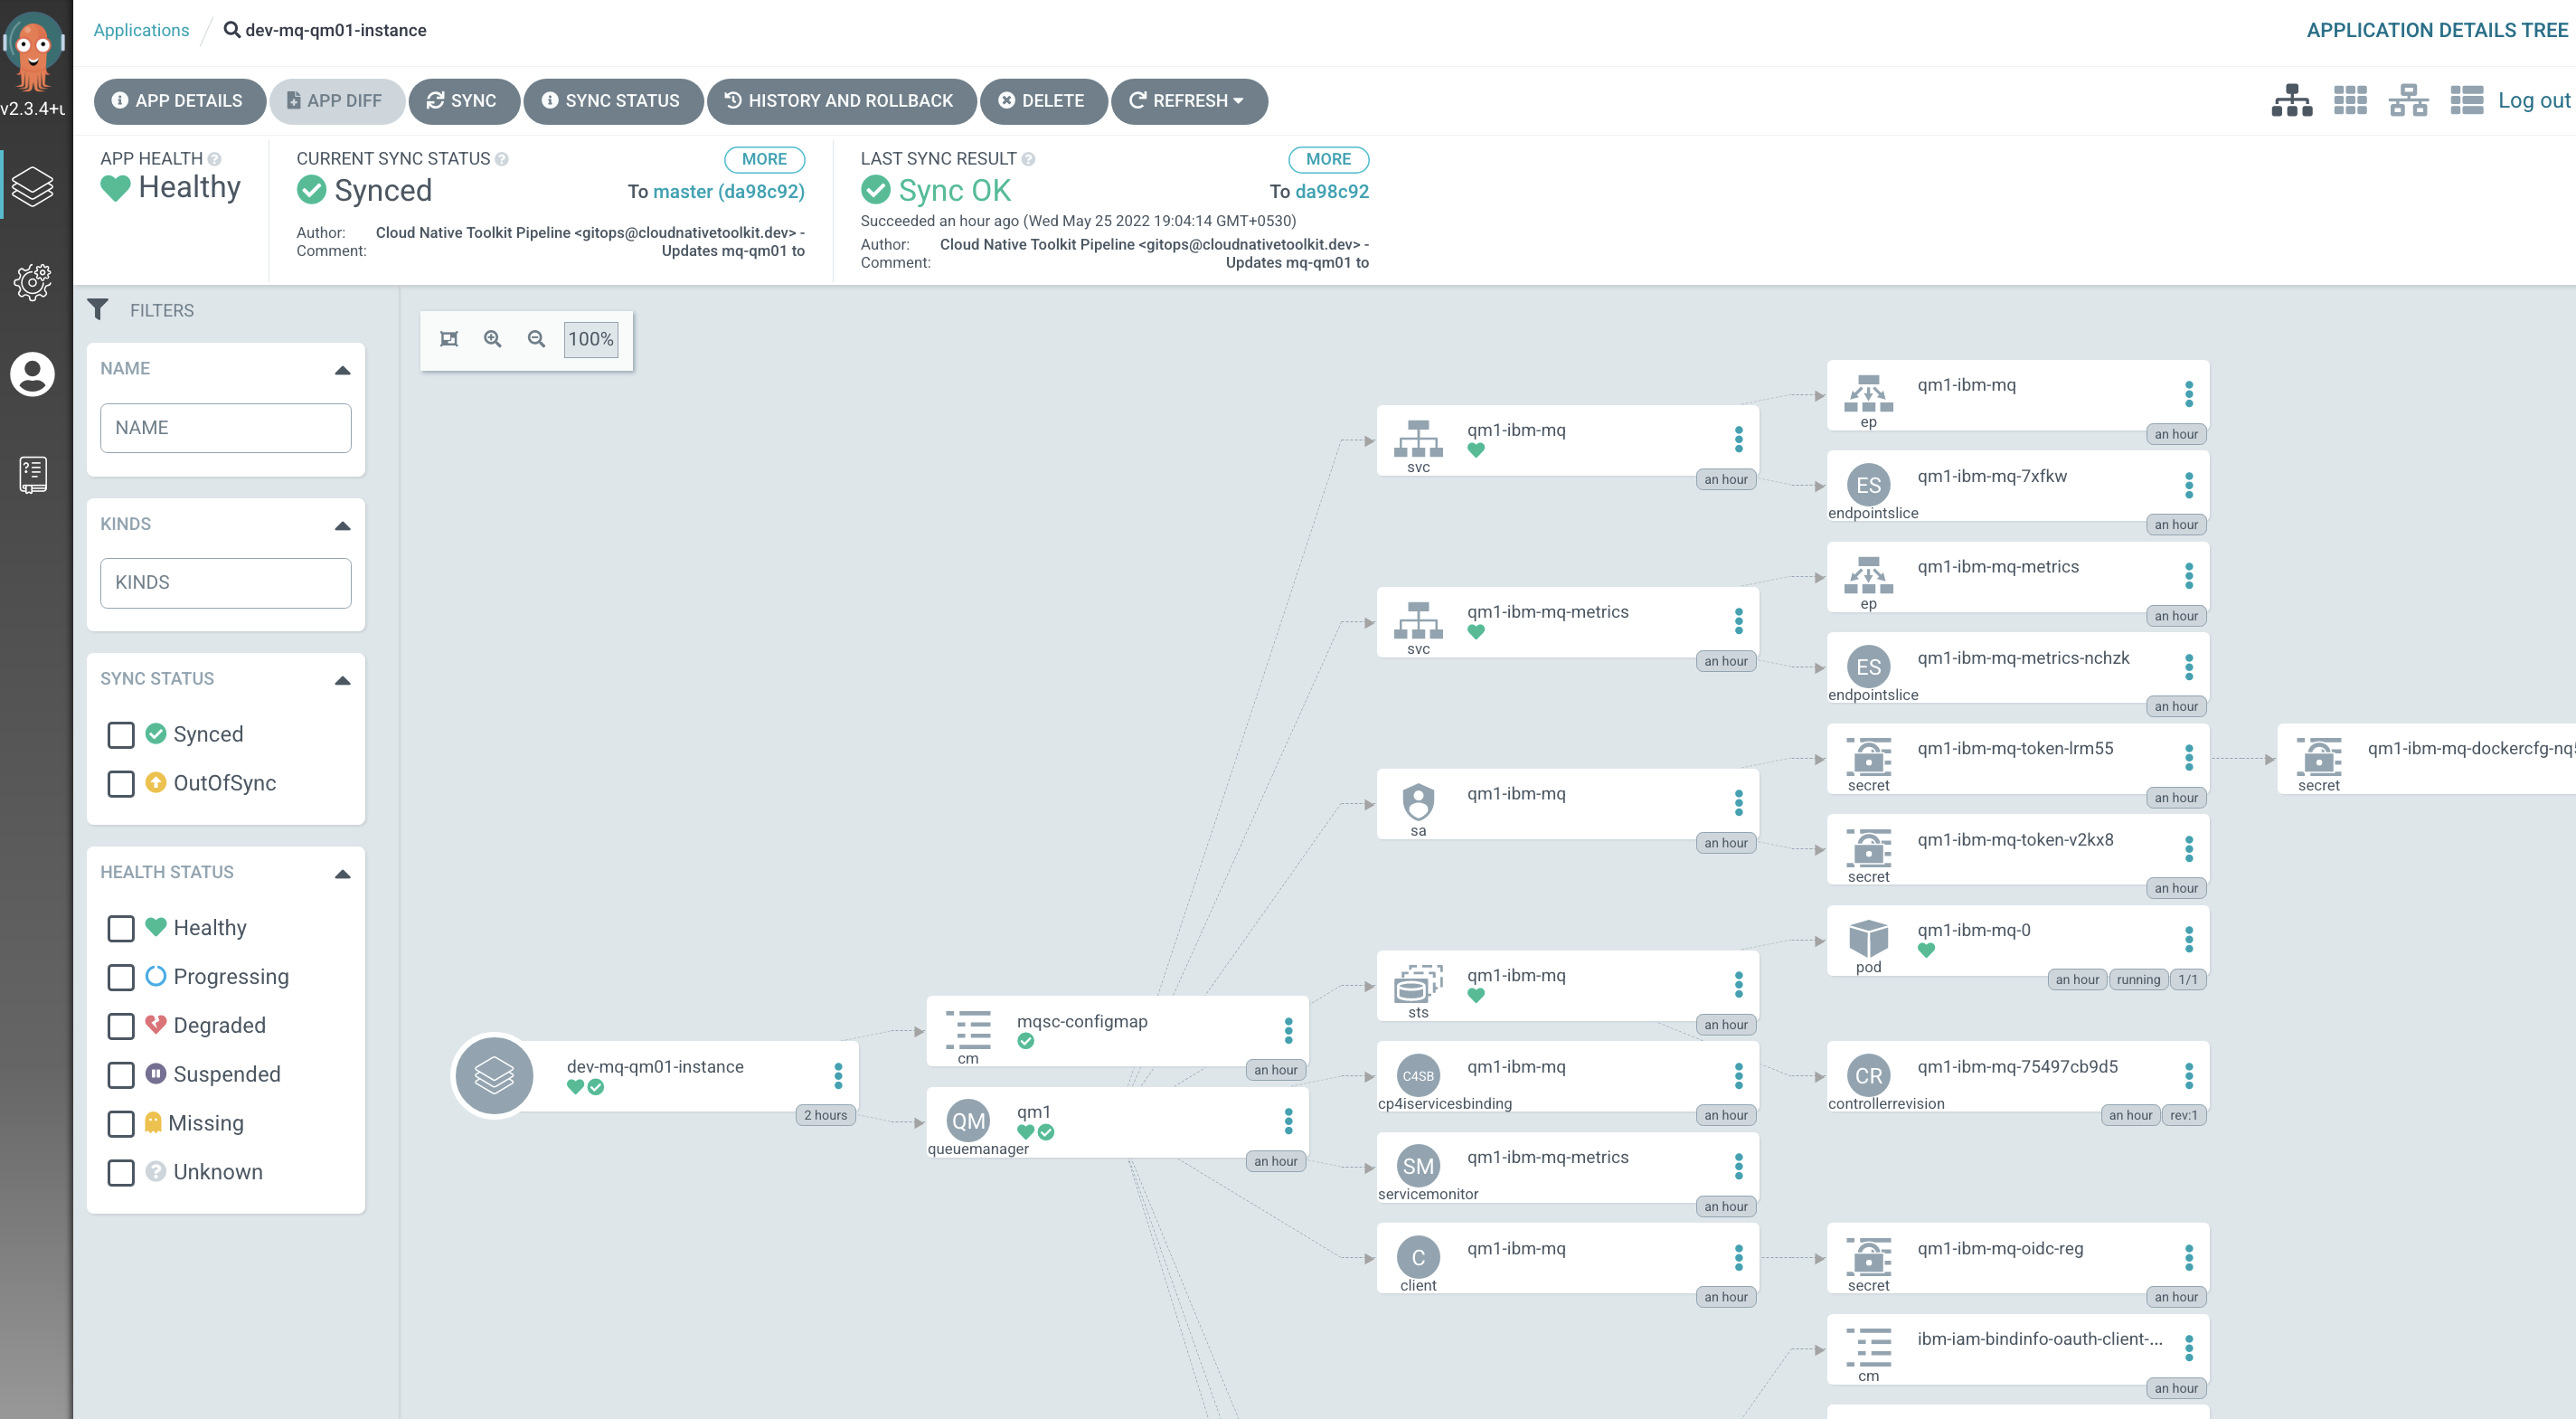
We can see that
QM1is comprised of many Kubernetes resources. We'll explore them in more detail later, but for now notice:-
The
QM1queue manager comprises two main Kubernetes components:- the
mqsc-configmapconfigmap resource that holds the MQSC definitions applied toQM1when it started. - the
qm1queuemanagercustom resource that represents the running queue manager.
- the
The
qm1custom resource has a rich structure comprising:- a
qm1-ibm-mq-0pod where theQM1binaries are running - a
qm1-ibm-mq-qmroute to the queue manager - a
qm1-ibm-mq-qm-webroute to the MQ web console - a
qm1-ibm-mqservice - a
qm1-ibm-mq-metricsmetrics service - a
qm1-ibm-mqservice account - a
qm1-ibm-mqstateful set - many other resources including secrets, configmaps, endpoints and more
These queue manager components are managed by the
IBM MQoperator which takes theQM1YAML and creates (and maintains) these Kubernetes resources.If the dynamic configurations are enabled, the
dev-mq-qm01-instanceArgoCD application is as follows:
If you carefully observe, you will notice some additional resources like
dynamic-mqsc-configmap,scripts-configmapalong with the above mentioned resources.Feel free to click on these components to get an idea of their contents. It's not important to understand this structure in detail -- but it helps to appreciate what's going on when we deploy
QM1. If you're used to running MQ outside of Kubernetes, you may find it interesting to map these Kubernetes resources to MQ components with which you're familiar. -
Explore the deployed Kubernetes resources for QM1
Let's spend a few moments exploring the two Kubernetes resources that have been deployed: the queuemanager custom resource named qm1, and its MQSC configuration stored in the configmap named mqsc-configmap.
-
Exploring the deployed queue manager using the command line
We will explore the
qm1queuemanagerresource from theoccommand line. The extensible nature of Kubernetes allows us to examine the newqueuemanagercustom resource added by theIBM MQoperator.Issue the following command:
oc describe queuemanager qm1 -n devNotice how
API Version: mq.ibm.com/v1beta1andKind: QueueManageridentify this as an IBM MQ queue manager.Name: qm1 Namespace: dev Labels: argo.cntk/instance=dev-mq-qm01-instance Annotations: argocd.argoproj.io/sync-wave: 300 helm.sh/hook-weight: 300 API Version: mq.ibm.com/v1beta1 Kind: QueueManager Metadata: Creation Timestamp: 2022-05-25T13:34:14Z Finalizers: finalizer.queuemanagers.mq.ibm.com Generation: 2 Managed Fields: ... Spec: License: Accept: true License: L-RJON-BZFQU2 Metric: VirtualProcessorCore Use: NonProduction Queue Manager: Availability: Type: SingleInstance Update Strategy: RollingUpdate Debug: false Image: image-registry.openshift-image-registry.svc:5000/ci/mq-qm01:0.0.1 Image Pull Policy: IfNotPresent Liveness Probe: Failure Threshold: 1 Initial Delay Seconds: 90 Period Seconds: 10 Success Threshold: 1 Timeout Seconds: 5 Log Format: Basic Metrics: Enabled: true Mqsc: Config Map: Items: static-definitions.mqsc Name: mqsc-configmap Name: QM1 Readiness Probe: Failure Threshold: 1 Initial Delay Seconds: 10 Period Seconds: 5 Success Threshold: 1 Timeout Seconds: 3 Resources: Limits: Cpu: 1 Memory: 2Gi Requests: Cpu: 1 Memory: 1Gi Route: Enabled: true Storage: Persisted Data: Enabled: false Queue Manager: Type: ephemeral Recovery Logs: Enabled: false Security Context: Init Volume As Root: false Template: Pod: Containers: Env: Name: MQSNOAUT Value: yes Name: qmgr Resources: Termination Grace Period Seconds: 30 Tracing: Agent: Collector: Enabled: false Namespace: Version: 9.2.3.0-r1 Web: Enabled: true Status: Admin Ui URL: https://qm1-ibm-mq-web-dev.itzroks-5500068atp-bqhgmx-6ccd7f378ae819553d37d5f2ee142bd6-0000.jp-tok.containers.appdomain.cloud/ibmmq/console Conditions: Endpoints: Name: ui Type: UI Uri: https://qm1-ibm-mq-web-dev.itzroks-5500068atp-bqhgmx-6ccd7f378ae819553d37d5f2ee142bd6-0000.jp-tok.containers.appdomain.cloud/ibmmq/console Name: QM1 Phase: Running Versions: Available: Channels: Versions: Name: 9.2.3.0-r1 Reconciled: 9.2.3.0-r1 Events: <none>(We've abbreviated it slightly to exclude the
Managed Fields:YAML detail.)Here are a few things to note:
Spec.Queue Manager.Nameidentities the name of the queue manager asQM1Name:identifies the name of the Kubernetes resource asqm1. Note how it incorporates the fact that the queue manager is running in thedevnamespace. (This name should really beqm1-dev!)Spec.Queue Manager.Image:identifies the image stored in the image registry that this queue manager is running.Spec.Queue Manager.Mqsc:identifies the name of the config mapmqsc-configmap.
If dynamic configurations are enabled, it will be as follows:
Name:         qm1
Namespace:    dev
Labels:       argo.cntk/instance=dev-mq-qm01-instance
Annotations:  argocd.argoproj.io/sync-wave: 300
              helm.sh/hook-weight: 300
API Version:  mq.ibm.com/v1beta1
Kind:         QueueManager
Metadata:
  Creation Timestamp:  2022-07-05T16:10:09Z
  Finalizers:
    finalizer.queuemanagers.mq.ibm.com
  Generation:  2
  Managed Fields:
  ...
  Spec:
    License:
      Accept:   true
      License:  L-RJON-BZFQU2
      Metric:   VirtualProcessorCore
      Use:      NonProduction
    Queue Manager:
      Availability:
        Type:             SingleInstance
        Update Strategy:  RollingUpdate
      Debug:              false
      Image:              image-registry.openshift-image-registry.svc:5000/ci/mq-qm01:0.0.1
      Image Pull Policy:  IfNotPresent
      Liveness Probe:
        Failure Threshold:      1
        Initial Delay Seconds:  90
        Period Seconds:         10
        Success Threshold:      1
        Timeout Seconds:        5
      Log Format:               Basic
      Metrics:
        Enabled:  true
      Mqsc:
        Config Map:
          Items:
            static-definitions.mqsc
          Name:  mqsc-configmap
      Name:      QM1
      Readiness Probe:
        Failure Threshold:      1
        Initial Delay Seconds:  10
        Period Seconds:         5
        Success Threshold:      1
        Timeout Seconds:        3
      Resources:
        Limits:
          Cpu:     1
          Memory:  1Gi
        Requests:
          Cpu:     1
          Memory:  1Gi
      Route:
        Enabled:  true
      Storage:
        Persisted Data:
          Enabled:  false
        Queue Manager:
          Type:  ephemeral
        Recovery Logs:
          Enabled:  false
    Security Context:
      Init Volume As Root:  false
    Template:
      Pod:
        Containers:
          Env:
            Name:   MQSNOAUT
            Value:  yes
          Name:     qmgr
          Resources:
          Volume Mounts:
            Mount Path:  /mq-config
            Name:        config-volume-scripts
            Read Only:   true
            Mount Path:  /dynamic-mq-config-mqsc
            Name:        dynamic-config-volume-mqsc
            Read Only:   true
        Volumes:
          Config Map:
            Default Mode:  511
            Name:          scripts-configmap
          Name:            config-volume-scripts
          Config Map:
            Default Mode:              511
            Name:                      dynamic-mqsc-configmap
          Name:                        dynamic-config-volume-mqsc
    Termination Grace Period Seconds:  30
    Tracing:
      Agent:
      Collector:
      Enabled:    false
      Namespace:
    Version:      9.2.3.0-r1
    Web:
      Enabled:  true
  Status:
    Admin Ui URL:  https://cpd-tools.itzroks-5500068atp-axdfhz-6ccd7f378ae819553d37d5f2ee142bd6-0000.jp-tok.containers.appdomain.cloud/integration/messaging/dev/qm1-ibm-mq
    Conditions:
    Endpoints:
      Name:  ui
      Type:  UI
      Uri:   https://cpd-tools.itzroks-5500068atp-axdfhz-6ccd7f378ae819553d37d5f2ee142bd6-0000.jp-tok.containers.appdomain.cloud/integration/messaging/dev/qm1-ibm-mq
    Name:    QM1
    Phase:   Running
    Versions:
      Available:
        Channels:
        Versions:
          Name:    9.2.3.0-r1
      Reconciled:  9.2.3.0-r1
  Events:          <none>
This additionally contains the volumes setup in the queue manager which holds the dynamic mqsc definitions.
Notice how we cannot see the internal structure of the queue manager. Instead we can see the YAML that was built from the
QM1Helm chart and applied to the cluster.For more details on this configuration, see the API reference for the
QueueManager(mq.ibm.com/v1beta1). -
Exploring the MQSC configuration for
QM1Let's now look at the MQSC configuration for this queue manager. As we've seen, it's contained in the
mqsc-configmapconfigmap.Issue the following command
oc get configmap mqsc-configmap -n dev -o yamlto show the MQSC commands that are applied to the queue manager when it starts:
apiVersion: v1
data:
  static-definitions.mqsc: |
    DEFINE QLOCAL(IBM.DEMO.Q) BOQNAME(IBM.DEMO.Q.BOQ) BOTHRESH(3) REPLACE
    DEFINE QLOCAL(IBM.DEMO.Q.BOQ) REPLACE
    * Use a different dead letter queue, for undeliverable messages
    DEFINE QLOCAL('DEV.DEAD.LETTER.QUEUE') REPLACE
    ALTER QMGR DEADQ('DEV.DEAD.LETTER.QUEUE')
    DEFINE CHANNEL('IBM.APP.SVRCONN') CHLTYPE(SVRCONN)
    ALTER QMGR CHLAUTH (DISABLED)
    * DEFINE CHANNEL('MONITORING_CHL') CHLTYPE(SVRCONN)
    * SET CHLAUTH(MONITORING_CHL) TYPE(BLOCKUSER) USERLIST(NOBODY)
    REFRESH SECURITY TYPE(CONNAUTH)
    * optional
    DEFINE SERVICE(APPLY_MQSC) CONTROL(QMGR) SERVTYPE(SERVER) STARTCMD('/mq-config/start-mqsc.sh') STARTARG(QM1) STOPCMD('/mq-config/start-mqsc.sh') STOPARG('') STDOUT('') STDERR('')
kind: ConfigMap
...
Since we enabled dynamic configurations, there will be two more additional configmaps. As we've seen, they are
dynamic-mqsc-configmapconfigmap andscripts-configmapconfigmap.Issue the following command
oc get configmap dynamic-mqsc-configmap -n dev -o yamlto show the MQSC commands that are applied to the queue manager when the dynamic configurations are enabled:
apiVersion: v1
data:
  dynamic-definitions.mqsc: |
    * Use this file for MQSC that you want to be able to update without restarting the queue manager.
    DEFINE QLOCAL(DEVTEST.DYNAMIC.QUEUE)
kind: ConfigMap
...
Issue the following command
oc get configmap scripts-configmap -n dev -o yamlto show the scripts that are used by the queue manager when the dynamic configurations are enabled:
apiVersion: v1
data:
  start-mqsc.sh: |
    #!/bin/bash
    #
    # A simple MVP script that will run MQSC against a queue manager.
    ckksum=""

    # Outer loop that keeps the MQ service running
    while true; do

       tmpCksum=`cksum /dynamic-mq-config-mqsc/dynamic-definitions.mqsc | cut -d" " -f1`

       if (( tmpCksum != cksum ))
       then
          cksum=$tmpCksum
          echo "Applying MQSC"
          runmqsc $1 < /dynamic-mq-config-mqsc/dynamic-definitions.mqsc
       else
          sleep 3
       fi

    done
  stop-mqsc.sh: |-
    #!/bin/bash
    echo "done"
kind: ConfigMap
...
Now that we have a fully operational queue manager, we can try it out.
Try out the deployed queue manager QM1
Now that we have a deployed instance of QM1 with dynamic configurations enabled running in the dev namespaces, we can use it. In this section, we're going to show both the MQ web console and oc command line to interact with QM1.
You can try either one of them based on your convenience.
Test using MQ web console
-
Locating the MQ web console
You can interact graphically with all the MQ queue managers in a cluster using the MQ web console. Access to the console is achieved via an OCP route.
Issue the following command:
oc get qmgr qm1 -n dev -o=jsonpath='{.status.adminUiUrl}'to show the web console route, for example:
https://cpd-tools.xxxxx.containers.appdomain.cloud/integration/messaging/dev/qm1-ibm-mqCopy the URL into your browser to launch the MQ web console.
(You can safely ignore any browser certificate warnings.)
-
Authenticating to the MQ web console
All IBM Cloud Pak products provide the option to use OpenID Connect (OIDC) for secure authentication and authorization. If you'd like to know more about why OpenID Connect is important, watch this short video.
When
QM1was deployed, it registered with the OpenID Connect provider for the cluster. For example, if your cluster is provisioned using IBM Cloud, it will use the IBM Cloud OIDC provider to provide both secure authentication and secure authorization.As the console launches, you will be presented with two authentication options.
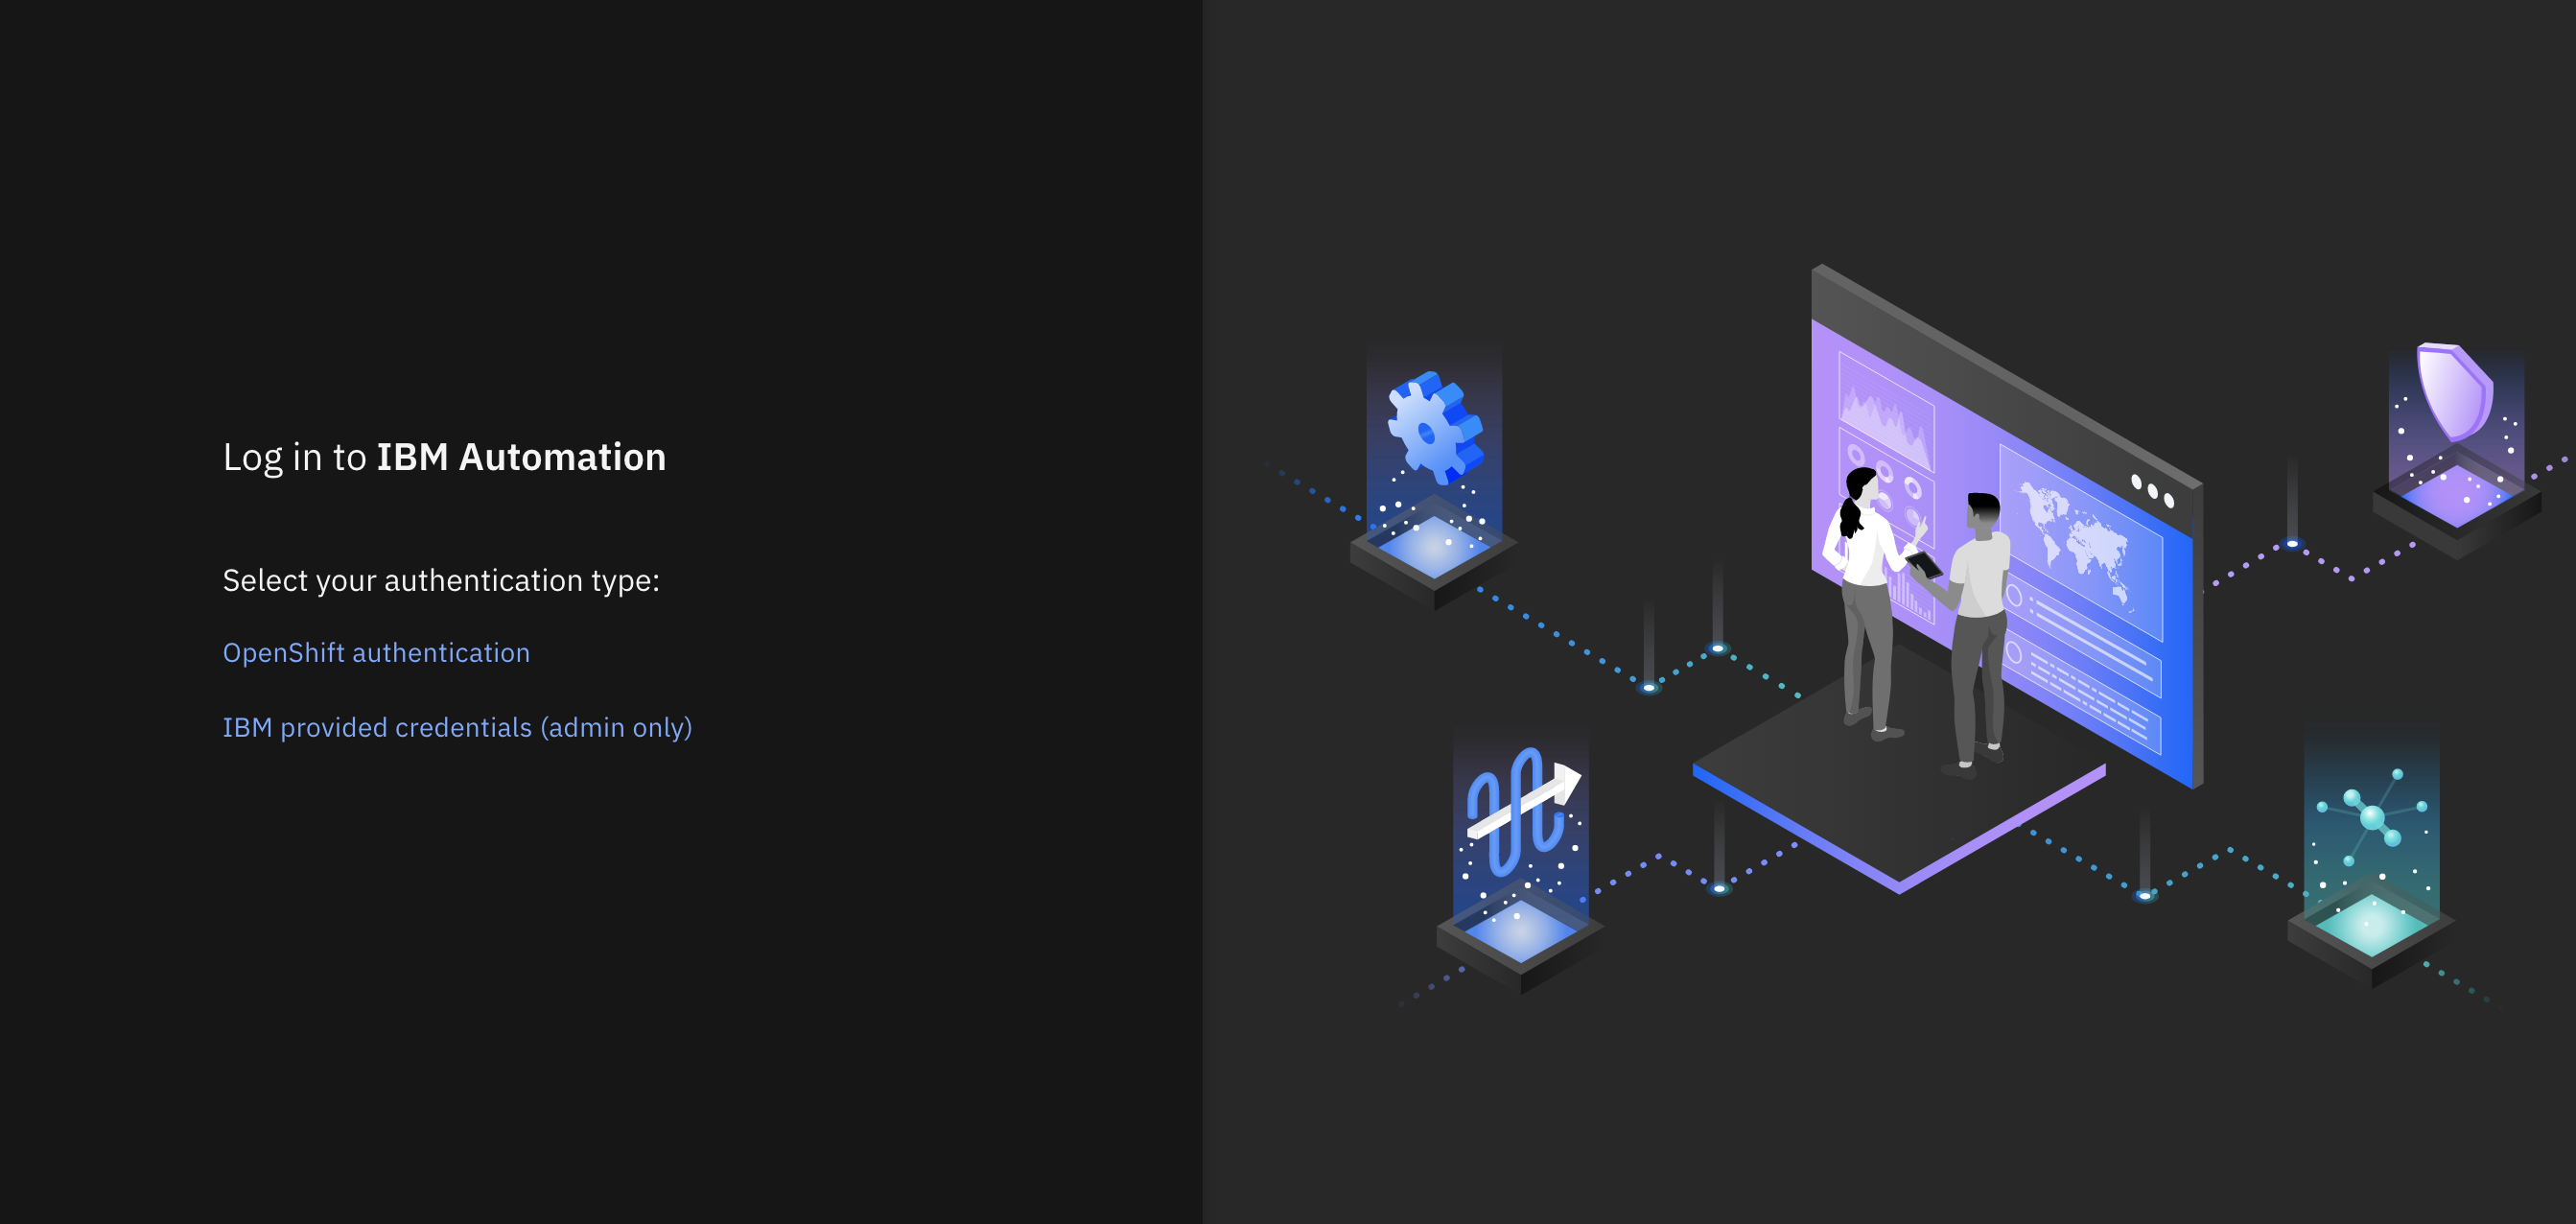
Select
IBM provided credentials (admin only)to log in with your IBM Cloud OIDC credentials.Login as
adminand retrieve the password as follows:oc extract -n ibm-common-services secrets/platform-auth-idp-credentials --keys=admin_username,admin_password --to=-
(*You may have to login to your OIDC provider, such as IBM Cloud, if your browser has not recently logged in.)
We'll discuss MQ security in more detail in the security chapter
-
Using the MQ web console
You can reach this console using the
Messagingnavigation item from the IBM Automation main console and then selecting qm1 Queue Manager in the dev namespace from the list.Once you've logged in to your OIDC provider, you'll be presented with the MQ web console home page for
QM1. This console will allow you to perform most MQ operations such as querying queues and channels, or putting and getting messages.The web console will look like this:
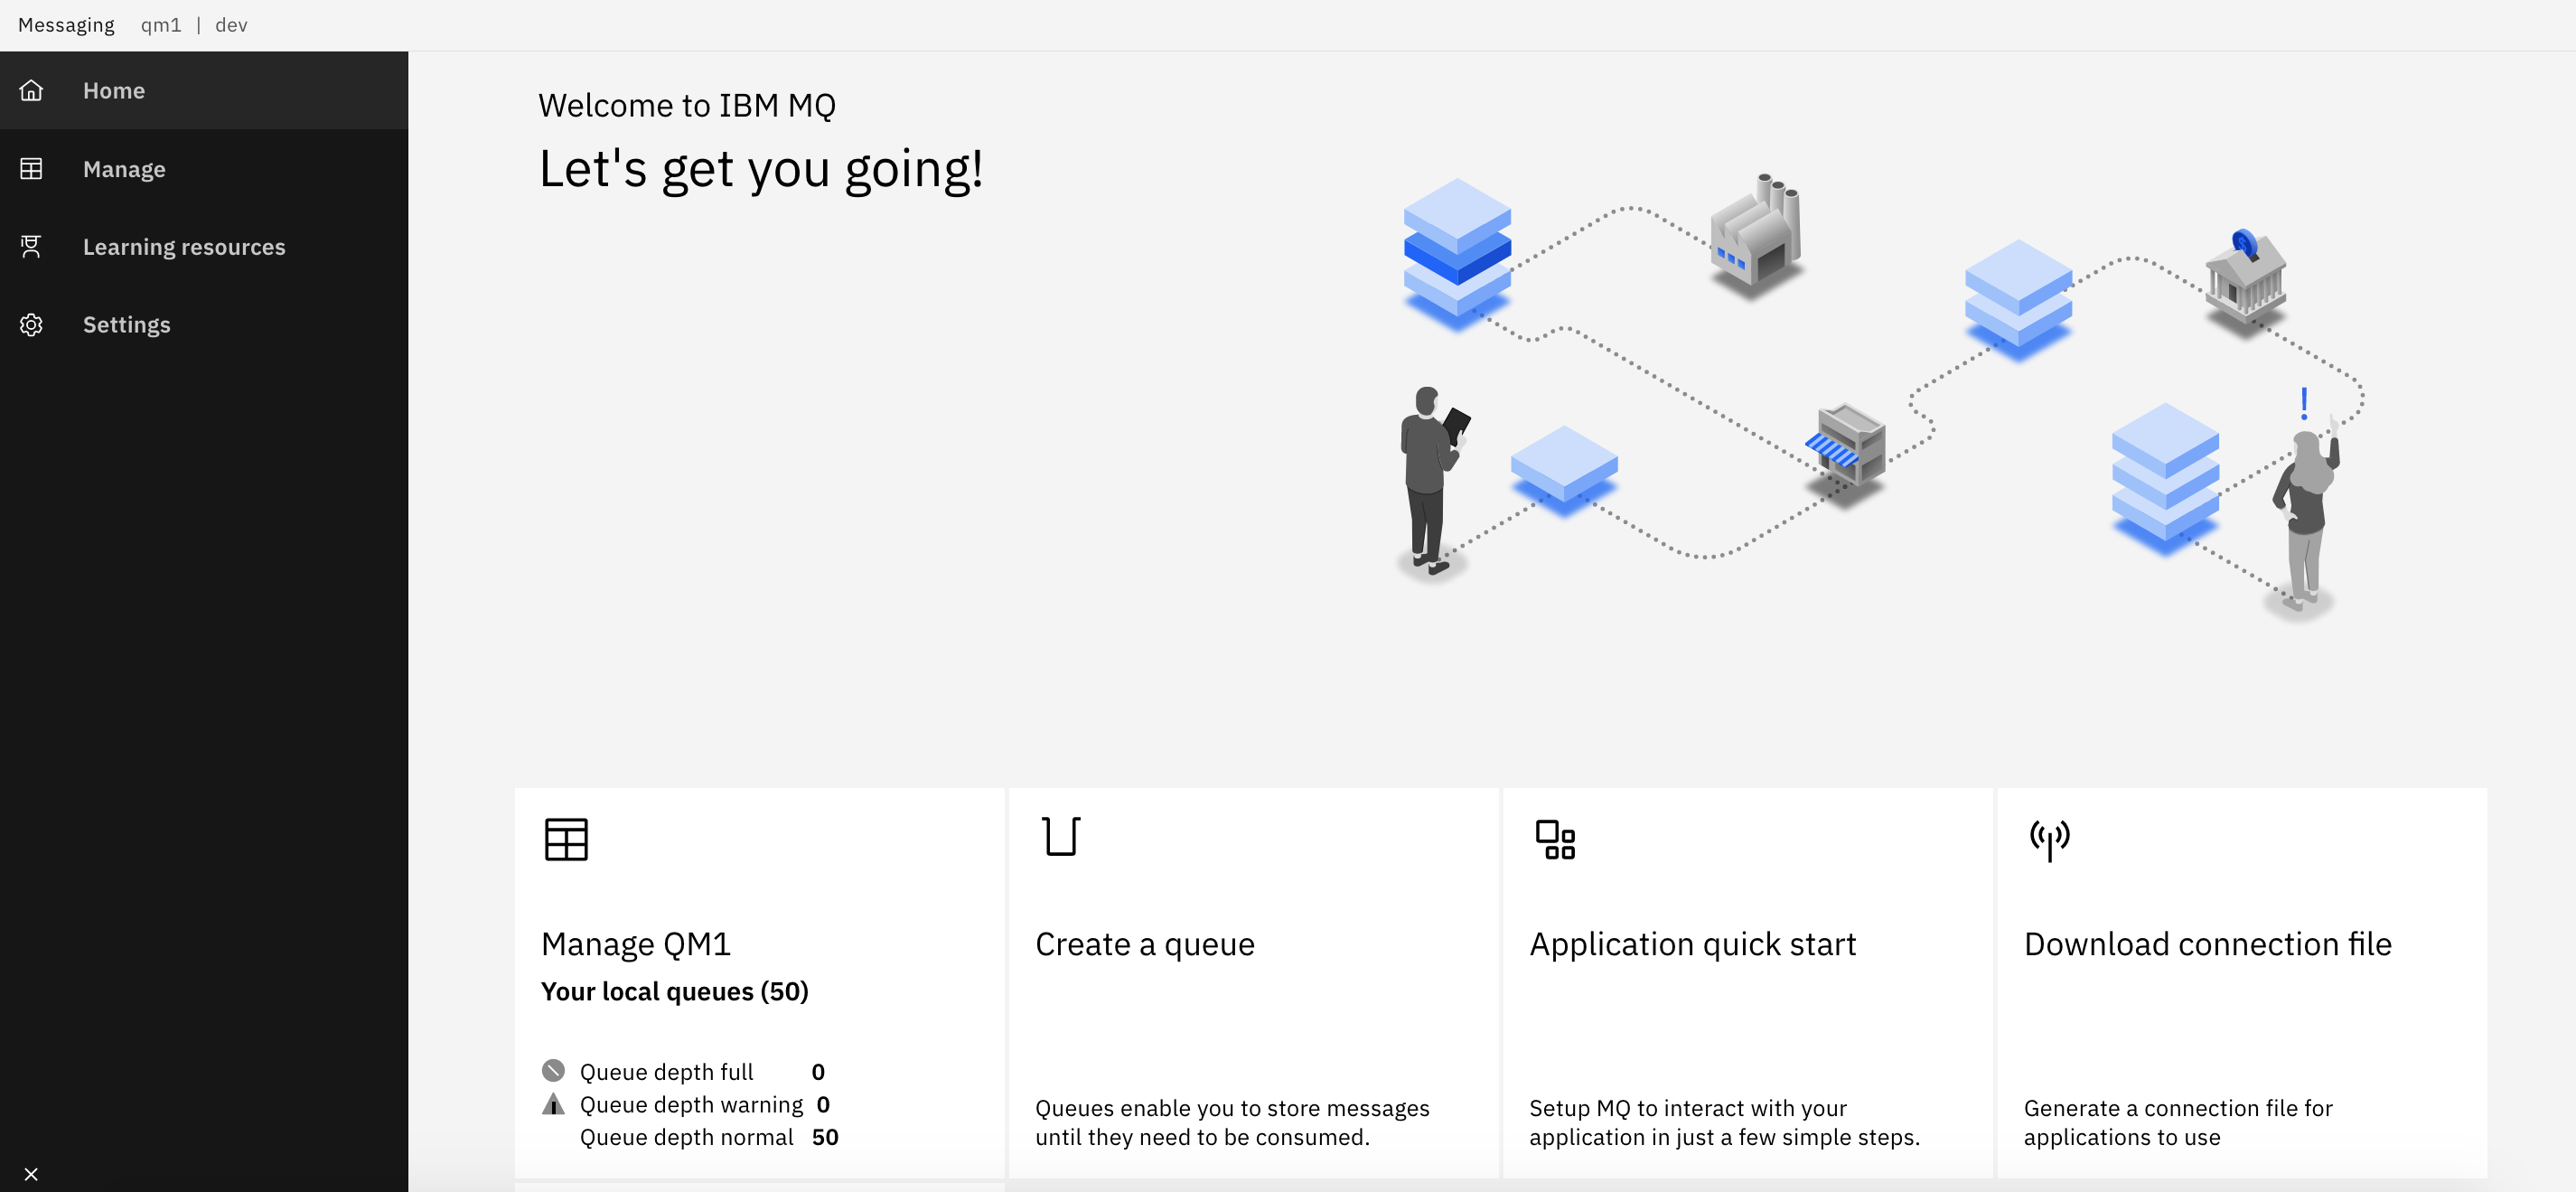
We're going to use the console to view a queue that was originally defined in the
QM1source repository. Then we're going to put a message to this queue. -
Viewing the
DEVTEST.DYNAMIC.QUEUEqueue onQM1In the MQ console you can interact with any queue manager that is connected to this console. We're going to interact with
QM1.Click on the
Managetab then selectLocal queue managers, or selectManage QM1tile: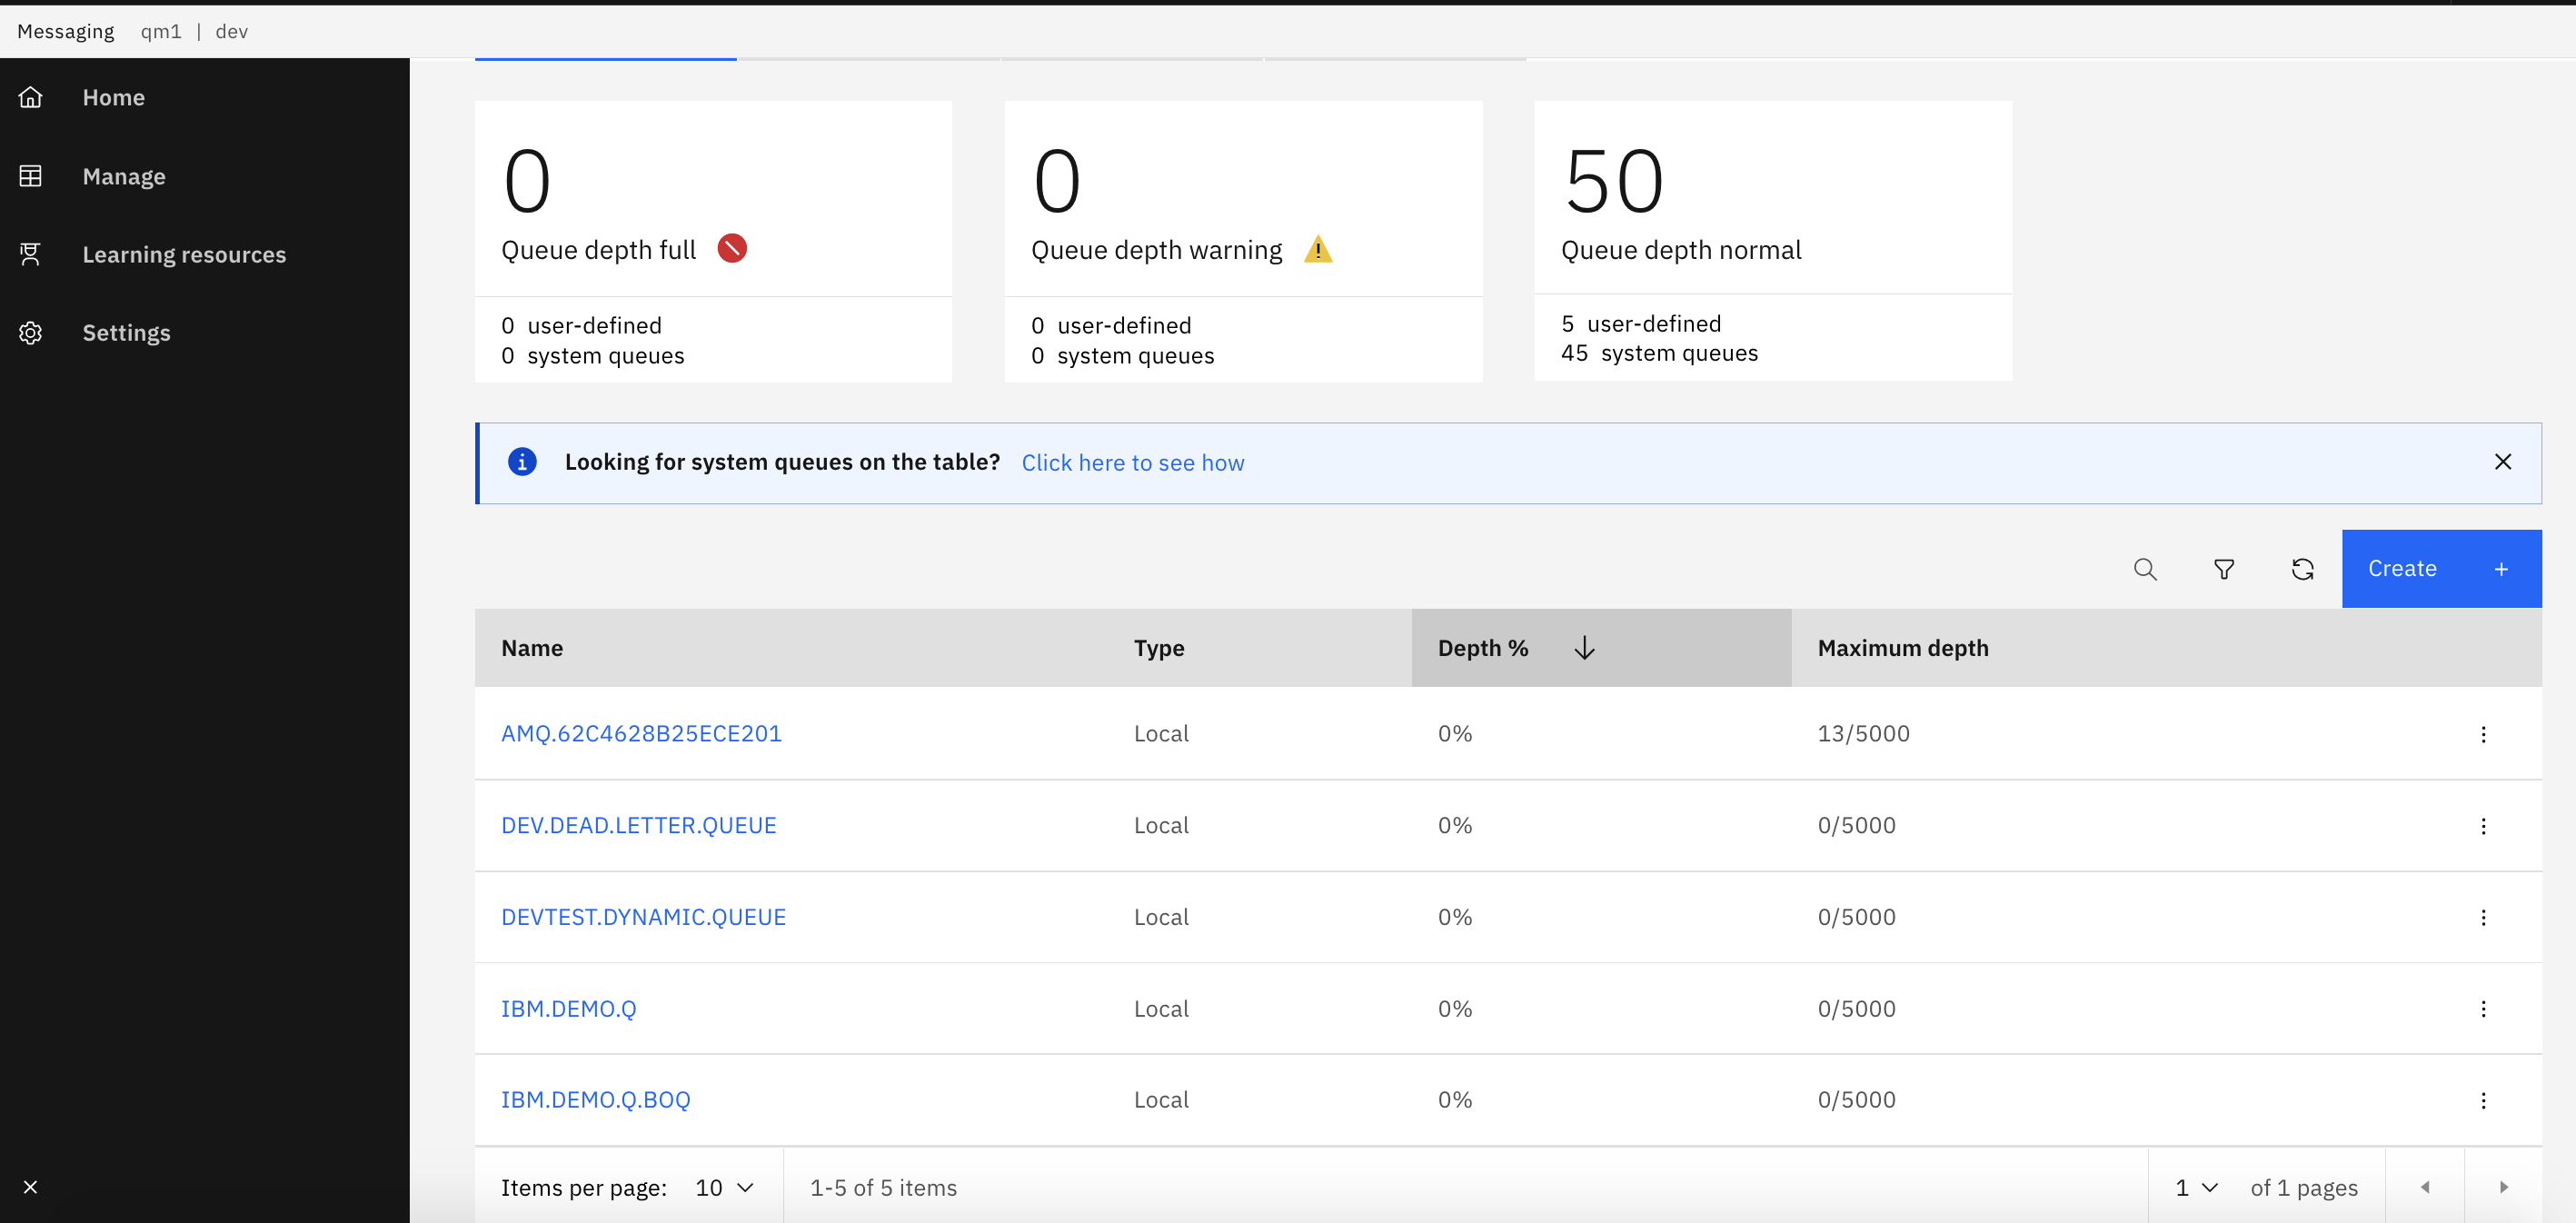
You can see a list of all the queues defined on
QM1.Notice the
DEVTEST.DYNAMIC.QUEUEfor example. See howMaximum depthis0/5000; there are no messages in this queue.See how you can select different operations for each queue such as
Create messageorClear queue. -
Put a message to
DEVTEST.DYNAMIC.QUEUELet's put a message to a the empty queue
DEVTEST.DYNAMIC.QUEUE.Select
Create messagefor queueDEVTEST.DYNAMIC.QUEUEto see theAdd Messagedialogue box: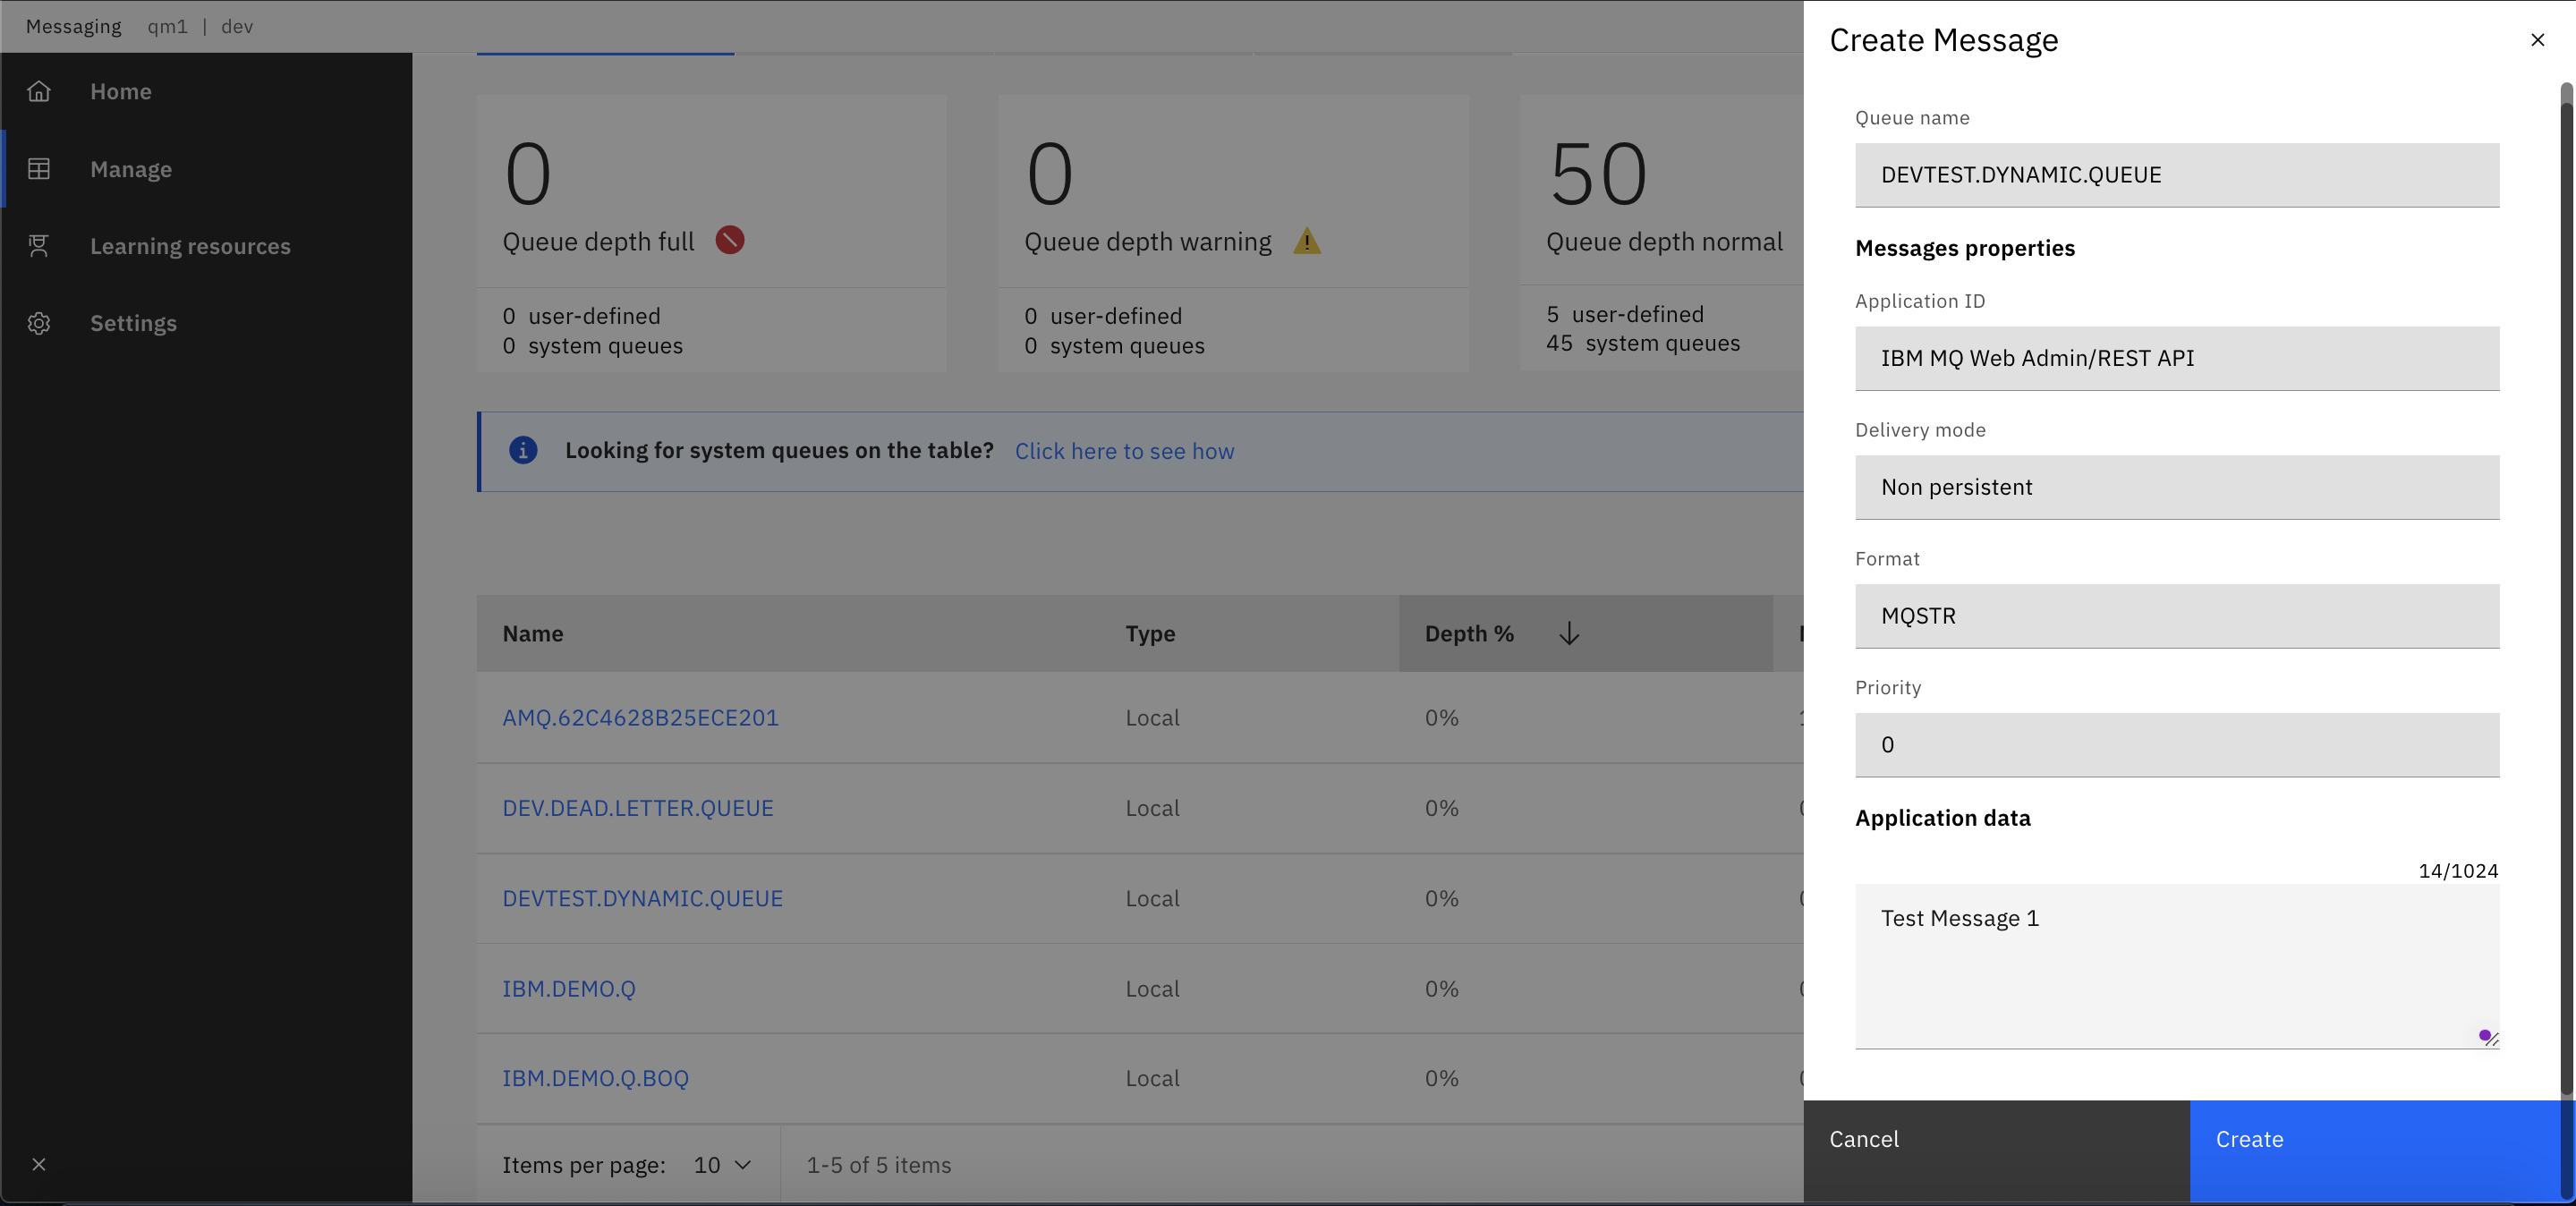
Type
Test message 1in theApplication databox.Press
Createto put the message to the queue.You'll see a confirmation message:

Notice that the queue depth for
IBM.DEMO.Qis now1/5000: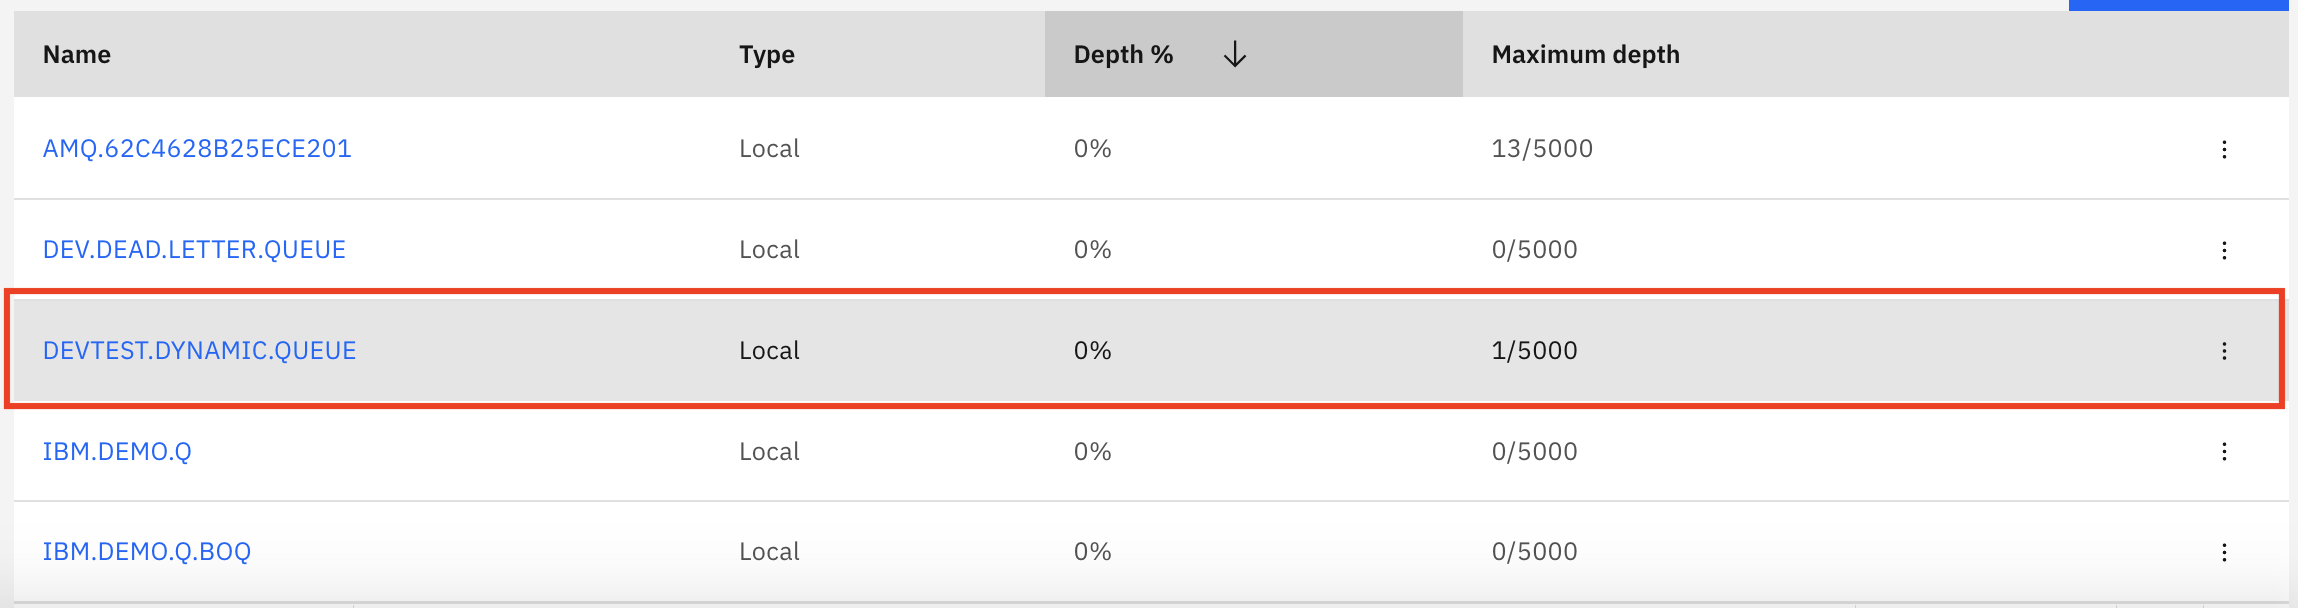
-
Modify the configurations dynamically
Let's try modifying the MQSC file definitions and see how these configurations are dynamically injected into the queue manager.
Ensure we're in the correct folder. Again, we've used typical defaults:
cd $GIT_ROOT
cd multi-tenancy-gitops-apps/
Examine the dynamic configurations using the below command:
See how the configurations are defined in the mqsc file :cat mq/environments/dev/mq-qm01/components/dynamic-mqsc/generic-qmgr/dynamic-definitions.mqsc* Use this file for MQSC that you want to be able to update without restarting the queue manager. DEFINE QLOCAL(DEVTEST.DYNAMIC.QUEUE)Let us now add an additional line to create another local queue named
TEST.DYNAMIC.QUEUEusing the below syntax:DEFINE QLOCAL(TEST.DYNAMIC.QUEUE)After the modification,
dynamic-definitions.mqsclooks like below:* Use this file for MQSC that you want to be able to update without restarting the queue manager. DEFINE QLOCAL(DEVTEST.DYNAMIC.QUEUE) DEFINE QLOCAL(TEST.DYNAMIC.QUEUE)Commit and push changes to your git repository:
git add .
git commit -s -m "Adding test queue to verify dynamic config"
git push origin $GIT_BRANCH
The changes have now been pushed to your GitOps repository:
Enumerating objects: 19, done.
Counting objects: 100% (19/19), done.
Delta compression using up to 8 threads
Compressing objects: 100% (9/9), done.
Writing objects: 100% (10/10), 909 bytes | 909.00 KiB/s, done.
Total 10 (delta 6), reused 0 (delta 0)
remote: Resolving deltas: 100% (6/6), completed with 6 local objects.
To https://github.com/prod-ref-guide/multi-tenancy-gitops-apps.git
   be5fba5..a962f6f  master -> master
Once you push the changes, the ArgoCD application
dev-mq-qm01-instancewill automatically pick the changes indynamic-mqsc-configmapand inject this new queue into the queue manager. Give it a minute for the sync to complete.Now, Access the MQ web console and it will look like this:
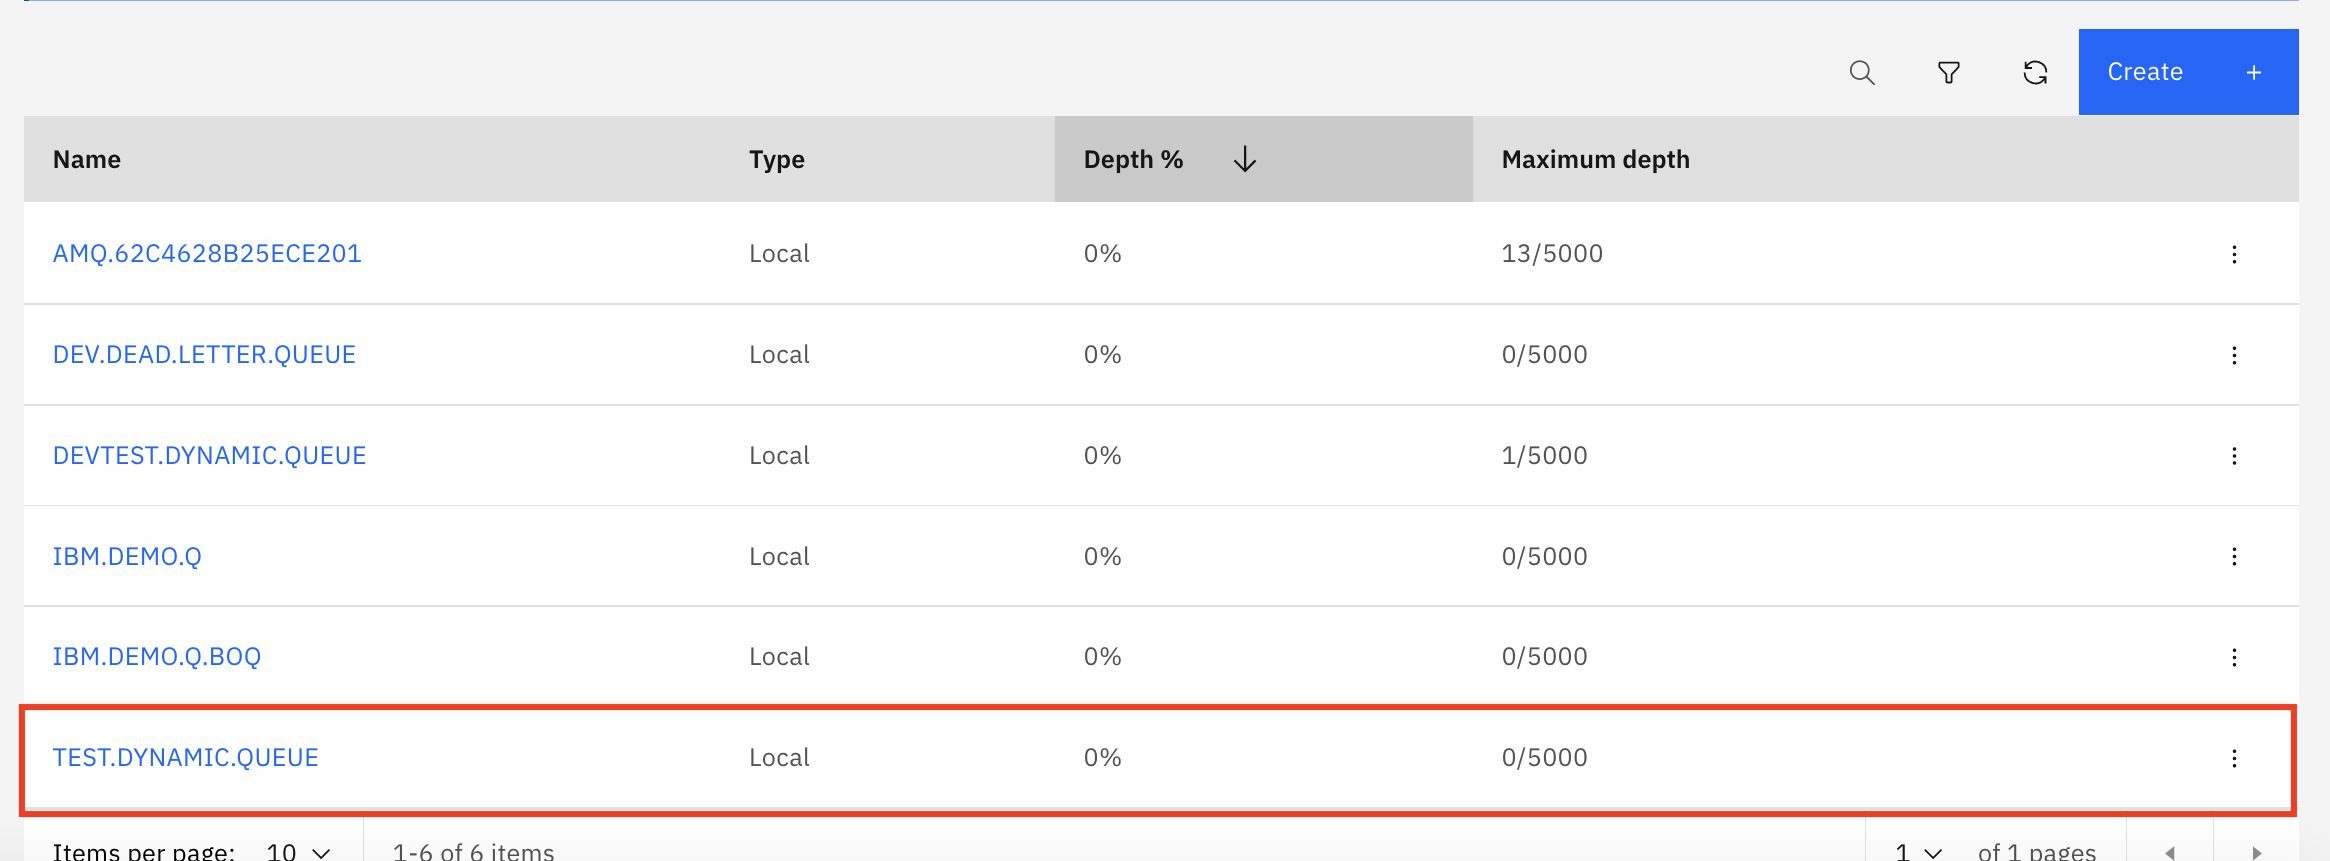
If you carefully observe, you will see the new queue
TEST.DYNAMIC.QUEUEwe just created in the list.
Test using CLI
-
Viewing the MQ pod in OpenShift web console
When we interact with
QM1via the MQ web console, we're interacting with a regular MQ queue manager running in a container managed by Kubernetes. You may have noticed the podqm1-ibm-mq-0when we explored the Kubernetes resources that comprisedQM1using the ArgoCD UI.Issue the following command:
oc get pods -n devto see the queue manager pod for
QM1:NAME READY STATUS RESTARTS AGE qm1-ibm-mq-0 1/1 Running 0 2d15hWe can see a single pod
qm1-ibm-mq-0in theREADYstate. Eachqueuemanagercustom resource has a single pod. Within this pod is a single container inside which the queue managerQM1is running. We'll examine this structure in a little more detail in the next section. -
Connect to the queue manager pod
Let's connect to this container, so that we can explore the queue manager
QM1.Issue the following command:
oc exec -n dev qm1-ibm-mq-0 -it -- /bin/bashto connect you to the pod default container, where you'll see the
bashprompt:bash-4.4$Your terminal is now connected to the container running the queue manager.
-
Use MQ command line
The container we've connected to has a fully running instance of the
QM1queue manager configured according to the YAML generated by the Kustomize. We can use regular MQ commands to verify that this is a regular queue manager.Issue the following command:
dspmq -o allto see a full list of the queue managers running in the container:
QMNAME(QM1) STATUS(Running) DEFAULT(yes) STANDBY(Permitted) INSTNAME(Installation1) INSTPATH(/opt/mqm) INSTVER(9.2.3.0) ROLE(Not configured) INSTANCE() INSYNC() QUORUM()We can see that
QM1is running, it's the default queue manager, where it's installed in the container file system, and it's version.See how a container is actually a full execution environment; in principle, we could have multiple queue managers executing within this container, although this is not good practice.
Feel free to issue other MQ commands.
-
Display queue manager properties
We can also run an MQSC command to display the queue manager properties. These properties were defined in the MQSC file.
Issue the following command:
runmqsc QM1 <<< "dis qmgr"to see the full set of queue manger properties for
QM1:5724-H72 (C) Copyright IBM Corp. 1994, 2021. Starting MQSC for queue manager QM1. 1 : dis qmgr AMQ8408I: Display Queue Manager details. QMNAME(QM1) ACCTCONO(DISABLED) ACCTINT(1800) ACCTMQI(OFF) ACCTQ(OFF) ACTIVREC(MSG) ACTVCONO(DISABLED) ACTVTRC(OFF) ADVCAP(ENABLED) ALTDATE(2022-07-05) ALTTIME(16.10.51) AMQPCAP(NO) AUTHOREV(DISABLED) CCSID(819) CERTLABL( ) CERTVPOL(ANY) CHAD(DISABLED) CHADEV(DISABLED) CHADEXIT( ) CHLEV(DISABLED) CHLAUTH(DISABLED) CLWLDATA( ) CLWLEXIT( ) CLWLLEN(100) CLWLMRUC(999999999) CLWLUSEQ(LOCAL) CMDEV(DISABLED) CMDLEVEL(923) COMMANDQ(SYSTEM.ADMIN.COMMAND.QUEUE) CONFIGEV(DISABLED) CONNAUTH(SYSTEM.DEFAULT.AUTHINFO.IDPWOS) CRDATE(2022-07-05) CRTIME(16.10.47) CUSTOM( ) DEADQ(DEV.DEAD.LETTER.QUEUE) DEFCLXQ(SCTQ) DEFXMITQ( ) DESCR( ) DISTL(YES) IMGINTVL(60) IMGLOGLN(OFF) IMGRCOVO(YES) IMGRCOVQ(YES) IMGSCHED(MANUAL) INHIBTEV(DISABLED) IPADDRV(IPV4) LOCALEV(DISABLED) LOGGEREV(DISABLED) MARKINT(5000) MAXHANDS(256) MAXMSGL(4194304) MAXPROPL(NOLIMIT) MAXPRTY(9) MAXUMSGS(10000) MONACLS(QMGR) MONCHL(OFF) MONQ(OFF) PARENT( ) PERFMEV(DISABLED) PLATFORM(UNIX) PSMODE(ENABLED) PSCLUS(ENABLED) PSNPMSG(DISCARD) PSNPRES(NORMAL) PSRTYCNT(5) PSSYNCPT(IFPER) QMID(QM1_2022-07-05_16.10.47) REMOTEEV(DISABLED) REPOS( ) REPOSNL( ) REVDNS(ENABLED) ROUTEREC(MSG) SCHINIT(QMGR) SCMDSERV(QMGR) SPLCAP(ENABLED) SSLCRLNL( ) SSLCRYP( ) SSLEV(DISABLED) SSLFIPS(NO) SSLKEYR(/run/runmqserver/tls/key) SSLRKEYC(0) STATACLS(QMGR) STATCHL(OFF) STATINT(1800) STATMQI(OFF) STATQ(OFF) STRSTPEV(ENABLED) SUITEB(NONE) SYNCPT TREELIFE(1800) TRIGINT(999999999) VERSION(09020300) XRCAP(NO) One MQSC command read. No commands have a syntax error. All valid MQSC commands were processed.Note how
CHLAUTH(DISABLED)has been set. This was set in the MQSC file configuration forQM1in via themqsc-configmapconfigmap.Feel free to run other
runmqsccommands to explore the queue manager properties. -
Examine the dynamic definitions in the queue manager
The dynamic definitions are mounted as volumes on top of the queue manager definition. Let us quickly examine those definitions.
Issue the following command:
cat dynamic-mq-config-mqsc/dynamic-definitions.mqscYou can see the
dynamic-definitions.mqscas follows:* Use this file for MQSC that you want to be able to update without restarting the queue manager. DEFINE QLOCAL(DEVTEST.DYNAMIC.QUEUE) -
Modify the configurations dynamically
Let's try modifying the MQSC file definitions and see how these configurations are dynamically injected into the queue manager.
Issue the following command:
exitto return to your local machine's command prompt:
.../git/multi-tenancy-gitops-appsExamine the dynamic configurations using the below command:
See how the configurations are defined in the mqsc file :cat mq/environments/dev/mq-qm01/components/dynamic-mqsc/generic-qmgr/dynamic-definitions.mqsc* Use this file for MQSC that you want to be able to update without restarting the queue manager. DEFINE QLOCAL(DEVTEST.DYNAMIC.QUEUE)Let us now add an additional line to create another local queue named
TESTCLI.DYNAMIC.QUEUEusing the below syntax:DEFINE QLOCAL(TESTCLI.DYNAMIC.QUEUE)After the modification,
dynamic-definitions.mqsclooks like below:* Use this file for MQSC that you want to be able to update without restarting the queue manager. DEFINE QLOCAL(DEVTEST.DYNAMIC.QUEUE) DEFINE QLOCAL(TESTCLI.DYNAMIC.QUEUE)Commit and push changes to your git repository:
git add .
git commit -s -m "Adding test queue to verify dynamic config"
git push origin $GIT_BRANCH
The changes have now been pushed to your GitOps repository:
Enumerating objects: 19, done.
Counting objects: 100% (19/19), done.
Delta compression using up to 8 threads
Compressing objects: 100% (9/9), done.
Writing objects: 100% (10/10), 909 bytes | 909.00 KiB/s, done.
Total 10 (delta 6), reused 0 (delta 0)
remote: Resolving deltas: 100% (6/6), completed with 6 local objects.
To https://github.com/prod-ref-guide/multi-tenancy-gitops-apps.git
   be5fba5..a962f6f  master -> master
Once you push the changes, the ArgoCD application
dev-mq-qm01-instancewill automatically pick the changes indynamic-mqsc-configmapand inject this new queue into the queue manager. Give it a minute or two. -
Examine the updated dynamic definitions in the queue manager
Let's re-connect to the container, so that we can explore the queue manager
QM1.Issue the following command:
oc exec -n dev qm1-ibm-mq-0 -it -- /bin/bashto connect you to the pod default container, where you'll see the
bashprompt:bash-4.4$Issue the following command:
cat dynamic-mq-config-mqsc/dynamic-definitions.mqscYou can see the
dynamic-definitions.mqscas follows:* Use this file for MQSC that you want to be able to update without restarting the queue manager. DEFINE QLOCAL(DEVTEST.DYNAMIC.QUEUE) DEFINE QLOCAL(TESTCLI.DYNAMIC.QUEUE)There you go, you have now successfully created
TESTCLI.DYNAMIC.QUEUEdynamically. -
Exit from queue manager container
When we're finished exploring the queue manager container, we can exit it.
Issue the following command:
exitto return to your local machine's command prompt:
.../git/multi-tenancy-gitops-appsNow that you've tried out the deployed queue manager, let's look at the deployed Kubernetes resources for
QM1in a little more detail.
Congratulations!
You've completed set up continuous deployment for the queue manager QM1 and deployed an instance of it to the dev namespace in the cluster. You've interacted with this queue manager using the command line as well as the MQ web console. You've also explored the key resources Kubernetes resources deployed to the cluster for QM1.
In the next and final topic of this chapter we're going to make a change to the queue manager, and verify that the change is continuously integrated and deployed to the cluster.