Building MQ Queue Managers
Audience: Architects, Application developers, Administrators
Timing: 40 minutes
Overview
In the previous chapter of this guide, we set up and configured GitOps for our cluster. We then used GitOps to install and manage Kubernetes infrastructure and services resources.
In this chapter, we're going to use these resources to build, deploy and run an MQ queue manager. This will require us to install some more components into our cluster.
Look at the following diagram:
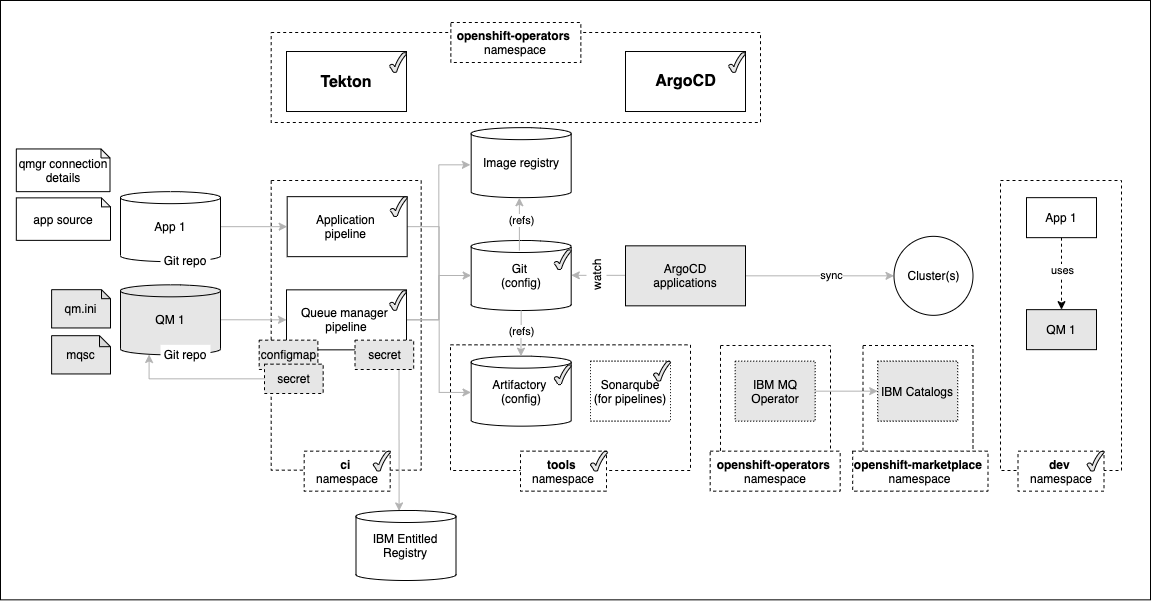
We'll examine these highlighted components in more detail throughout this section of the tutorial; here's an overview of their function, from left to right:
- The queue manager pipeline requires a
secretto access the IBM Entitled Registry. This registry hosts the container images used by IBM Operators. The secret contains your IBM entitlement key, allowing you to easily access the IBM container software you have licensed. - The
QM1 Git repocontains the source definition for queue manager QM1, including itsMQSCresources (e.g. queue and channel definitions) andqm.inifile that contains other configuration information (e.g. log file sizes). - The queue manager pipeline requires a
configmapandsecretto connect to GitHub. They contain the repository URL and security token used by the pipeline to access theQM1Git repository. IBM Catalogsis aCatalogSourcethat adds the IBM custom provider to the Operator Hub. Once added, IBM Operators, such as the MQ operator, or CloudPak for Integration, or CloudPak for Data can be installed into the cluster.- The
IBM MQ operatoris installed from the IBM Catalogs source. It adds a newqueuemanagercustom resource definition to the cluster. This allows Tekton pipelines and ArgoCD applications to manage queue managers using a simple YAML interface.
In this topic, we're going to:
- Fork, clone and explore a sample queue manager repository,
QM1 - Configure the cluster connection to the IBM Entitled Registry
- Install the IBM Catalogs and IBM MQ operator using GitOps
- Configure the pipeline connection to the
QM1repository - Review the MQ queue manager pipeline for queue manager
QM1
By the end of this topic we'll have a fully functioning MQ GitOps CICD pipeline that we can use to build and change queue managers.
Pre-requisites
Before attempting this topic, you should have successfully completed the previous chapter.
The sample queue manager repository
In the diagram above, we can see that the result of the CICD process is to build, test and deploy the queue manager QM1 that runs in the dev namespace. The CICD process uses the QM1 Git repository as its primary input source; every committed change to this repository will result in a pipeline run which, if successful, will update the deployed version of QM1 in the cluster. This is GitOps in practice, the upstream source of truth for QM1 is the Git repository.
In this section, we're going to create our copy of the QM1 repository. We'll examine its contents to see how queue manager QM1 and its properties are defined. In a subsequent section, we'll use the Tekton queue manager pipeline and a dedicated ArgoCD queue manager application to build, test and deploy QM1 to our cluster.
It's wise to use a new terminal window for this chapter. It will help us switch between the queue manager repository and GitOps repository as we examine the different steps in the CICD process.
-
Clone the sample queue manager repository
The sample queue manager repository gets us going quickly. Once you've seen how it works, you can use it as a starting point for your projects.
Navigate to the below sample repository to your custom GitHub Organization by using :
https://github.com/cloud-native-toolkit/mq-qm01
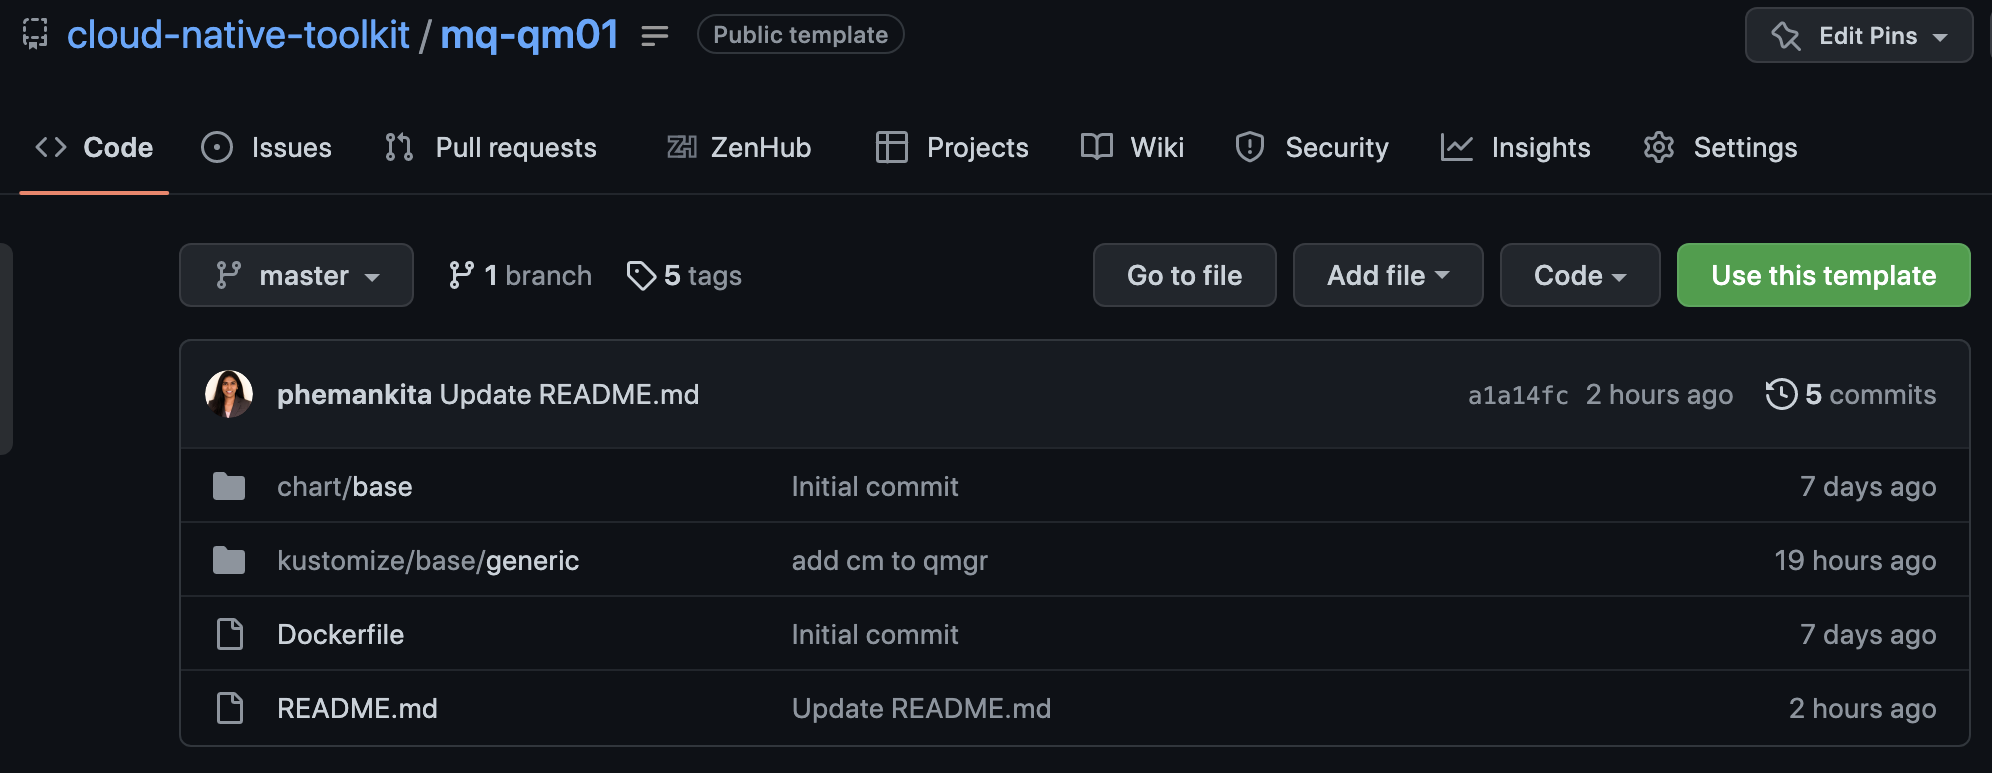
Once you navigate, click on
Use this template. Choose the organization, name the repository, and enter the rest of the details as follows. Once done, click onCreate repository from template.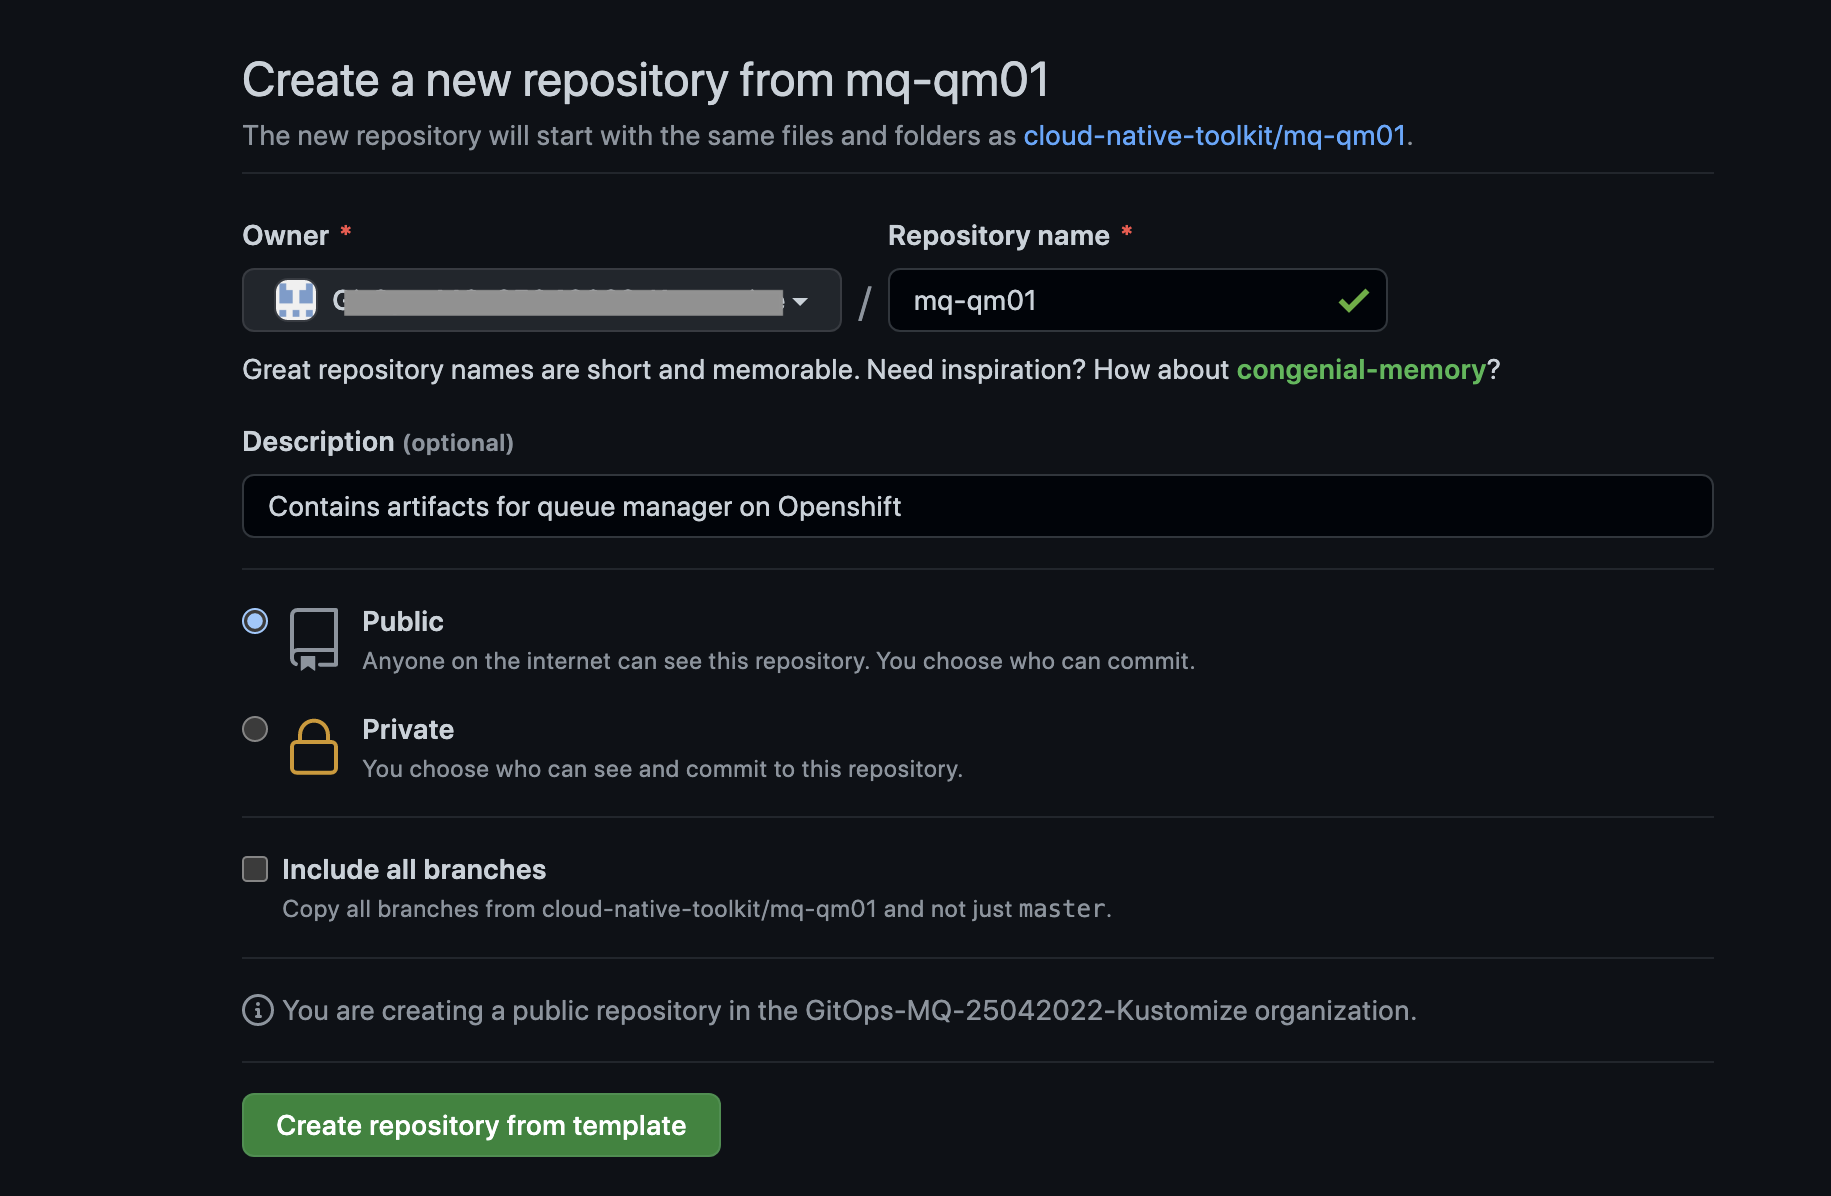
-
Ensure you've set up the
$GIT_ORGenvironment variableThis chapter also uses environment variables to save typing and reduce errors.
Let's set up an environment variable,
$GIT_ORG, that contains your GitHub organization name. We'll use this variable in many subsequent commands.Open a new terminal window.
Replace
<git-org>in the following command with your GitHub user name:export GIT_ORG=<git-org>You can verify your
$GIT_ORGas follows:echo $GIT_ORGwhich will show your GitHub Organization, for example:
prod-ref-guideWe'll use this environment variable extensively in scripts and
bashcommands, so it's important to ensure it's correct. -
Change to your working git folder
As in the previous chapter, we're going to clone a local copy of our sample repository. Most users keep all of their locally cloned git repositories under a common folder, accessed using the
$GIT_ROOTenvironment variable.Change to your working
gitfolder:export GIT_ROOT=$HOME/git/$GIT_ORG-root cd $GIT_ROOT -
Clone the MQ QM01 repository
We're going to work on a local clone of our GitOps repository. We'll push changes to our local copy back to GitHub at appropriate times so that they can be accessed by the queue manager pipeline to build and test the most recently committed version of
QM1.Clone the forked Git config repository to your local machine:
git clone https://github.com/$GIT_ORG/mq-qm01A local copy will be made on your machine as follows:
Cloning into 'mq-qm01'...
remote: Enumerating objects: 23, done.
remote: Counting objects: 100% (23/23), done.
remote: Compressing objects: 100% (17/17), done.
remote: Total 23 (delta 1), reused 21 (delta 0), pack-reused 0
Unpacking objects: 100% (23/23), done.
Note
Throughout this tutorial we use the HTTPS URL to clone repositories, however you can also use the SSH option.
-
Work on the local copy of the GitOps repository
Change to the
mq-qm01folder containing your local clone of the queue manager repository:cd mq-qm01 -
Review the GitOps folder structure
The folder structure of this repository defines all the properties for queue manager
QM1. The queue manager pipeline reads the repository contents to build and test a queue manager with exactly these properties, ready for deployment by ArgoCD.Let's examine the structure in a little more detail.
Show the folder structure with the following command:
tree .Notice that this is quite a simple folder structure. You may recognize some of the files immediately:
.
├── Dockerfile
├── README.md
├── chart
│   └── base
│       ├── Chart.yaml
│       ├── config
│       │   └── config.mqsc
│       ├── security
│       │   └── config.mqsc
│       ├── templates
│       │   ├── NOTES.txt
│       │   ├── _helpers.tpl
│       │   ├── configmap.yaml
│       │   └── qm-template.yaml
│       └── values.yaml
└── kustomize
    ├── base
    │   ├── generic-qmgr
    │   │   ├── kustomization.yaml
    │   │   ├── queuemanager.yaml
    │   │   └── static-definitions.mqsc
    │   └── native-ha-qmgr
    └── components
        ├── dynamic-mqsc
        │   └── generic-qmgr
        │       ├── dynamic-definitions.mqsc
        │       ├── kustomization.yaml
        │       └── queuemanager.yaml
        └── scripts
            ├── kustomization.yaml
            ├── start-mqsc.sh
            └── stop-mqsc.sh

13 directories, 19 files
The key folders and files are as follows:
- The
Dockerfilefile contains the base Dockerfile that will be used to build the container forQM1. - The contents of the
kustomizefolder are used to generate the queue manager Kubernetes resources such as an MQ custom resource and config map usingKustomize.- The
basefolder contains different variants ofQM1. We can seegeneric-qmgrandnative-ha-qmgrfor example.- Each underlying folder in the
basecontains a set of Kubernetes resources such as MQ custom resources, necessary configuration files like mqsc files and a kustomization.yaml. - The
kustomization.yamlincludes all the resources to be deployed.
- Each underlying folder in the
- The
componentsfolder contains optional features on demand that enables us to define reusable kustomizations. We can enable/disable these subset of features on demand.- The
dynamic-mqscfolder includes the component that enables dynamic configurations to the queue manager. - The
scriptsfolder includes the necessary scripts for the dynamic configuration injection.
- The
- The
- The contents of the
chartfolder are used to create a Helm application forQM1. This Helm application is used to manage the deployment of a set of Kubernetes resources such as an MQ custom resource and config map.- The
templatesfolder contains the Kubernetes resource definitions that will be created for this chart. We can see a queue manager custom resource and a config map for example. - The
values.yamlcontains a set of default values used by these templates to customize the Kubernetes resources. For example, theqm-templategets the CPU limit forQM1fromvalues.yaml. It ensures thatQM1always has a set good defaults for deployment. - The
configfolder is ignored by Helm; but will be used by the pipeline. It contains the introductory queue manager MQSC definitions that will be placed in the config map used byQM1. - The
securityfolder is also ignored by Helm; but will be used by the pipeline. It contains the more advanced queue manager MQSC definitions that will be placed in the config map used byQM1, when security is required.
- The
We'll see how the
mq-qm-devpipeline uses the kustomize components to populate the queue manager resources which in turn is used by ArgoCD to deployQM1. However, we'll also see how these values can be overridden -- using GitOps -- when required.Feel free to explore the kustomize resources; we'll examine it in much more detail throughout this chapter. Alternatively, feel free to learn more about Kustomize before you proceed.
- The
Install the kubeseal operator into the cluster
-
Change to the Application GitOps directory
Let's ensure we're in the correct folder. Again, we've used typical defaults:
cd $GIT_ROOT
cd multi-tenancy-gitops-apps
Verify that your
$GIT_ORGand$GIT_BRANCHenvironment variables are set:echo $GIT_ORG echo $GIT_BRANCHFor example:
(base) anthonyodowd/git/multi-tenancy-gitops-apps echo $GIT_ORG
prod-ref-guide
(base) anthonyodowd/git/multi-tenancy-gitops-apps echo $GIT_BRANCH
master
If either is not set, set them as follows.
export GIT_ORG=<replace_with_gitops_apps_repo_organization> export GIT_BRANCH=<replace_with_gitops_apps_repo_branch> -
Login to the cluster
In the terminal window, log into your OCP cluster, substituting the
--tokenand--serverparameters with your values:oc login --token=<token> --server=<server>If you are unsure of these values, click your user ID in the OpenShift web console and select "Copy Login Command".
-
Install the
kubesealCLINow that we've installed the sealed secret operator and instance, we can create a sealed secret. We install the Kubeseal CLI on our local machine to do this.
brew install kubesealThis make take a minute or so to install:
==> Downloading https://homebrew.bintray.com/bottles/kubeseal-0.14.1.big_sur.bottle.tar.gz
...
==> Installing kubeseal
==> Pouring kubeseal-0.14.1.big_sur.bottle.tar.gz
/usr/local/Cellar/kubeseal/0.14.1: 5 files, 31.9MB
The above installation is for MacOS. Use your favorite package manager to install the CLI on Linux distributions.
Configure access to IBM Entitled Registry
We need access credentials to interact with IBM Entitled Registry and MQ Git repositories. We store these credentials in Kubernetes secrets. However, because of the sensitive nature of its contents, we don't want to store these secret in our Git repository.
Instead, we are using sealed secrets. To create a sealed secret, we use the YAML for a regular secret to create a sealed secret which is a strongly encrypted form of the secret. We store this in our GitOps repository. When ArgoCD deploys the sealed secret, the sealed secret operator will create a regular, un-encrypted, secret in the ci namespace where it can be accessed when required.
The key point is that the deployed un-encrypted secret is never stored in the GitOps repository; only the sealed secret which is encrypted is stored in Git. Once created, the secret can only be accessed by users who have access to the ci namespace, such as the Tekton queue manager pipeline.
Configure connection to the IBM Entitled Registry
To install and use the relevant IBM MQ containers in your cluster, an entitlement key is required to retrieve them from the IBM Entitled Registry. In this section, we retrieve your key, and store it in a secret in the cluster where it can be used to install containers at the appropriate time.
-
Discover your IBM Entitlement Key
Your IBM entitlement key is used to access IBM software. By accessing the IBM Entitled Registry using this key, you can easily access the IBM container software you have licensed.
Access your IBM entitlement key.
Copy the key and store it in the
$IBM_ENTITLEMENT_KEYenvironment variable where it will be used by subsequent commands in this tutorial:export IBM_ENTITLEMENT_KEY=<ibm-reg-key>You should keep this key private from other users.
-
Create the YAML for the IBM entitlement key and seal the IBM entitlement key secret
Let us first run the below script and look into the details later.
./mq/environments/ci/secrets/ibm-entitled-registry-credentials-secret.shThis script performs the below actions.
- It initially creates the YAML for a regular secret using the
oc create secretcommand with the--dry-runoption; it creates the YAML, but doesn't apply it to the cluster. -
Then, it seals the IBM entitlement key secret.
We can examine the sealed secret YAML using the following command:
See how a sealed secret is very similar to a regular secret in structure:cat ibm-entitled-registry-credentials-secret.yamlapiVersion: bitnami.com/v1alpha1 kind: SealedSecret metadata: creationTimestamp: null name: ibm-entitled-registry-credentials namespace: ci spec: encryptedData: IBM_ENTITLED_REGISTRY_PASSWORD: AgALF7SxZrv+cWxZzplncnNImnWBl0vSjQy3whhwl3pch2eVgwVBoN94AH2XUNRlY+pVXKUAAFwDexUgLwpkdvfFo5ZTZR33sIEiCl3JdV0IXTJmpLqMeSUXMgcJ2RUL81frGwPMGy9/Tmv41k/Eaapyj9FTj0n8IlKiNkHqwHzkOsEF1ueSkoLETlrR0rOV8DHy7VPzPQ0RylX66Q7vvB43xI/Aq3AfpNu+jthH+qRv8D7Mx1mVmqXVxaOz/TBhQyk5Z2P3/JPu1oQK3Xrrr3i5tb8vUHQLh/1lCa0hY30HrCDXwTphcvDnXkKGsyw4pmf6Mkzr6SbPahEOG6Mmz8InYYbJQOLXPwRmrluGv+IRe+1nqh5JAaSrJHC38mKXUFsRaLEODf/DCtNz9NNJkSlLM2OSBzGsFL2v1NrhA6envrScljjv8MqcSFkzR9bPNuXu/8ANHM3C4mcvHAY1/+uRkOxLmEaEgBab1zu3ellSnNH3zNi9YjhXVw1R4505kjM2r5O6Oe7UdxtI50axFdxcU6JpfFT++kEsiVJZyqqBzVKjFDVww8ReH9U9BK0ibDfmhO+7IFNNODVCcXHicf/pRjh+Y0Z/OY/IVbpdenS9YL/vZIVdVXKwf/oZzMiIAvoZ93KgIY0pzqZitXo7jNuAIYlMX6X0vHrx0TK6nJh4OOOhUwGDnsSg4GaYRs8GZPw= IBM_ENTITLED_REGISTRY_USER: AgCVxkhumBCyp3nGLuOhFKo4o03NwB7audQ2DJruzO7uscFTBcktzeDrMKmdwOfZkqyhb8zNpnxyZwZzdqP4TgTTLVr71c1YqYo+tMd+UEYO1+QdCKGi7+IzJYusMKSgLcNshuAZfhKqLybGyOOK6qv+EmIjJ5GuPKgZgKsMEvlSHswp4pWYEfC+sokwWV8t3APRb1RR3B0Lx40dLduJ8+QL4i4Qcu267vCqa6HK5423b/ryjF+FBAlpUELiK9BX2OQ7BtT/en/zbDW1tj0hdsOu8BD1JvTmY/ueRTF+CQ+dU5dPQCvGIZCDQEAqhr0jjMp9eL+JQMiBEjFlR6AYf1IFNk1SkaD68f8mSLy+eLn3qfc365shIBQtuGF9x/bpLgMbuHofEgO3/qvXy4WxNxqwsGVlNl3bYd6JrLf+SnOR+NmC69k/cRJVs/6wjod/lJrDHsWofc07paADcSRVJ1aDv5E77ibuJSRlw8Zuyu4S445/8/m0x3Fgc9WW69G7pBAYRyN7w83jaGMf/2pJVcqUPu06jFeCwvGOXwRbK/A0f76gG/CWzM3zMSzr5CqyNaiAJN7GFdv3xuFkCpKpSsRu7jYP6PSS+0G0YJ03IAXj9smxmLKe0ZCEYxBetzmhiMychAZTbUSLtXDscbdYZlkcZct/E9lqOM3hl8FuPNDchS1VRDVbcsQUohx5oqtwJSukgQ== template: metadata: creationTimestamp: null name: ibm-entitled-registry-credentials namespace: ci type: OpaqueHowever, notice the following differences:
apiVersion:andkind:identify this as a sealed secret..dockerconfigjsonhas been encrypted using the public key of the sealed secret controller, meaning that it can only be decrypted by this controller.
This sealed secret is safe to store in our GitOps repository, because it can only be decrypted by the sealed secret controller that was used to encrypt it.
We haven't applied this sealed secret to the cluster yet -- we create the YAML file so that we can use the GitOps process to deploy it.
- It initially creates the YAML for a regular secret using the
-
Install the entitlement key into the cluster
We deploy this sealed secret into the
cinamespace in the cluster. To do this, we need to place the sealed secret in the GitOps Application repository, within the foldermq/environments/ci/secrets.mv ibm-entitled-registry-credentials-secret.yaml mq/environments/ci/secrets/Pushing these changes to our GitOps repository will apply them to the cluster:
git add mq/environments/ci/secrets
git commit -s -m "Deploy the IBM entitled registry sealed secret"
git push origin $GIT_BRANCH
Configure the pipeline for QM1 source repository
Now that we have the ability to create queue managers in our cluster, let's configure the queue manager Tekton pipeline we are going deploy later in this tutorial to use the source repository for QM1 we created earlier as well as the GitOps repository where its built configuration will be stored before deployment by ArgoCD.
To run the pipeline, we need to create a configmap and secret that contain the Github repository location, and GitHub access token. Once we've deployed these to the cluster, we can run the pipeline.
-
Change to the Application GitOps directory
Let's ensure we're in the correct folder. Again, we've used typical defaults:
cd $GIT_ROOT
cd multi-tenancy-gitops-apps
Verify that your
$GIT_ORGand$GIT_BRANCHenvironment variables are set:echo $GIT_ORG echo $GIT_BRANCHFor example:
(base) anthonyodowd/git/multi-tenancy-gitops-apps echo $GIT_ORG
prod-ref-guide
(base) anthonyodowd/git/multi-tenancy-gitops-apps echo $GIT_BRANCH
master
If either is not set, use the instructions below.
export GIT_ORG=<replace_with_gitops_apps_repo_organization> export GIT_BRANCH=<replace_with_gitops_apps_repo_branch> -
The sample configmap
The GitOps repository contains a template for the configmap used by the pipeline to access GitHub.
Issue the following command to view the template of the configmap YAML:
cat mq/environments/ci/configmaps/gitops-repo-configmap.yaml_templateapiVersion: v1 kind: ConfigMap metadata: labels: app: multi-tenancy-gitops group: pipeline type: git name: gitops-repo data: branch: ${GIT_BRANCH} host: github.com org: ${GIT_ORG} owner: ${GIT_ORG} parentdir: . protocol: https repo: multi-tenancy-gitops-apps url: https://github.com/${GIT_ORG}/multi-tenancy-gitops-apps.gitMany of these YAML nodes will be customized by the script we run now.
cd mq/environments/ci/configmaps/
./gitops-repo-configmap.sh
cd ../../../../
Once, this script is run successfully, you should see a new file named
gitops-repo-configmap.yaml.Issue the following command to view the configmap YAML we just created:
cat mq/environments/ci/configmaps/gitops-repo-configmap.yamlapiVersion: v1 kind: ConfigMap metadata: labels: app: multi-tenancy-gitops group: pipeline type: git name: gitops-repo data: branch: master host: github.com org: hp-gitops-test owner: hp-gitops-test parentdir: . protocol: https repo: multi-tenancy-gitops-apps url: https://github.com/hp-gitops-test/multi-tenancy-gitops-apps.gitFor example,
branch:,host:,org:andowner:, these values will be used by the queue manager pipeline to update the GitOps repository after a successful pipeline run. -
Create GitHub access token
As well as the location of the GitHub repositories it uses, the pipeline will also need a GitHub personal access token to identify it as a valid user to GitHub. A Personal Access Token is used in place of a user password to authenticate with GitHub.
This token provides specific access to all repositories owned by a particular GitHub user or organization. When GitHub is accessed using this token, the only permitted operations are those defined by the specific token.
Navigate to your GitHub Developer Settings to generate a new token.
Click on
Generate new tokenand make the following selections:- Name the token
CI pipeline - Select
public_repoto enable git clone - Select
write:repo_hookso the pipeline can create a web hook

After you click
Generate tokento create the access token with these permissions, the GitHub UI will let you see the generated token once, but never again.Therefore, save the token somewhere safe -- so that you can use it later if required.
In the meantime, let's store the token in the
$GIT_TOKENenvironment variable.export GIT_TOKEN=<personal access token>Also, store the git user information in the
$GIT_USERenvironment variable.export GIT_USER=<git user name> - Name the token
-
Create a regular secret to hold the GitHub access credentials and seal the credentials
As before, we're going to create a sealed secret to store the personal access token previously created. To do this, we first create the regular secret YAML, and then seal it with
kubeseal.The secret will contain two literals,
usernameandpassword, which contain our GitHub username and personal access token. We will store this secret in thecinamespace.Make sure you set the
GIT_USERandGIT_TOKENenvironment as shown above.Create the regular secret YAML with the following command:
./mq/environments/ci/secrets/git-credentials-secret.shThis script performs the below actions:
- It initially creates the YAML for a regular secret by using the git username and access token provided; it creates the YAML, but doesn't apply it to the cluster.
- Then, it seals the
github credentialssecret.
We can examine the sealed secret YAML using the following command:
cat git-credentials-secret.yamlNotice the
kind: SealedSecretin the YAML:apiVersion: bitnami.com/v1alpha1 kind: SealedSecret metadata: creationTimestamp: null name: git-credentials namespace: ci spec: encryptedData: password: AgCufC++OG16tYVA5cs7v8uE9ed/ihpkdYYXSlrtmdlQfwjHzttj97X32tq4NaXzF64GIVCzr2vnweDCYIC+sd0SSs9b//KpdNgiZ2AHmJBdhhnmGs0PHHEgh16QmDlxV3on+Ewe6uM5MmbV/bpmRHu9L3spF+kcRdTfdpsQegpz7+QlR9Owvgt0LbZYiNwGzkwnczRtRhG8DZC6FodH95t7KoXN+fjupGJFS2GQo55e0QbhgdgPDLHYrZo8pQyvQVG+PsK3bn6OiJbB9nLsY4xV+r38Qg6BrVGW+kY2oqAHT0BR+4KljIWdSVMXoG9zU7HNU1H6R1nFB+8wblHF9ySaKxObIPhjxMEjD3ieOg7WjuySWDtIL2PF5OGuY8B2m/totM1CKWCJZ+RT0X8y98NjqR03QPD7AKz4JgL8Cerkq4JojroANNyIDl9iiwjEd7on7d2CmzLSWX2STXw0LuqfjMoId3K2l/THpwpbhpnX2ZDJHiSUtJ+mepjFYyJrj4hCm4dXGKABVE7rilQvLaS5paZPx3uUC7eZqqdo+pz3dd/+o4R+PCQTCTKEzEnrGZCKISff6pMMgDHx7RsotGDbyAEqrpK2MuwxzIV/lxeQEA6qZeSS65sndOHTZlgMCGeRazkybDxc4PMcuEqbXM2e9cDwzf7cqyCL+czCjYPF0PRA5kaYBgTZiLUUfnUlVtttCStBdUOKiQ54wMj8mjFCkfnbMnhgFCrylLhmGiq5Oq4nUPQ4GQh/ username: AgCc4ywhZ7MDcrKNbGNKeItPvg343PwycBGMiTESVtNgWGdcDOhMUzx2T1Het+JLFbfCQDV4Ewh1Jv/CC+4yjF87YBUu6vu+dTFM05M59mEj9PgG89d/Xpf/H2St1z8ZoqQyYKIF90W3ji4HvMzQv/RHC3dECTFQI5Jh2YmA7U0XyQjWb+YxSQtRFDM/E2CTXoYZD5ZK+J8emWzCk0F5/1bdUt+Q/IHoJg5LsPgjZEVnv7Wd+8Gn0UKQE/BYqfInU6rrS1Sc5ogQvWnd73LeN2gViqriwiTgjA2LlNK4JWkimYifDgt0ZEOdaJ7XjyFznq42vYL+KbY1oeL1dKMuh1bFv0m9796CHsYjYahLknXbN1FztGfh1gswhP97mPrp0Fq5x0qF8ZbTFz/GeH8TzN4VlsaKzvApxQDBV/FHCZQ0n5xLlSLpuDHKDXgEbD+Hc8Nfz18aUgBC/Tgm4qcObjg1Px7ASbEG5m4uxZb30Qp2R4tW7NFIzAd1EbQSaN+cPrsmlcRNoE6lU2bpWrW9e1HnUQiZzZp1/W8iqBkpb7Dl9bR8XtfxB3CK03rj72dBSOJseQruNXn7tfhMf5vgxwEppC3rSR1eTPuXFdiI2tbLvMawNtSASiQB23MVrqXdjV0gXCM9cf3XJA8mIzppc8iE3T7z1WmkLhlAR66gkByrOyemKgw4q9T+aSSpE2HQtemwp8SbbUWpCPcF template: data: null metadata: annotations: tekton.dev/git-0: https://github.com creationTimestamp: null name: git-credentials namespace: ci type: kubernetes.io/basic-authAlso notice how the
usernameandpasswordare not just obfuscated, they are fully encrypted. (If you'd like, you can use thebase64 -Dcommand from above -- it will not reveal the original username.) -
Install the sealed secret into the cluster
Again, we deploy this sealed secret into the
cinamespace in the cluster.To do this, we need to place the sealed secret in the GitOps Application repository, within the folder
mq/environments/ci/secrets.mv git-credentials-secret.yaml mq/environments/ci/secrets/Pushing these changes to our GitOps repository will apply them to the cluster:
git add mq/environments/ci/secrets mq/environments/ci/configmaps/
git commit -s -m "Deploy the github credentials secret and configmap"
git push origin $GIT_BRANCH
Deploy applications to the cluster
-
Ensure you're logged in to the cluster
Start a terminal window and log into your OCP cluster, substituting the
--tokenand--serverparameters with your values:oc login --token=<token> --server=<server>If you are unsure of these values, click your user ID in the OpenShift web console and select "Copy Login Command".
-
Locate your GitOps repository
If necessary, change to the root of your GitOps repository, which is stored in the
$GIT_ROOTenvironment variable.Issue the following command to change to your GitOps repository:
cd $GIT_ROOT cd multi-tenancy-gitops -
Deploy the applications layer in the GitOps repo
Access the
0-bootstrap/single-cluster/kustomization.yaml:cat 0-bootstrap/single-cluster/kustomization.yamlLet us deploy
appsresources to the cluster. Open0-bootstrap/single-cluster/kustomization.yamland uncomment3-apps/3-apps.yamlas follows:resources: - 1-infra/1-infra.yaml - 2-services/2-services.yaml - 3-apps/3-apps.yaml patches: - target: group: argoproj.io kind: Application labelSelector: "gitops.tier.layer=gitops" patch: |- - op: add path: /spec/source/repoURL value: https://github.com/prod-ref-guide/multi-tenancy-gitops.git - op: add path: /spec/source/targetRevision value: master - target: group: argoproj.io kind: AppProject labelSelector: "gitops.tier.layer=infra" patch: |- - op: add path: /spec/sourceRepos/- value: https://github.com/prod-ref-guide/multi-tenancy-gitops.git - op: add path: /spec/sourceRepos/- value: https://github.com/prod-ref-guide/multi-tenancy-gitops-infra.git - target: group: argoproj.io kind: AppProject labelSelector: "gitops.tier.layer=services" patch: |- - op: add path: /spec/sourceRepos/- value: https://github.com/prod-ref-guide/multi-tenancy-gitops.git - op: add path: /spec/sourceRepos/- value: https://github.com/prod-ref-guide/multi-tenancy-gitops-services.git - target: group: argoproj.io kind: AppProject labelSelector: "gitops.tier.layer=applications" patch: |- - op: add path: /spec/sourceRepos/- value: https://github.com/prod-ref-guide/multi-tenancy-gitops.git - op: add path: /spec/sourceRepos/- value: https://github.com/prod-ref-guide/multi-tenancy-gitops-apps.gitOnce we push this change to GitHub, it will be seen by the
bootstrap-single-clusterapplication in ArgoCD, and the changes will be applied to the cluster.:git add . git commit -s -m "Initial boostrap setup for applications" git push origin $GIT_BRANCH -
The
bootstrap-single-clusterapplication detects the change and resyncsOnce these changes to our GitOps repository are seen by ArgoCD, it will resync the cluster to the desired new state.
Switch to the ArgoCD UI Applications view to see the changes:
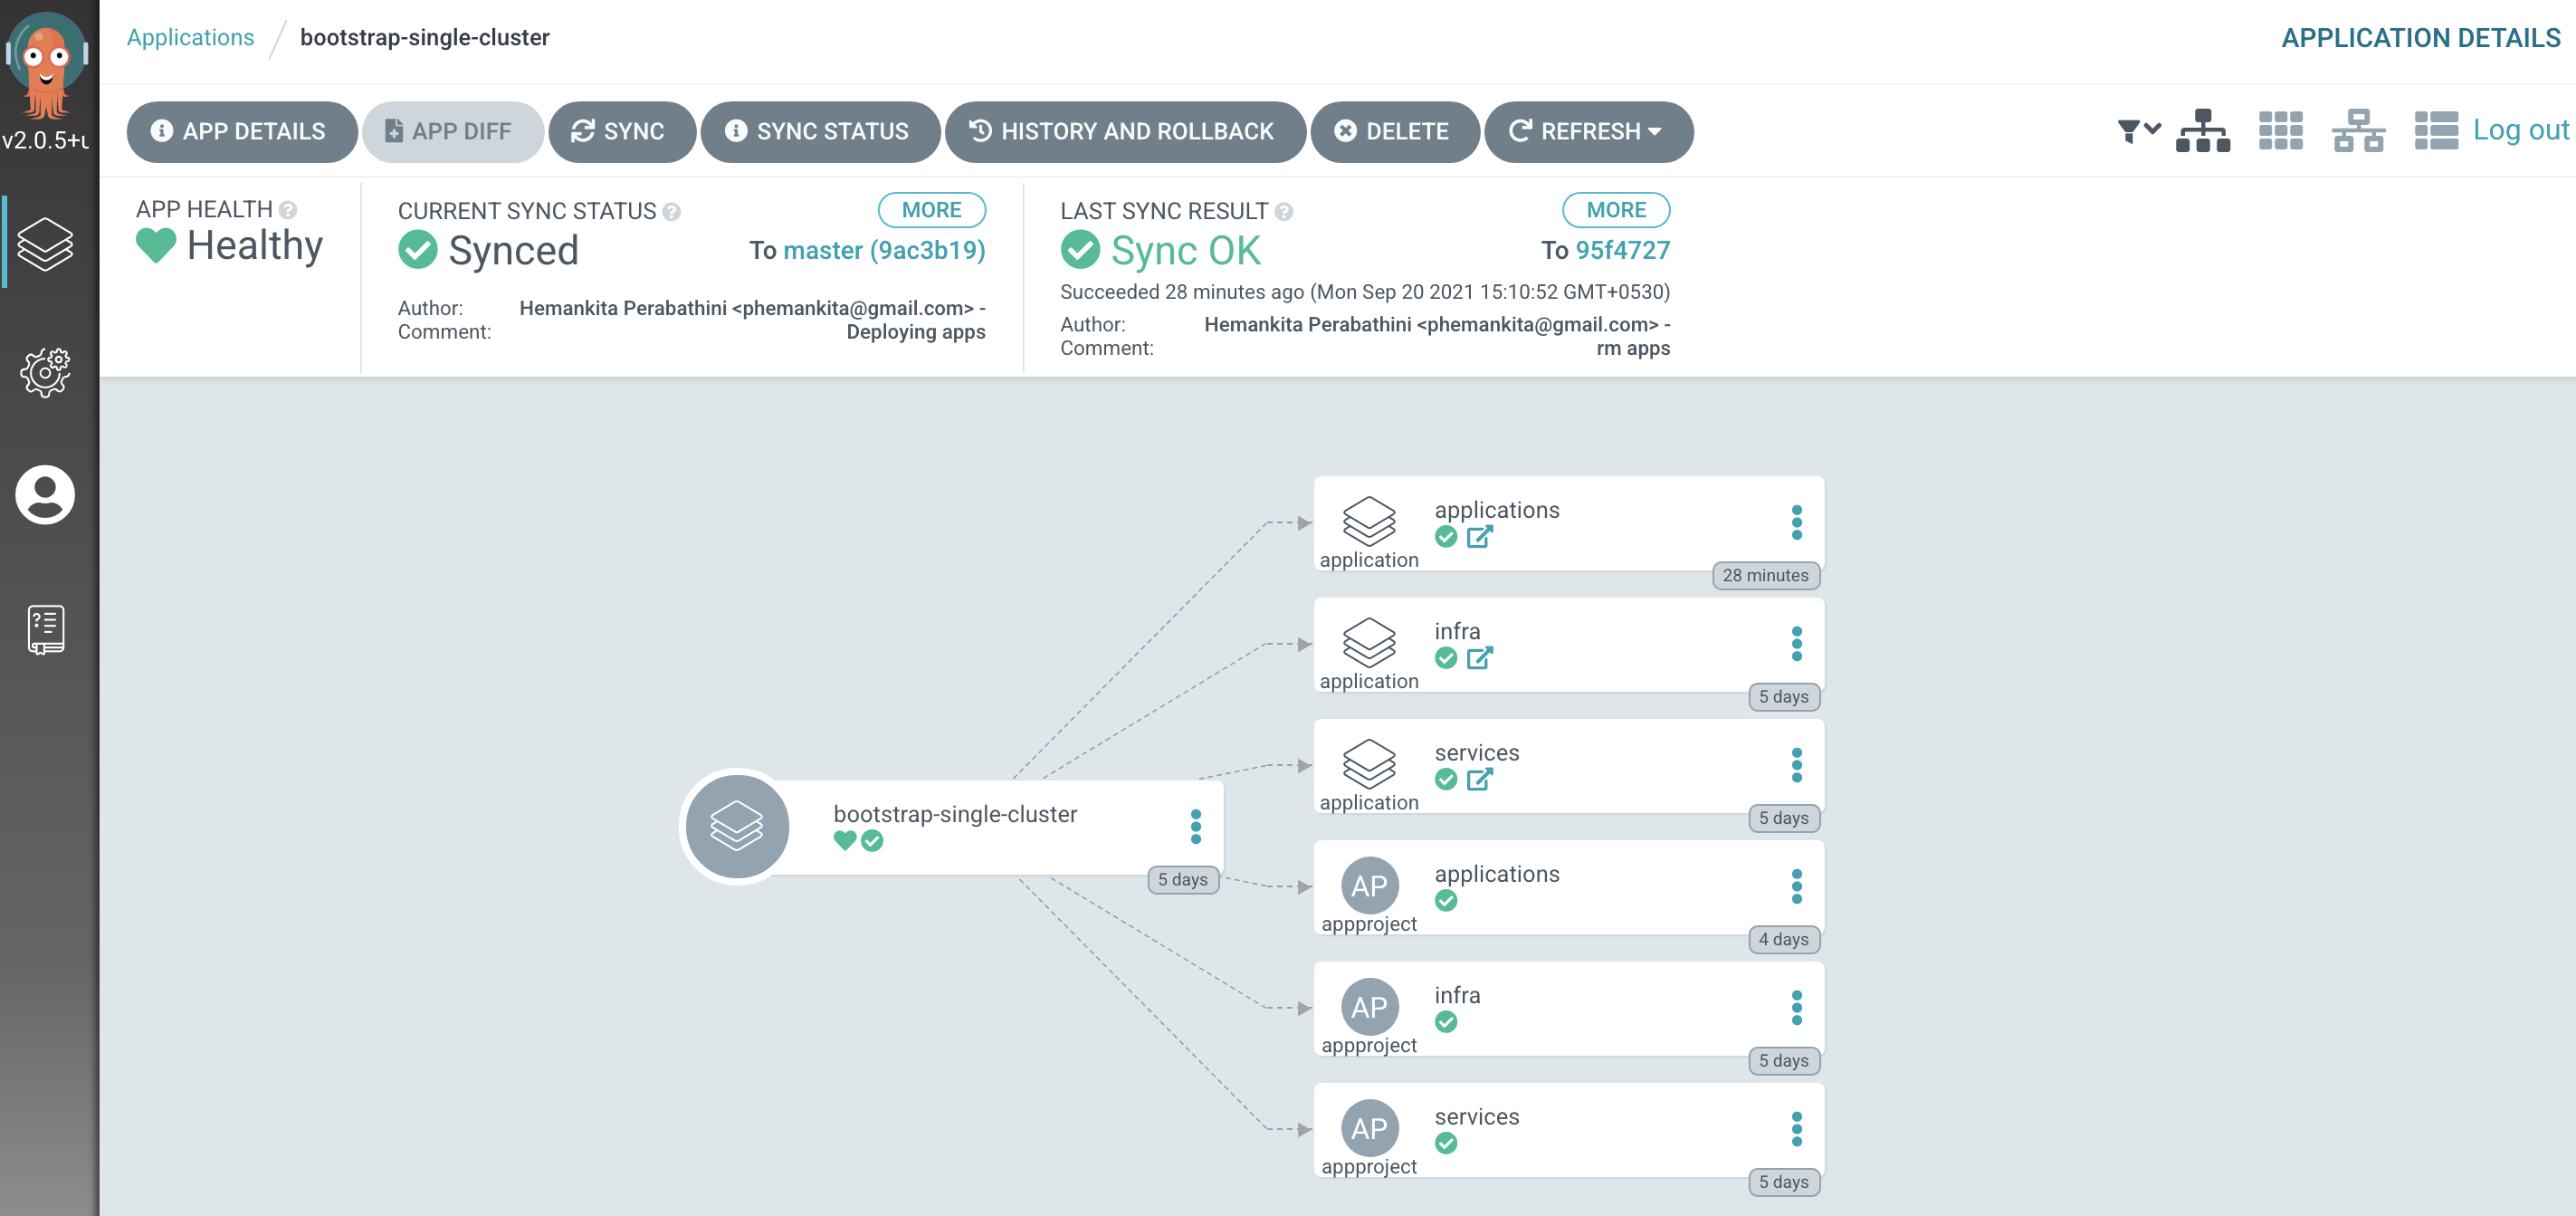
Note
In the
Applicationsview of ArgoCD, you may notice two applications in an Unknown state,dev-mq-qm01-instanceanddev-mq-spring-app-instance. These applications status will be resolved later in the tutorial. -
Select resources to deploy
Access the
0-bootstrap/single-cluster/3-apps/kustomization.yaml:cat 0-bootstrap/single-cluster/3-apps/kustomization.yamlOpen
0-bootstrap/single-cluster/3-apps/kustomization.yamland uncomment the following:resources: #- argocd/ace/cicd.yaml #- argocd/ace/dev.yaml #- argocd/ace/stage.yaml #- argocd/ace/prod.yaml - argocd/mq/cicd.yaml - argocd/mq/dev.yaml #- argocd/mq/stage.yaml #- argocd/mq/prod.yaml #- argocd/apic/cicd.yaml #- argocd/apic/dev.yaml #- argocd/apic/stage.yaml #- argocd/apic/prod.yaml #- argocd/apic/single-cluster.yaml #- argocd/apic/multi-cluster-app.yaml #- argocd/apic/multi-cluster-ops.yaml #- argocd/bookinfo/cicd.yaml #- argocd/bookinfo/dev.yaml #- argocd/bookinfo/stage.yaml #- argocd/bookinfo/prod.yaml #- argocd/soapserver/soapserver.yaml #- argocd/cp4a/cp4a.yaml patches: - target: group: argoproj.io kind: Application labelSelector: "gitops.tier.layer=applications" patch: |- - op: add path: /spec/source/repoURL value: https://github.com/gitops-workflow-demo/multi-tenancy-gitops-apps.git - op: add path: /spec/source/targetRevision value: master -
Push GitOps changes to GitHub
Let’s make these GitOps changes visible to the ArgoCD
bootstrap-single-clusterapplication via GitHub.Add all changes in the current folder to a git index, commit them, and push them to GitHub:
git add .
git commit -s -m "Deploying apps"
git push origin $GIT_BRANCH
The changes have now been pushed to your GitOps repository:
Enumerating objects: 9, done.
Counting objects: 100% (9/9), done.
Delta compression using up to 8 threads
Compressing objects: 100% (5/5), done.
Writing objects: 100% (5/5), 431 bytes | 431.00 KiB/s, done.
Total 5 (delta 4), reused 0 (delta 0)
remote: Resolving deltas: 100% (4/4), completed with 4 local objects.
To https://github.com/prod-ref-guide/multi-tenancy-gitops.git
   533602c..85a4c46  master -> master
This change to the GitOps repository can now be used by ArgoCD.
-
The
applicationsargocd applicationLet's examine the ArgoCD application that manage the applications in our reference architecture.
In the ArgoCD UI Applications view, click on the icon for the
applicationsapplication: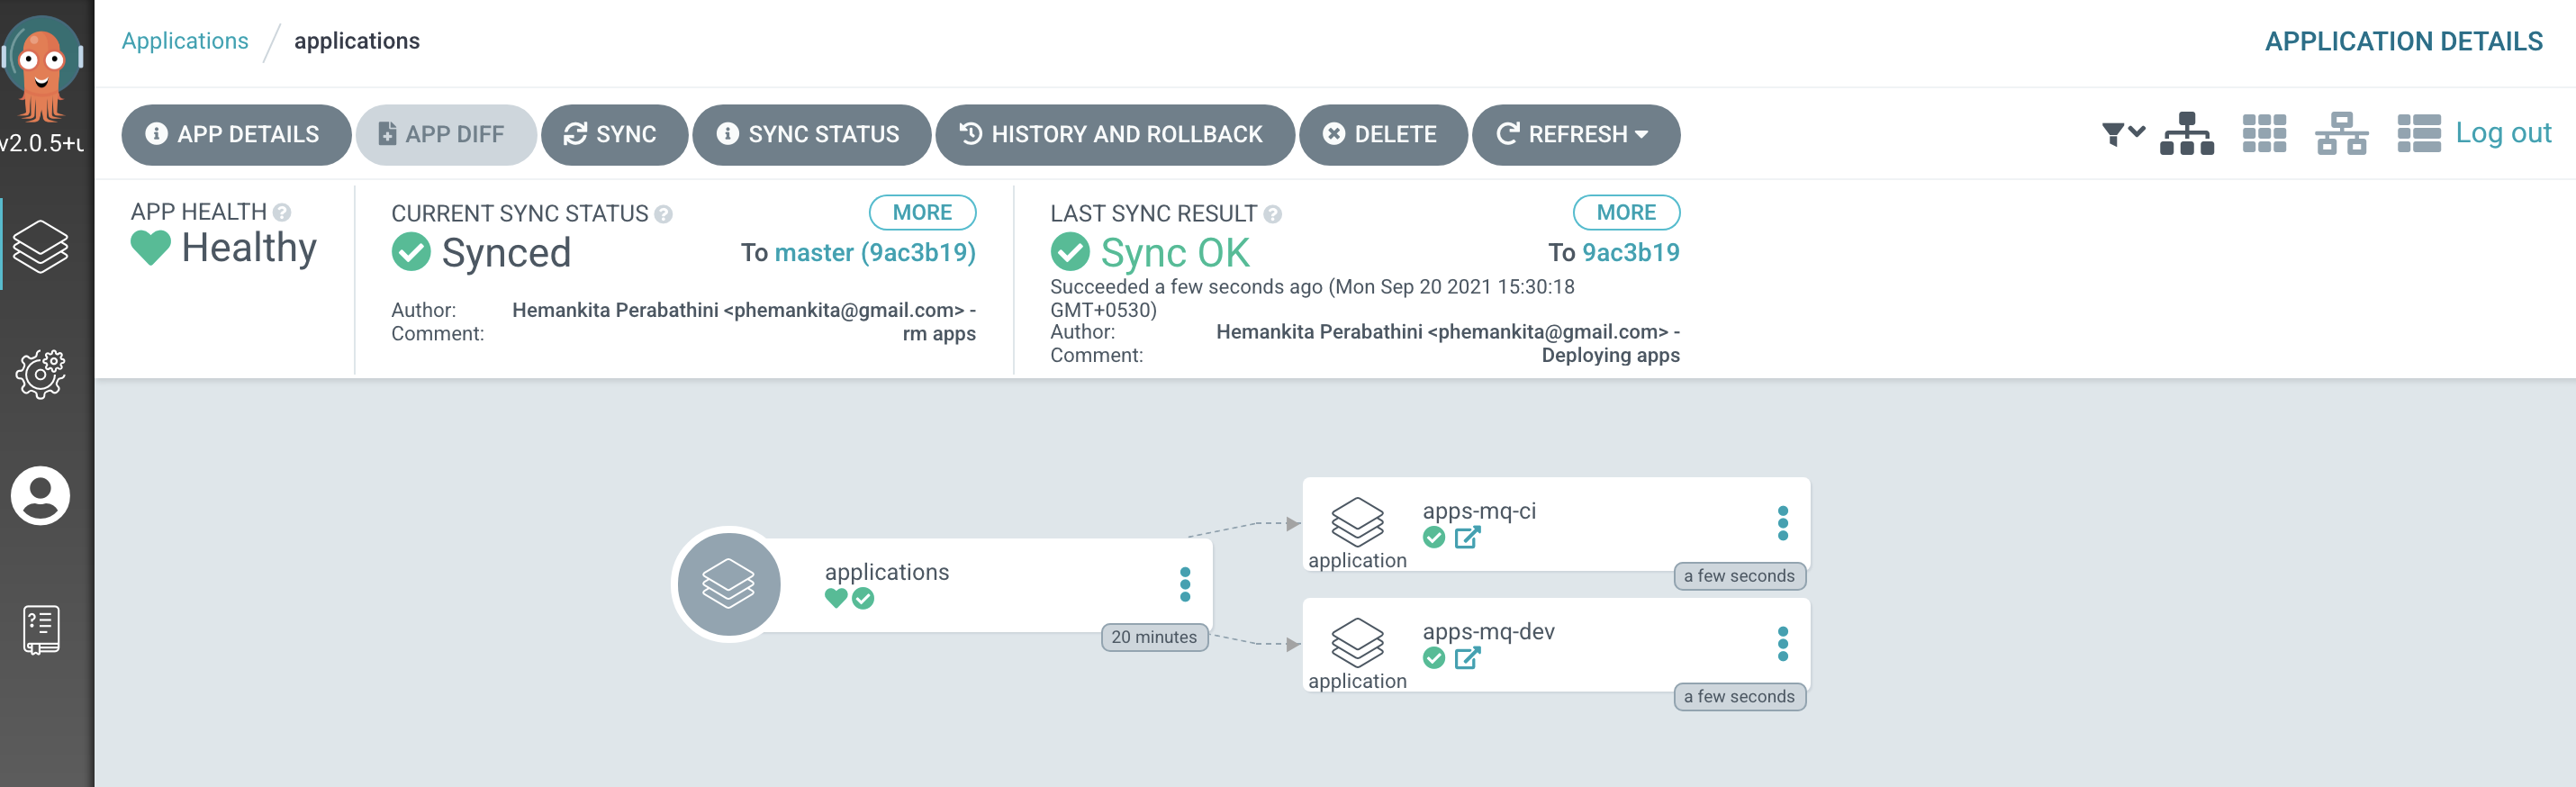
-
The
apps-mq-rest-ci-1argocd applicationLet's examine the ArgoCD application that manage the applications in ci namespace.
In the ArgoCD UI Applications view, click on the icon for the
apps-mq-rest-ci-1application: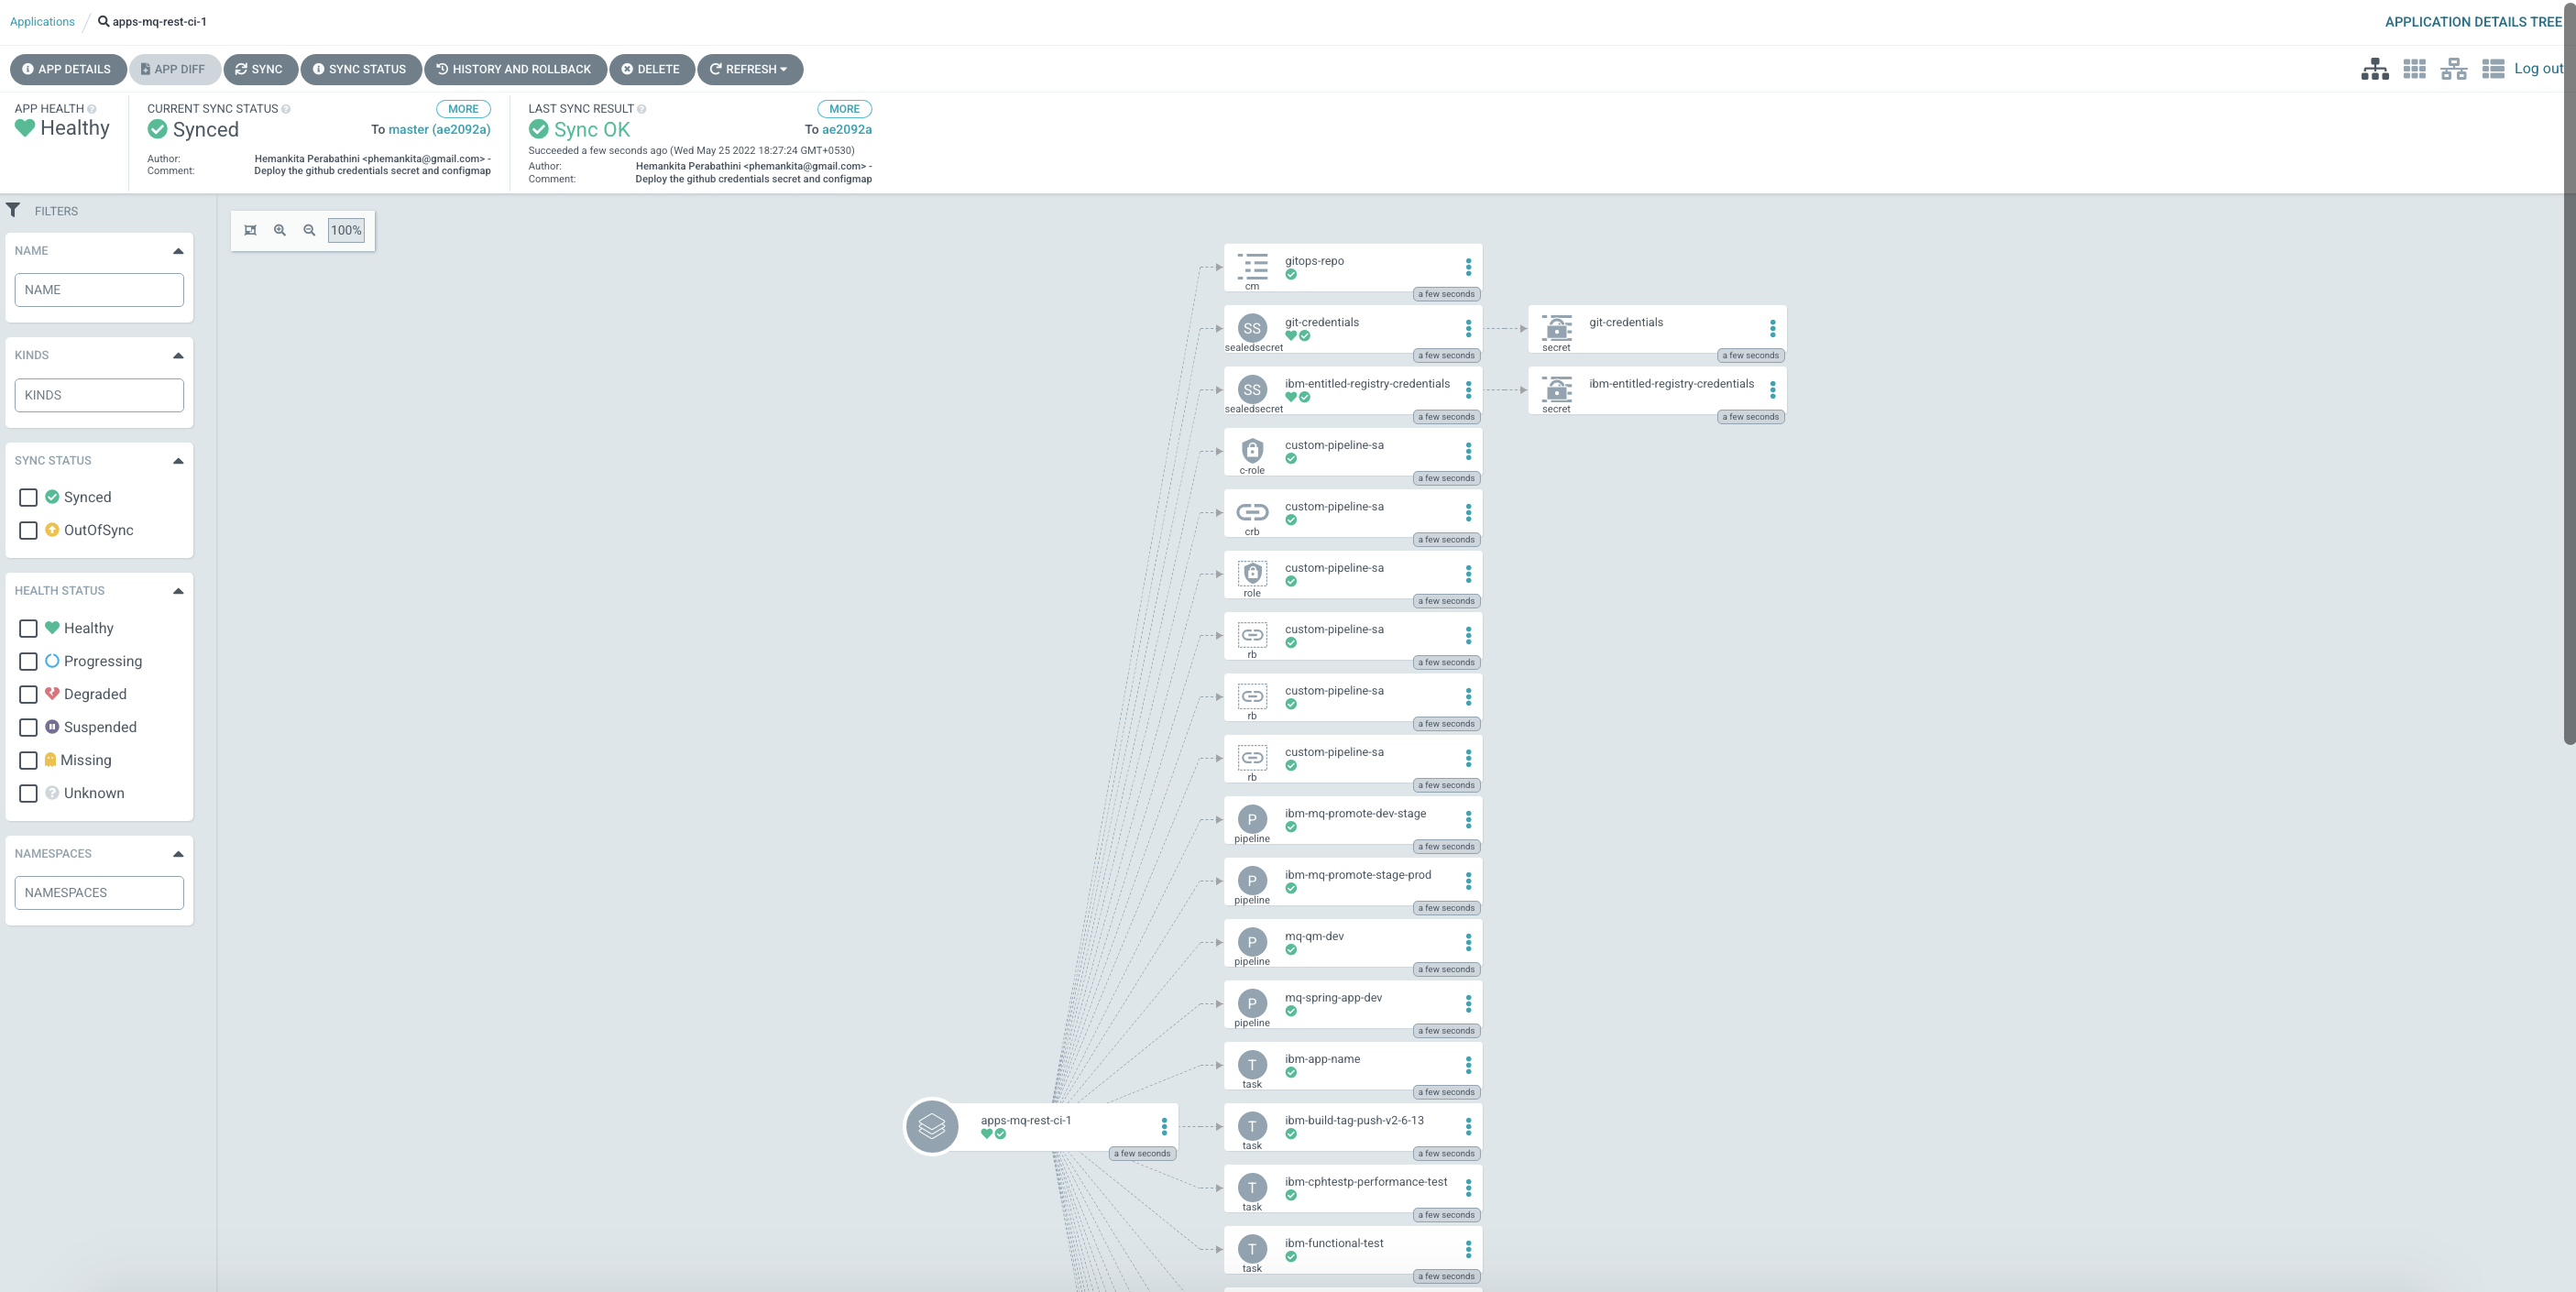
You will see all the necessary configurations. If you observe carefully, you will see all the sealed secrets and configmaps we created earlier under this application.
-
Examine the fully configured queue manager
devpipelineWe've now fully configured the queue manager pipeline for the
devnamespace. In the next section of this chapter we're going to run this pipeline to buildQM1and deploy it to thedevnamespace.Let's have a quick look at the pipeline in the OpenShift console.
From OpenShift console, select
Pipelines>Pipelines. Then selectProject:ci. You'll see the below pipelines;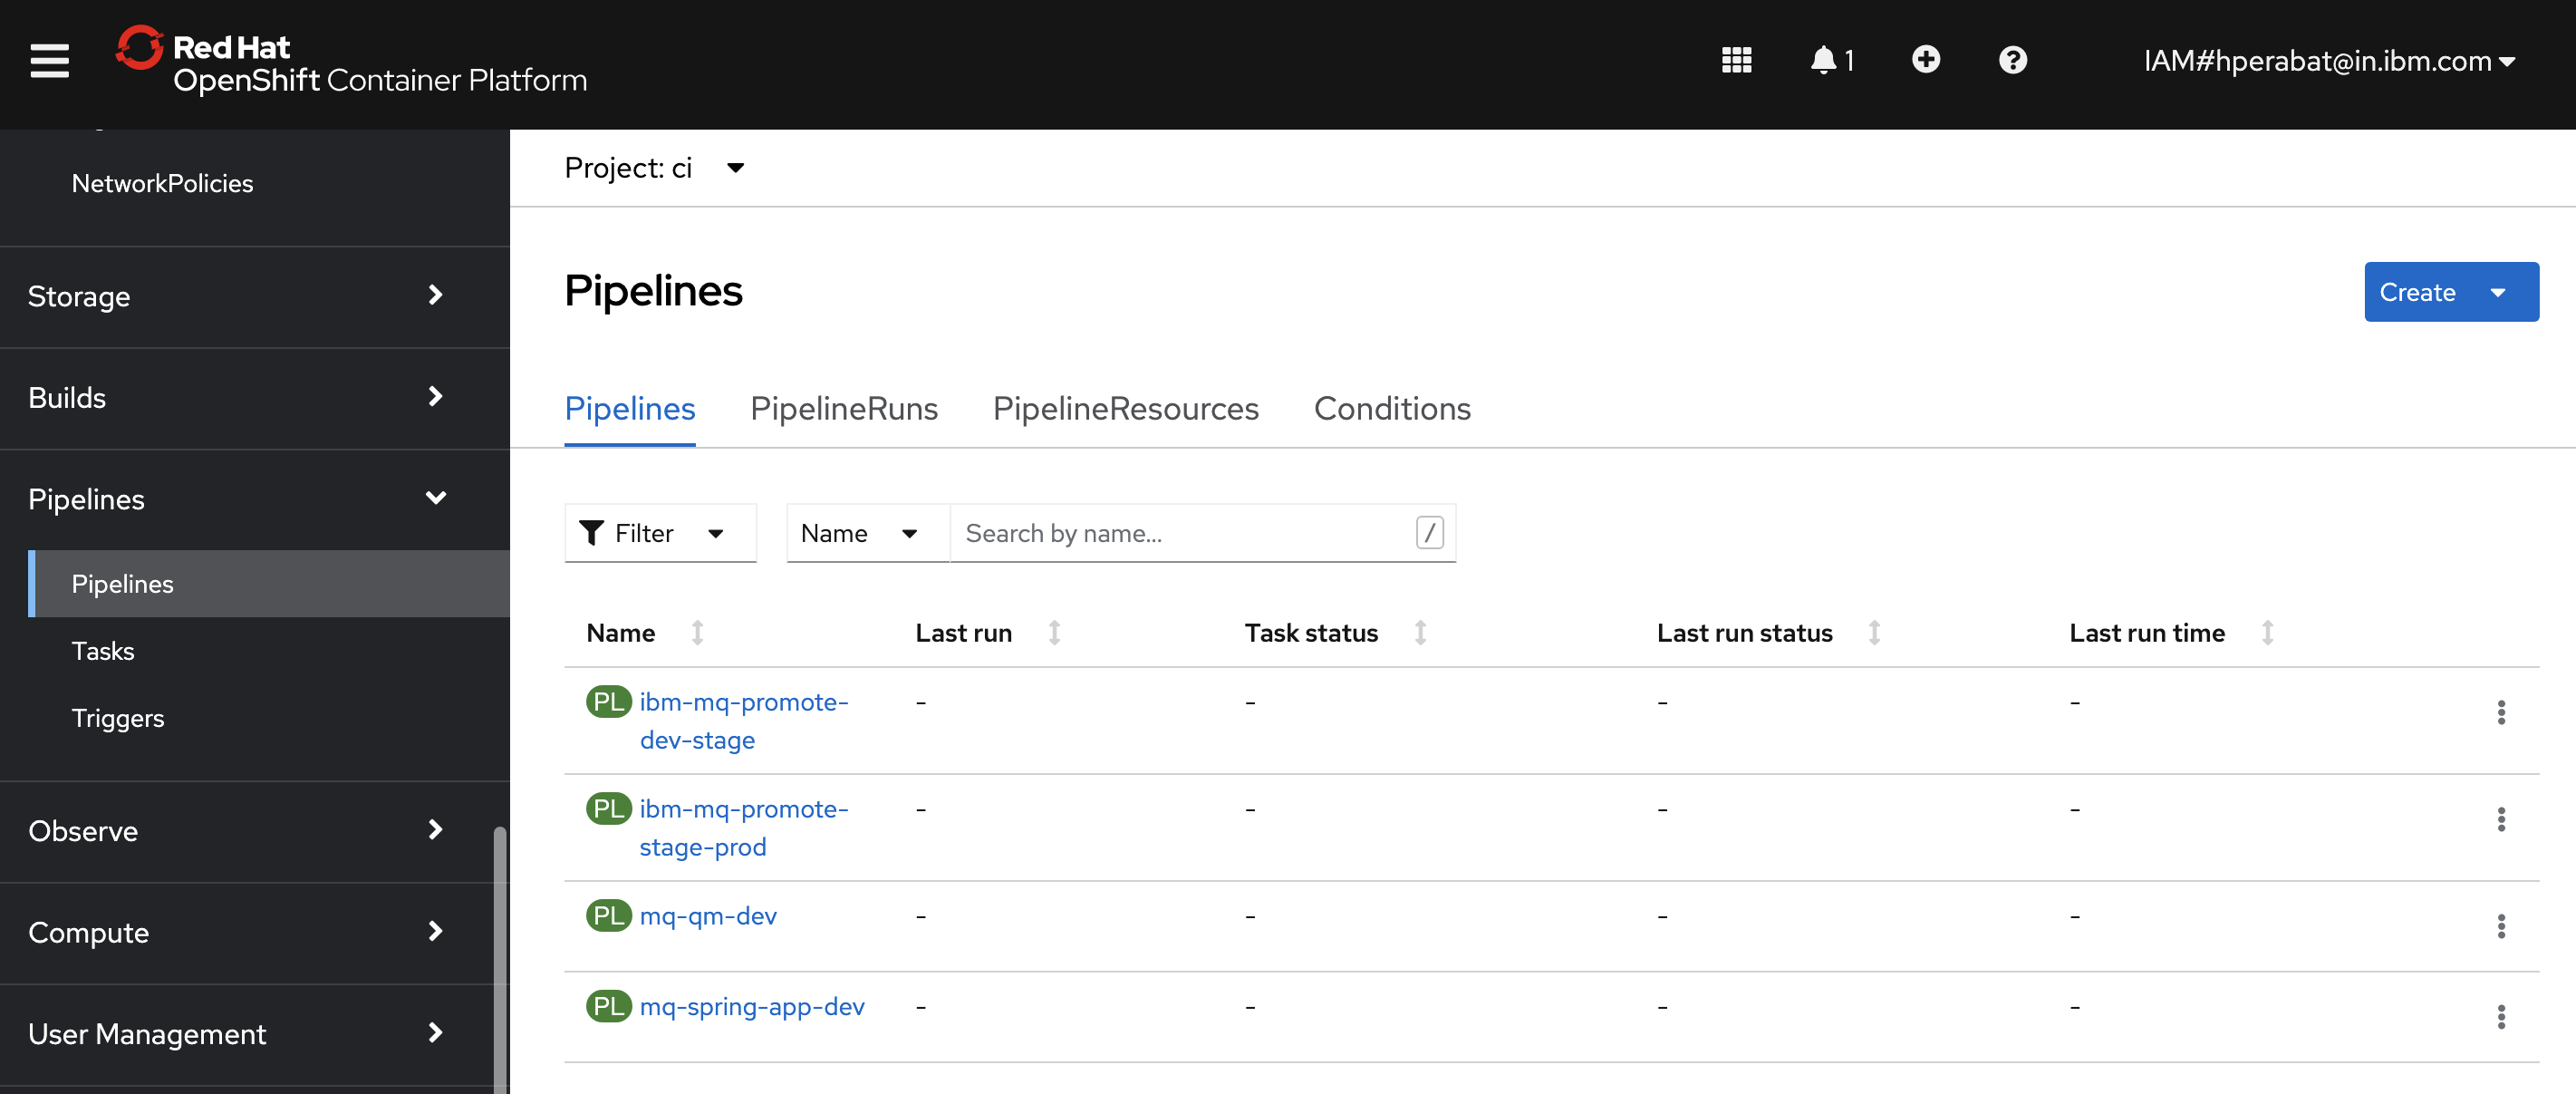
Select
mq-qm-devpipeline: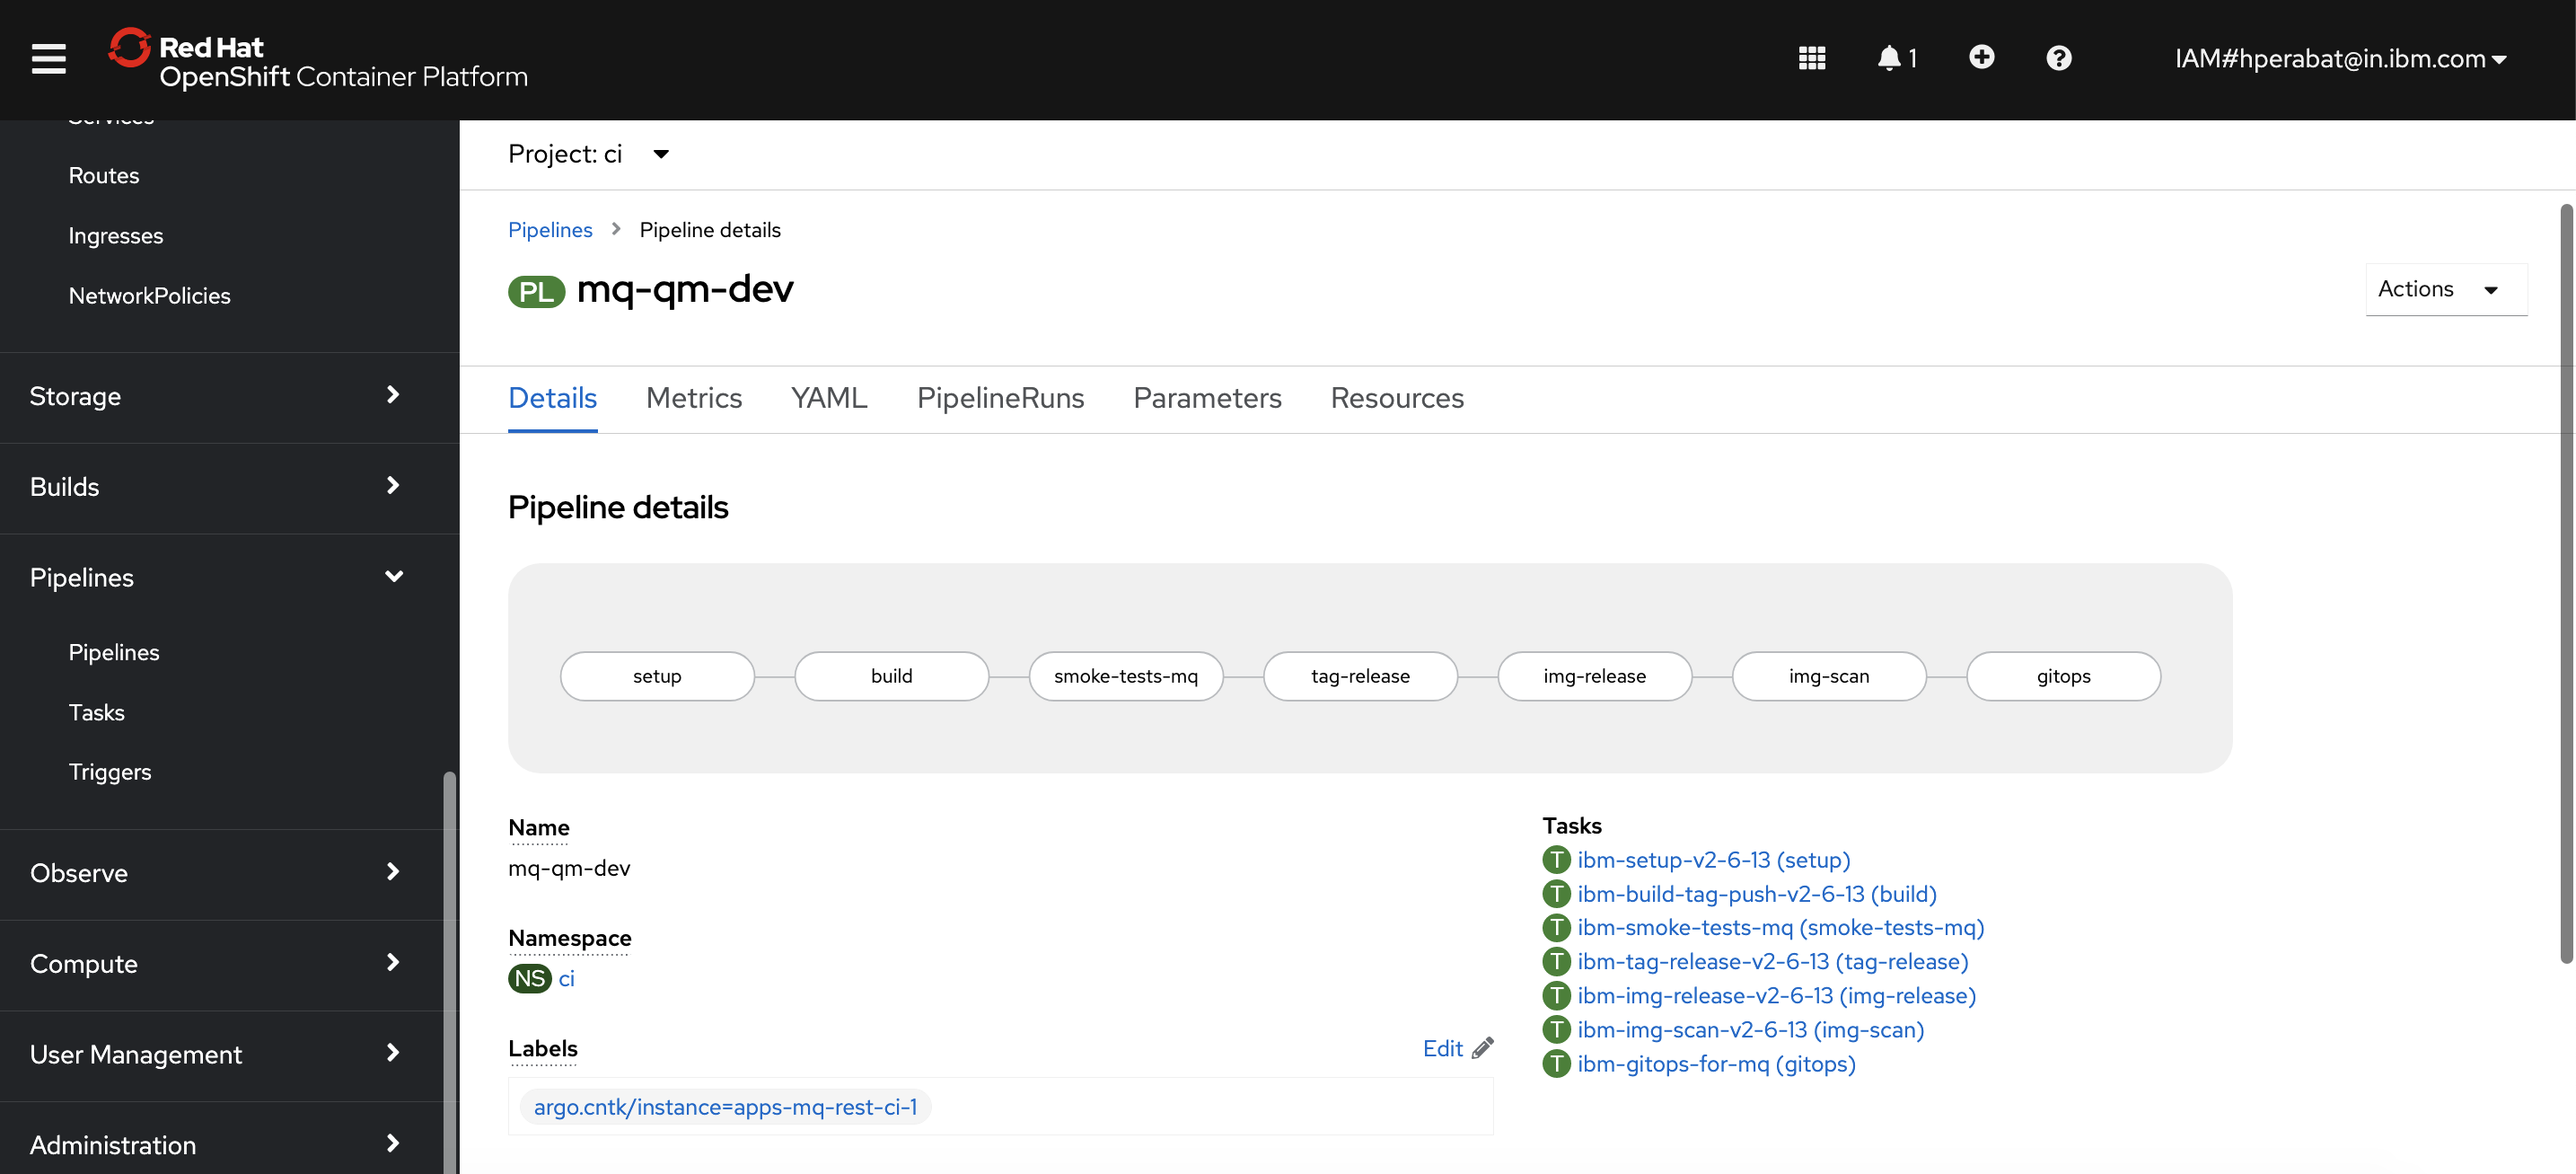
We'll explore this pipeline more fully in the next topic of this chapter.
Congratulations!
You've now got a fully functioning MQ queue manager pipeline. In the next topic of this chapter, we're going to use this pipeline to deploy a fully tested queue manager QM1 to the dev namespace. We'll explore the pipeline, tasks and steps in more detail to see exactly how they work.