Configuring the cluster for GitOps
Audience: Architects, Application developers, Administrators
Timing: 45 minutes
Overview
In this topic, we're going to:
- Create a new GitHub organization for our tutorial
- Copy the sample repositories for this tutorial to our new organization
- Clone these repositories to our local machine
- Briefly review the main GitOps repository,
multi-tenancy-gitops - Install ArgoCD to help us set up the cluster
- Customize ArgoCD
- Login in to the ArgoCD UI
By the end of this topic we'll have a all the basic components in place to perform GitOps in our cluster.
Introduction
Continuous integration and continuous deployment (CICD) are at the core of our MQ deployment. CICD ensures that any changes to source applications and queue managers are automatically built and tested before they are deployed, helping to ensure their correctness and the integrity of the cluster.
MQ applications and queue managers are defined, configured and changed using a GitOps model. GitOps puts git repositories and git commands such as git push (to request a change) and git merge (to approve a change) at the heart of configuration management. A GitOps approach helps an organization implement best practices in version control and release governance based on a widely used open standard -- git.
The following diagram outlines the major components in a GitOps MQ CICD process:

Notice the clear separation of concerns:
-
Tekton pipelines (OpenShift Pipelines) use MQ application and queue manager source repositories to build and store successfully tested Kubernetes artifacts in a Git config repository, image registry and Artifactory. While Kubernetes resources (e.g. pods, routes...) can be created as part of the pipeline run to test the source change, these resources only last for the duration of the pipeline run. It is the resultant Git, container image registry and Artifactory resources that are used to affect changes to the cluster in a subsequent, asynchronous processing step controlled by ArgoCD.
-
ArgoCD applications (OpenShift GitOps) watch a Git config repository for changes built as a result of successful pipeline runs. This repository identifies the latest version of the application or queue manager using YAMLs stored in Git which reference the image repository and Artifactory. ArgoCD applies recently updated Kubernetes resources to the cluster, resulting in new or updated Kubernetes resources that represent the changed MQ applications and queue managers, such as pods, routes etc. In contrast to pipeline runs, ArgoCD changes are durable; they remain as defined unless and until they are explicitly changed or deleted in the GitOps repository. Moreover, if the cluster resources drift from their repository-defined values, ArgoCD will restore them to these values; only changes that are applied to the Git config repository affect the long term state of the cluster.
-
The Git configuration repository, often referred to as the GitOps repository, is used to store the MQ application and queue manager YAML artifacts built by Tekton and watched by ArgoCD. We think of this repository as a transfer point between Continuous Integration and Continuous Deployment; the successful built and tested YAMLs are stored in the Git configuration repository by a Tekton pipeline, which is continuously being watched by an ArgoCD application which deploys the latest YAML which references information in Artifactory and the image registry.
Often, a Tekton pipeline will perform its changes to a GitOps repository under a pull-request (PR) to provide an explicit approval mechanism for cluster changes. ArgoCD will only see the changes once a PR is merged, providing the formal sign-off which is often so important in higher environments such as production. In contrast, lower environments such as development, are often committed into directly and therefore immediately seen by ArgoCD and applied to the cluster.
It's worth noting that although we show a single GitOps repository, there are in fact multiple repositories -- each corresponding to a different architectural layer in our cluster such as infrastructure, services and applications. As we'll see, we don't just use the GitOps repository to deploy MQ applications and queue managers, but every component in the cluster. When we look at our target architecture, every single component (Cert manager, SonarQube, JMeter...) will be deployed to the cluster using ArgoCD and a set of YAMLs from the appropriate specific GitOps repository.
In this section of the tutorial, we're going to set up the GitOps repository, and install ArgoCD. Later, we'll customize our GitOps config repositories, and them in conjunction with ArgoCD it to install the rest of the components in the cluster, including MQ applications and queue managers.
Pre-requisites
Before attempting this section, you must have completed the following tasks:
- You have created an OCP cluster instance.
- You have installed the
occommand on your local machine. Its version must be compatible with the version of your cluster. Use these instructions to get the latest version ofoc. Useoc versionto confirm that you haveClient Version: 4.6or higherServer Version: 4.7or higher
- You have also installed
npm,git,tree,jqandghcommands.- (Use
gh --versionto ensure you are using at least version 2 ofgh.)
- (Use
See these instructions about how install these prerequisites.
Video walkthrough
The following video walkthrough takes you through this topic step by step:
Click to watch the video
Setting up GitHub
In this section we're going to create the GitOps organization that contains the GitOps repositories that are used by ArgoCD to determine the state of our cluster. We'll copy set of sample GitOps repositories as a starting point; we'll make our own copy and review its contents. Later in the tutorial, we'll customize it for our cluster.
(If you'd like to re-familiarize yourself with git, GitHub or managing repositories, you'll find the following short video and short read helpful.)
-
Create a new GitHub organization
We're going to create a dedicated GitHub organization for the repositories used in this tutorial. This is good practice as it allows you to keep your production reference work separate from other git work, or try out multiple configurations using different organizations.
In your browser, navigate to https://github.com/settings/organizations to create a new GitHub organization:

Click on
New organizationand select theFreeplan:
Complete this page as follows:
- A
Organization account namesuch astutorial-org-123 - A
Contact emailsuch asmquser123456@hotmail.com - Select
My personal accountto associate this with your personal GitHub account - Click
Nextto create the GitHub organization
- A
-
Set up environment variable for your GitHub Organization
This tutorial uses environment variables to save typing and reduce errors. We will use the
$GIT_ORGenvironment variable to store your GitHub organization name. We'll use this variable in many subsequent commands.Tip
You'll find it helpful to open a new terminal window for this topic.
In the following command, replace
<git-organization>with the GitHub organization name you've just chosen (e.g.tutorial-org-123):export GIT_ORG=<git-organization>You can verify your
$GIT_ORGas follows:echo $GIT_ORG -
Set the value of your working git folder
We recommend that you keep all repositories related to your Git organization under a common folder, which is usually a child folder of your home folder, e.g.
$HOME/git.The
$GIT_ROOTenvironment variable will be used to identify this folder as the root folder for your cloned git repositories.export GIT_ROOT=$HOME/git/$GIT_ORG-rootYou can verify your
$GIT_ROOTfolder as follows:echo $GIT_ROOTFeel free to use a different value for
$GIT_ROOTif you'd like to do so. -
Change to your working git folder
The set of repositories will be cloned under the
$GIT_ROOT. Let's create this folder if required, and move to it.Issue the following command to create the
$GIT_ROOTfolder and move to it:mkdir -p $GIT_ROOT cd $GIT_ROOTYou'll now be in your working folder, for example:
/Users/anthonyodowd/git/tutorial-org-123-root %
Clone sample repositories
Now that we have a GitHub organization and a local folder, we can populate them with the sample GitOps repositories. Later, we'll customize these repositories for our cluster.
-
Install and authenticate with the gh cli
To install gh cli
To validate your github authentication follow below steps:brew install ghWhat is your preferred protocol for Git operations?gh auth login -h github.comAuthenticate Git with your GitHub credentials?HTTPSHow would you like to authenticate GitHub CLI?yesFirst copy your one-time code: ***Login with a web browserPress Enter to open github.com in your browser...

Enter one-time code then click on continue button

When you see authorize GitHub CLI page click on authorize github

-
The
create-repos.shscriptThe production reference guide provides a script that creates the GitOps repositories from a set of GitHub templates and then clones them to your local machine under the
$GIT_ROOTfolder.Issue the following command to get the script:
curl -O https://raw.githubusercontent.com/cloud-native-toolkit/multi-tenancy-gitops/master/scripts/create-repos.sh && chmod +x create-repos.shYou'll see the
create-repos.shbeing downloaded, stored on the local file system and made executable.% Total % Received % Xferd Average Speed Time Time Time Current Dload Upload Total Spent Left Speed 100 9006 100 9006 0 0 27779 0 --:--:-- --:--:-- --:--:-- 28681You can use the
lscommand to verify that the script is now in your local folder:ls -altto show the files in your working folder:
total 24
drwxr-xr-x   3 anthonyodowd  staff    96  7 Feb 17:32 .
-rwxrwxr-x   1 anthonyodowd  staff  8374  8 Feb 15:20 create-repos.sh
drwxr-xr-x  17 anthonyodowd  staff   544  7 Feb 15:53 ..
Notice that file mode for
create-repos.shhasxset to indicate that it is executable. -
Run the
create-repos.shscriptLet's run the
create-repos.shscript. It will:- create the repositories in your GitHub organization
- clone those repositories to your local machine for customization
Issue the following command to run the script:
OUTPUT_DIR=. ./create-repos.shYou'll see four repositories created in your
$GIT_ORGorganization and cloned to your local machine:Client Version: 4.8.0-202111041632.p0.git.88e7eba.assembly.stream-88e7eba Creating GitHub repositories and local clones in folder: tutorial-org-123-root Github user/org is tutorial-org-123 Repository multi-tenancy-gitops found but not cloned... cloning repository Cloning into 'multi-tenancy-gitops'... remote: Enumerating objects: 403, done. remote: Counting objects: 100% (403/403), done. remote: Compressing objects: 100% (194/194), done. remote: Total 403 (delta 259), reused 328 (delta 198), pack-reused 0 Receiving objects: 100% (403/403), 3.29 MiB | 4.98 MiB/s, done. Resolving deltas: 100% (259/259), done. Already on 'master' Your branch is up to date with 'origin/master'. Repository multi-tenancy-gitops-infra found but not cloned... cloning repository Cloning into 'multi-tenancy-gitops-infra'... ... Repository multi-tenancy-gitops-services found but not cloned... cloning repository Cloning into 'multi-tenancy-gitops-services'... ... Creating repos for Cloud Pak examples Repository multi-tenancy-gitops-apps found but not cloned... cloning repository Cloning into 'multi-tenancy-gitops-apps'... ... Your branch is up to date with 'origin/master'.See how the output shows that the sample repositories have been successfully created and cloned. Let's now check that this has happened.
-
Verify the new repositories in your GitHub organization
Let's examine the newly created repositories in your GitHub organization.
The following command will print the URL of your Git organization:
echo https://github.com/orgs/$GIT_ORG/repositoriesfor example:
https://github.com/orgs/tutorial-org-123/repositoriesUse your browser to locate this URL. See how your organization has the following repositories:

These are the GitOps repositories that are used to sync the cluster:
multi-tenancy-gitopscontains the YAML files that describe a set of ArgoCD applications. It's these ArgoCD applications that synchronize the cluster with the following resources:- infrastructure components such as Kubernetes namespaces, whose YAMLs are defined in
multi-tenancy-gitops-infra - service components such as Artifactory, Cloud Pak services or Sonarqube, whose YAMLs are defined in
multi-tenancy-gitops-services - application components such as queue managers, databases, workflow engines, integration servers... whose YAMLs are defined in
multi-tenancy-gitops-apps
- infrastructure components such as Kubernetes namespaces, whose YAMLs are defined in
multi-tenancy-gitops-infracontains a library of infrastructure component YAMLs that are referenced by the ArgoCD applications. There are a fixed number of these YAMLs and they come preloaded with this repository.multi-tenancy-gitops-servicescontains a library of service component YAMLs that are referenced by the ArgoCD applications. There are a fixed number of these and they come preloaded with this repository.multi-tenancy-gitops-appscontains a the set of application component YAMLs that are references by the ArgoCD applications. There are a variable number of these, corresponding to the number of application components that are being deployed in a given configuration. This repository is populated by the Tekton pipelines using the source repositories for these components. For example, a source repository containing a database configuration might be used to build the database YAMLs for deployment of that database to the cluster.
Feel free to examine these repositories; we'll look at them in much more detail later.
-
Verify the new repositories cloned to your local machine
These repositories have also been cloned to your local machine under the
$GIT_ROOTfolder.Issue the following command:
tree . -L 1to see the four repositories newly cloned repositories:
. ├── create-repos.sh ├── multi-tenancy-gitops ├── multi-tenancy-gitops-apps ├── multi-tenancy-gitops-infra └── multi-tenancy-gitops-services -
Review the GitOps folder structure
The
multi-tenancy-gitopsrepository will be the focus of our attention as we configure the cluster.Issue the following command to show its structure:
cd multi-tenancy-gitops
tree . -L 1
Notice the top level folders and files:
.
├── 0-bootstrap
├── LICENSE
├── README.md
├── doc
├── scripts
└── setup
The main folders perform the following roles:
0-bootstrapcontains different profiles that can be used to initialize the cluster ready. We will choose one of the available profiles --single-cluster.scriptsandsetupcontain useful scripts that we'll use during this tutorial.
Feel free to explore these folders and files. We'll examine it in much more detail throughout this tutorial, and you'll become very familiar with it by trying it out.
Installing ArgoCD
Now that we've had an initial view of the main GitOps repository multi-tenancy-gitops, let's install ArgoCD to make use of it.
We will install ArgoCD using the Red Hat OpenShift GitOps operator. We will also configure it with the appropriate access rights to limit the resources it can create in the cluster. In so doing, we ensure that ArgoCD acts like a well-governed administrator of the cluster, only doing what it needs to do. Also, we will customize our ArgoCD instance by adding necessary custom checks.
-
Ensure you're logged in to the cluster
Tip
Ensure your terminal window is in the
multi-tenancy-gitopsfolder.Log into your OCP cluster, substituting the
--tokenand--serverparameters with your values:oc login --token=<token> --server=<server>If you are unsure of these values, click your user ID in the OpenShift web console and select
Copy Login Command.On successful login, you'll see some basic information:
Logged into "https://c100-e.jp-tok.containers.cloud.ibm.com:30749" as "IAM#hperabat@in.ibm.com" using the token provided.

You have access to 63 projects, the list has been suppressed. You can list all projects with 'oc projects'

Using project "default".
This shows some details about your user within this cluster. (This user is different to your GitHub user.)
-
Install ArgoCD into the cluster
We use the Red Hat GitOps operator to install ArgoCD into the cluster. The cloned
multi-tenancy-gitopsrepository contains the YAML necessary to do this. We’ll examine the YAML later; first let’s use it.Issue the following command to create an ArgoCD subscription in your cluster:
oc apply -f setup/ocp4x/The response confirms that the below resources has been created:
clusterrole.rbac.authorization.k8s.io/custom-argocd-cluster-argocd-application-controller created
clusterrolebinding.rbac.authorization.k8s.io/openshift-gitops-argocd-application-controller created
clusterrolebinding.rbac.authorization.k8s.io/openshift-gitops-cntk-argocd-application-controller created
subscription.operators.coreos.com/openshift-gitops-operator created
Most importantly, this command verifies that it has registered a subscription for ArgoCD to be installed in the cluster.
-
Wait for the ArgoCD installation to complete
Installation of ArgoCD is an asynchronous process; that's because while the previous script created the subscription for ArgoCD almost immediately, the installation of the ArgoCD operator takes some time, and the once the operator has been installed, the default instance of ArgoCD also takes a little time to create.
We can now issue two commands which, in turn, will wait for the ArgoCD operator to be installed and for the default instance of ArgoCD to be started.
Issue the following commands:
while ! oc wait crd applications.argoproj.io --timeout=-1s --for=condition=Established  2>/dev/null; do sleep 30; done
while ! oc wait pod --timeout=-1s --for=condition=Ready --all -n openshift-gitops 2>/dev/null; do sleep 30; done
After a while, you should see the following message informing us that operator installation is complete (it may tale a few minutes):
customresourcedefinition.apiextensions.k8s.io/applications.argoproj.io condition metThe ArgoCD operator is now installed and the default instance has been successfully created.
-
ArgoCD
clusterroleandclusterrolebindingArgoCD runs under a dedicated service account. For good governance, we use a custom clusterrole and clusterrolebinding to control the specific operations this service account can perform on different resources in the cluster.
The cluster role and the cluster role binding YAMLs are also setup along with the subscription.
oc get clusterrole custom-argocd-cluster-argocd-application-controller
oc get clusterrolebinding openshift-gitops-argocd-application-controller
oc get clusterrolebinding openshift-gitops-cntk-argocd-application-controller
You'll see the resources are created in the cluster:
$ oc get clusterrole custom-argocd-cluster-argocd-application-controller
NAME                                                  CREATED AT
custom-argocd-cluster-argocd-application-controller   2021-08-27T13:35:13Z

$ oc get clusterrolebinding openshift-gitops-argocd-application-controller
NAME                                             ROLE                                                              AGE
openshift-gitops-argocd-application-controller   ClusterRole/custom-argocd-cluster-argocd-application-controller   8m43s

$ oc get clusterrolebinding openshift-gitops-cntk-argocd-application-controller
NAME                                                  ROLE                                                              AGE
openshift-gitops-cntk-argocd-application-controller   ClusterRole/custom-argocd-cluster-argocd-application-controller   8m45s
The clusterrole
custom-argocd-cluster-argocd-application-controllerdefines a specific set of specific resources that are required by the ArgoCD service account and access rights over them.The cluster role bindings
openshift-gitops-argocd-application-controllerandopenshift-gitops-cntk-argocd-application-controllerbinds the ArgoCD service account to the cluster role above.In combination, these definitions limit ArgoCD to perform the minimum set of operations required to manage the cluster. This is important; it means that ArgoCD behaves as a well governed administrator of the cluster.
We'll also see later in the tutorial how ArgoCD creates resource in the cluster.
-
Delete default ArgoCD instance
As we'll see in a moment, the default instance of ArgoCD, created when we install the operator, isn't sufficient for our tutorial; we have to create a new one. But before we do this, we have to delete the default instance of ArgoCD.
Issue the following command to delete the default ArgoCD instance:
oc delete gitopsservice cluster || trueYou will see the resources being deleted as follows:
gitopsservice.pipelines.openshift.io "cluster" deletedNow that we've deleted the default instance, we can create a customized ArgoCD instance with additional capabilities.
Creating a custom instance
The default instance of ArgoCD provides some built-in health checks for validating standard Kubernetes resources. However, these checks are not sufficient to check the health of the custom resources added by the IBM Cloud Paks; we need to create a custom instance of ArgoCD that implements some IBM Cloud Pak specific health checks.
-
The custom ArgoCD instance
You can explore these custom health checks in the ArgoCD YAML that we'll use to create the new ArgoCD instance:
cat setup/ocp4x/argocd-instance/argocd-instance.yamlNotice, for example, a custom health check for queue managers:
mq.ibm.com/QueueManager:
  health.lua: |
    hs = {}
    if obj.status ~= nil then
      if obj.status.phase ~= nil then
        hs.message = obj.status.phase
        if obj.status.phase == "Running" then
          hs.status = "Healthy"
        else
          hs.status = "Progressing"
        end
        return hs
      end
    end
    hs.status = "Progressing"
    hs.message = "Unknown"
    return hs
This logic is used by ArgoCD to determine when a queue manager is healthy.
You can learn more about the ArgoCD Resource Health here and ArgoCD custom Lua health checks here.
-
Create a custom ArgoCD instance
Now let's create the custom ArgoCD instance using this YAML.
Issue the following command to create a custom ArgoCD instance:
oc apply -f setup/ocp4x/argocd-instance/ -n openshift-gitopsThe response confirms that the below resources has been created:
argocd.argoproj.io/openshift-gitops-cntk createdIssue the below command; it will wait to complete until ArgoCD instance pod is up and running:
while ! oc wait pod --timeout=-1s --for=condition=ContainersReady -l app.kubernetes.io/name=openshift-gitops-cntk-server -n openshift-gitops > /dev/null; do sleep 30; done -
Associate a certificate with the ArgoCD instance
Warning
If you are using the Firefox browser, you will not be able to access the ArgoCD console until a valid certificate has been associated with it. Other browsers are unaffected; you can omit this step if you wish.
Some browsers will not allow you to access the ArgoCD instance unless it has been configured with a valid certificate. The following commands will associate a valid certificate directly with the ArgoCD instance.
mkdir $$tmp$$ cd $$tmp$$ ingress_secret_name=$(oc get ingresscontroller.operator default \ --namespace openshift-ingress-operator \ -o jsonpath='{.spec.defaultCertificate.name}') oc extract secret/$ingress_secret_name -n openshift-ingress oc create secret tls -n openshift-gitops openshift-gitops-cntk-tls --cert=tls.crt --key=tls.key --dry-run=client -o yaml | oc apply -f - cd .. rm -rf $$tmp$$ -
Launch ArgoCD
ArgoCD can be accessed via an OpenShift route. Using a browser, navigate to the URL returned by following command:
oc get route openshift-gitops-cntk-server -n openshift-gitops -o jsonpath='{"https://"}{.spec.host}{"\n"}'This will list the route to the ArgoCD instance we've just created, for example:
https://openshift-gitops-cntk-server-openshift-gitops.ibmcloud-roks-xxxxx.containers.appdomain.cloudCopy the URL from your terminal output into your browser to launch the ArgoCD web console.
(You can safely ignore any browser certificate warnings.)
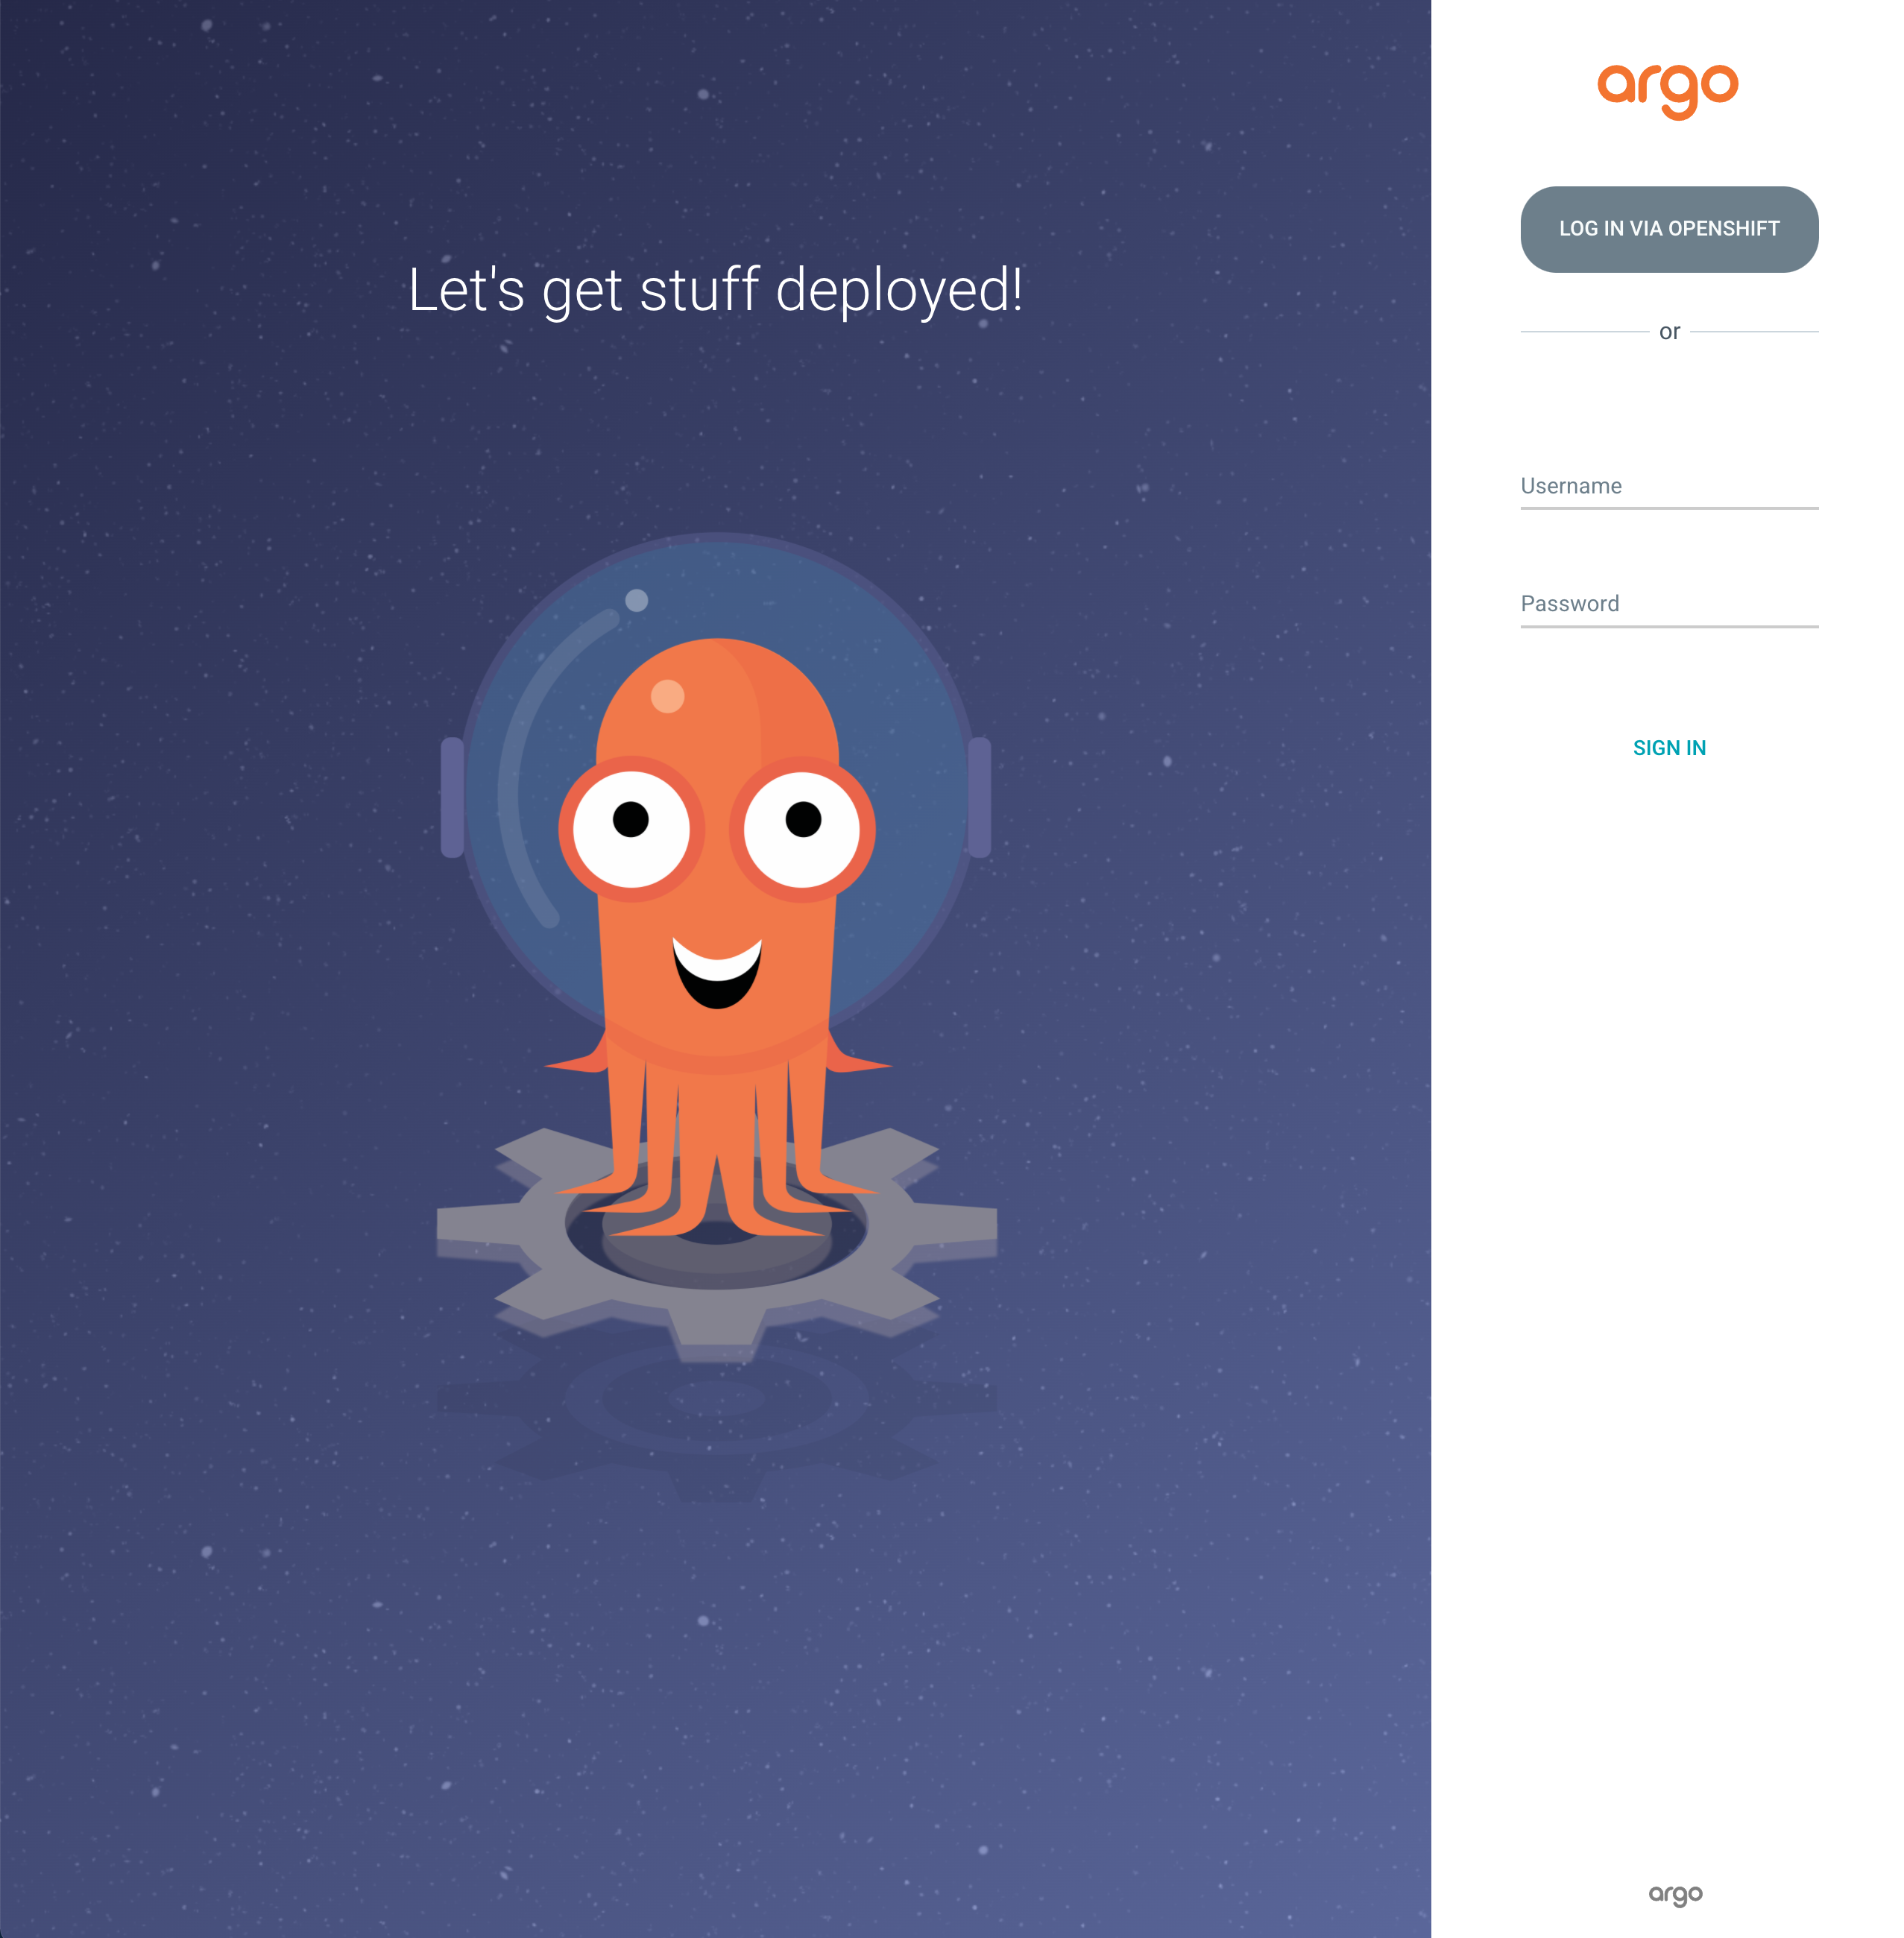
You should get to the ArgoCD login page:
-
Login to ArgoCD
Info
When logging into ArgoCD you can select one of two different authentication mechanisms. You can select either mechanism, but if you want to have full access to do things like synching or refreshing ArgoCD Applications, you should use the mechanism that uses administrator credentials (first option below).
You can see that the ArgoCD login page provides two different mechanism for authentication:
-
The first mechanisms uses the ArgoCD service account credentials created at installation time. If you use this mechanism, you will be authenticated as an administrator with all associated privileges. (You don't need administrator privileges to complete the tutorial.)
To log in using the ArgoCD administrator credentials, use admin for the
usernameand retrieve the password from the appropriate Kubernetes secret. Use the following command to retrieve the password:oc extract secret/openshift-gitops-cntk-cluster -n openshift-gitops --keys="admin.password" --to=- -
The second mechanism uses your OpenShift Single Sign On mechanism to authenticate you. If you use this mechanism, you will be authenticated as your user, rather than an administrator, with appropriate permissions. These permissions are sufficient to complete the tutorial, but you will not be able to perform a full range of ArgoCD operations.
You may be prompted to grant the ArgoCD Service Account access your OpenShift user account information details.
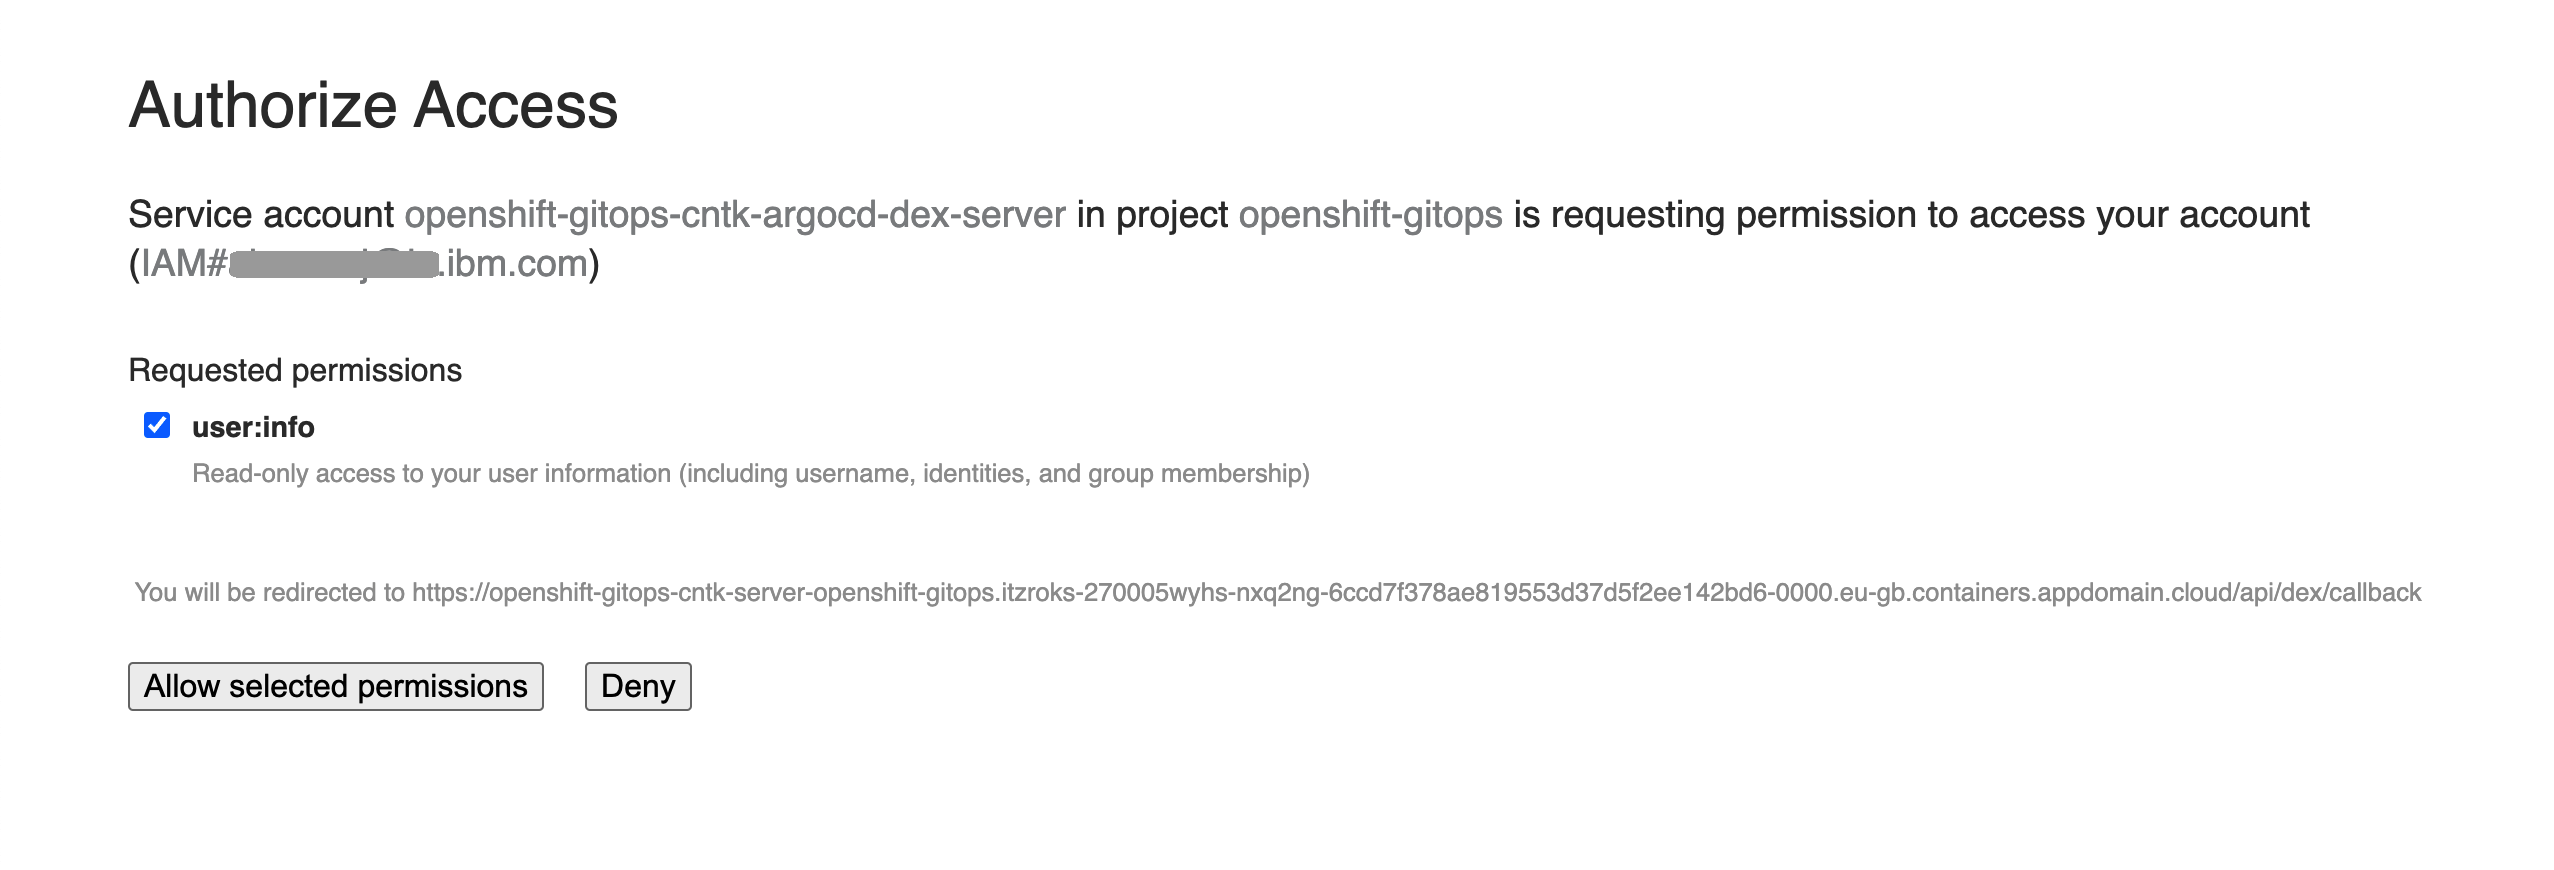
If so, grant access to retrieve your OpenShift user information.
Once the UI launches, you'll see:
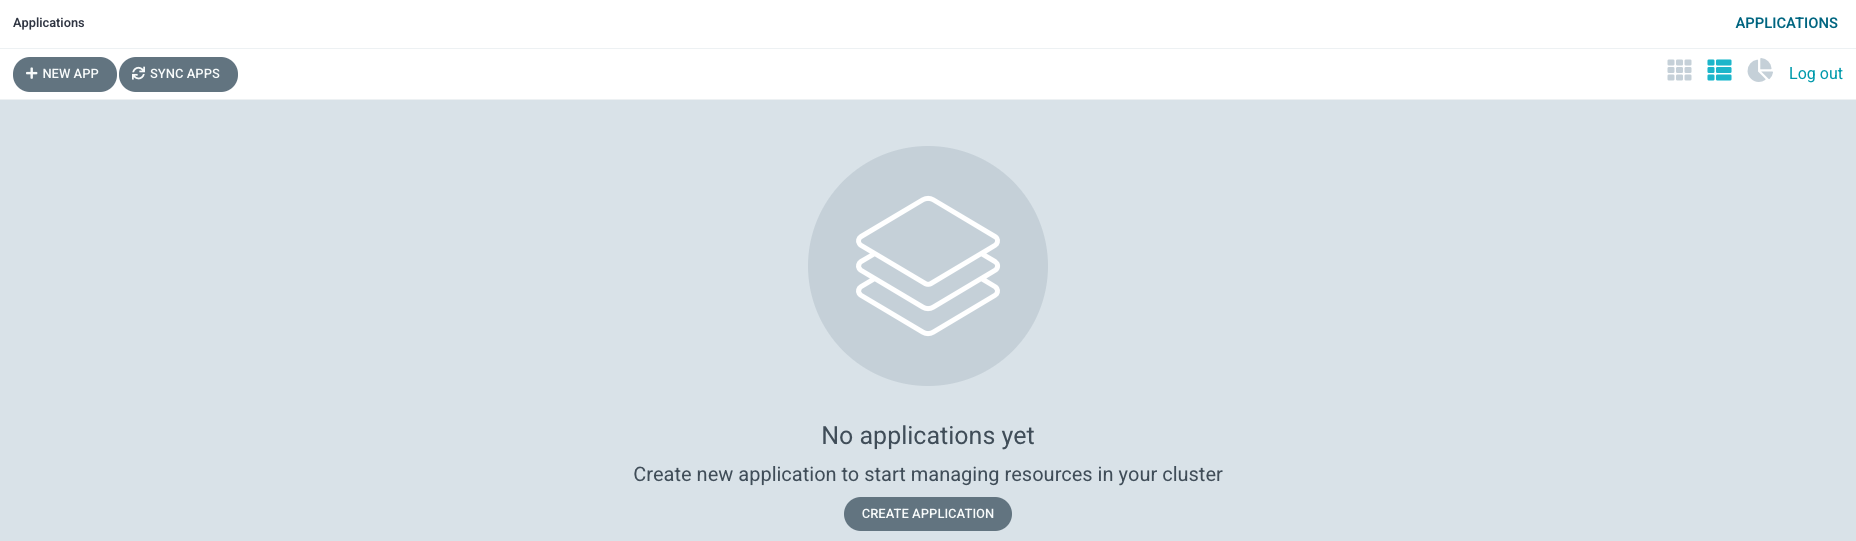
See how there are no ArgoCD applications active at the moment.
In the next section of the tutorial, we'll configure ArgoCD to create the ArgoCD applications that will in turn spin up infrastructure, service, and application resources to apply to the cluster.
-
Congratulations!
You've created the GitOps repositories for your cluster using the samples and examined the high level structure of the main multi-tenancy-gitops repository. You also installed ArgoCD. You created a specific clusterrole and clusterrolebinding for the ArgoCD service account to ensure that it manages the cluster in a well governed manner. Finally, you launched the UI for ArgoCD; you'll make extensive use of it during this tutorial.
In the next topics, we're going to customize the GitOps repositories for your cluster and use ArgoCD to create and manage the Kubernetes infrastructure and services resources that will support your MQ applications and queue managers.