Application pipeline
Overview
Audience: Architects, Application developers, Administrators
Timing: 30 minutes
In this topic, we're going to:
- Create an MQ application pipeline
- Examine the pipeline tasks
- Run the pipeline
- Review the resultant GitOps application folders
- Explore how ArgoCD automatically deploys the application
- Test the application using
curl
The following diagram illustrates how CICD is achieved using Tekton pipelines and ArgoCD applications. In this topic, we are going to focus on the highlighted application CICD.
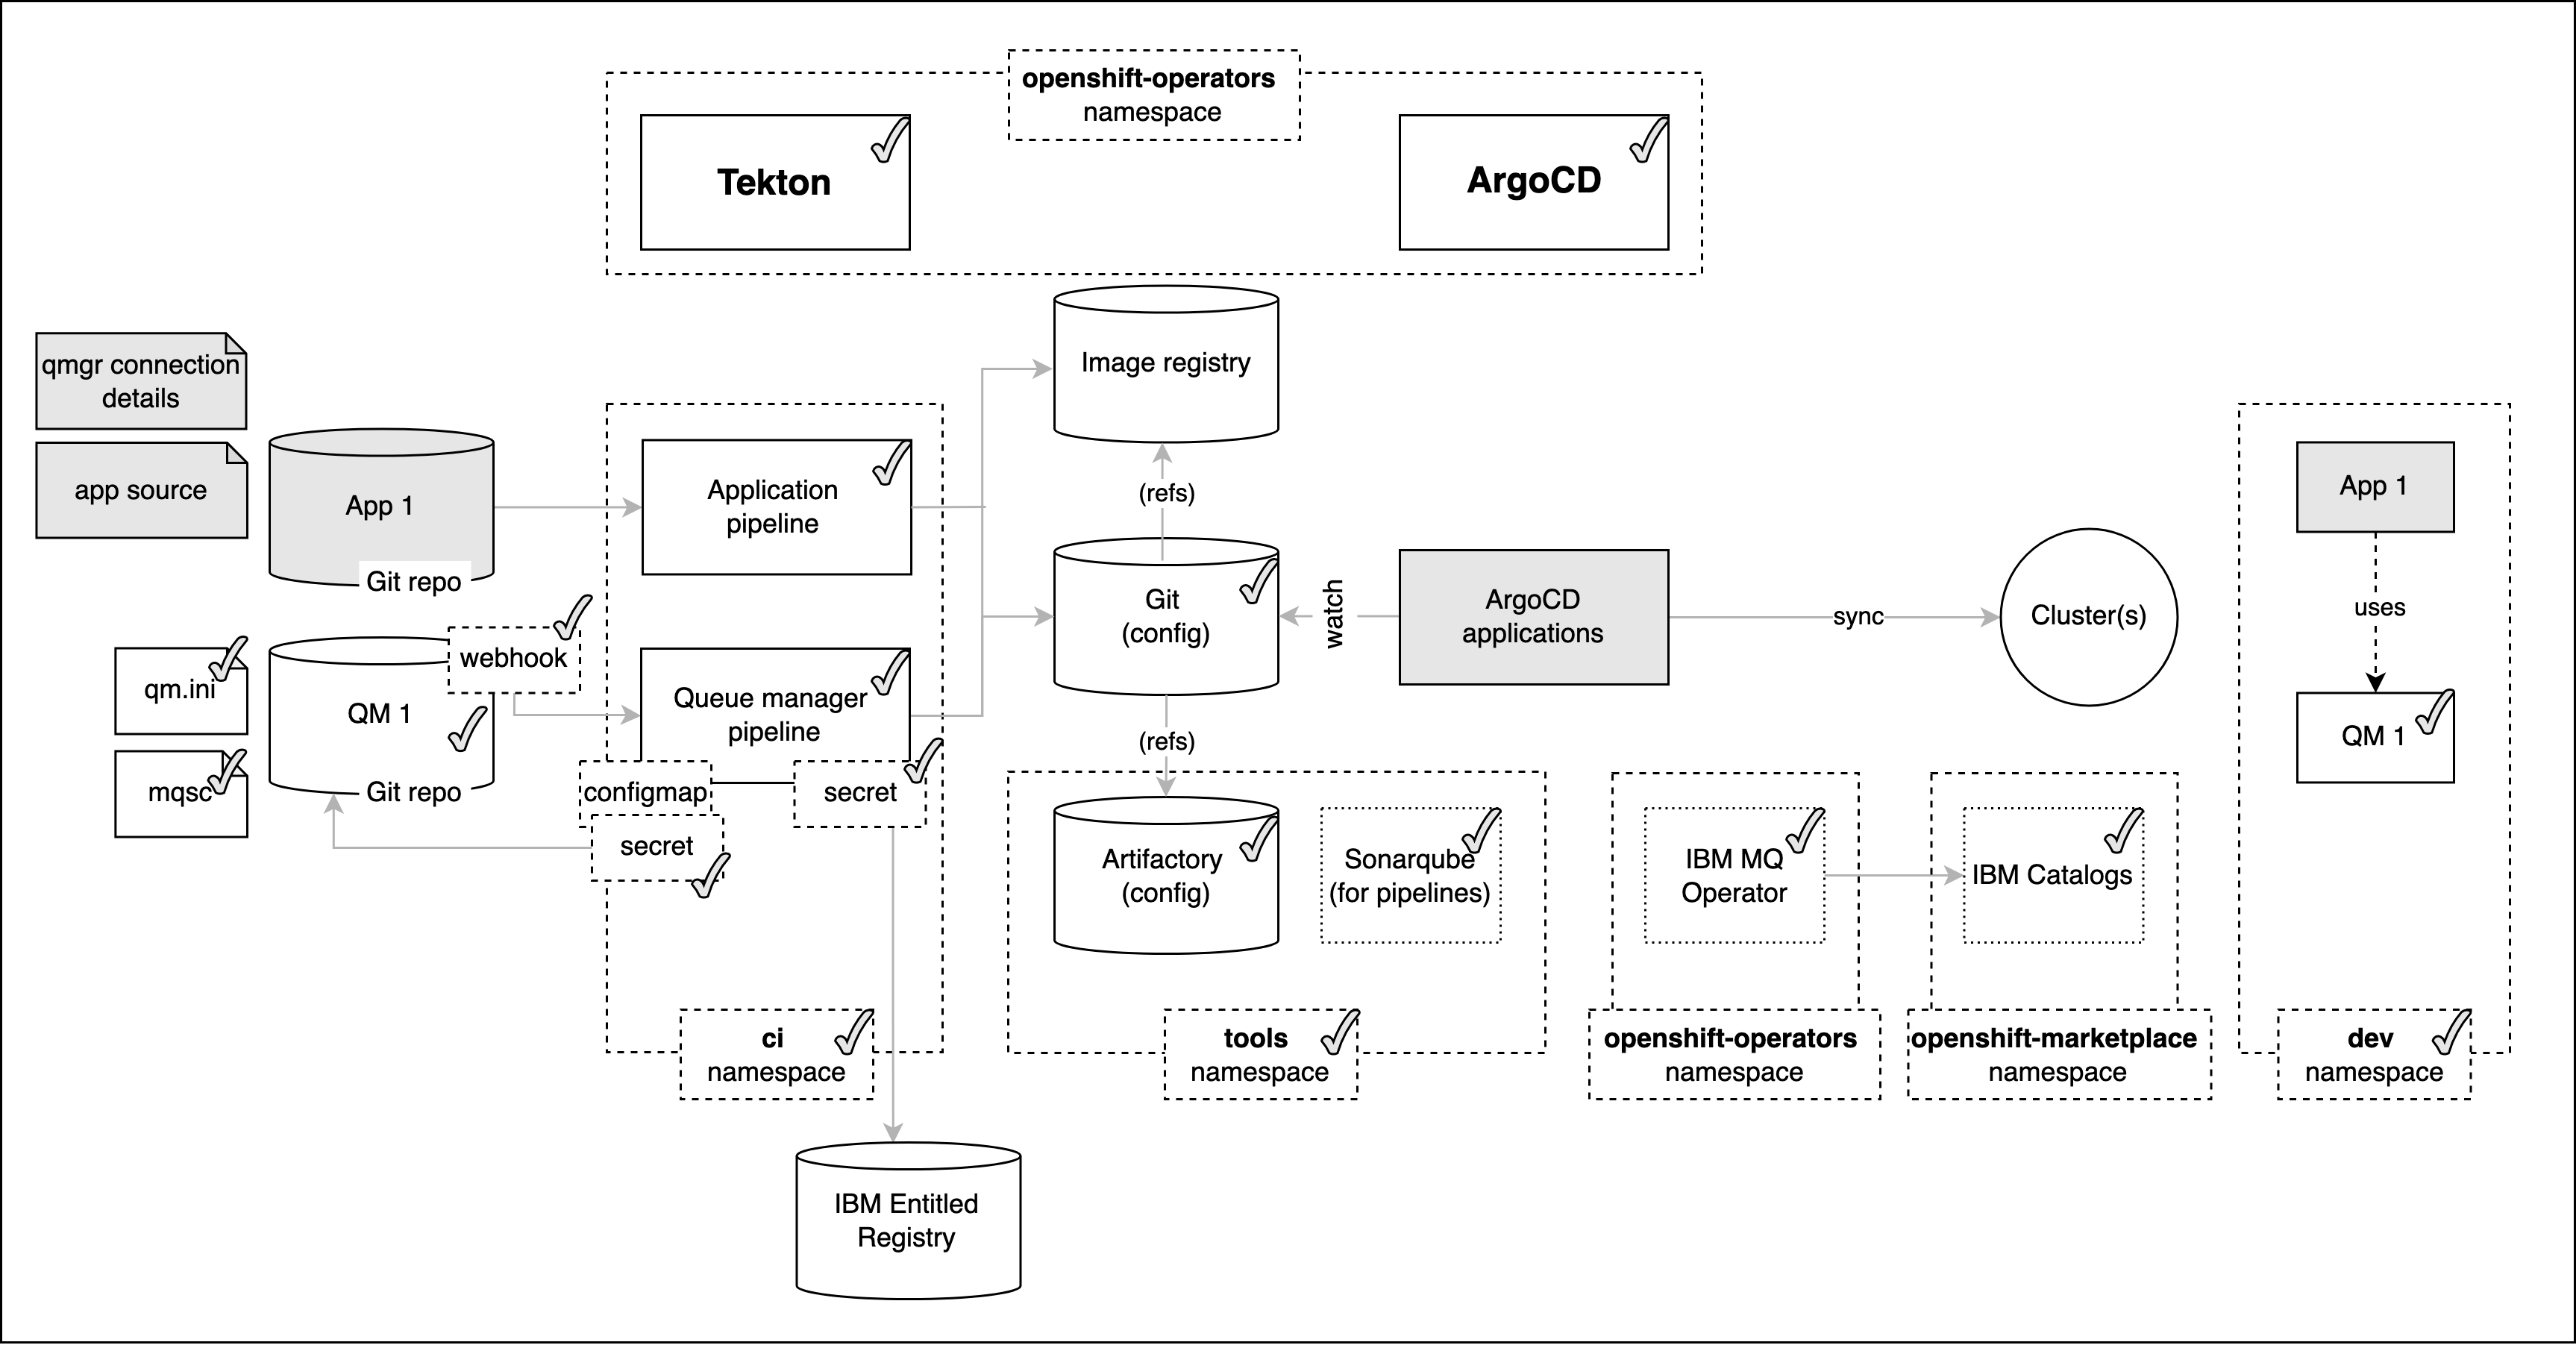
The application pipeline executes a set of tasks designed to ensure that the application builds successfully, including passing a set of functional and security tests. If every step is successful, the pipeline creates a new application image and GitOps configuration. Subsequently, a dedicated ArgoCD application watches for new MQ application images and configurations, which it deploys to the cluster.
Notice the separation of concerns between Tekton and ArgoCD. Tekton's role is to perform continuous integration, ensuring that the best current version of the application is available for deployment. ArgoCD's role is to perform continuous deployment, ensuring that the cluster is always kept up-to-date with the latest built application that has passed all required tests.
Pre-requisites
In order to deploy the pipelines for the application we require the following prerequisites to be configured and installed:
- Create the cluster on the cloud platform of your choice.
- Configure the cluster for GitOps, and install the cluster infrastructure and cloud native services.
- Complete the steps in the previous topic to clone the application source.
- Ensure you are logged into your cluster from the command line.
Build and test the application
Let's now review the application pipeline to build, smoke test and configure the application.
The production reference guide includes a number of pre-configured application pipelines for different programming languages and frameworks. These pipelines illustrate best practices for continuous integration. They are not meant to be exhaustive; you can modify them for your own projects.
For this section, we return to the terminal window we used in previous chapters for interacting with the GitOps repository rather than the one we’ve just used to clone the mq-spring-app client application source repository. Open a new terminal window for the multi-tenancy-gitops-apps repository if necessary.
-
Review the pre-configured pipeline
Open the OpenShift console and navigate to
Pipelines > Pipelines.You will want to select the
ciProject from the drop-down at the top of the page.Click the
mq-spring-app-devPipeline to view the client application build and deployment pipeline.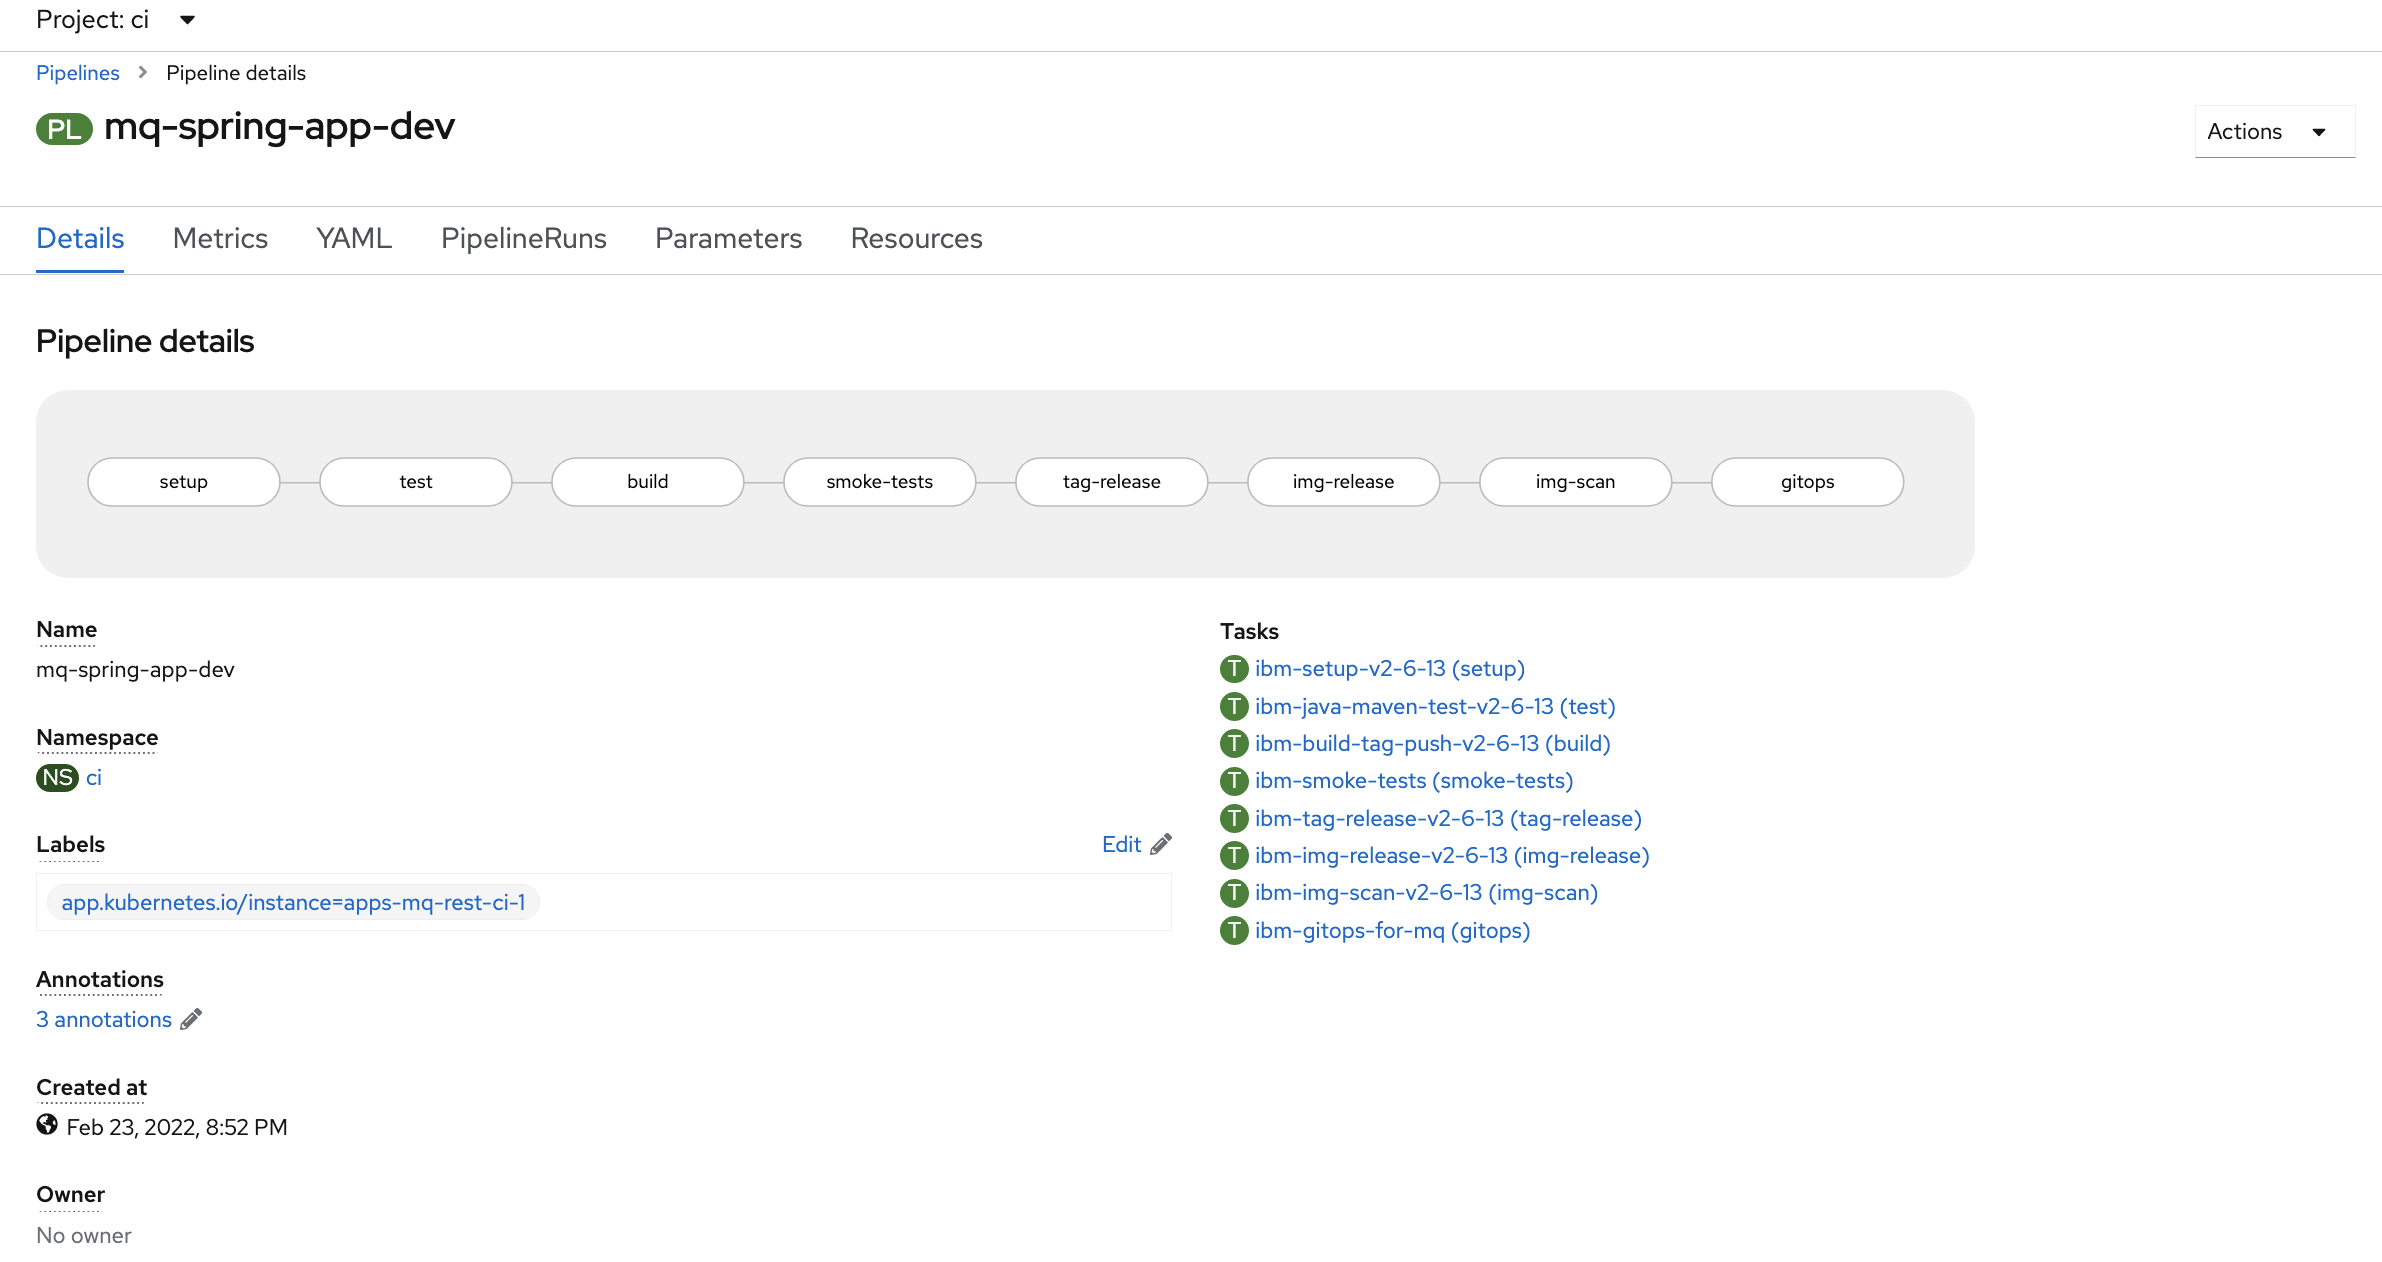
You can see the different stages of the pipeline, from building the Java application, unit testing, through to updating the image registry and GitOps repo.
You can also view the pipeline from the command line:
oc describe Pipeline mq-spring-app-dev -n ci -
Kickoff a pipeline run
From the Actions dropdown menu in the upper-right corner, select Start.
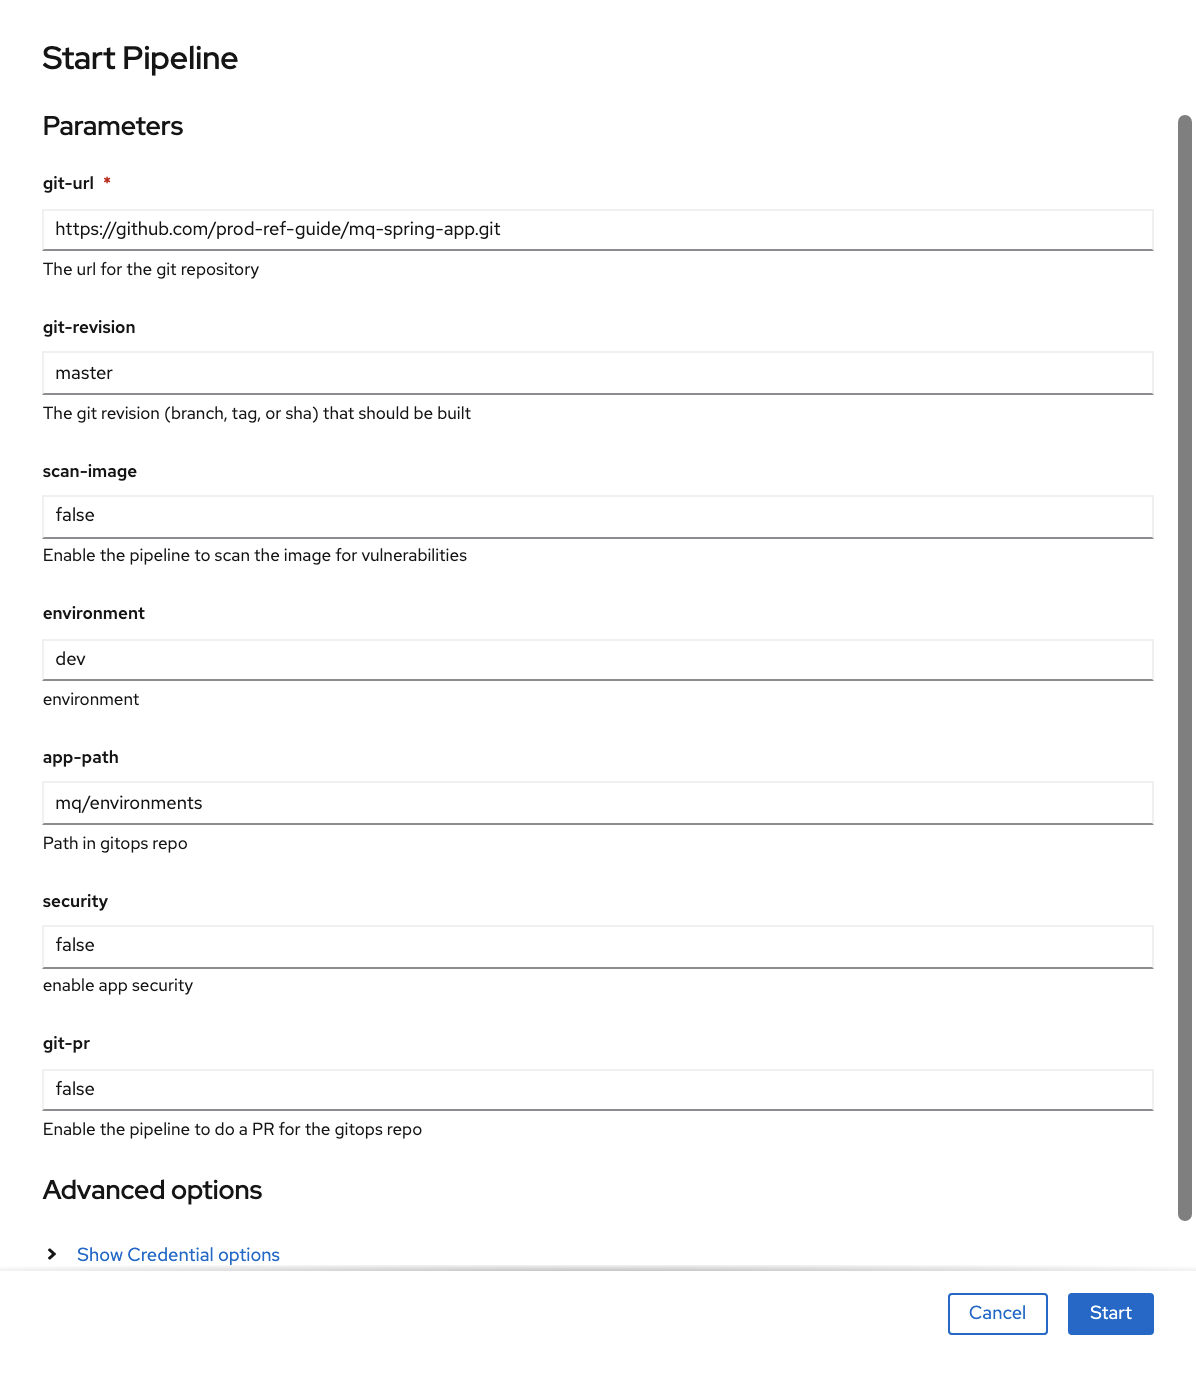
Configure the run as follows:
- Set
git-urlto your fork of themq-spring-apprepository - Set
git-revisiontomaster. (Later in the tutorial, we will use a new branch.) - Set
scan-image: false(temporary fix while issues with UBI are resolved)
Click Start and wait! It may take a little while for the pipeline to run. Keep checking until all steps have completed.
- Set
-
Re-merging local clone to view updated app resources in GitOps repository
The
mq-spring-app-devpipeline run updated the GitOps repository with the application kubernetes resources. This means that our local clone of the GitOps repository is one commit behind GitHub. Before we can push any more changes to the GitOps repository, we must re-merge our local clone with GitHub.Return to the terminal window you're using for the
multi-tenancy-gitops-appsGitOps apps repository. (Rather than the terminal window you're using for themq-spring-app-devsource repository.)git fetch origin git merge origin/$GIT_BRANCHwhich shows that
Updating e99438d..3a1f80d
Fast-forward
 mq/environments/dev/mq-qm01/queuemanager/queuemanager.yaml      |   2 --
 mq/environments/dev/mq-spring-app/configmap/configmap-ccdt.yaml |  25 +++++++++++++++
 mq/environments/dev/mq-spring-app/configmap/configmap.yaml      |  12 +++++++
 mq/environments/dev/mq-spring-app/deployment/deployment.yaml    | 100 ++++++++++++++++++++++++++++++++++++++++++++++++++++++++++
 4 files changed, 137 insertions(+), 2 deletions(-)
 create mode 100644 mq/environments/dev/mq-spring-app/configmap/configmap-ccdt.yaml
 create mode 100644 mq/environments/dev/mq-spring-app/configmap/configmap.yaml
 create mode 100644 mq/environments/dev/mq-spring-app/deployment/deployment.yaml
We're now in a consistent state with the GitOps apps repository, so let's construct our next set of changes to push.
-
The ArgoCD application for
MQ sample applicationMQ sample applicationhas its deployment to the cluster managed by a dedicated ArgoCD application calleddev-mq-spring-app-instance. This follows the separation of concerns pattern where one ArgoCD application manages a set of related Kubernetes resources deployed to a cluster; in this case, all those resources associated withMQ sample applicationin thedevnamespace.Issue the following command to show the ArgoCD application details:
cat mq/config/argocd/dev/dev-mq-spring-app-instance.yamlwhich shows a YAML file typical of those we've seen before:
apiVersion: argoproj.io/v1alpha1
kind: Application
metadata:
  name: dev-mq-spring-app-instance
  annotations:
    argocd.argoproj.io/sync-wave: "300"
  finalizers:
    - resources-finalizer.argocd.argoproj.io
spec:
  destination:
    namespace: dev
    server: https://kubernetes.default.svc
  project: applications
  source:
    path: mq/environments/dev/mq-spring-app/
    repoURL: https://github.com/prod-ref-guide/multi-tenancy-gitops-apps.git
    targetRevision: master
  syncPolicy:
    automated:
      prune: true
      selfHeal: true
See how the application resources are referenced by
path: mq/environments/dev/mq-spring-app:mq/environments/dev/mq-spring-app/ ├── certificates │ ├── dev-mq-client-certificate.sh │ ├── dev-mq-client-certificate.yaml_template │ ├── dev-mq-server-certificate.sh │ └── dev-mq-server-certificate.yaml_template ├── configmap │ ├── configmap-ccdt.yaml │ └── configmap.yaml ├── deployment │ ├── deployment.yaml │ └── hooks │ ├── post-sync-job.sh │ └── post-sync-job.yaml_template ├── kustomization.yaml └── secrets ├── mq-client-jks-password-secret.sh └── mq-client-jks-password-secret.yamlThe ArgoCD application applies these resources to the cluster to instantiate
MQ sample applicationas a set of cluster resources. -
Look at active
MQ sample applicationArgoCD applicationLet's examine
MQ sample applicationand its Kubernetes resources using the ArgoCD UI.In the ArgoCD UI search the Applications view with the keyword
mq-spring-app:(You may need to launch the ArgoCD UI again. Refer to these instructions.)
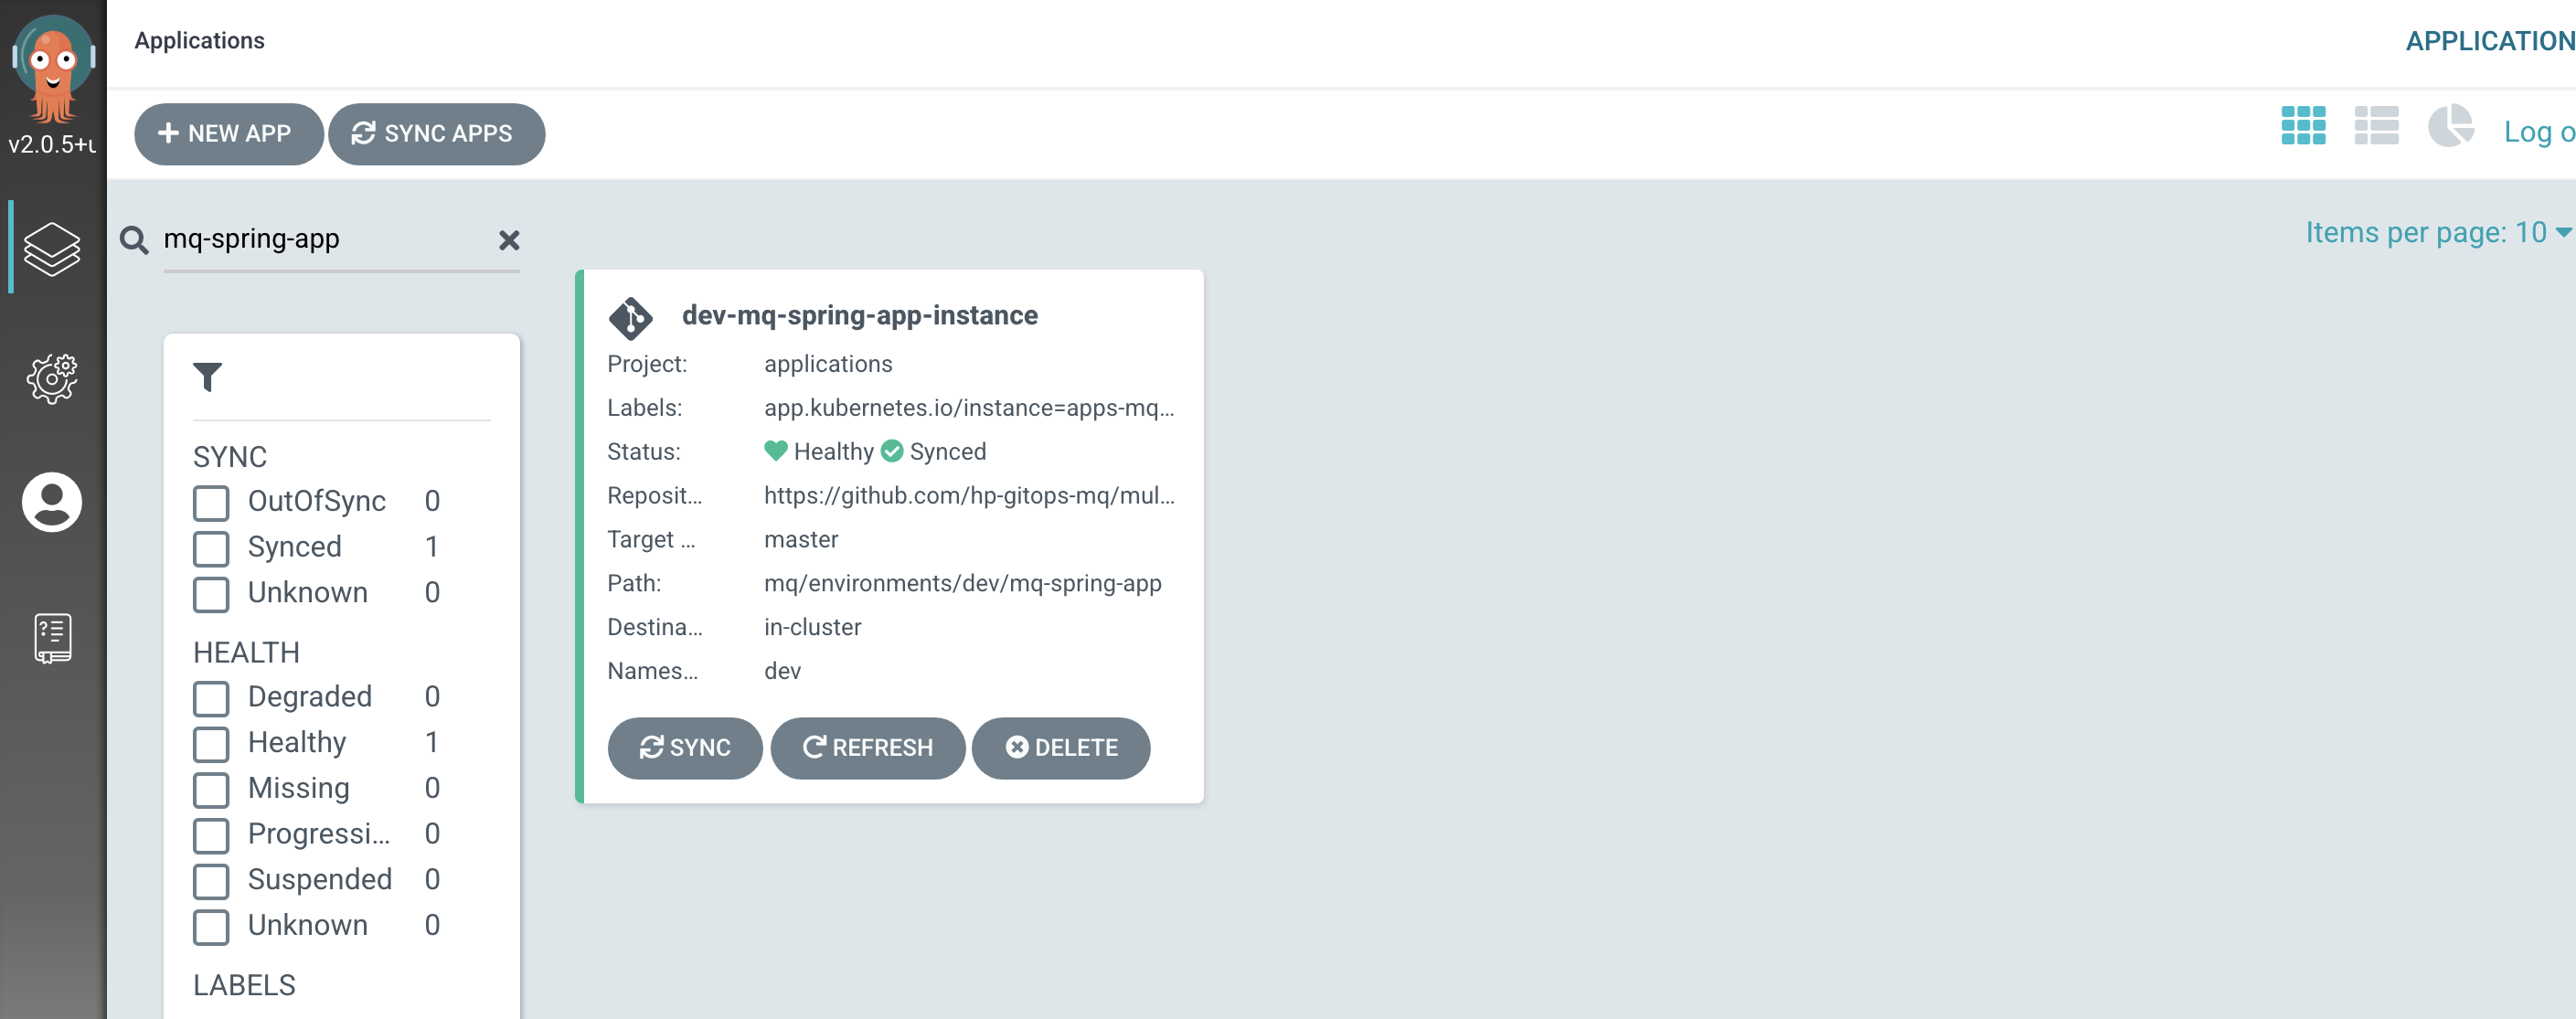
We can now see the below ArgoCD Application:
- A new
dev-mq-spring-app-instanceArgoCD application that is managingQM1resources deployed to the cluster.
- A new
-
View the new
MQ sample applicationKubernetes resourcesWe can look at the deployed instance of
mq-spring-appand its dependent kubernetes resources.Click on the
dev-mq-spring-app-instanceArgoCD application: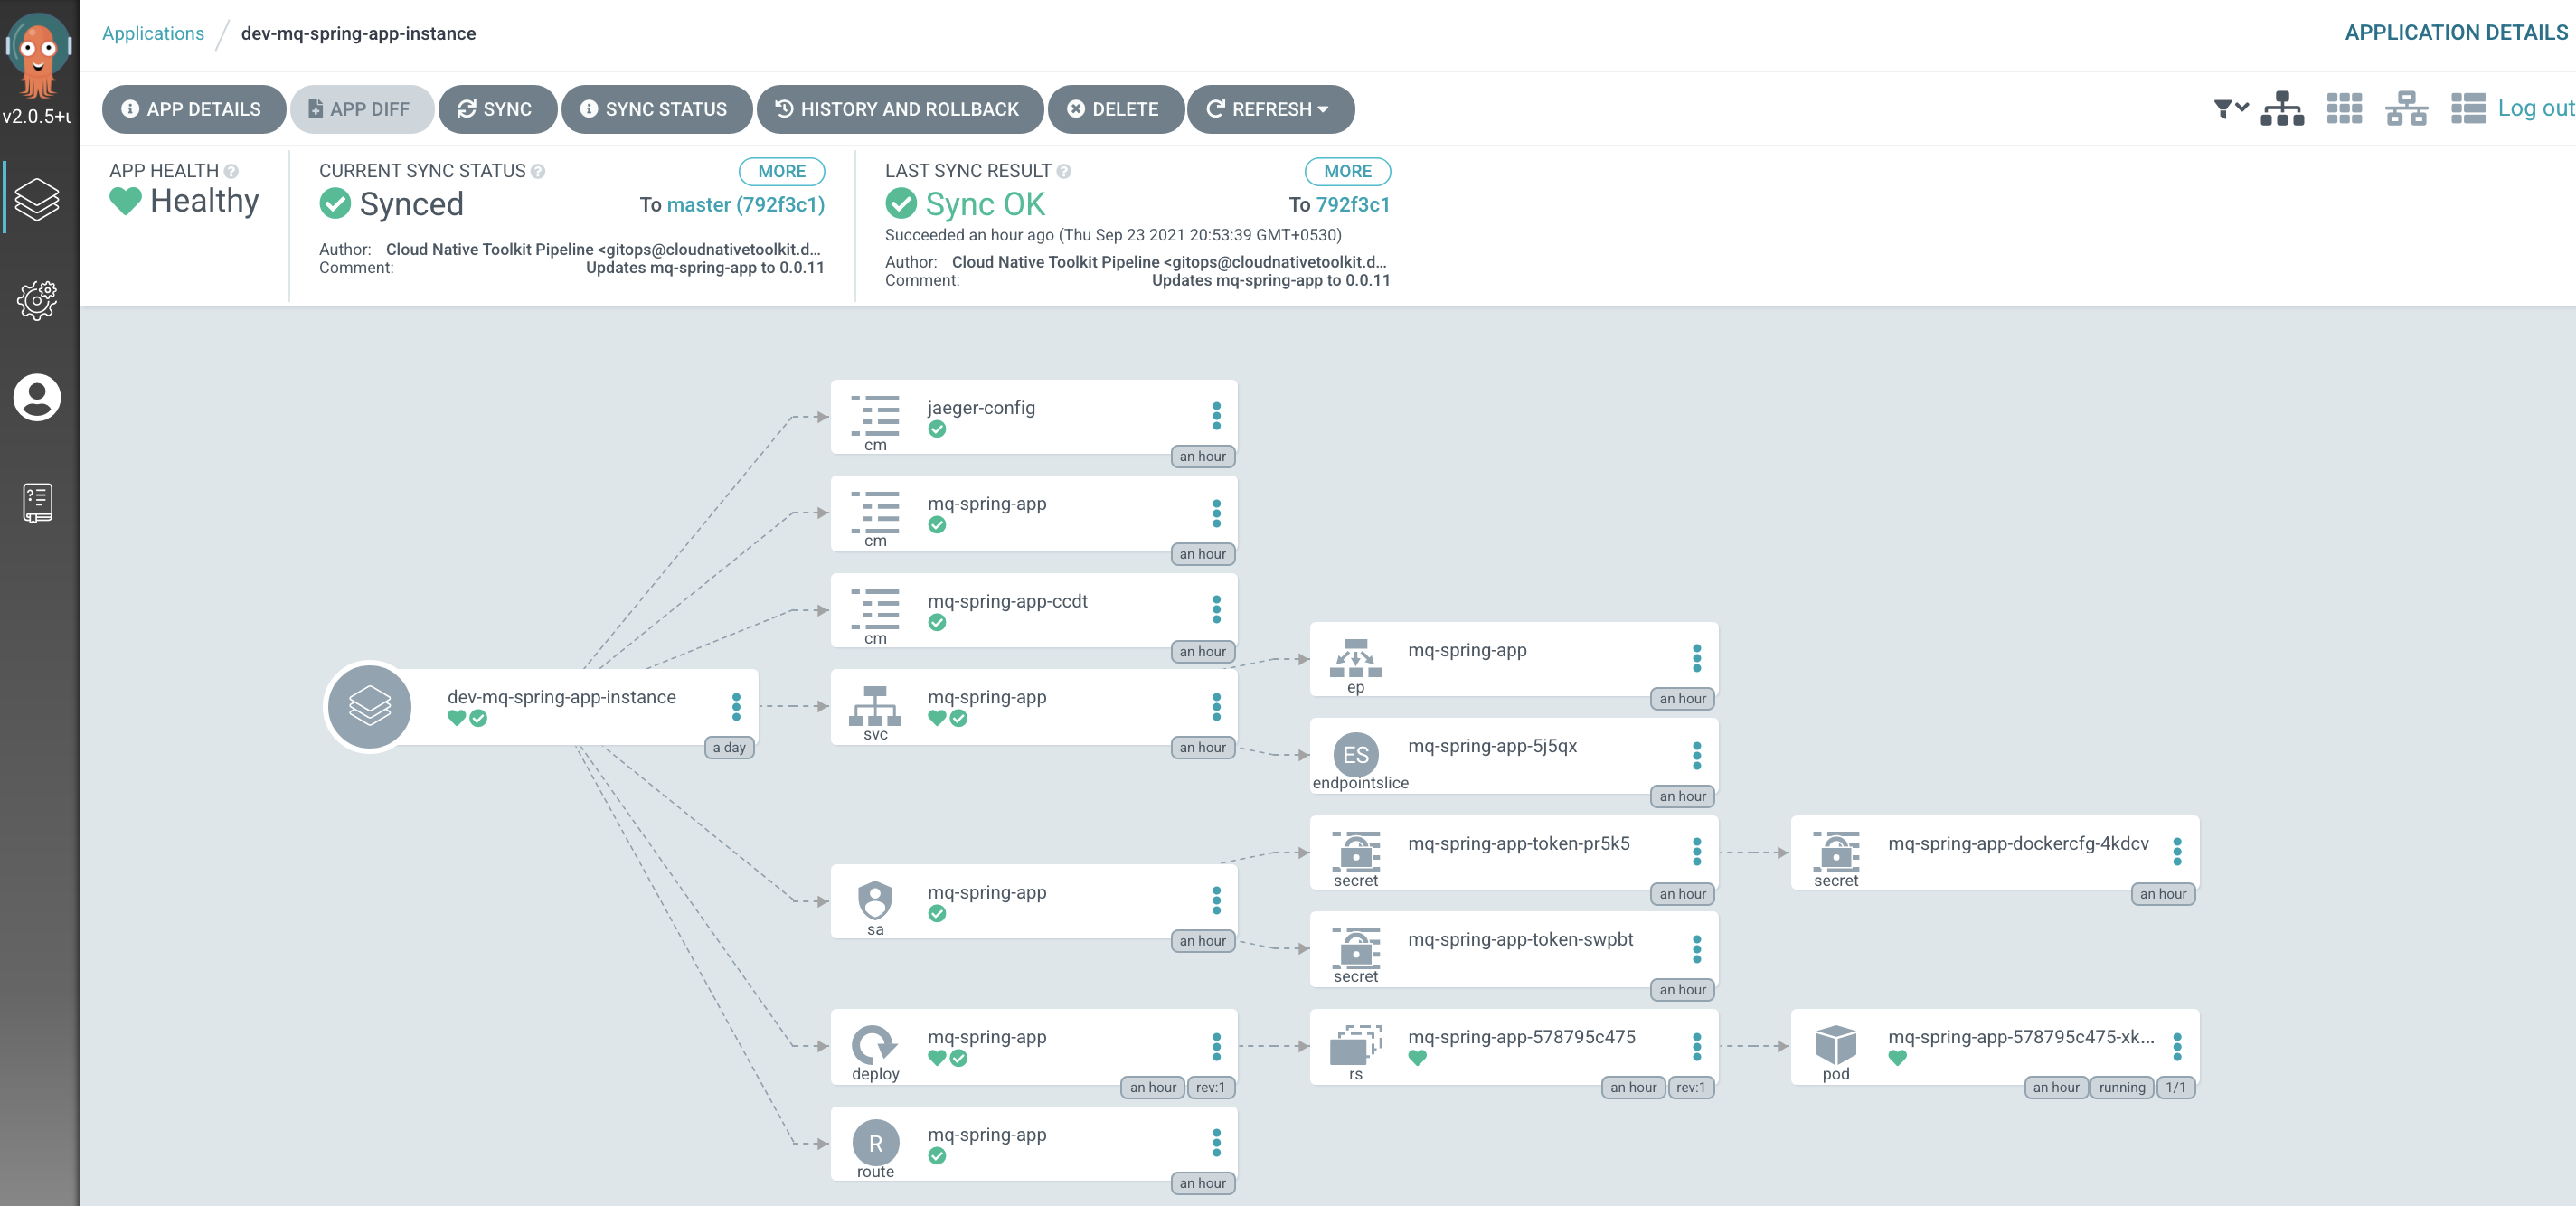
Verify application deployment
-
Review the deployed application
The application is deployed within the cluster using a
deploymentmanifest. The deployment creates areplica setto manage the application's pod.A
serviceis also created to manage the port, and arouteallows external connectivity to the application via the service.This is the
deploymentfor the application, where we can see 1 pod has been created for development and testing purposes: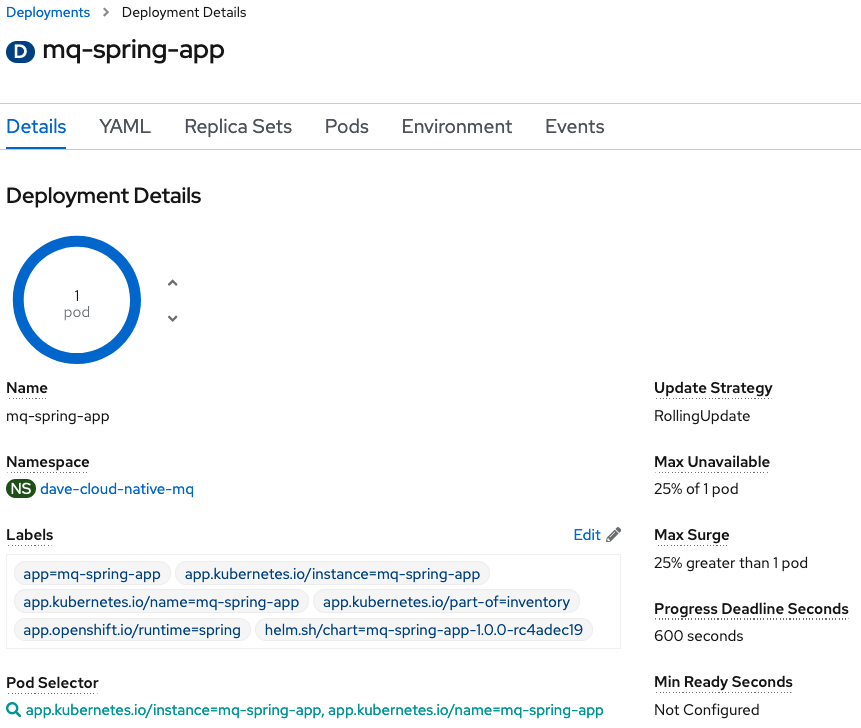
You can also view the
deploymentfrom the command line:oc project dev oc describe deployment mq-spring-appThe application writes logs to stdout. These can be viewed from the command line. First of all find the name of the running
mq-spring-apppod:oc get pods -l app.kubernetes.io/name=mq-spring-appUsing the name of the running
mq-spring-apppod, the following commands displays its log for the last 60 seconds and will stream any further messages:oc logs mq-spring-app-d9474564c-85mf6 -f --since=60s -
Review the application's service
This shows the corresponding
service, where we can see the application's port 80 inside the application pod is being mapped toport 8080at the cluster level: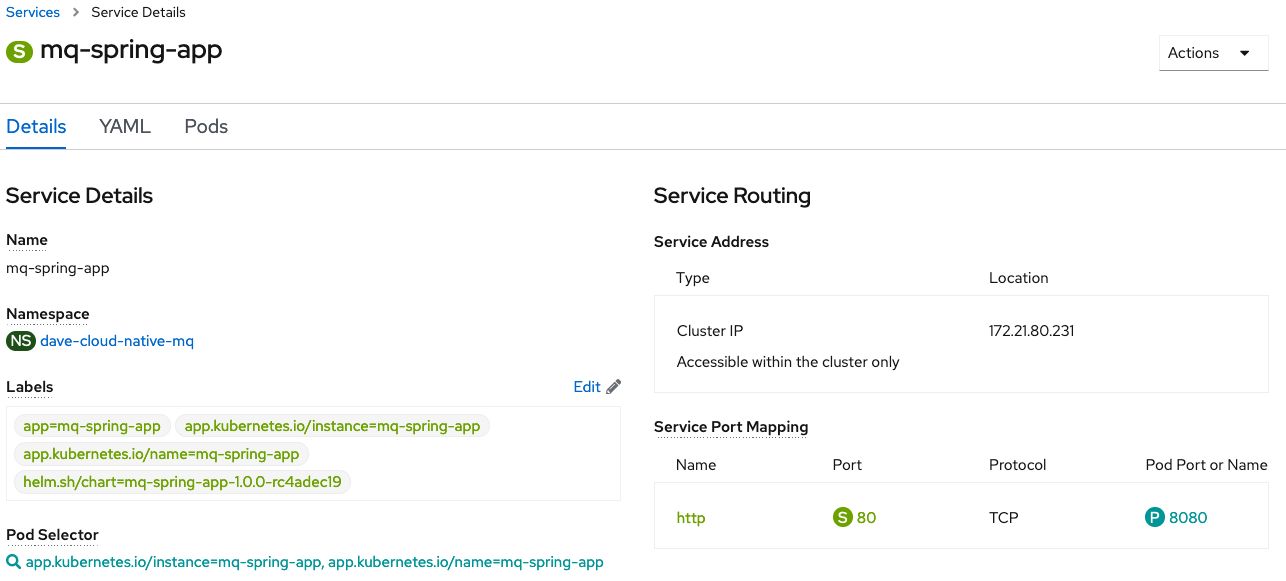
You can also view the
servicefrom the command line:oc describe service mq-spring-app -
Review the application's route
Finally the
routeshows the external url (location) we use to interact with the application: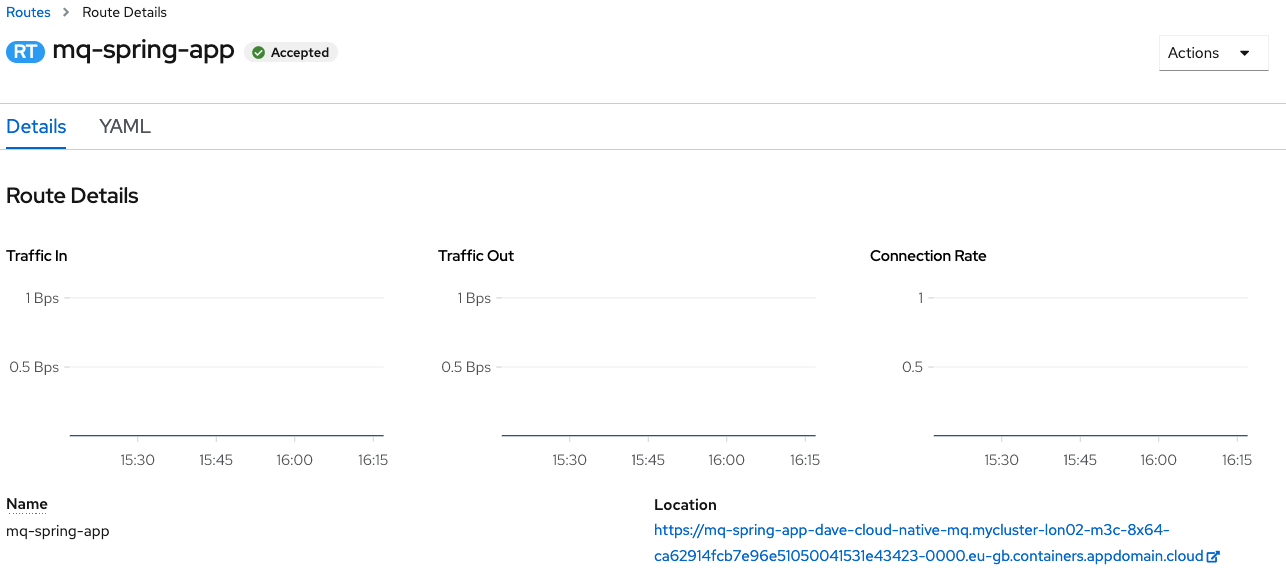
You can also view the
routefrom the command line:oc describe route mq-spring-app -
Check the application is running
Using the
locationvalue from theroutewe can call the application to check its health by appending/health, for example:export APP_URL=$(oc get route -n dev mq-spring-app -o jsonpath="{.spec.host}") curl -X GET https://$APP_URL/actuator/health
The function should return something similar to the JSON-formatted response below:
{ "status": "UP", "components": { "HeathEndPointMain": { "status": "UP" }, "diskSpace": { "status": "UP", "details": { ... } }, "jms": { "status": "UP", "details": { "provider": "IBM MQ JMS Provider" } }, "livenessState": { "status": "UP" }, "ping": { "status": "UP" }, "readinessState": { "status": "UP" } }, "groups": [ "liveness", "readiness" ] } -
Call the application to put a message to a queue
Using the same
locationvalue we can call the application to to put a message to a queue on the queue manager, for example:curl -X GET https://$APP_URL/api/send-hello-world -
Call the application to get a message from a queue
Using the same
locationvalue we can call the application to to get a message from a queue on the queue manager, for example:curl -X GET https://$APP_URL/api/recv -
Call the application to put a JSON message to a queue
Using the same
locationvalue we can call the application to to put a message with a JSON payload to a queue on the queue manager, for example:curl -X POST -H "Content-Type: application/json" https://$APP_URL/api/send-json --data "{\"data\":\"Hola Munda\"}"Note the use of the
POSTverb in the above command. This can be followed with a call to get the message from the queue.
Congratulations!
You've now created and run the pipeline for the application. In the next section we're going to make a change to the application that will trigger the pipeline to build a new version of the application image.