Application overview
Overview
Audience: Architects, Application developers, Administrators
Timing: 30 minutes
In this topic, we're going to:
- Review how an MQ application connects to a queue manager
- Configure a sample application using a GitHub repository
- Examine the structure of the sample application
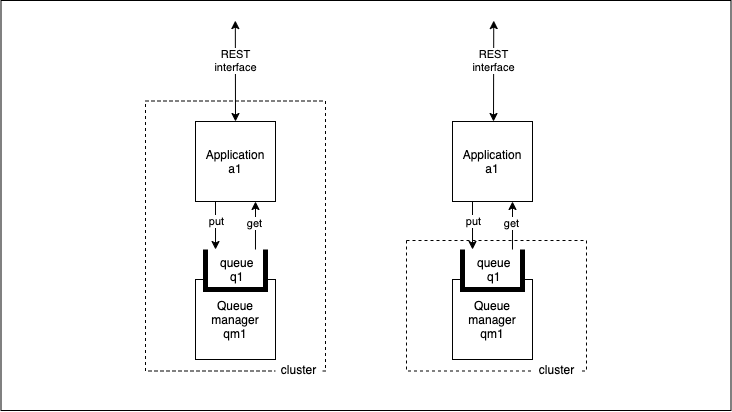
An MQ application is a client that consumes messaging services provided by an MQ queue manager server. For example, an application connects to a queue manager to put and get a messages from a queue; or alternatively publish and subscribe to a topic. A client application can be written in a variety of programming languages.
The following diagram shows two examples of an application consuming simple messaging services provided by a queue manager. In the first example, the application is local to the queue manager; it is in the same cluster. In the second example the application is remote to the queue manager; it might be in a different cluster, or not in a Kubernetes environment.
Our sample application exposes the following REST interface, making it easy to consume by other applications and services both inside and outside the cluster:
/api/send-hello-worldto put a defaultHello worldmessage to a queue/api/recvto get a message from the queue/api/send-jsonto put a JSON message to a queue/healthto check the application is running
The /health function allows Kubernetes to check the application is running and healthy and to automatically heal it if any problems occur.
We will test each of these REST interfaces in a later topic.
The application uses the Spring framework and the IBM MQ Spring Boot Starter to simplify application development and configuration. We use the Spring framework for the development of our REST and MQ interfaces because it simplifies the development of microservice and web based applications often found in a containerized environment such as Kubernetes.
Pre-requisites
Before attempting this section, make sure you have followed the section in configuring the cluster. Specifically, you must have completed the following tasks:
- You have installed the
gitandtreecommand line tools. - You have created a GitHub access token for your application repository's account.
- You have completed the previous chapter to deploy a Queue Manager instance.
Creating the application repository
It’s wise to use a new terminal window for this chapter. It will help us switch between the client application repository and GitOps repository as we examine the different steps in the CICD process.
Follow these instructions to download the application source code.
-
Navigate to the following sample configuration repository and create a fork:
-
Set up a GitHub environment variable
If you've not done it already, set up environment variable
$GIT_ORG, with your GitHub organization. We'll use this variable in subsequent commands.Open a new terminal window.
Replace
<git-org>in the following command:export GIT_ORG=<git-org> -
Clone the fork to your local machine
git clone https://github.com/$GIT_ORG/mq-spring-app.git -
Change to the local clone's folder
cd mq-spring-app -
Set up environment variable for Git branch
The sample repository has a single
masterbranch. We're going to create a new branch that is initially populated with this branch and work in it.Create a new branch
$GIT_BRANCH_SPRINGfor you using the$GIT_ORGenvironment variable we just set up:export GIT_BRANCH_SPRING=mq-spring-$GIT_ORG git checkout -b $GIT_BRANCH_SPRINGyou'll see something like:
Switched to a new branch 'mq-spring-prod-ref-guide'Push the changes:
git push -u origin $GIT_BRANCH_SPRINGTotal 0 (delta 0), reused 0 (delta 0) remote: remote: Create a pull request for 'mq-spring-prod-ref-guide' on GitHub by visiting: remote: https://github.com/prod-ref-guide/mq-spring-app/pull/new/mq-spring-prod-ref-guide remote: To https://github.com/prod-ref-guide/mq-spring-app.git * [new branch] mq-spring-prod-ref-guide -> mq-spring-prod-ref-guide Branch 'mq-spring-prod-ref-guide' set up to track remote branch 'mq-spring-prod-ref-guide' from 'origin'.Notice how we've created a new branch
$GIT_BRANCH_SPRINGbased on themasterbranch. All changes will be made in$GIT_BRANCH_SPRING; whereasmasterwill remain unchanged.Also note that we use
$GIT_BRANCH_SPRINGto name themq-spring-appclient application branch in contrast to$GIT_BRANCHfor themulti-tenancy-gitops-appsGitOps branch. This helps to prevent us from accidentally promoting a change if we use the wrong terminal window in the tutorial. -
Review the application source directories
tree -dThe following diagram shows the directory structure for the MQ application:
.
├── architecture
├── chart
│   └── base
│       └── templates
├── jmeter
├── kustomize
│   └── base
├── local
│   ├── certs
│   ├── jaeger
│   ├── ldap
│   └── mq
├── postman
└── src
    ├── main
    │   ├── java
    │   │   └── com
    │   │       └── ibm
    │   │           ├── cloud_garage
    │   │           │   └── swagger
    │   │           ├── health
    │   │           └── mqclient
    │   │               ├── app
    │   │               ├── config
    │   │               ├── controller
    │   │               ├── exceptions
    │   │               ├── model
    │   │               └── service
    │   └── resources
    │       └── public
    └── test
        └── java
            └── com
                └── ibm
                    ├── cloud_garage
                    │   └── swagger
                    ├── health
                    └── mqclient
                        └── controller
Notice the top-level folder structure:
architecturecontains the application architecture reference diagram.chartcontains the helm templates required to deploy the application.jmetercontains sample application testing artifacts to demonstrate application and service availability.kustomizecontains all the necessary resources that are required to deploy the application using kustomize.localcontains the configuration required to run the application locally.postmancontains files used by postman to test the application.src/maincontains the application source files written using the Spring Boot framework.src/testcontains the test code used by the pipeline to test the application.
Spend a few minutes browsing these folders; we'll explore them in more detail throughout this chapter.
Congratulations!
You have successfully cloned and reviewed the application source code. In the next topic, we will build the application using a Tekton pipeline, deploy it using an ArgoCD application, and test it using the curl command.