Continuous Update
Audience: Architects, Application developers, Administrators
Timing: 1 hour
Overview
In the previous sub-section, Building Integration Server, when we tested our API for our Integration Server we had noticed that the phone number that gets generated from the OpenAPI definition is in the wrong format, see Wrong phone number format. We can fix this by adding a "pattern" (see pattern, OpenAPI) to the phone number schema in our OpenAPI document, in our ACE source repository.
To integrate and deploy this change, instead of manually running the Integration Server pipeline, in this section we will automate it. In doing so, as changes submitted to the ACE source repository, Integration Server pipeline will be triggered automatically.
What about Configuration pipeline?
The changes we will make in this section does not require any new Configurations. When we introduce security for our Cloud Native example ACE flow, we will update the Configuration repository as well and we will automate the Configuration pipeline.
To automate running of pipelines, we will make use of GitHub Webhook. GitHub Webhook is mechanism to subscribe to "push events" from GitHub repositories. As changes are "pushed" to a repository, events from GitHub.com will be emitted as HTTPS POST Payload. We will set up an EventListener custom resource to receive the payload and in turn will trigger pipeline. For more information on triggering pipeline from GitHub events, see Triggering Pipeline Execution From GitHub.
In this section, we will cover the following:
-
Deploy a TriggerTemplate resource to create to a PipelineRun template referring to our Integration Server pipeline.
-
Deploy a TriggerBinding resource to bind values in the above template from the WebHook payload
-
Deploy an EventListener to receive the WebHook payload and trigger the Integration Server pipeline using the TriggerTemplate and TriggerBinding
-
Set up a WebHook on ACE source repository, pointing the endpoint of the EventListener so that payloads are sent to it.
Set Environment Variables
Throughout this chapter we will make use of two environment variables,
GIT_ORG: an environment variable that identifies your GitHub organizationGIT_ROOT: an environment variable that identifies the root folder for your cloned git repositories
We will make use of these environment variables to save typing and reduce errors. We have made use of these variables in the chapter GitOps, Tekton & ArgoCD.
Start a terminal window, we need to keep this terminal and the shell running throughout this chapter.
In the following command, replace <git-organization> with the GitHub organization name you've just chosen (e.g. tutorial-org-123):
export GIT_ORG=<git-organization>
export GIT_ROOT=$HOME/git/$GIT_ORG-root
You can verify your variables follows:
echo $GIT_ORG
echo $GIT_ROOT
Deploy TriggerTemplate
A pipeline instance is run with an creation of PipelineRun resource. When we executed our Integration Server pipeline, in the previous section, we essentially created the instance, either by the Web UI or via tkn CLI tool (Using tkn to instantiate pipeline).
To automatically trigger a pipeline, therefore, PipelineRun resource need to be created. A EventListener creates PipelineRun. It makes use of a template, a TriggerTemplate, which contains a template for the PipelineRun:
1 2 3 4 5 6 7 8 9 10 11 12 13 14 15 16 17 18 19 20 21 22 23 24 25 26 27 28 29 30 31 32 33 34 35 36 37 38 39 40 41 42 | |
Notice that similarities of the parameters and workspaces to that of the tkn script, run-ace-is-pipeline.sh (see run-ace-is-pipeline.sh) we used in the previous section. The variables, GIT_ORG and SOURCE_REPO from the script corresponds to git-org and source-repo parameters of the above TriggerTemplate. These parameters are bound from event payload received from GitHub by EventListener with the definition of TriggerBinding.
Lets deploy this TriggerTemplate.
-
Change to multi-tenancy-gitops-apps
Issue the following command to change to your GitOps repository and the pipeline directory
cd $GIT_ROOT/multi-tenancy-gitops-apps -
Update kustomization in
cidirectory to enable trigger template,ace-integration-server*Open
kustomization.yaml($GIT_ROOT/multi-tenancy-gitops-apps/ace/environments/ci/kustomization.yaml) and uncomment:- triggertemplates/ace-integration-server.yaml -
Add PR secret name if necessary
As part of previous sections we used a machine user to interact with our GitHub repositories and a secret was created. If the secret name used is the default one (
cicd-acme) there is no need to make any updates in the TriggerTemplate yaml. But if you used a different name we will need to add it as part of the params section inserting it at line 27 in the above yaml file. Replace the right name of the secret in the<alternative name>string. The params section would look like this:16 17 18 19 20 21 22 23 24 25 26 27 28 29
... spec: params: - name: is-source-repo-url value: git@github.com:$(tt.params.git-org)/${tt.params.source-repo}.git - name: is-infra-repo-url value: git@github.com:$(tt.params.git-org)/ace-infra.git - name: git-ops-repo-url value: git@github.com:$(tt.params.git-org)/multi-tenancy-gitops-apps.git - name: gitops-apps-repo-full-name value: $(tt.params.git-org)/multi-tenancy-gitops-apps - name: github-pr-token-secret-name value: <alrternative name> ... -
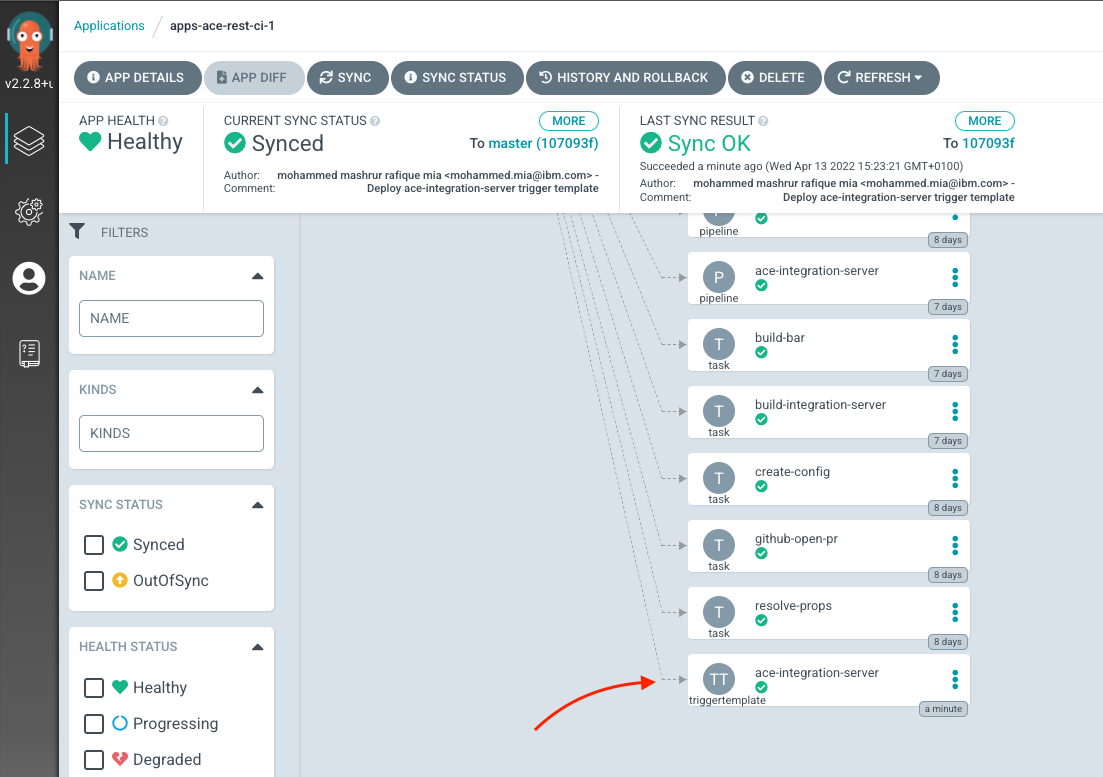
Commit and push the change
git add .
git commit -m "Deploy ace-integration-server trigger template"
git push
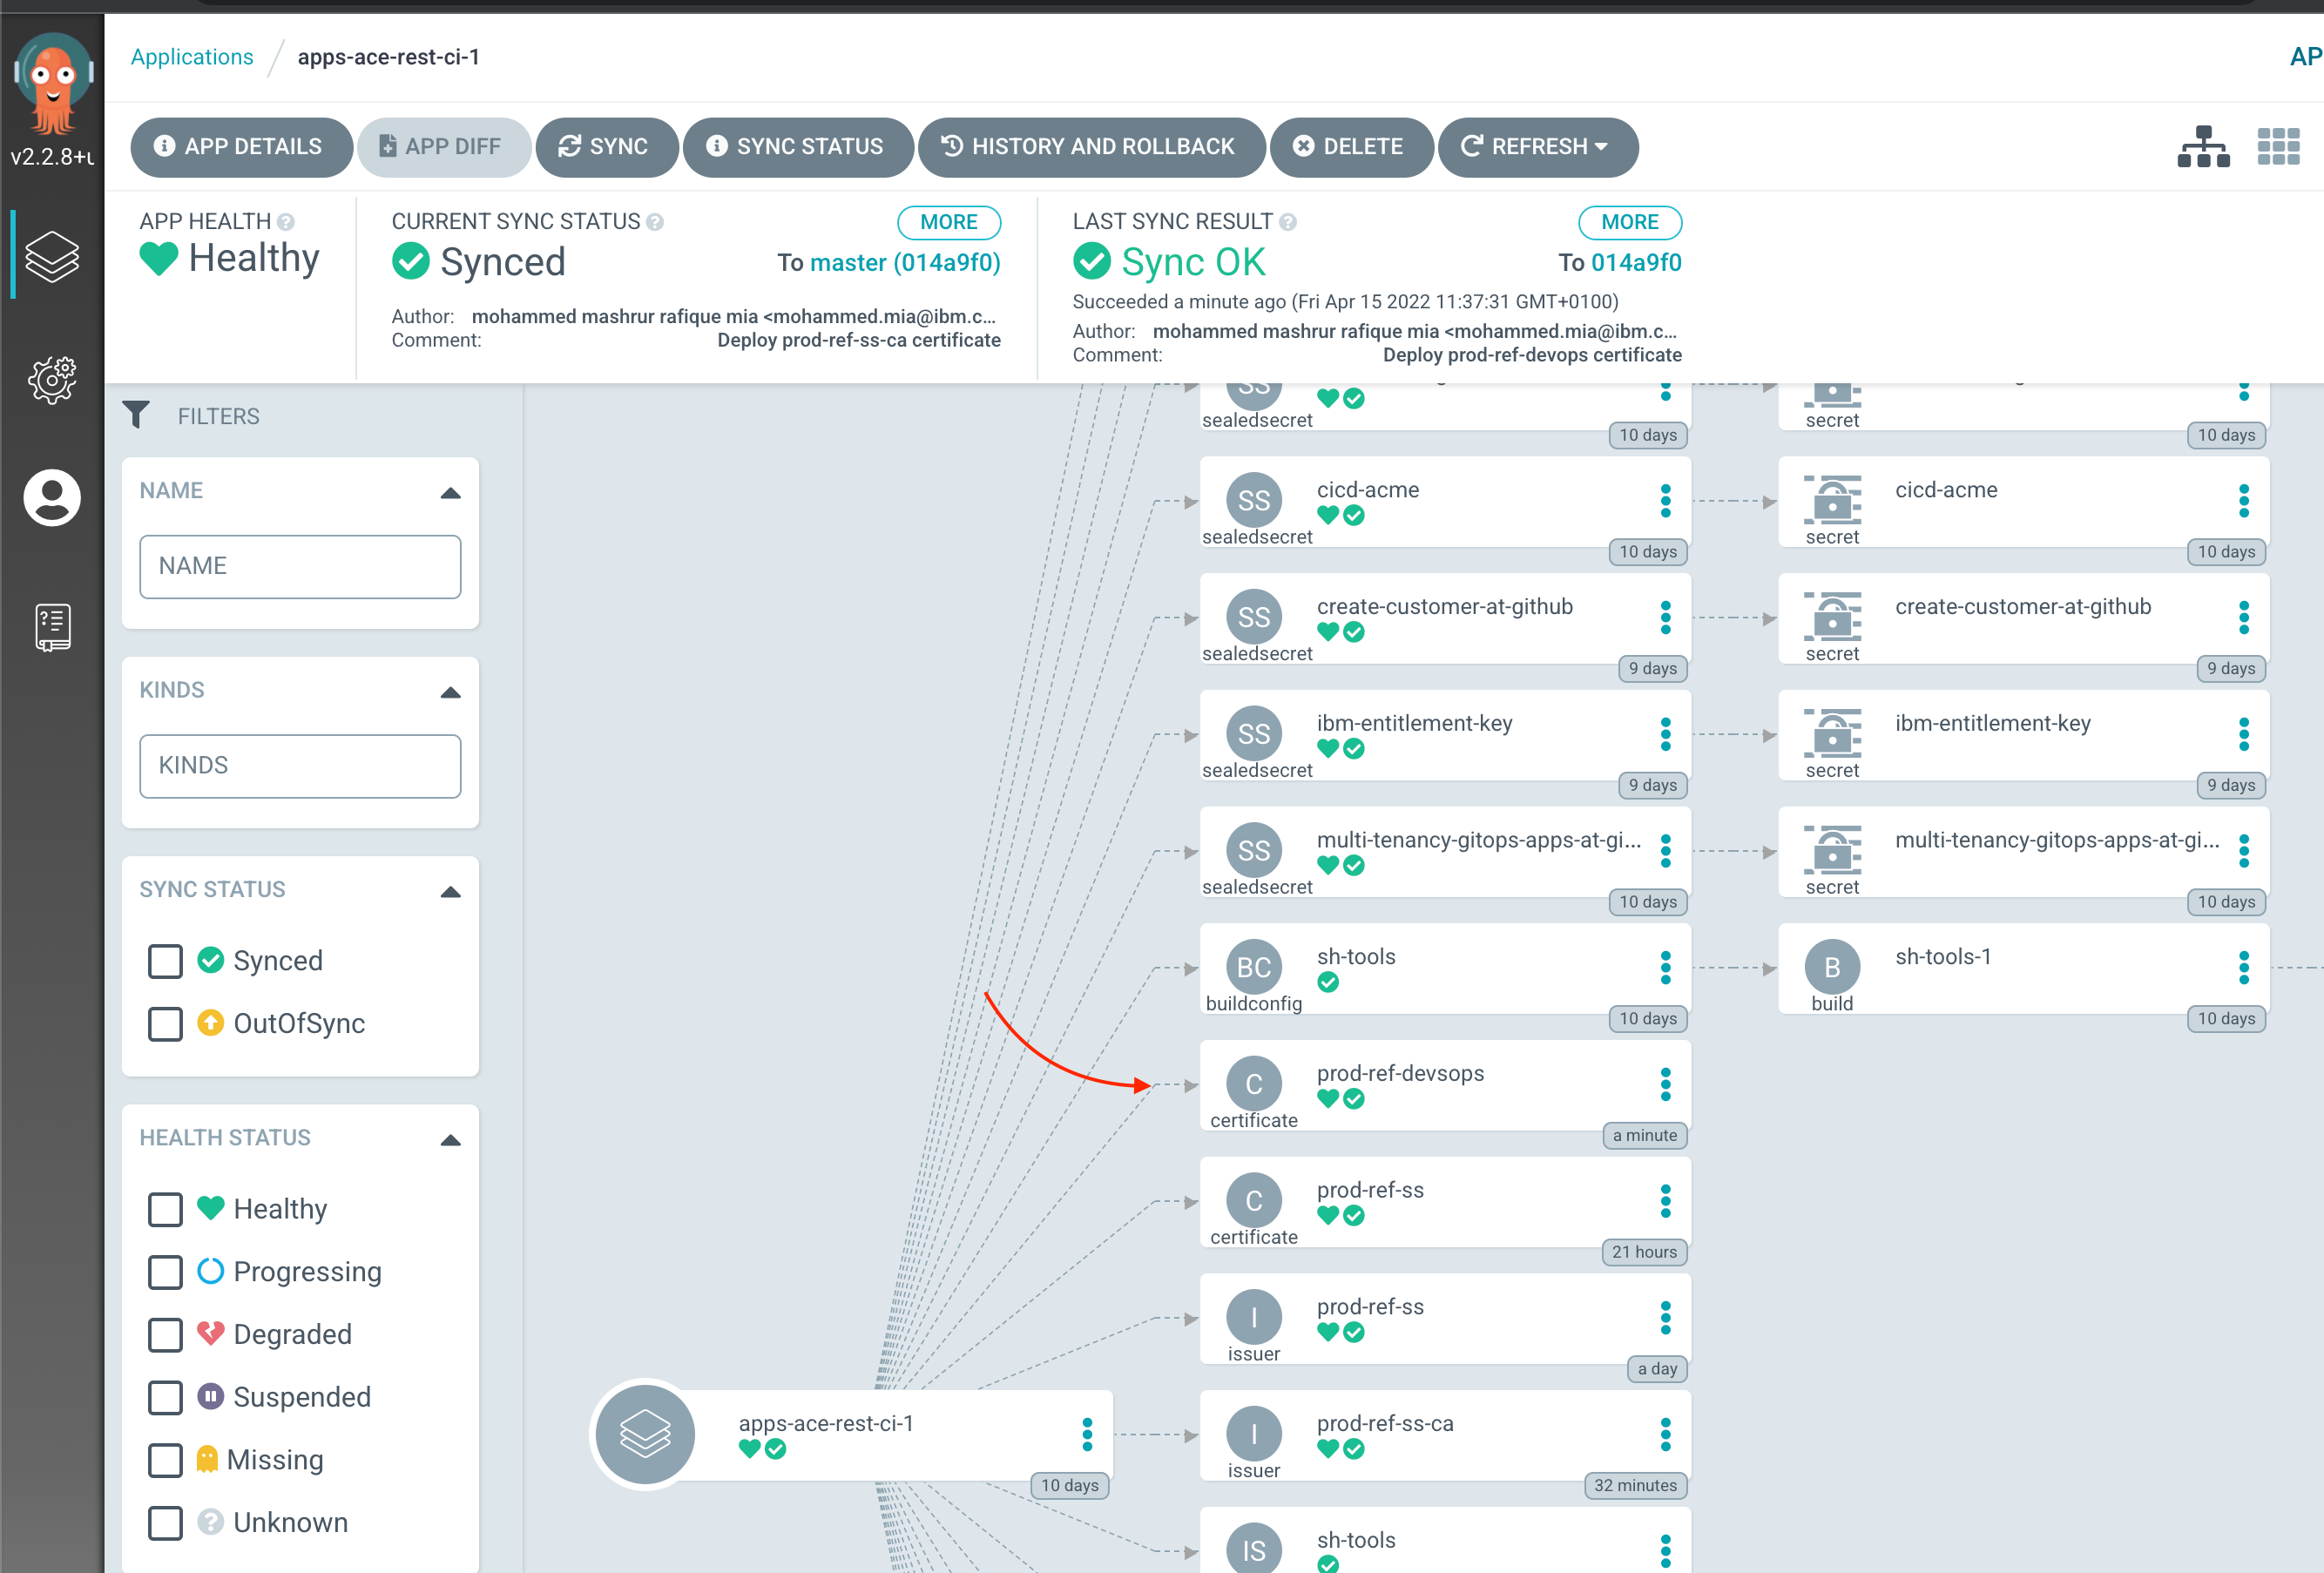
You can verify that ArgoCD deployed the resource using the ArgoCD UI, for apps-ace-rest-ci-1:
Deploy TriggerBinding
EventListener upon receiving an event payload from GitHub make use of TriggerBinding to bind parameters of TriggerTemplate by parsing the payload.
For instance, our TriggerBinding:
1 2 3 4 5 6 7 8 9 10 | |
Parameters to bind are, source-repo and git-org, which matches the parameter specification of our TriggerTemplate above. As an example of push payload from GitHub, EventListener will receive something like:
{
  "ref": "refs/heads/master",
  "repository": {
    ...
    "name": "create-customer",
    ...
    "owner": {
      ...
    },
    ...
  },
  "pusher": {
    ...
  },
  "organization": {
    "login": "ace-prod-ref",
    ...
  },
  ...
}
From above, expression body.repository.name maps to source-repo name and body.organization.login maps to git-org name.
Push Payload
Once we set up our WebHook and EventListener, we can examine the payloads that are sent from GitHub. We will examine that later in this section.
Lets deploy this TriggerBinding.
-
Change to multi-tenancy-gitops-apps
Issue the following command to change to your GitOps repository
cd $GIT_ROOT/multi-tenancy-gitops-apps -
Update kustomization in
cifolder to enable trigger binding,ace-integration-serverOpen
kustomization.yaml($GIT_ROOT/multi-tenancy-gitops-apps/ace/environments/ci/kustomization.yaml) and uncomment:- triggerbindings/ace-integration-server.yaml -
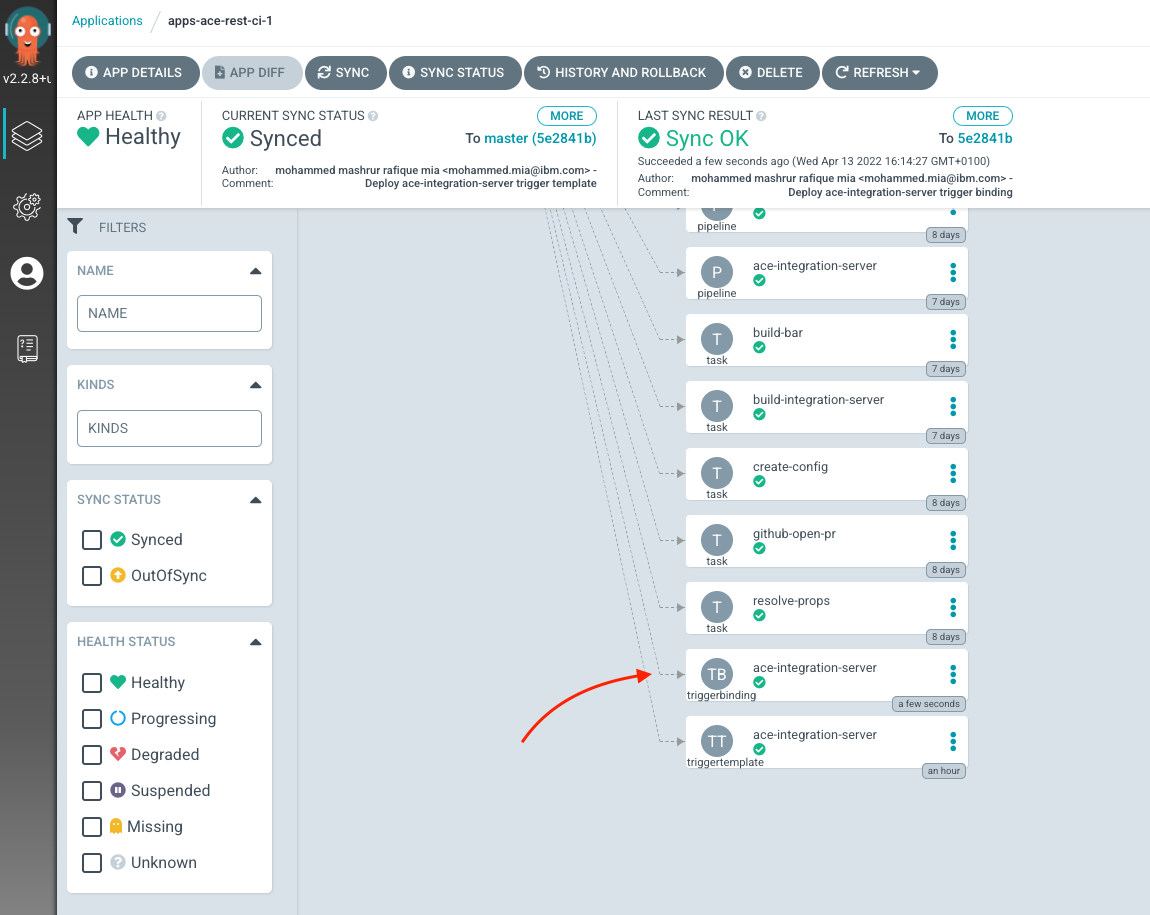
Commit and push the change
git add .
git commit -m "Deploy ace-integration-server trigger binding"
git push
You can verify that ArgoCD deployed the resource using the ArgoCD UI, for apps-ace-rest-ci-1:
Deploy EventListener
In order for GitHub to send events to EventListener, it needs to be accessible publicly. But once the EventListener is exposed anyone can send a payload which will cause the pipeline to run. Therefore, we would want to secure the communication between GitHub webhook and EventListener.
We can do this by setting up Interceptors in the EventListener. With Interceptors EventListener can verify payload, filter payload and implement other useful processing. For more information, see EventListener and Interceptors.
To verify the payload, we will set up GitHub Webhook with a secret token. The token is sent out alongside the payload and EventListener can use an Interceptors to verify the token against an OpenShift secret. See Securing your webhooks for more information.
We will also want to configure our EventListener to communicate over TLS. Otherwise the payload from GitHub will be sent out in plaintext and will essentially defeat the use to secret verification.
Therefore in this sub-section, we will:
-
Deploy a TLS key and certificate pair.
-
Deploy a string secret to be used a token to verify GitHub payload.
-
Deploy the EventListener, making use of Interceptors to verify and filter payload.
-
Create GitHub WebHook, setting up secret token.
Deploy Key and Certificate
We will make use of cert-manager.io to generate TLS key and certificate for us. cert-manager.io is already installed as part of IBM Foundation Service installation, that we enabled in a previous section.
We will make use of self-signed certificate Authority (CA) certificate to sign our certificate. We will first create a self-signed Issuer, and then generate a CA key and certificate pair from this Issuer. We will then create a new Issuer based on the CA key and certificate pair. Thereafter, this new Issuer will be used to generate key and certificate pair for our EventListener. For more information on self-signed issuer, see SelfSigned Issuer.
Got CA?
If you have a proper CA, you can use that to create your Issuer. See CA Issuer.
Lets deploy self-signed Issuer.
-
Change to multi-tenancy-gitops-apps
Issue the following command to change to your GitOps repository and the pipeline directory
cd $GIT_ROOT/multi-tenancy-gitops-apps -
Update kustomization in
cifolder to enable self-signed Issuer,prod-ref-ss.yaml*Open
kustomization.yaml($GIT_ROOT/multi-tenancy-gitops-apps/ace/environments/ci/kustomization.yaml) and uncomment:- issuer/prod-ref-ss.yaml -
Commit and push the change
git add .
git commit -m "Deploy self-signed Issuer"
git push
You can verify that ArgoCD deployed the resource using the ArgoCD UI, for apps-ace-rest-ci-1:

Now that we have the Issuer, we can provision a CA key, certificate pair.
-
Change to multi-tenancy-gitops-apps certificate directory
Issue the following command to change to your GitOps repository and the pipeline directory
cd $GIT_ROOT/multi-tenancy-gitops-apps/ace/environments/ci/certificates -
Run
generate-cert.shto generate CertificateWe will run
generate-cert.shto generate Certificate for us. We want to put our cluster's ingress URL, prepend with wildcard in the Subject Alternative Name field of our certificate so that hostname verification can be performed by the clients.CERTIFICATE=prod-ref-ss-ca ./generate-cert.shthis will generate a file, named,
prod-ref-ss-ca.yaml. If we look at the status of our repository now:git statusYou should see something like this:
On branch master
Your branch is up to date with 'origin/master'.

Untracked files:
  (use "git add <file>..." to include in what will be committed)
  prod-ref-ss-ca.yaml

nothing added to commit but untracked files present (use "git add" to track)
Add the newly generated YAML file to the repository and commit:
git add prod-ref-ss-ca.yaml git commit -m 'Add self-signed CA certificate' -
Change to multi-tenancy-gitops-apps directory
Issue the following command to change to your GitOps repository and the pipeline directory
cd $GIT_ROOT/multi-tenancy-gitops-apps -
Add
prod-ref-ss-ca.yamlkustomization in ci folder to deploy certificate,prod-ref-ss-ca*Open
kustomization.yaml($GIT_ROOT/multi-tenancy-gitops-apps/ace/environments/ci/kustomization.yaml) and add:- certificates/prod-ref-ss-ca.yamlIf you take a diff now with
git diff --unified=0the result should be see:
diff --git a/ace/environments/ci/kustomization.yaml b/ace/environments/ci/kustomization.yaml index 6078bab..2a5b35b 100644 --- a/ace/environments/ci/kustomization.yaml +++ b/ace/environments/ci/kustomization.yaml @@ -4,0 +5 @@ resources: +- certificate/prod-ref-ss-ca.yaml -
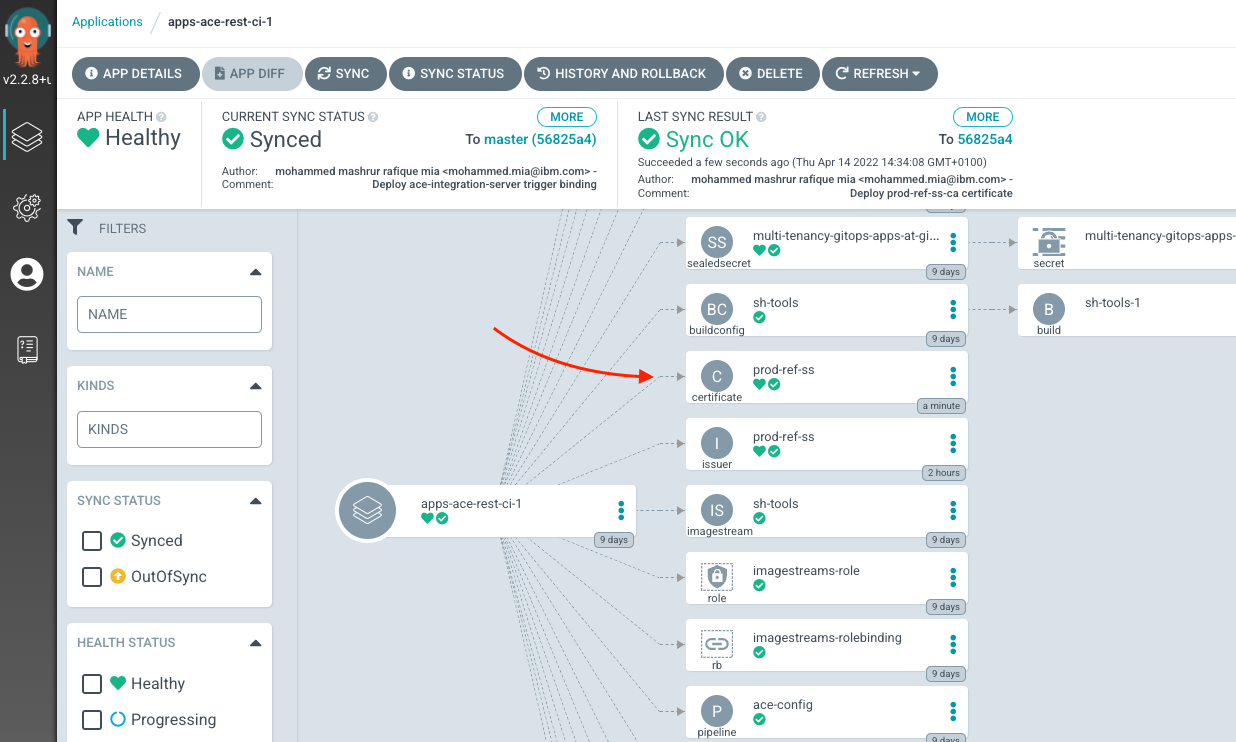
Commit and push the change
git add .
git commit -m "Deploy prod-ref-ss-ca certificate"
git push
You can verify that ArgoCD deployed the resource using the ArgoCD UI, for apps-ace-rest-ci-1:
The certificate and key is generated and maintained in a secret, prod-ref-ss-tls-ca-key-pair. We can examine this either on the OCP Web Console, via oc CLI. Let's use the CLI:
oc -n ci describe secret prod-ref-ss-tls-ca-key-pair
Which should output the following:
Name:         prod-ref-ss-tls-ca-key-pair
Namespace:    ci
Labels:       operator.ibm.com/watched-by-cert-manager=
Annotations:  cert-manager.io/alt-names: *.itzroks-5500059ths-bwukw7-6ccd7f378ae819553d37d5f2ee142bd6-0000.eu-gb.containers.appdomain.cloud
              cert-manager.io/certificate-name: prod-ref-ss
              cert-manager.io/common-name: appdomain.cloud
              cert-manager.io/ip-sans:
              cert-manager.io/issuer-group:
              cert-manager.io/issuer-kind: Issuer
              cert-manager.io/issuer-name: prod-ref-ss
              cert-manager.io/uri-sans:

Type:  kubernetes.io/tls

Data
====
ca.crt:   1578 bytes
tls.crt:  1578 bytes
tls.key:  1675 bytes
Now lets make a Issuer with this CA key and certificate:
-
Change to multi-tenancy-gitops-apps, if you are not already
Issue the following command to change to your GitOps repository and the pipeline directory
cd $GIT_ROOT/multi-tenancy-gitops-apps -
Update kustomization in
cifolder to enable Issuer,prod-ref-ss-ca*Open
kustomization.yaml($GIT_ROOT/multi-tenancy-gitops-apps/ace/environments/ci/kustomization.yaml) and uncomment:- issuer/prod-ref-ss-ca.yaml -
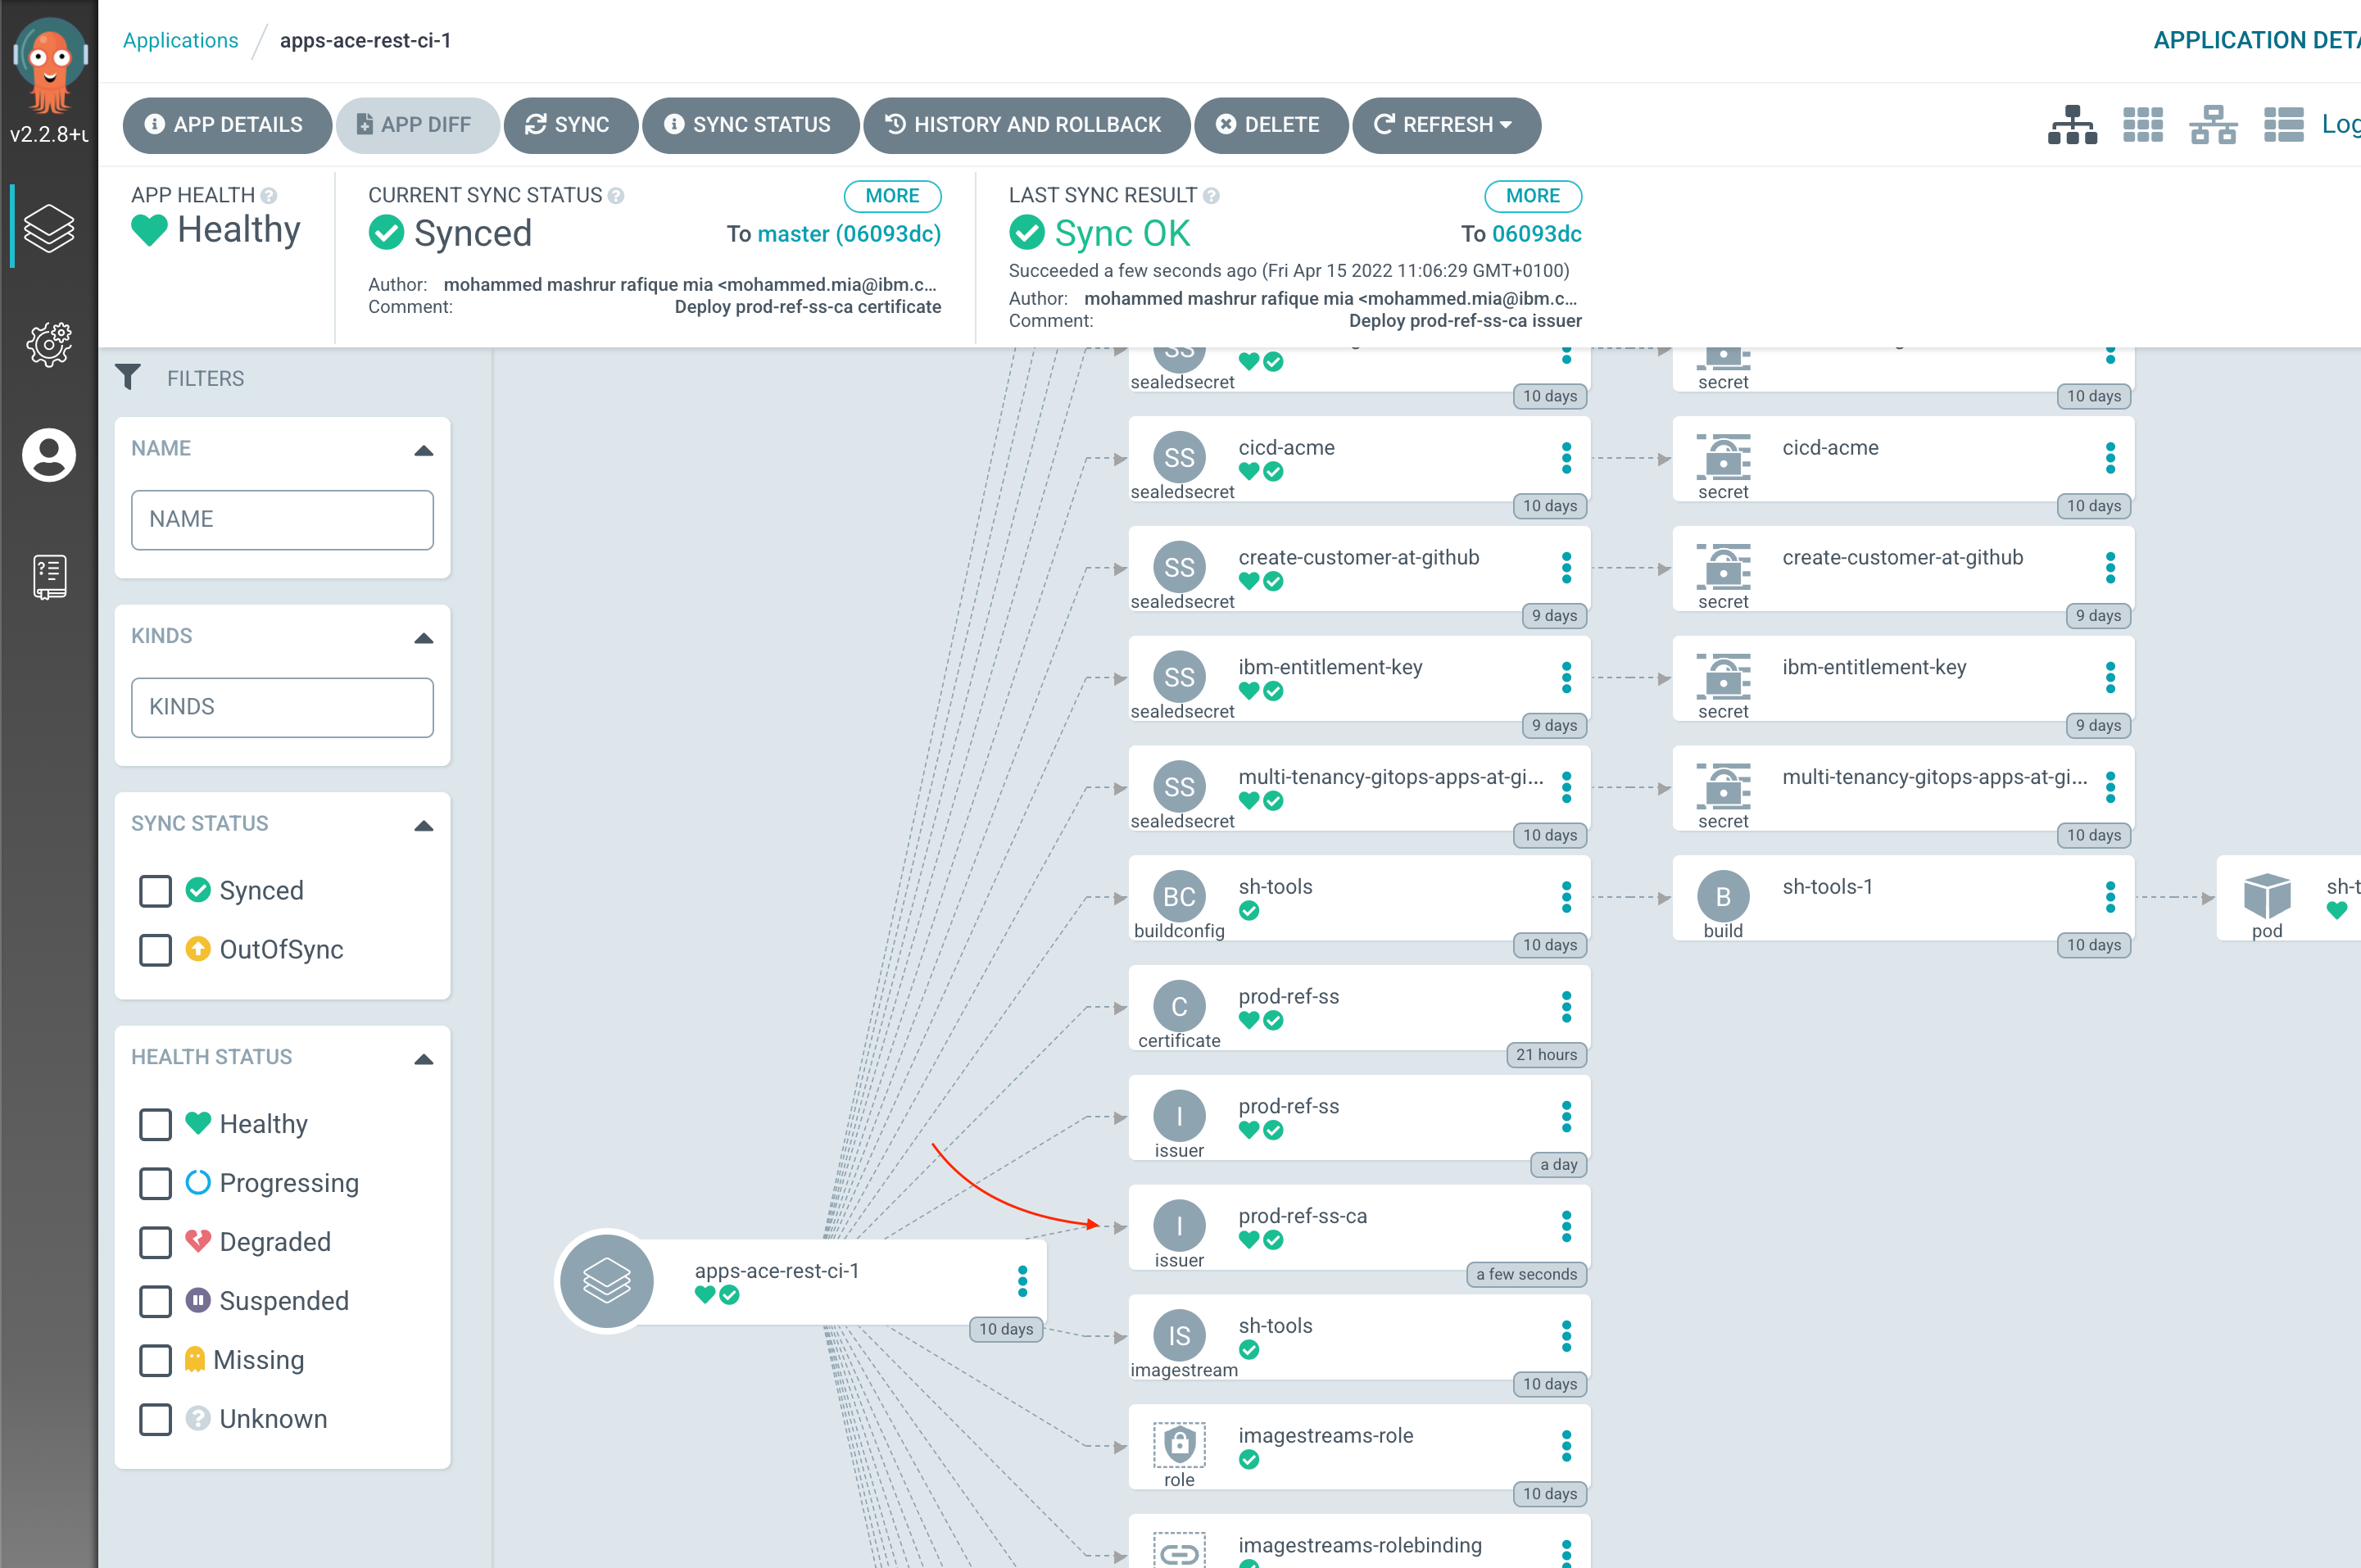
Commit and push the change
git add .
git commit -m "Deploy prod-ref-ss-ca issuer"
git push
You can verify that ArgoCD deployed the resource using the ArgoCD UI, for apps-ace-rest-ci-1:
And now we are ready to create a key and certificate via this Issuer.
-
Change to multi-tenancy-gitops-apps certificate directory
Issue the following command to change to your GitOps repository and the pipeline directory
cd $GIT_ROOT/multi-tenancy-gitops-apps/ace/environments/ci/certificates -
Run
generate-cert.shto generate CertificateWe will
generate-cert.shto generate Certificate for us. We want to put our cluster's ingress URL, prepend with wildcard in the Subject Alternative Name field of our certificate so that hostname verification can be performed by the clients.CERTIFICATE=prod-ref-devops ./generate-cert.shthis will generate a file, named,
prod-ref-devops.yaml. If we look at the status of our repository now:git statusYou should see something like this:
On branch master
Your branch is ahead of 'origin/master' by 3 commits.
  (use "git push" to publish your local commits)

Untracked files:
  (use "git add <file>..." to include in what will be committed)
        prod-ref-devops.yaml

nothing added to commit but untracked files present (use "git add" to track)
Add the newly generated YAML file to the repository and commit:
git add prod-ref-devops.yaml git commit -m 'Add certificate for devops' -
Change to multi-tenancy-gitops-apps
Issue the following command to change to your GitOps repository and the pipeline directory
cd $GIT_ROOT/multi-tenancy-gitops-apps -
Add
prod-ref-ss-ca.yamlkustomization incifolder to deploy certificate,prod-ref-ss-ca*Open
kustomization.yaml($GIT_ROOT/multi-tenancy-gitops-apps/ace/environments/ci/kustomization.yaml) and add:- certificates/prod-ref-devops.yamlIf you take a diff now with
git diff --unified=0the result should be see:
diff --git a/ace/environments/ci/kustomization.yaml b/ace/environments/ci/kustomization.yaml index 81a709a..29e9a7c 100644 --- a/ace/environments/ci/kustomization.yaml +++ b/ace/environments/ci/kustomization.yaml @@ -5,0 +6 @@ resources: +- certificate/prod-ref-devops.yaml -
Commit and push the change
git add .
git commit -m "Deploy prod-ref-devops certificate"
git push
You can verify that ArgoCD deployed the resource using the ArgoCD UI, for apps-ace-rest-ci-1:
The certificate and key is generated and maintained in a secret, prod-ref-devops-tls-key-pair. We can examine this either on the OCP Web Console, via oc CLI. Let's use the CLI:
oc -n ci describe secret prod-ref-devops-tls-key-pair
Which should output the following:
Name:         prod-ref-devops-tls-key-pair
Namespace:    ci
Labels:       operator.ibm.com/watched-by-cert-manager=
Annotations:  cert-manager.io/alt-names: *.itzroks-5500059ths-bwukw7-6ccd7f378ae819553d37d5f2ee142bd6-0000.eu-gb.containers.appdomain.cloud
              cert-manager.io/certificate-name: prod-ref-devsops
              cert-manager.io/common-name: appdomain.cloud
              cert-manager.io/ip-sans:
              cert-manager.io/issuer-group:
              cert-manager.io/issuer-kind: Issuer
              cert-manager.io/issuer-name: prod-ref-ss
              cert-manager.io/uri-sans:

Type:  kubernetes.io/tls

Data
====
ca.crt:   1537 bytes
tls.crt:  1537 bytes
tls.key:  1675 bytes
Deploy Secret Token
We will secure our webhook so that payload from GitHub is authenticated by the EventListener before pipeline is triggered. We will do this by setting up a secret token when we set up our WebHook. The token can then be verified by a Interceptor within the EventListener against an OpenShift secret.
In this sub-section we will generate an OpenShift secret with a generated token. In the subsequent section, we will use this generated token when setting up our WebHook.
-
Change to multi-tenancy-gitops-apps secrets directory
Issue the following command to change to your GitOps repository and the pipeline directory
cd $GIT_ROOT/multi-tenancy-gitops-apps/ace/environments/ci/secrets -
Run
gitops-webhook-token.shto generate SealedSecret with tokenWe will
gitops-webhook-token.shto generate a SealedSecret.The script will first generate a random string, which we will use a token. The string token will then be used to content of Secret object, which will then be encrypted with sealed secret.
./gitops-webhook-token.shthis will generate a file, named,
gitops-webhook-token.yaml. If we look at the status of our repository now:git statusYou should see something like this:
On branch master
Your branch is ahead of 'origin/master' by 1 commit.
  (use "git push" to publish your local commits)

Untracked files:
  (use "git add <file>..." to include in what will be committed)
        gitops-webhook-token.yaml

nothing added to commit but untracked files present (use "git add" to track)
Add the newly generated YAML file to the repository and commit:
git add gitops-webhook-token.yaml git commit -m 'Add sealed secret for webook token' -
Change to multi-tenancy-gitops-apps
Issue the following command to change to your GitOps repository and the pipeline directory
cd $GIT_ROOT/multi-tenancy-gitops-apps -
Enable
gitops-webhook-token.yamlkustomization incifolder to deploy the secret,gitops-webhook-token.yaml*Open
kustomization.yaml($GIT_ROOT/multi-tenancy-gitops-apps/ace/environments/ci/kustomization.yaml) and add:- secrets/gitops-webhook-token.yamlIf you take a diff now with
git diff --unified=0the result should be see:
diff --git a/ace/environments/ci/kustomization.yaml b/ace/environments/ci/kustomization.yaml index d3f1656..5754fec 100644 --- a/ace/environments/ci/kustomization.yaml +++ b/ace/environments/ci/kustomization.yaml @@ -26,0 +27 @@ resources: +- secrets/gitops-webhook-token.yaml -
Commit and push the change
git add .
git commit -m "Deploy Webhook secret create-customer"
git push
You can verify that ArgoCD deployed the resource using the ArgoCD UI, for apps-ace-rest-ci-1:
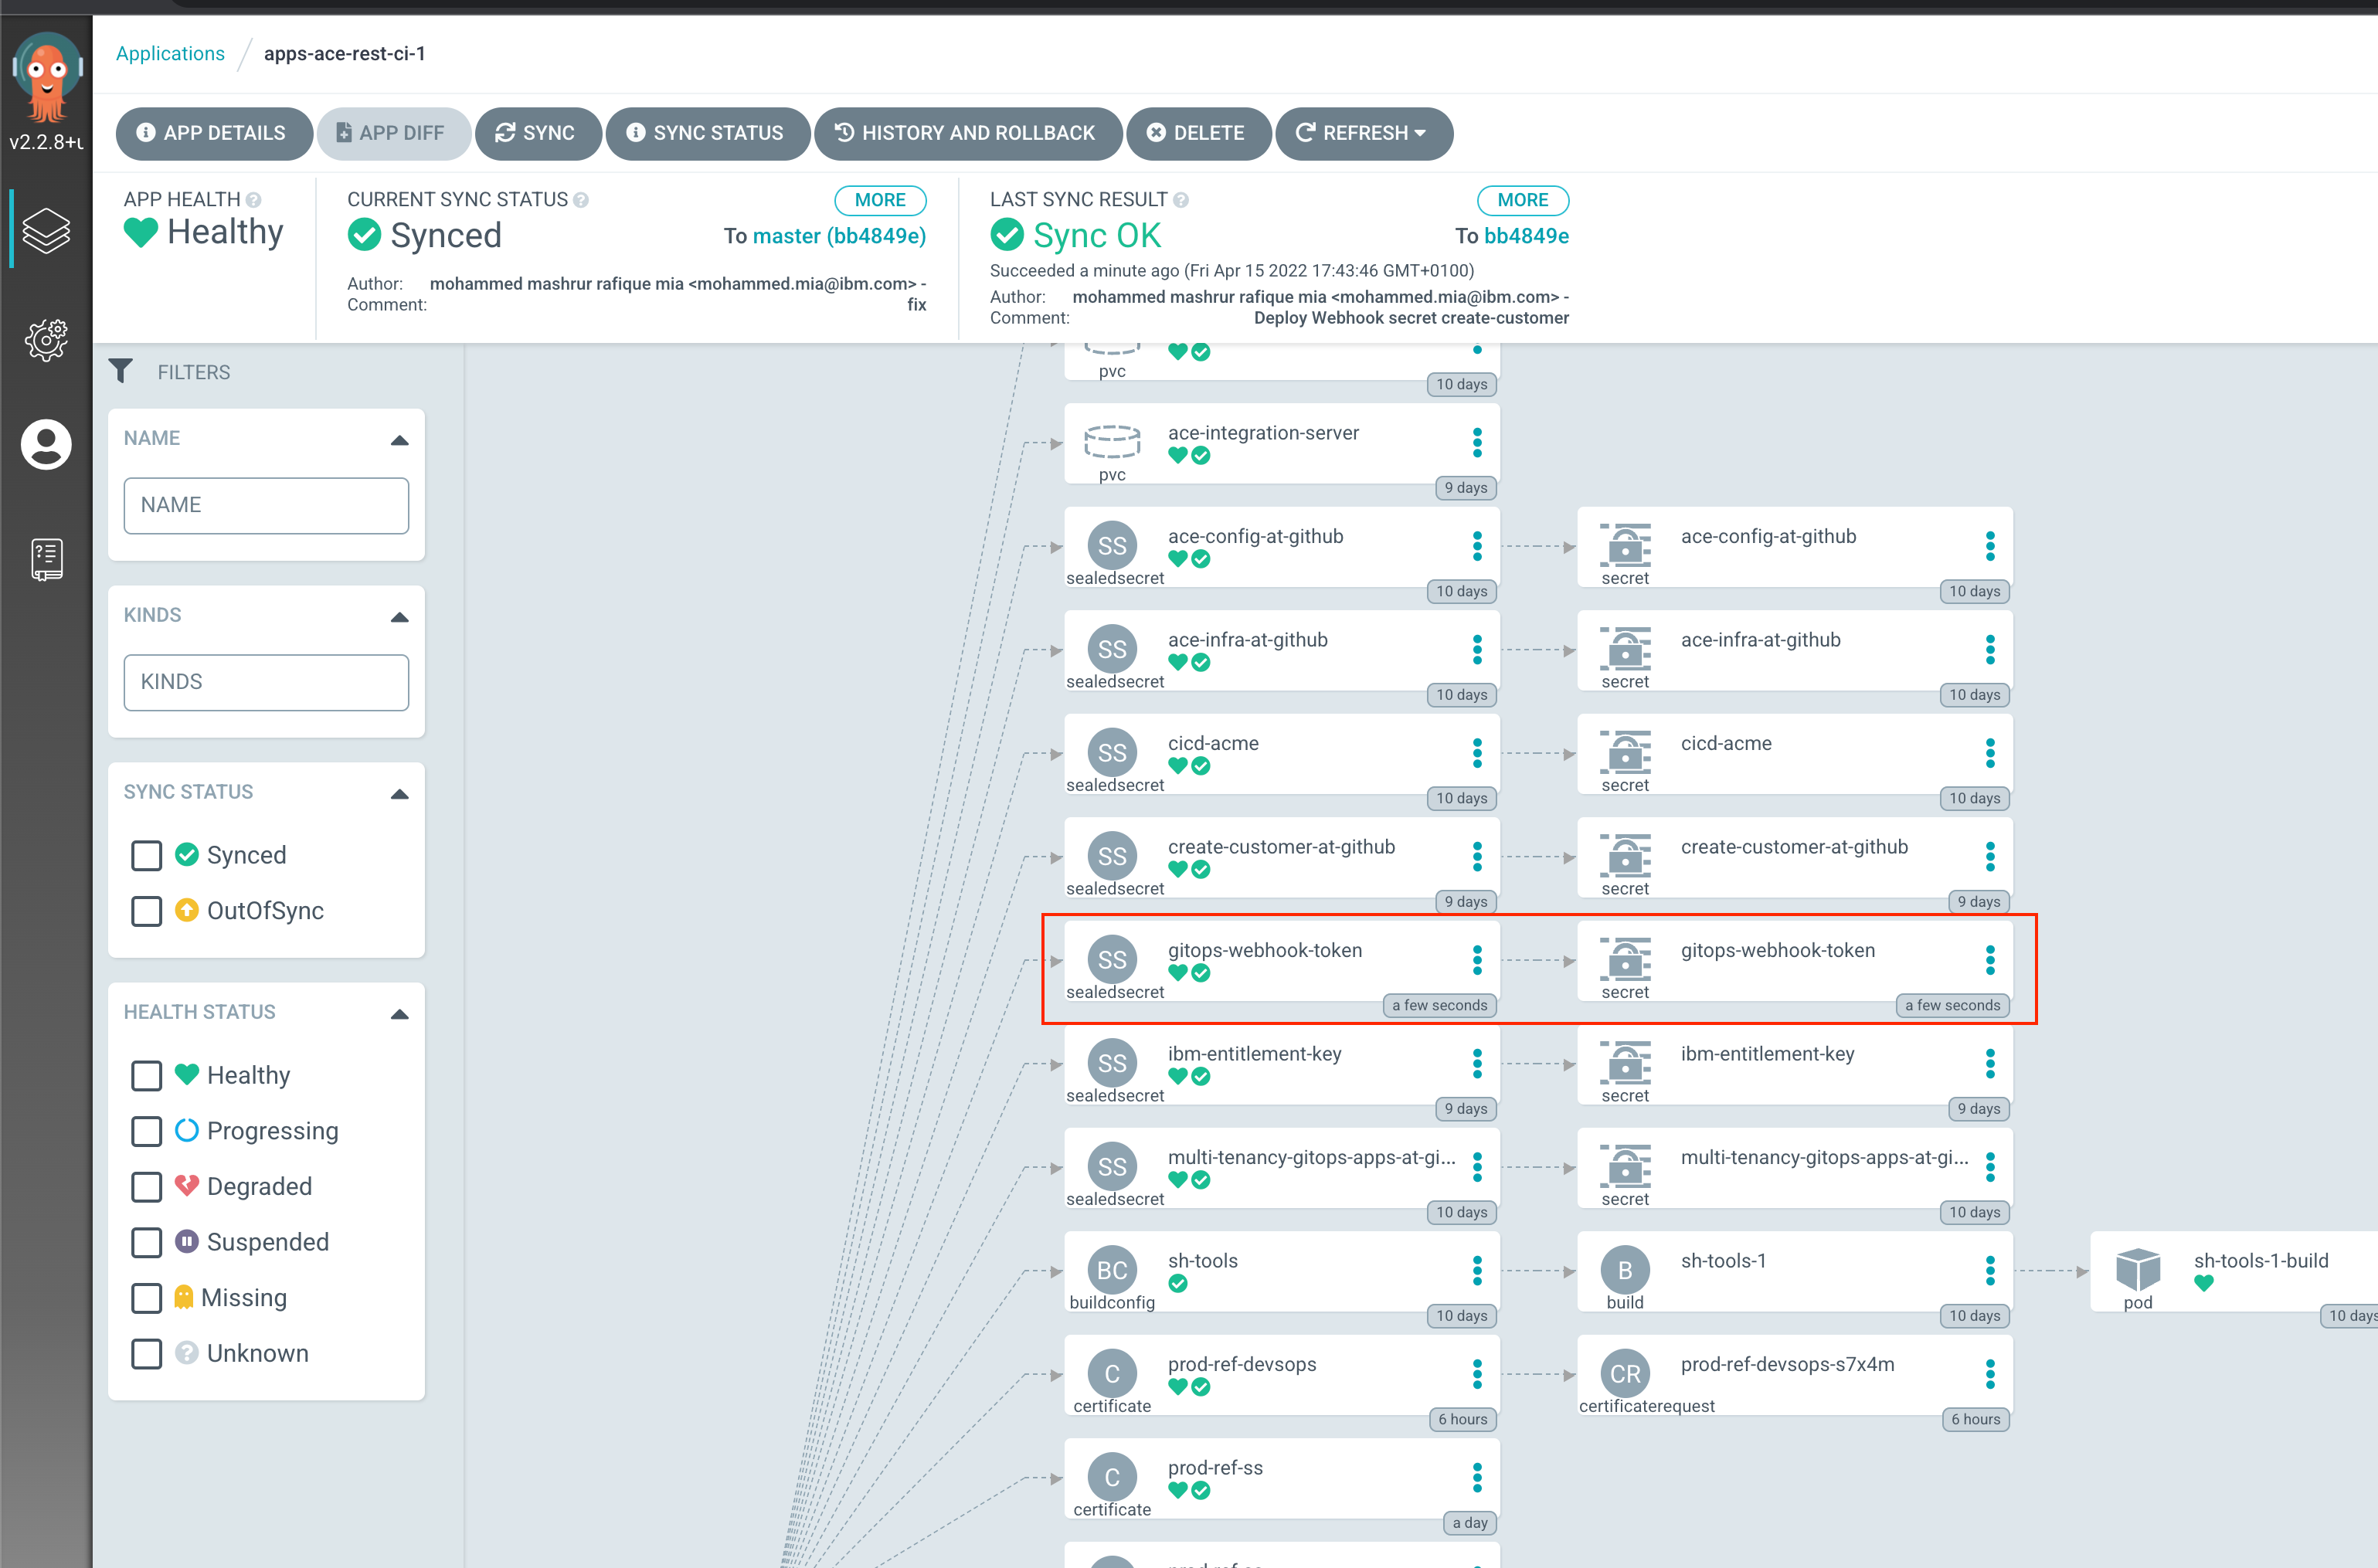
Deploy EventListener
We are now ready to deploy EventListener as we have deployed all of its pre-requisites resources.
Our EventListener, maintained in multi-tenancy-gitops-apps, has two interceptors defined:
1 2 3 4 5 6 7 8 9 10 11 12 13 14 15 16 17 18 19 20 21 22 23 24 | |
First, a GitHub interceptor that validates the GitHub webhook. It validates the webhook's origin by comparing the token against an OpenShift secret. If the token from the webhook does not match the secret value then pipeline is not triggered. For more information, see GitHub Interceptors
The second is a cel interceptor, which allows us to filter the webhook payloads. Here we are using a cel expression to match events coming only from the master branch. See CEL interceptor for more information.
We also specify a kubernetesResource definition to enable TLS with our certificate and key, created earlier in this section:
1 2 3 4 5 6 7 8 9 10 11 12 13 14 15 16 17 18 19 20 21 22 23 24 | |
Lets deploy this EventListener.
-
Change to multi-tenancy-gitops-apps
Issue the following command to change to your GitOps repository and the pipeline directory
cd $GIT_ROOT/multi-tenancy-gitops-apps -
Update kustomization in
cifolder to enable EventLister,ace-integration-server*Open
kustomization.yaml($GIT_ROOT/multi-tenancy-gitops-apps/ace/environments/ci/kustomization.yaml) and uncomment:- eventListeners/ace-integration-server.yaml -
Commit and push the change
git add .
git commit -m "Deploy ace-integration-server eventlistener"
git push
You can verify that ArgoCD deployed the resource using the ArgoCD UI, for apps-ace-rest-ci-1:
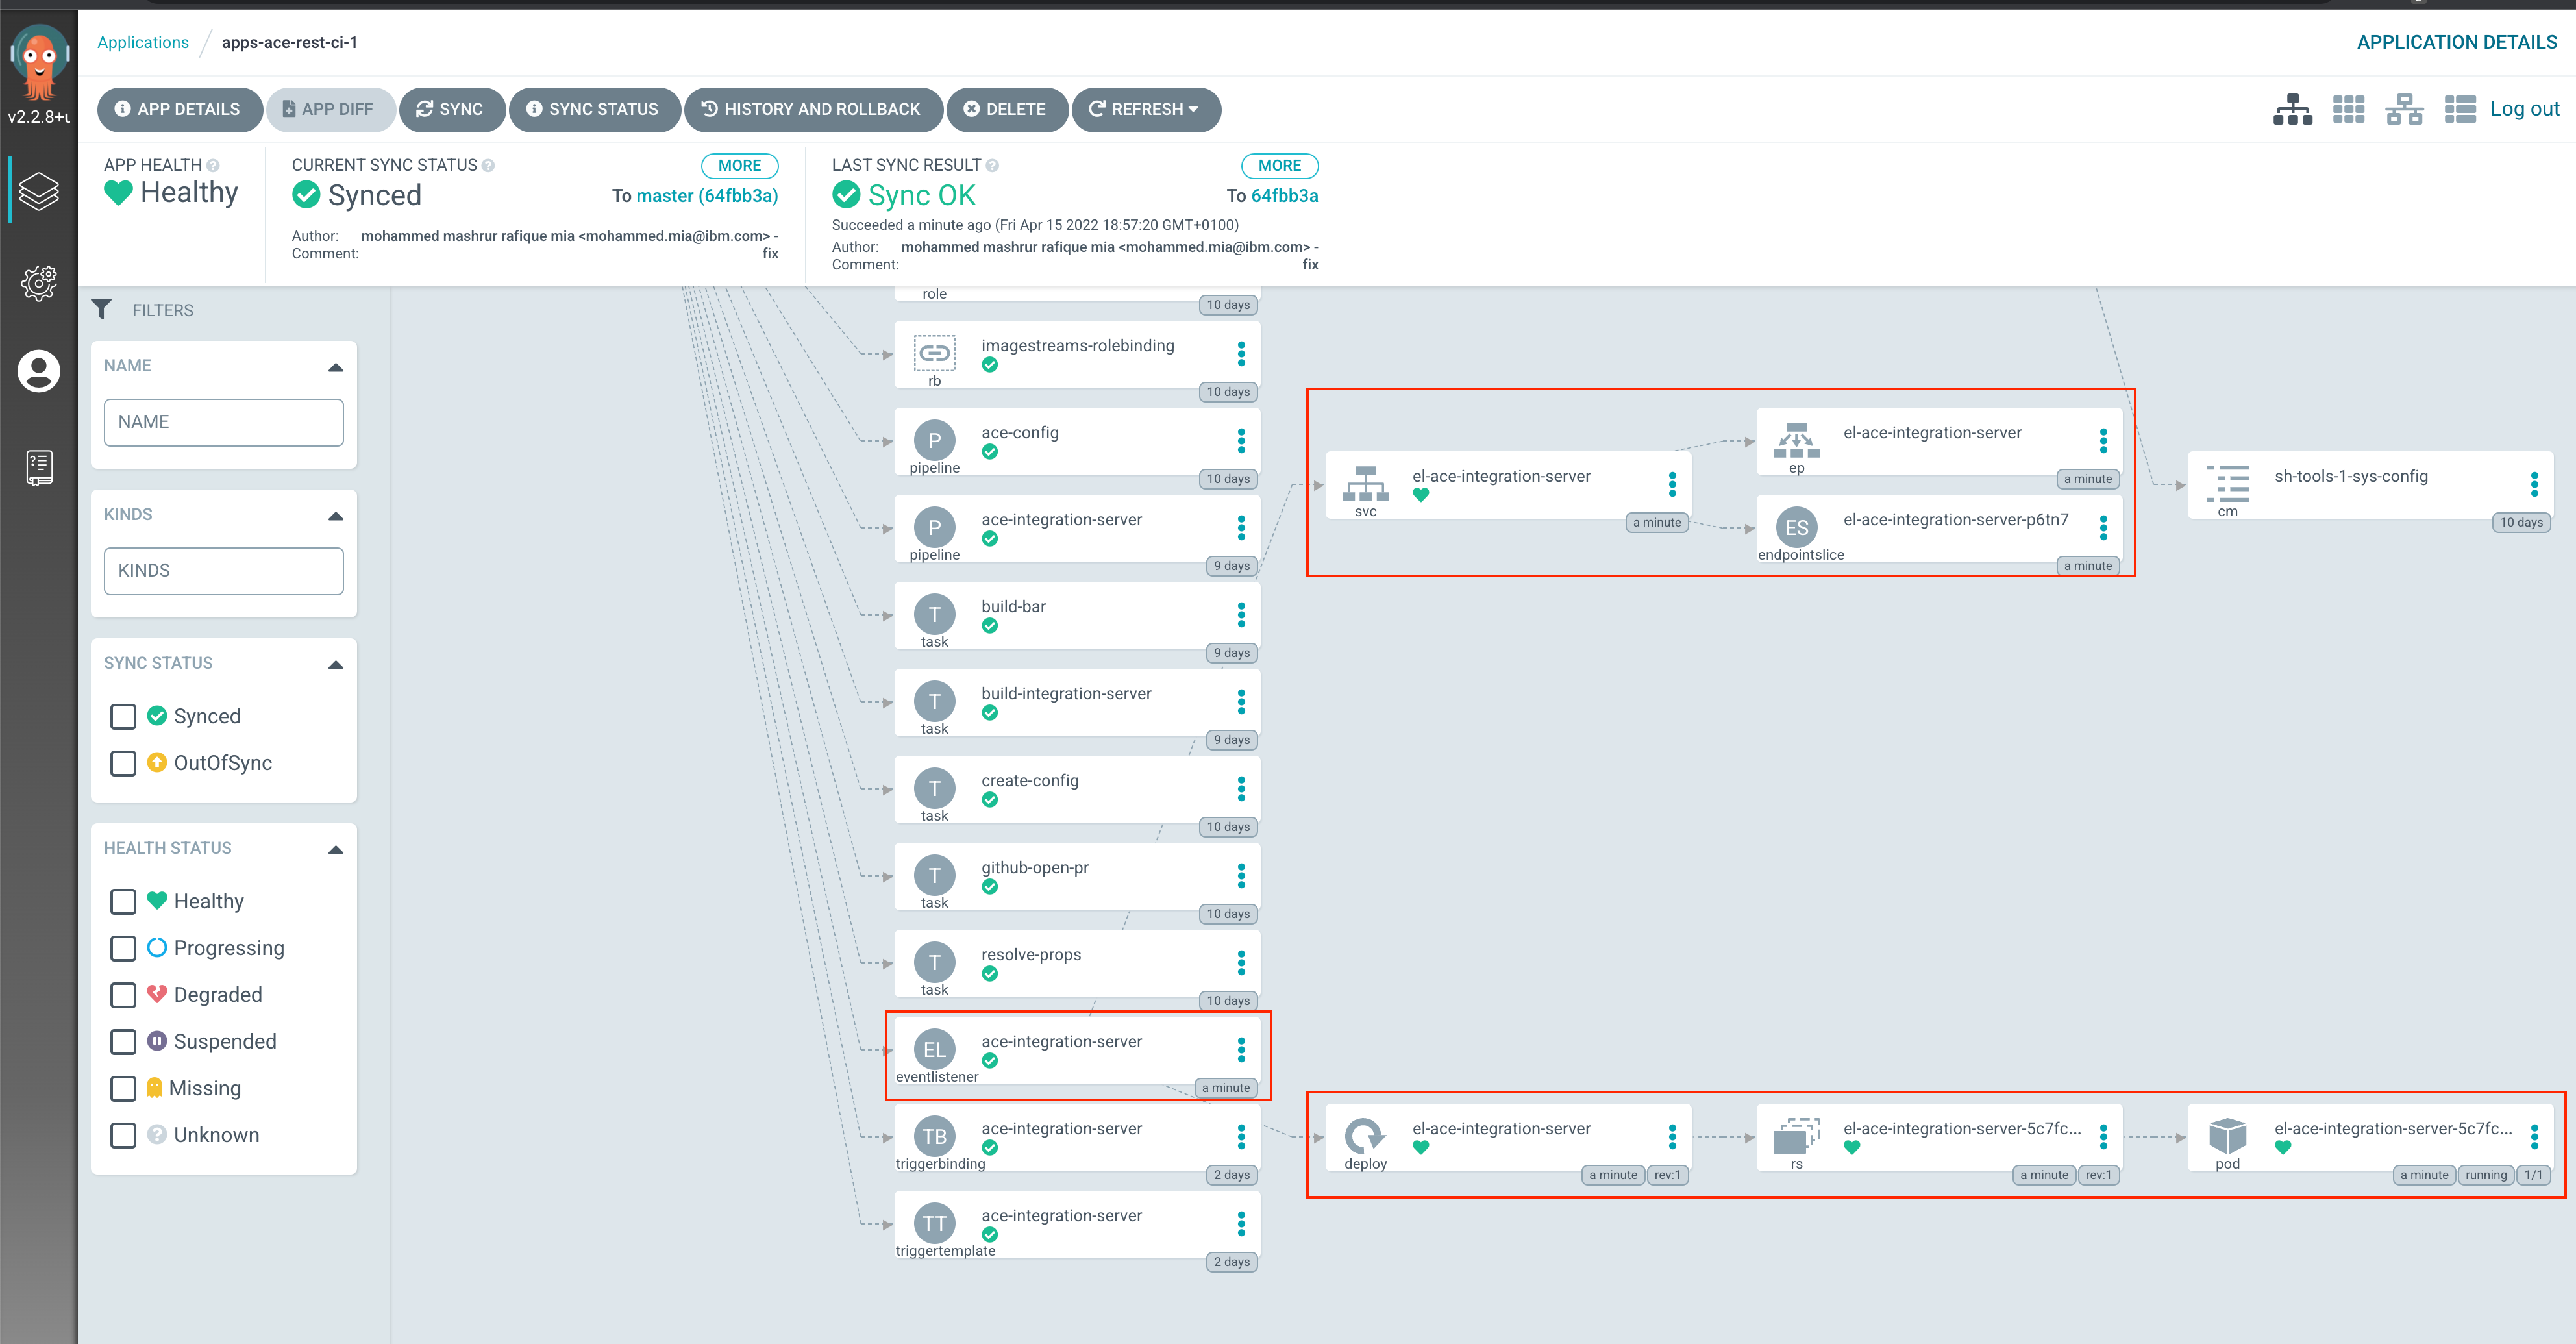
Notice the deployment and service that got created along. But we do not have any route though. Since GitHub is outside of our cluster, we need to expose our EventListener via a Route resource:
-
Change to multi-tenancy-gitops-apps
Issue the following command to change to your GitOps repository and the pipeline directory
cd $GIT_ROOT/multi-tenancy-gitops-apps -
Update kustomization in
cifolder to enable route,el-ace-integration-server*Open
kustomization.yaml($GIT_ROOT/multi-tenancy-gitops-apps/ace/environments/ci/kustomization.yaml) and uncomment:- routes/el-ace-integration-server.yaml -
Commit and push the change
git add .
git commit -m "Deploy ace-integration-server eventlistener route"
git push
You can verify that ArgoCD deployed the resource using the ArgoCD UI, for apps-ace-rest-ci-1:
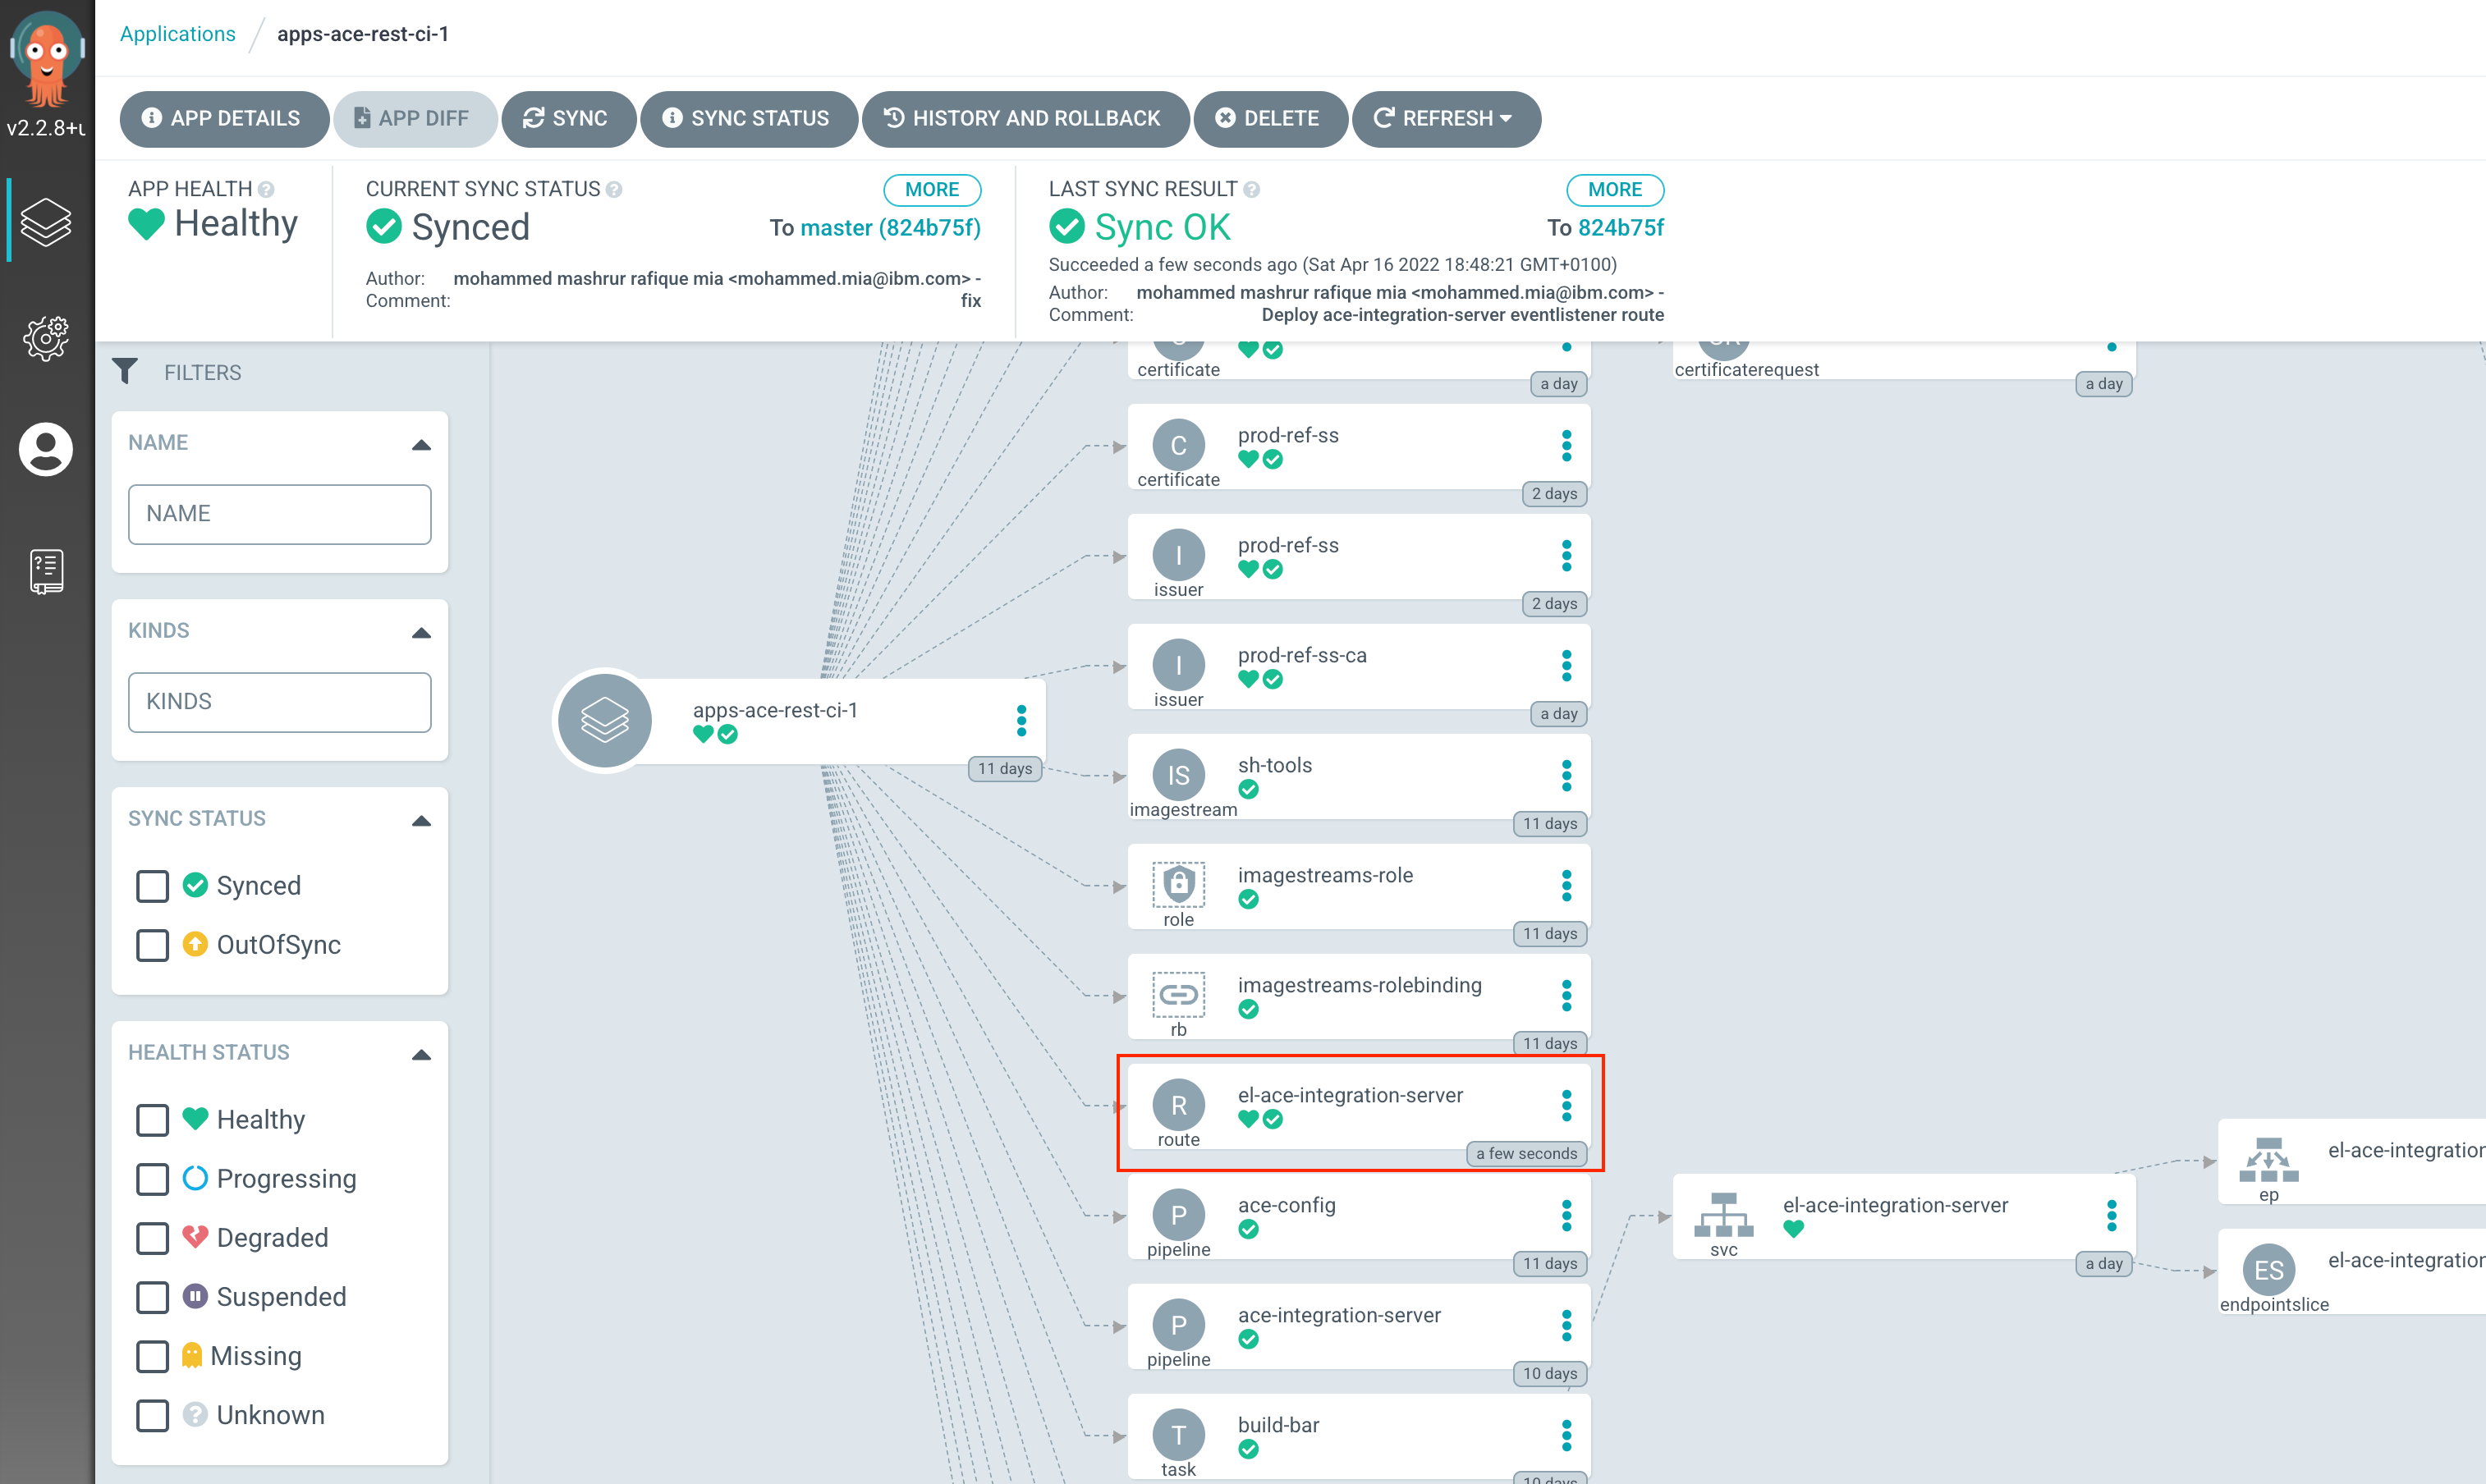
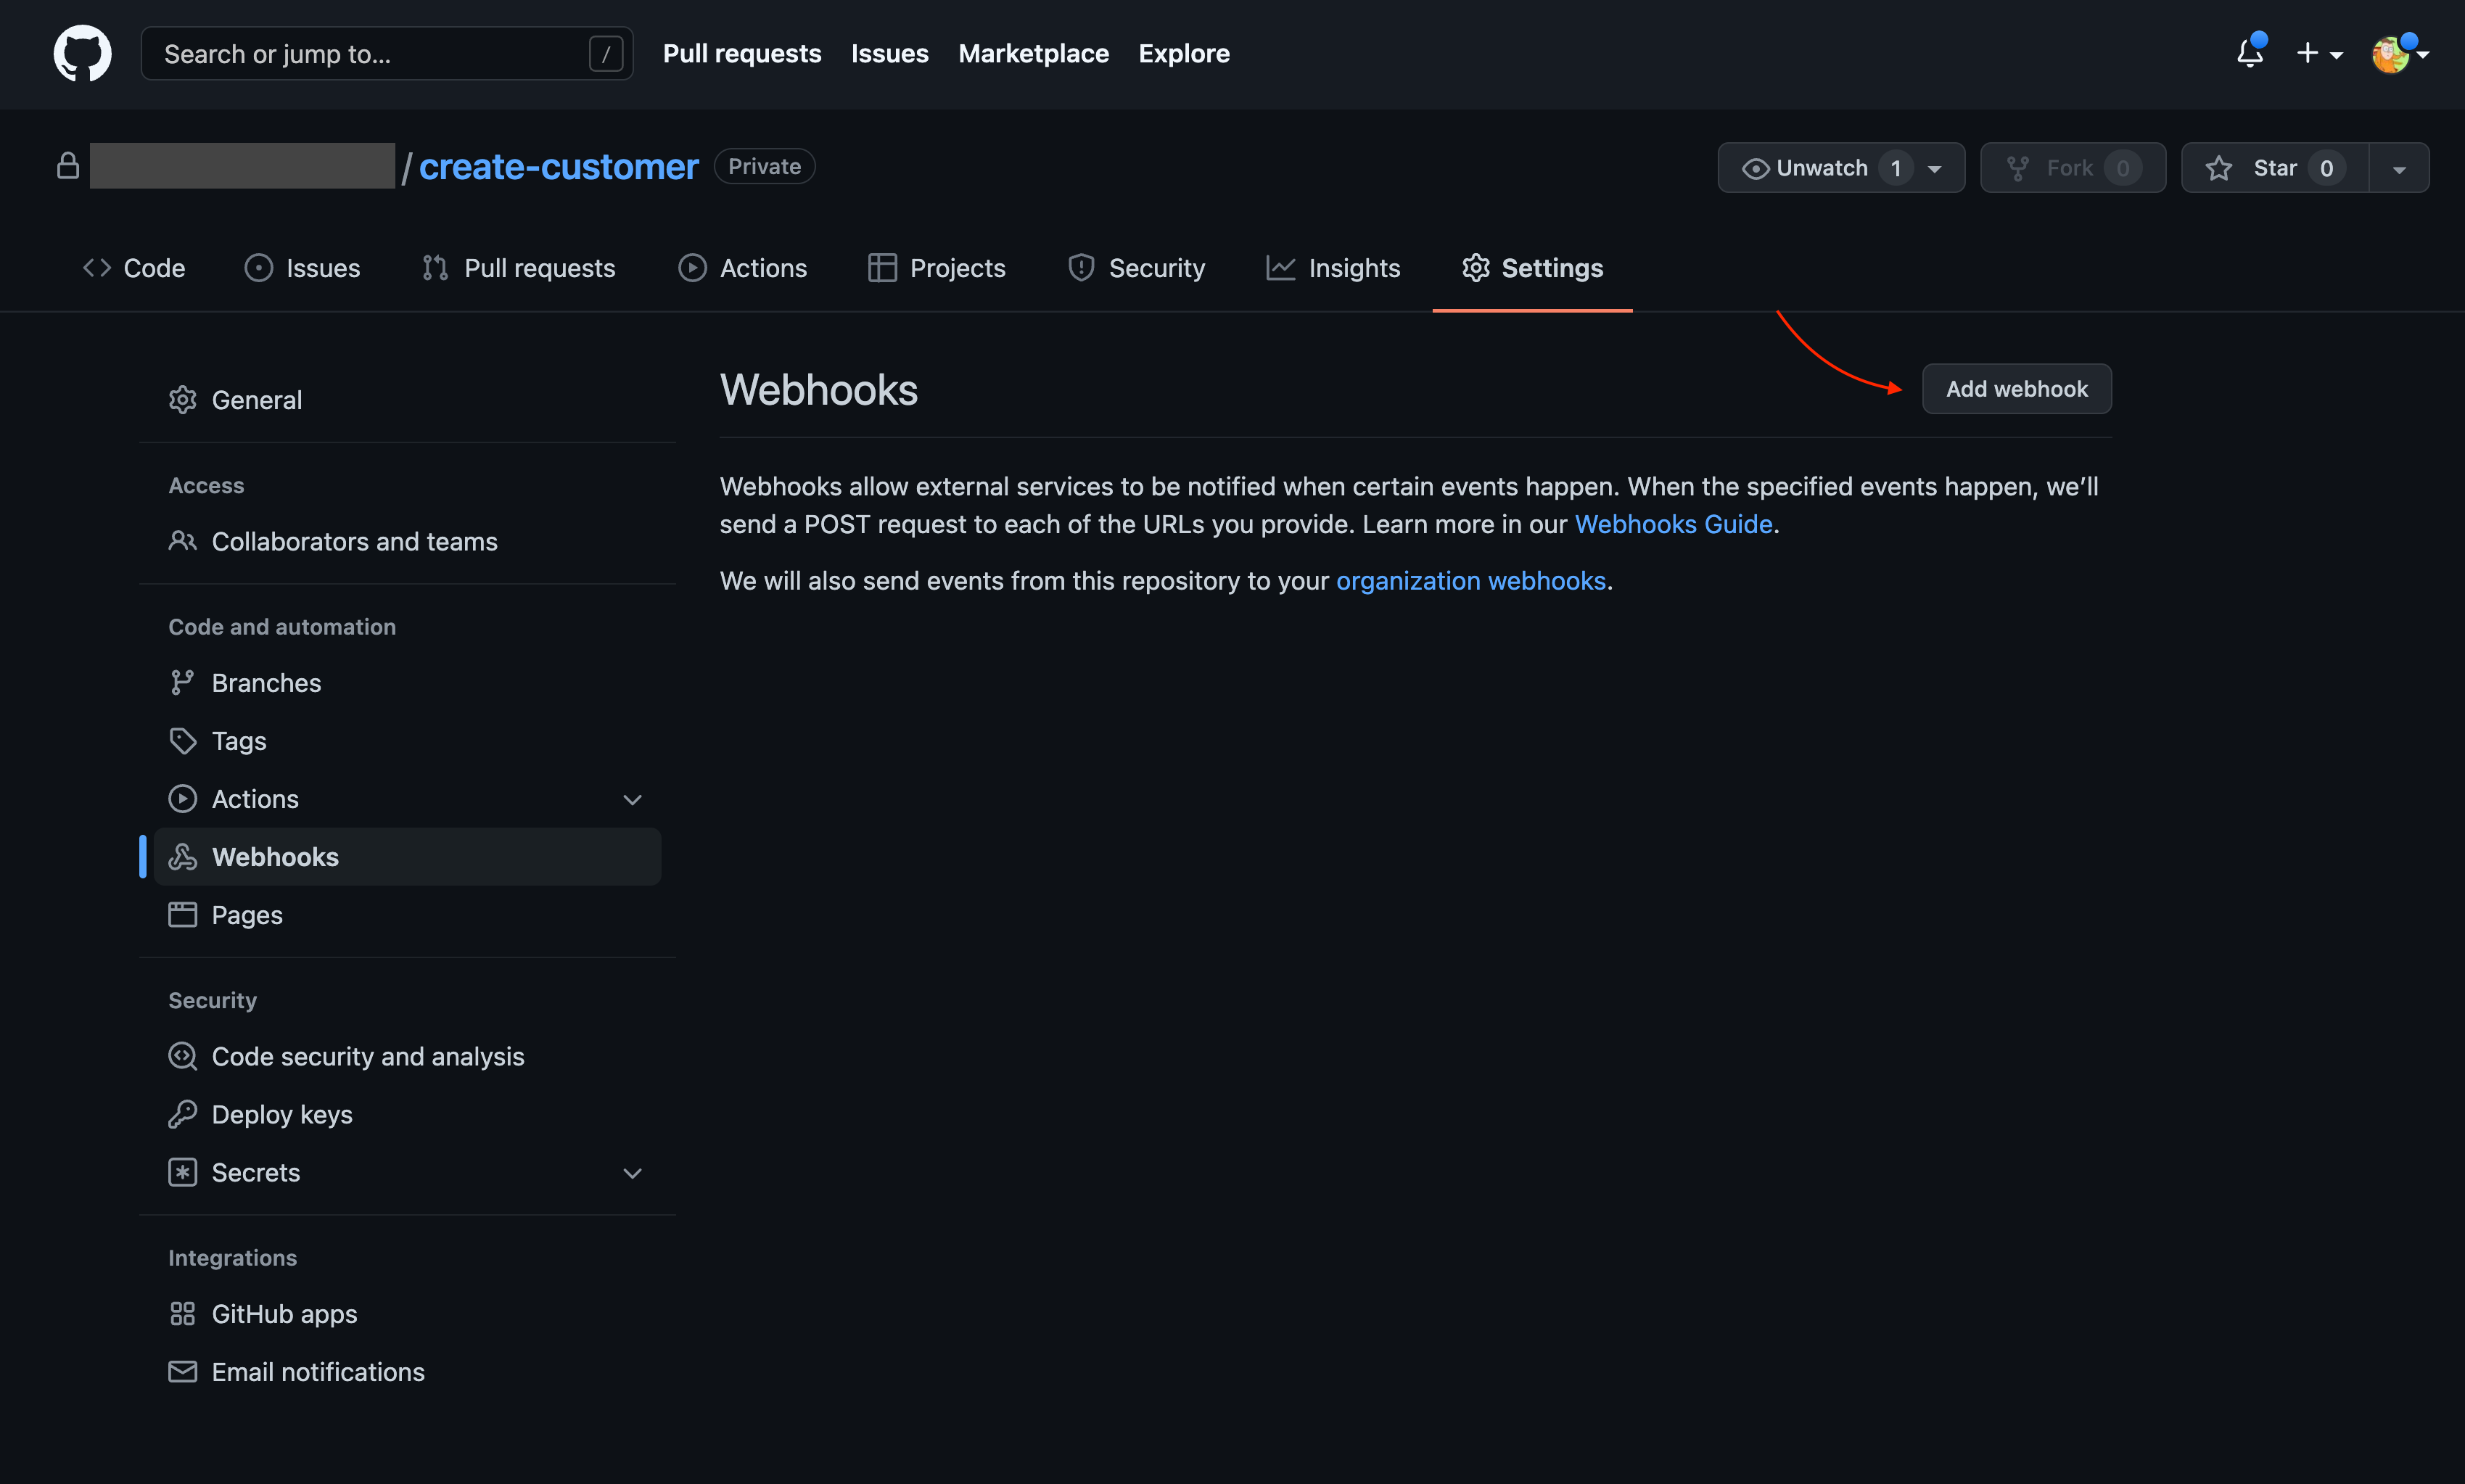
Create WebHook
We are now ready to create the WebHook in our ACE source repository. Visit the ACE source repository, create-customer, on your GitHub organization, navigate to to Settings > Webhooks and click Add Webhook button:
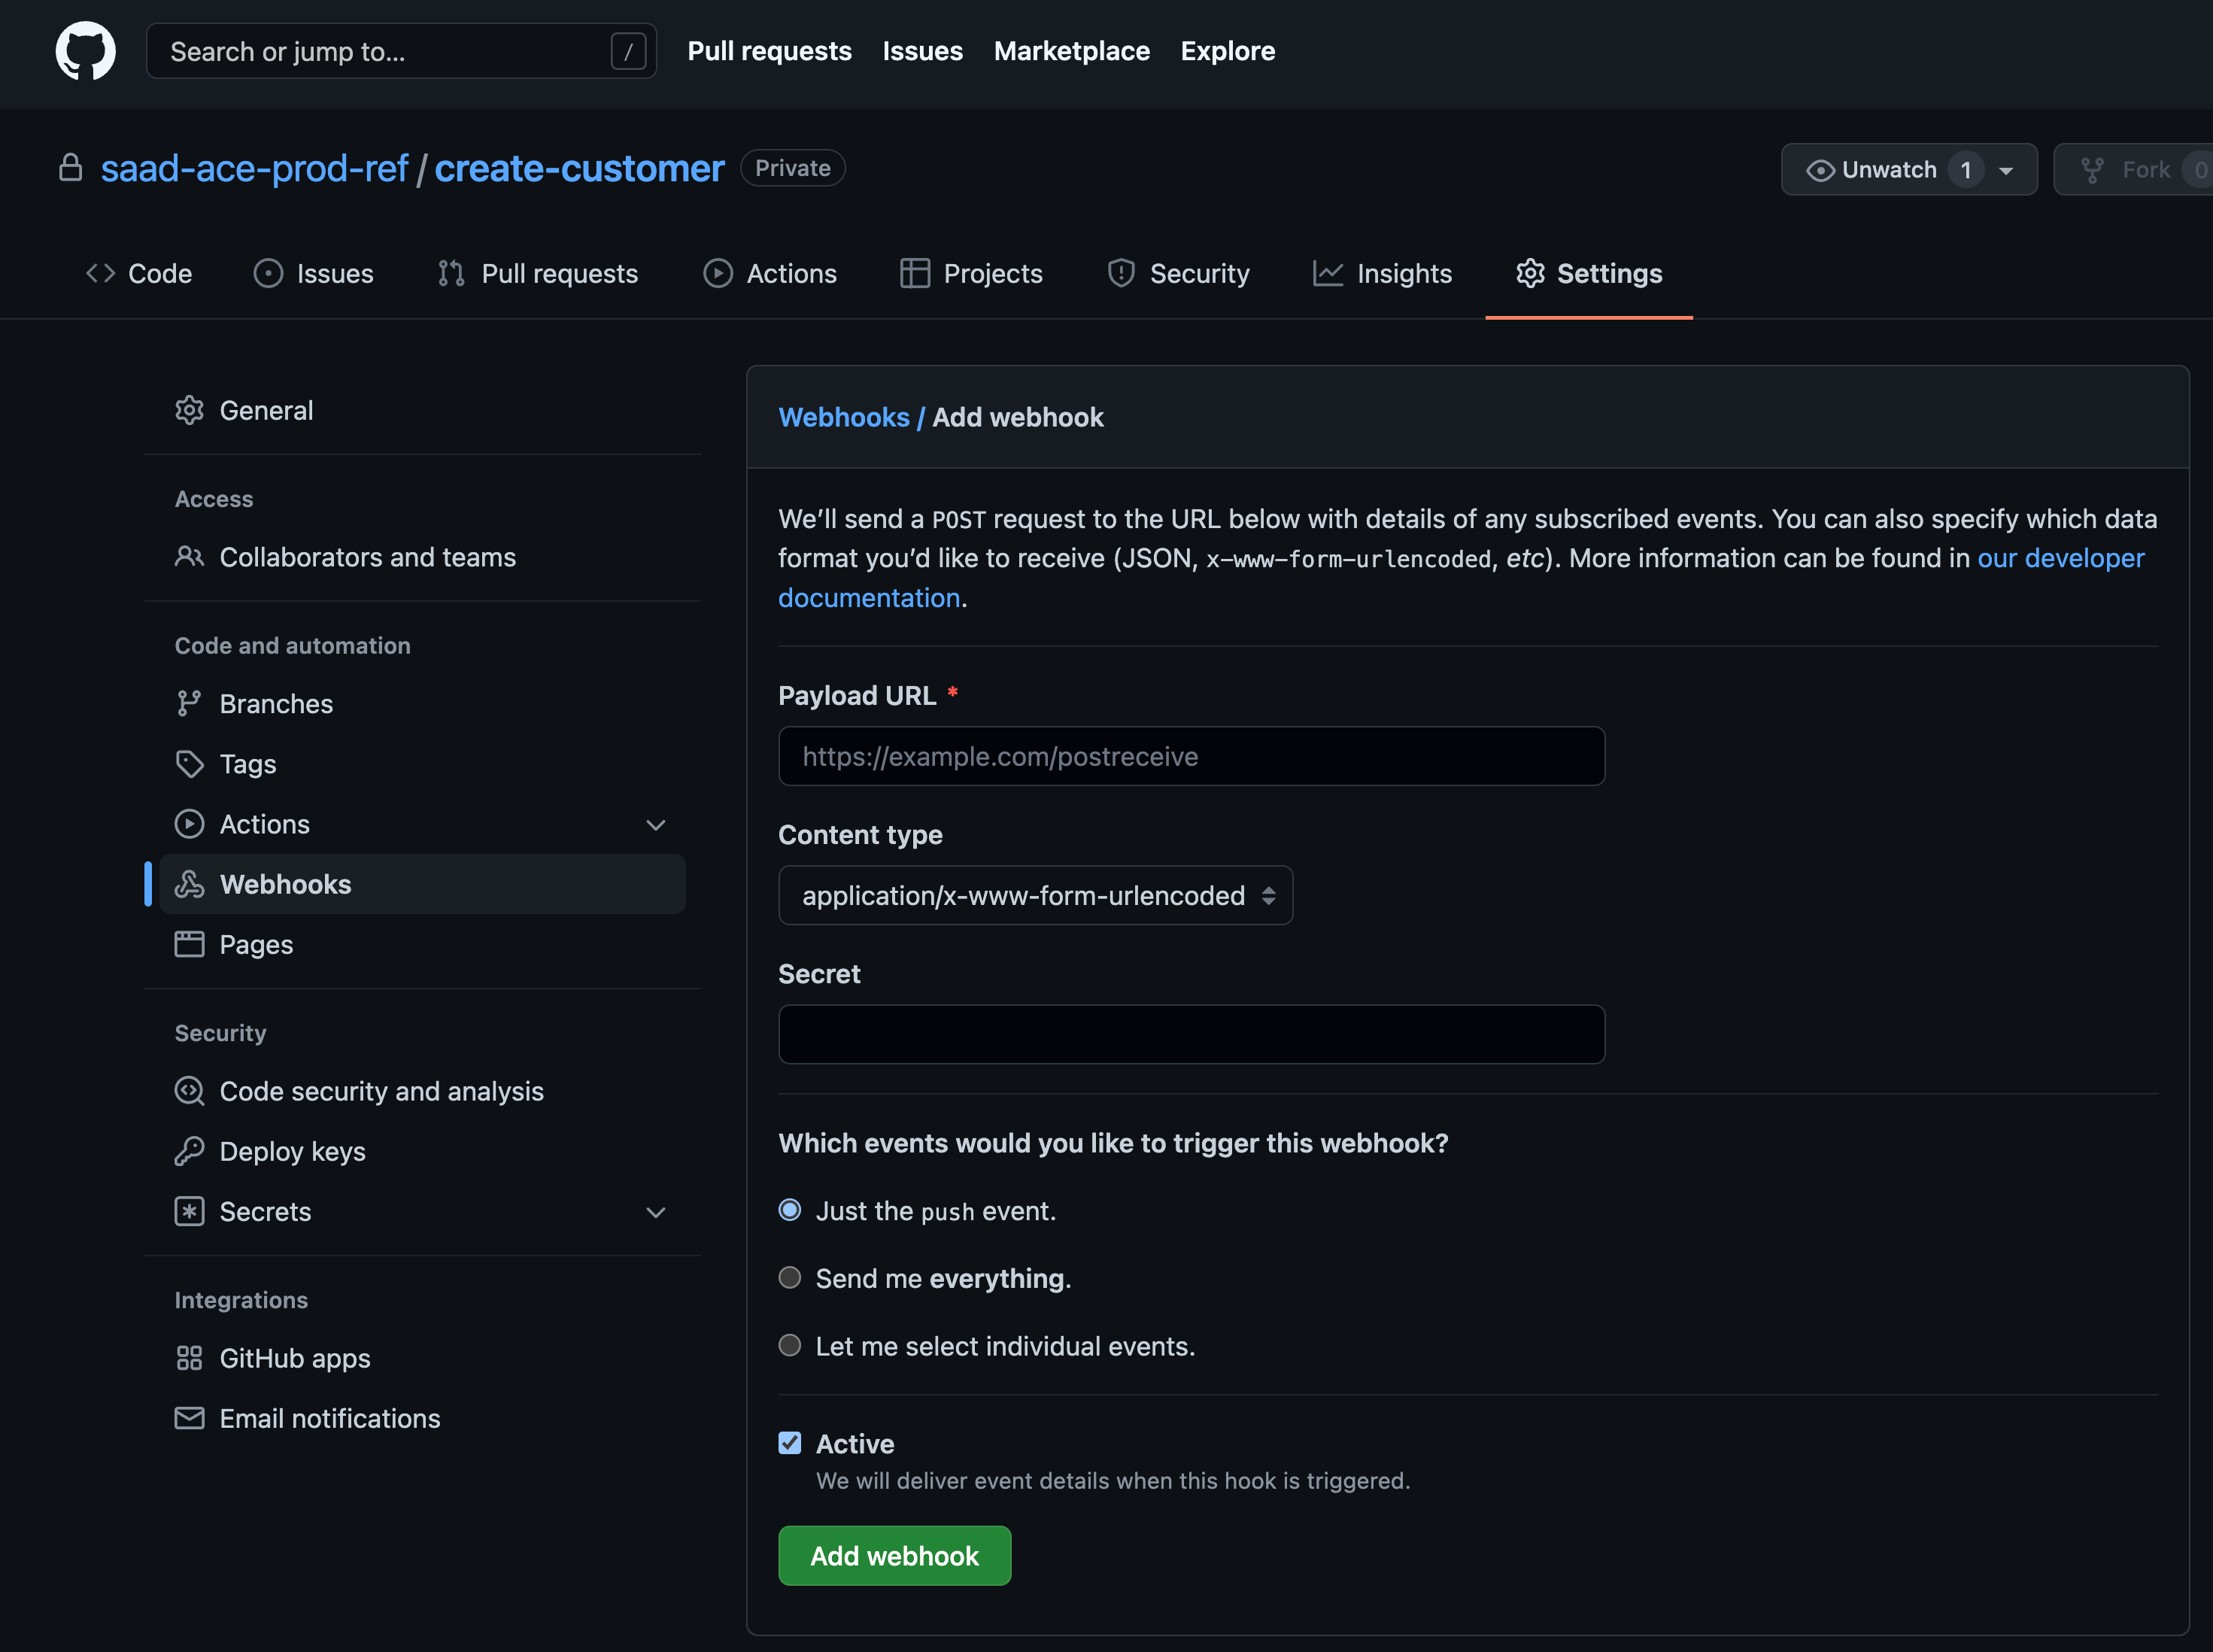
On the form, we need to put our EventListener route and token.
The route can be extracted with:
oc get route el-ace-integration-server -n ci --template='{{"https://"}}{{.spec.host}}{{"\n"}}'
and the secret string can be extracted with:
oc extract secret/gitops-webhook-token -n ci --to=-
Because we are using self-signed certificates in our EventListener, we will disable SSL verification:
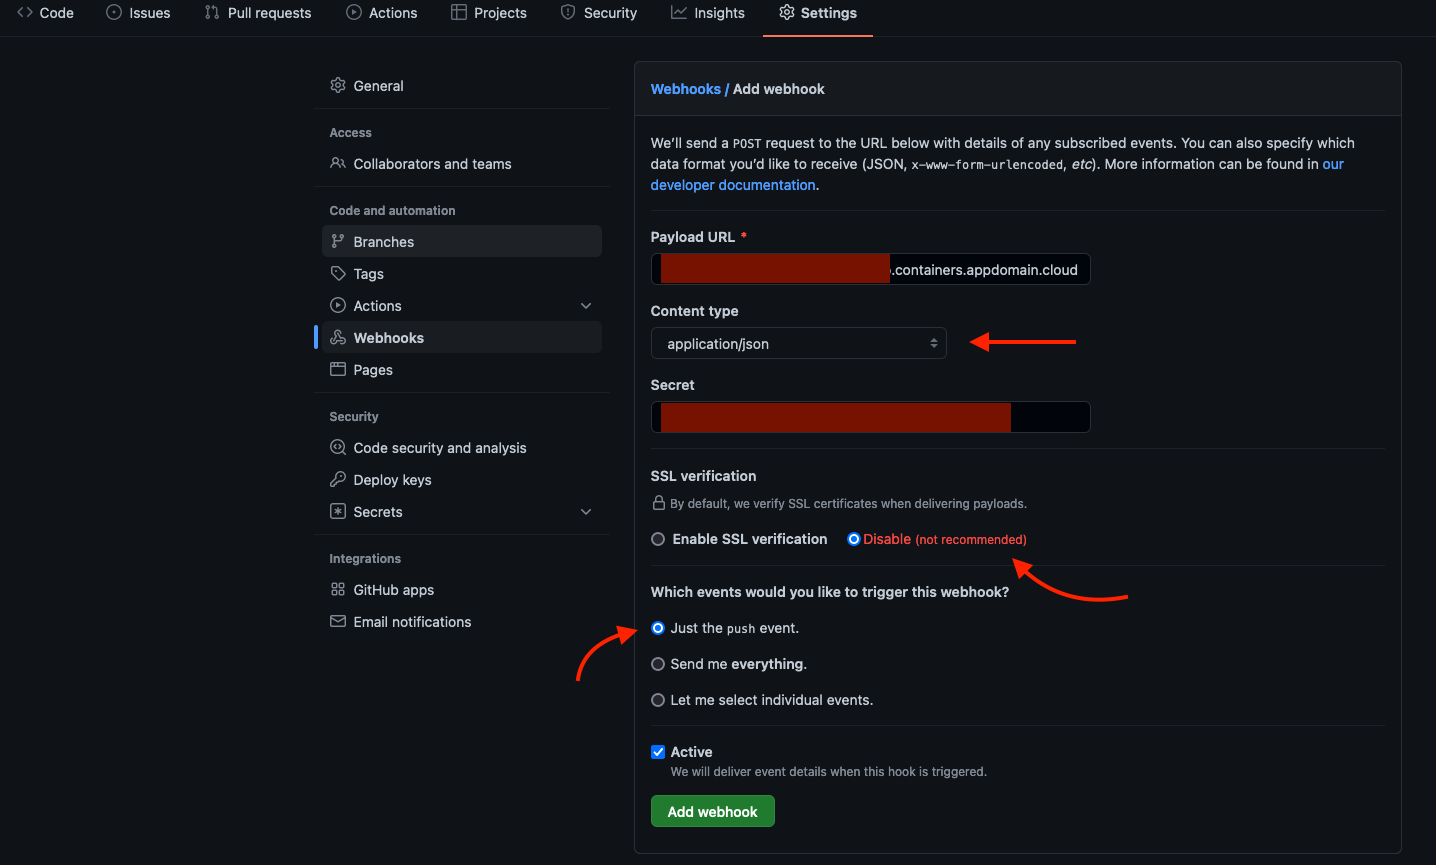
After setting these values, click Add webhook to add the webhook.
Test WebHook
We will follow GitHub flow to contribute changes to our source code. It is out of scope of this guide to explain GitHub flow in details, but in brief, to contribute changes:
- We create a "feature" branch.
- Add our changes to this branch.
- Make a pull request.
- The pull request is reviewed.
- If everything looks good, pull request is approved and merged.

To learn more about GitHub flow, see GitHub flow.
To make changes to our ACE source repository, we will be doing the following:
- Clone the
create-customerrepository. - Create a branch.
- Make changes.
- Commit and push the branch to origin.
- Create a pull request.
- Approve and merge the pull request.
Let's get started.
-
Change to our git root directory
cd $GIT_ROOT -
Clone the repository
Following is an example of cloning the
create-customerusing SSH URL (change the URL that suits your version of the repository)git clone git@github.com:ace-prod-ref/create-customer.git -
Change to
create-customerworkspacecd $GIT_ROOT/create-customer -
Create a branch
We will make changes to the OpenAPI document to add pattern to the phone number of new customer. Therefore, we will create a branch named, `update-phone-number-pattern':
git checkout -b update-phone-number-pattern -
Add a pattern for the phone number in OpenAPI document
Open file,
createcustomer/openapi.jsonand add the pattern^\\d{3}-\\d{7}$to thephoneproperty of thecontact_detailsobject. If you take a diff:git diffyou should see:
diff --git a/createcustomer/openapi.json b/createcustomer/openapi.json index aec8aa9..fe96719 100644 --- a/createcustomer/openapi.json +++ b/createcustomer/openapi.json @@ -95,7 +95,8 @@ "type": "object", "properties": { "phone": { - "type": "string" + "type": "string", + "pattern": "^\\d{3}-\\d{7}$" }, "address": { "type": "string" -
Add, commit and push the change
git add createcustomer/openapi.json git commit -m "Add pattern to phone number" git push origin update-phone-number-pattern -
Create the pull request
If you navigate to the repository on your GitHub organization, you should see
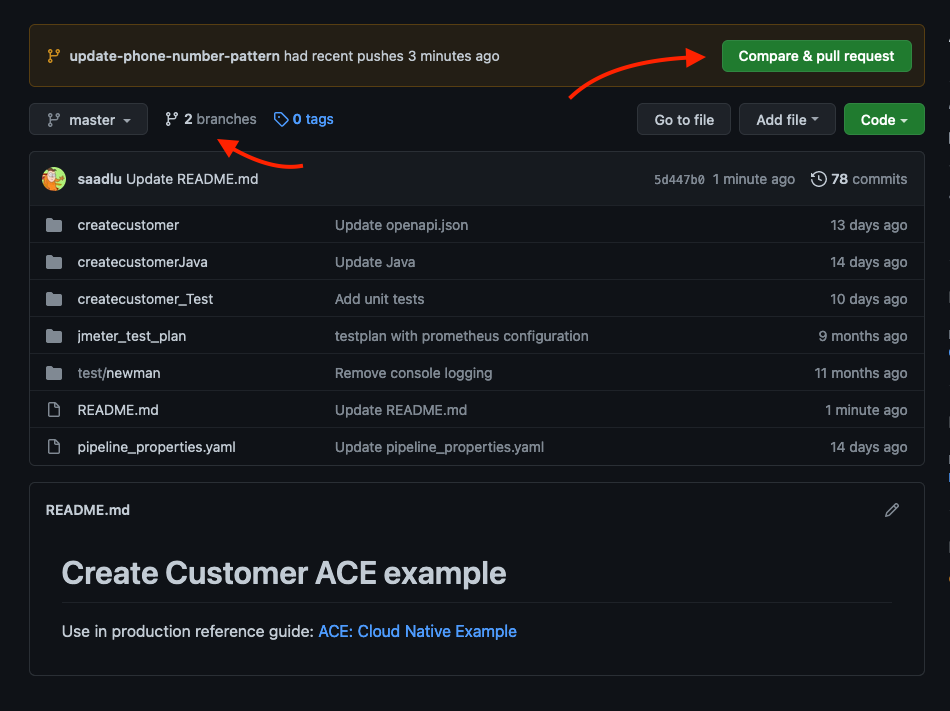
New feature branch on create-customer From here you can create a pull request by either clicking on Compare & pull request or going the branch view.
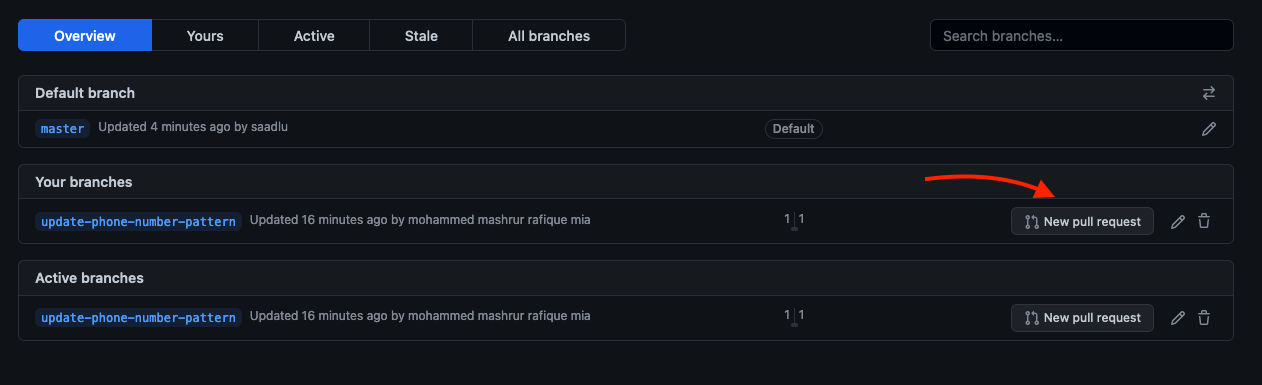
New pull request from branch view click on New pull request. Fill up the paragraph to describe your change and click on Create pull request
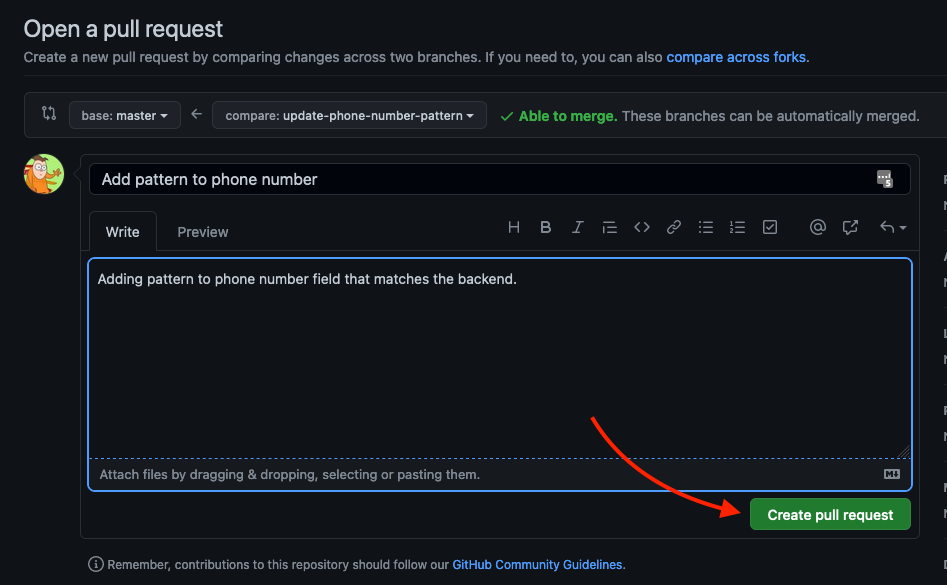
Create pull request 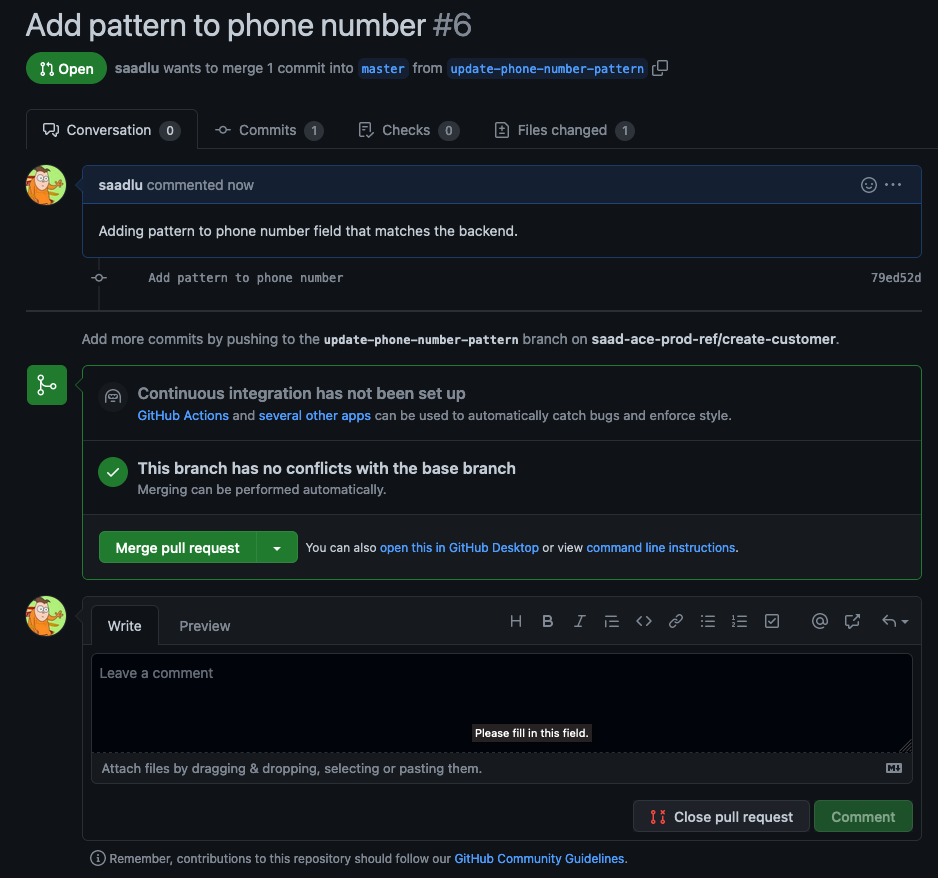
Review pull request Ideally you want a reviewer to check your changes, someone from your team. In this example, we will simply look at the change and approve.
Click on Commits tab and click on commit to see the
diffof the changes: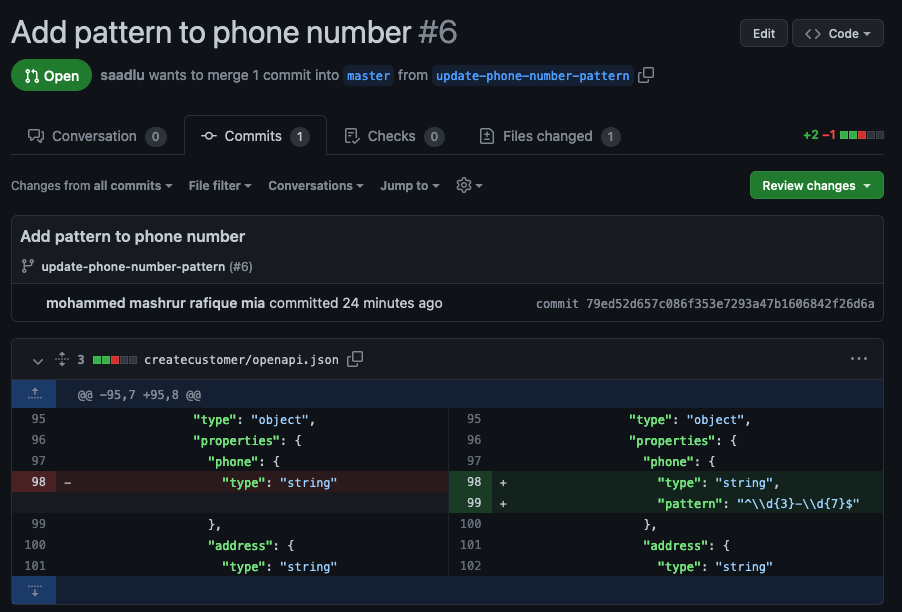
Review the commit We will assume that we are happy with this change. Click on Conversation tab and click on Merge pull request to merge the request and confirm the merge.
This should trigger a pipeline run.
-
Verify that the pipeline is running
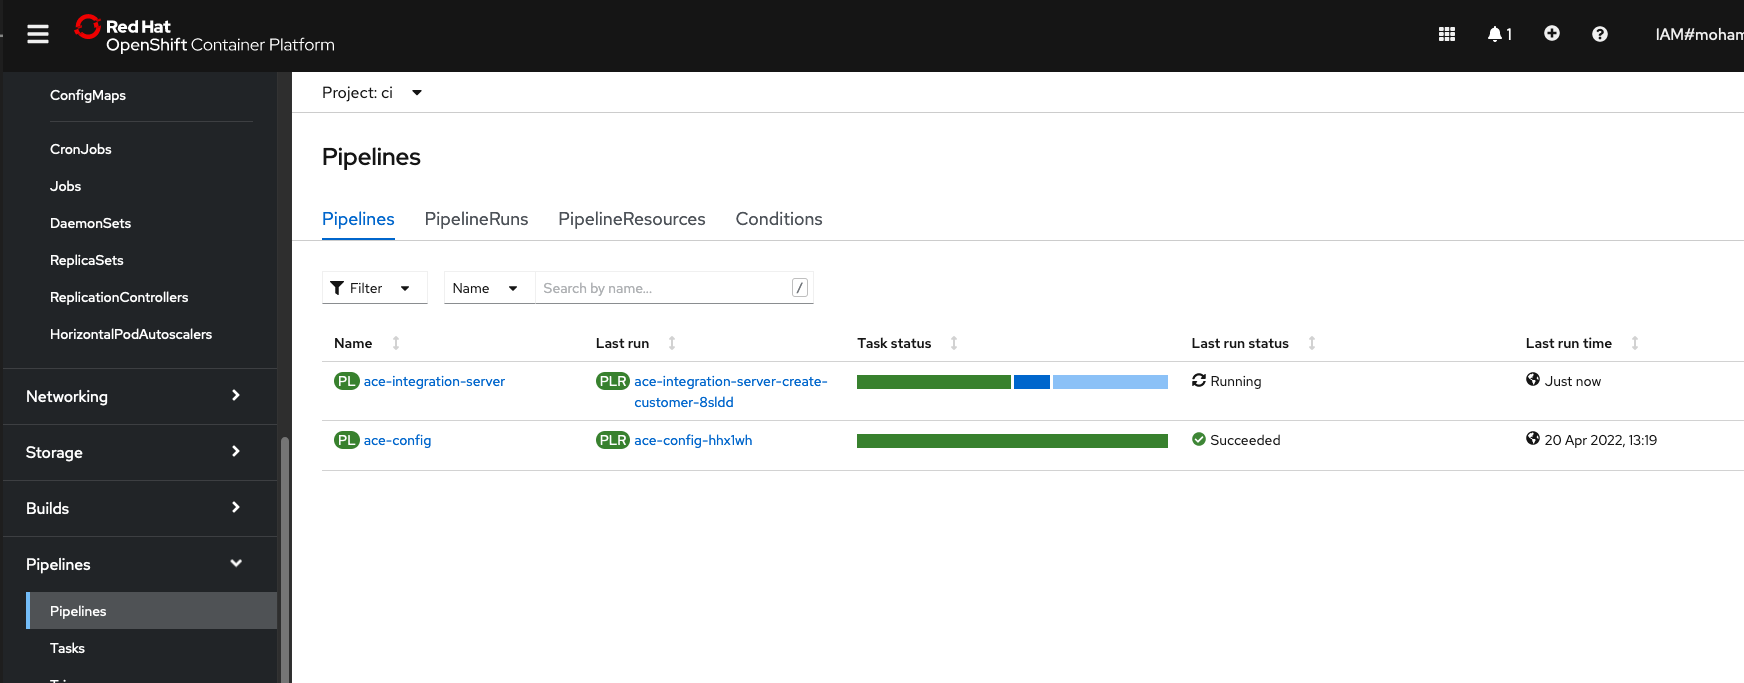
Pipeline Run Triggered When the pipeline run completes, you will see a pull request in your
multi-tenancy-gitops-appsrepository. -
Verify pull request has been submitted by the pipeline
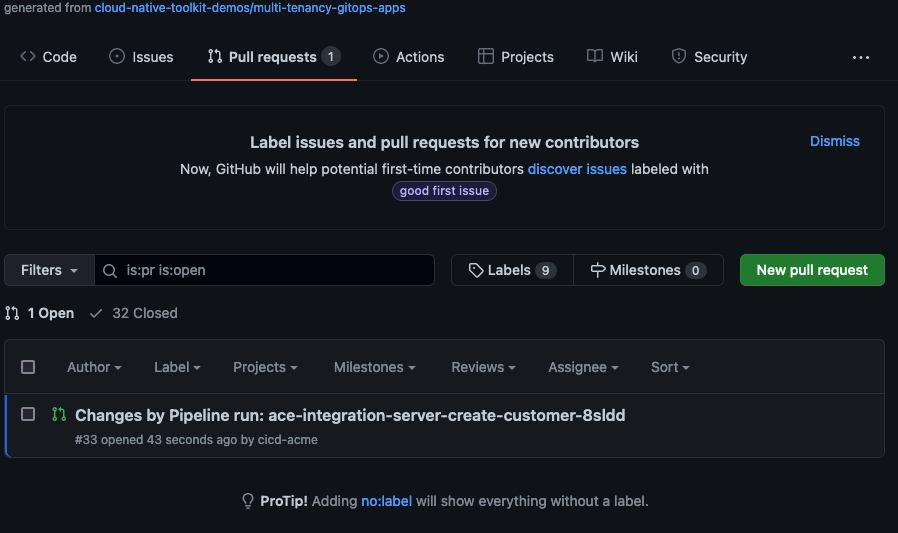
Pull request from pipeline run -
Examine the current version of our ACE integration server deployment
Before we merge the pull request on
multi-tenancy-gitops-apps, let us check the current version of our ACE application. Open up ACE dashboard:As a reminder the URL to the dashboard can be found by
oc get dashboard ace-dashboard -n dev -o jsonpath='{.status.endpoints[0].uri}{"\n"}'while the
adminpassword can be found byoc extract secret/ibm-iam-bindinfo-platform-auth-idp-credentials --keys=admin_password -n ibm-common-services --to=-On the dashboard, open our
createcustomerAPI. You can either download the OpenAPI document to verify thatphonefield undercontact_detailsdoes not have apatternassociated it, or, you can see the details of thePOST /createcustomeroperation and check the body that is generated: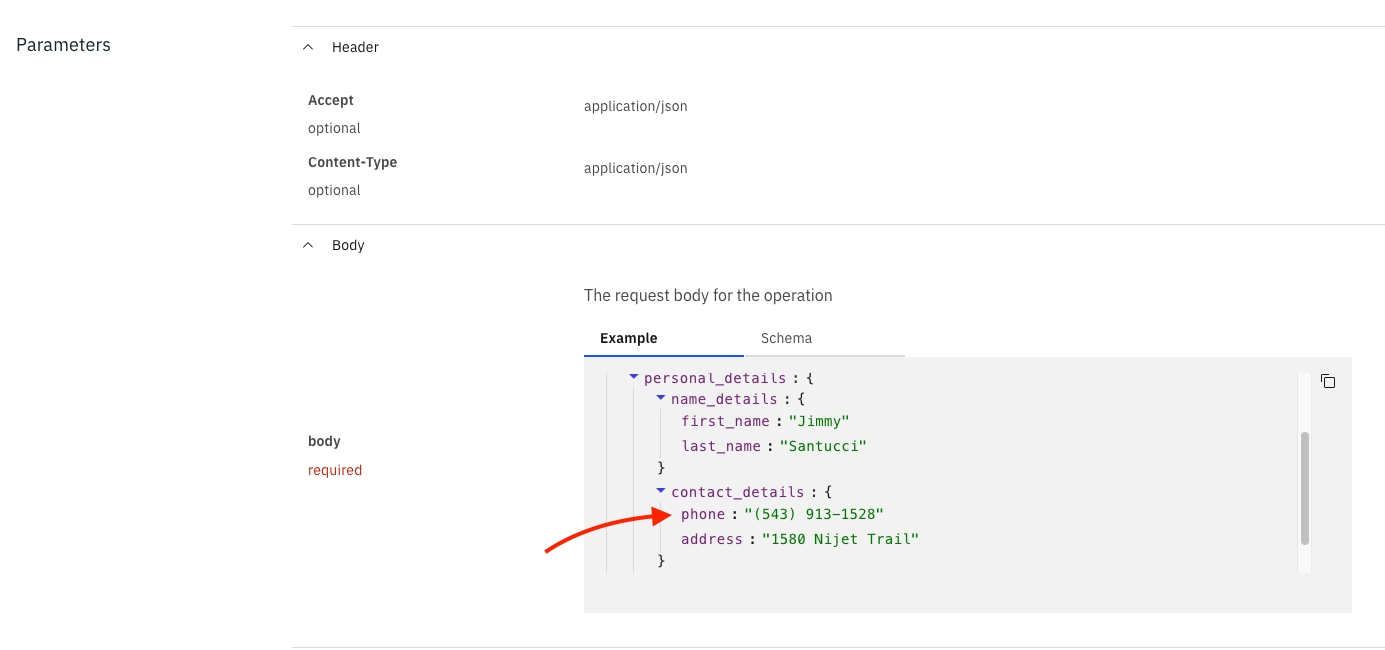
Incorrectly formatted phone number As you can verify this is not the format we want.
-
Merge the pull request in
multi-tenancy-gitops-appsMerge the pull request generated by the pipeline run on the
multi-tenancy-gitops-appsrepository. ArgoCD will notice the change and will update the deployment of ACE integration server. On theapps-ace-rest-dev-1ArgoCD application, verify that the syncing happened - refresh if it did not:
Syncing in ArgoCD -
Verify that the ACE application has been re-deployed with the change
If you open up the ACE dashboard now, navigate to
createcustomerAPI and to the details ofPOST /createcustomeroperation, you would see generated body has been updated:
This concludes this section of Continuous Update.