Building Integration Server
Audience: Architects, Application developers, Administrators
Timing: 1 hour 30 minutes
Overview
In this topic, we will build IntegrationServer Custom Resource, which defines our AppConnect Integration Server.

As mentioned in the Overview section, the IntegrationServer Custom Resource (CR) is produced by the Integration Server pipeline. The pipeline takes AppConnect application resources, such as message flows (.messageflow), sub-flows (.subflow), ESQL (.esql), mapping (.map), etc. creates a BAR file, bakes in the BAR file to a custom container image, pushes the container image to OpenShift internal registry. It then creates the IntegrationServer CR which refers to the custom container image. The CR also refers to he Configuration objects needed for the message flow and the integration server.
Pre-requisites
Before attempting this topic, you should have successfully completed the Building Configurations. This section relies on the resources that have been already deployed as part of the Building Configurations and previous sections. At this stage we should have available:
- ArgoCD application.
resolve-propsandgithub-open-prTekton tasks.- SSH keys for infrastructure and GitOps repos from the Upload the public ssh-key section.
- GitHub machine user from Create a "machine user" section and related permissions from Create access token for the Machine User section.
- Sealed secret operator from Deploy services to the cluster section.
kubesealfrom Create sealed secrets section.
Creating the BAR file
To deploy an integration solution to a production environment on OpenShift, we need to package the App Connect Enterprise (ACE) resources into a broker archive (BAR) file.
Consider our Create Customer Integration application. The source code of the application is maintained in a Git template. The template contains resources such as message flows (.messageflow), sub-flows (.subflow), ESQL (.esql), mapping (.map), etc. as well as supporting Java Application with .java code files. The Java application need to be complied and packaged with all the resources to a BAR.
The BAR file can be created from the source via ibmint package command. The command is available on the App Connect Enterprise container image. We will make use of this command in our pipeline to build the BAR file from ACE source.
Custom container image
The BAR file will be "baked in" in a custom container image. The image URI will then be referred in the IntegrationServer CR. Our pipeline will build this image and push it to the internal OpenShift registry.
We will base our custom container image on a IBM App Connect Enterprise server image, located in the IBM Cloud Container Registry, cp.icr.io. Our pipeline would therefore need access to this registry. We will make use of ibm-entitlement-key container registry Secret to provide us access to the IBM Cloud Container Registry.
Pipeline overview

The pipeline has 6 tasks:
-
Clone source repo.
-
Clone infra repo.
-
Clone gitops repo.
Based on git-clone cluster task, execution of these tasks will clone the required repositories:
-
ACE Source Repository: Contains the ACE application resources, such message flows and subflows (
.msgflow,.subflow), maps (.map), ESQL code (.esql), supporting Java application code (.java), XML schemas (e.g. WSDL files) and any other resources (e.g.openapi.json). The pipeline needs read-only access to this repository. -
Infrastructure Repository: Contains template for IntegrationServer custom resource and Dockerfile for our custom integration server container image. These files are plain text template file that container place holders. The pipeline needs read-only access to this repository.
-
GitOps repository: The multi-tenancy apps repository. This is the repository the GitOps operator watches for any desire state of the application. Configurations for ACE application concern, and therefore the CRs are maintained in the The multi-tenancy apps repository. The pipeline will write the generated Configurations to this GitOps repository. The pipeline needs write access to this repository.
The tasks will clone the repositories on shared workspace. Subsequent tasks will make use the workspace to access content of the repositories.
The tasks will require secure access to the repositories. We will use SSH based authentication by using GitHub's deploy key.
-
-
Resolve props.
Pipeline properties maintains properties of the IntegrationServer we are going to deploy. It contains metadata such as name of the application, release name of the Integration Server, licensing information, version of the server, and the type of endpoint. It also contains the URI of the image our custom integration server container image is going to be based upon.
It also lists Configurations that the IntegrationServer requires as it gets deployed. These configurations will be referenced in the
IntegrationServercustom resource.The task is the same one that was deployed as part of the Building Configurations section. But it reads the
pipeline_properties.yamlfrom the source repository. -
Build bar
A custom task that builds the ACE BAR file from ACE resources. It makes use of
ibmint packagecommand. The command is available in the ACE server and ACE for Developers container image. We will make use of ACE server container image. For list of ACE server and ACE for Developer images see IBM App Connect Enterprise server image from the IBM Cloud Container Registry. -
Build image
A container image based on IBM App Connect Enterprise server image is created that bakes in the BAR file generated in the previous pipeline task. The Dockerfile located in the Infrastructure repository is used, replacing the base image. The base image URI is taken from the pipeline properties located on the source repository. See pipeline_properties.yaml for an example.
-
Build integration server
This custom task have three steps:
-
Create IntegrationServers YAML file: Generates an
IntegrationServerCR. The templatedIntegrationServerCR from the infrastructure repository is used by substituting the the parameters. In particular, custom container image and requiredConfigurations are referenced in the generated CR. The step makes use ofyqandenvsubstCLI. Custom image,sh-tools, will contains these tools. -
Update the
kustomization.yamlfile: IntegrationServers that are to be deployed by GitOps operator is driven by kustomize. Once the pipeline creates a IntegrationServer, thekustomization.yamllists it so that it can be deployed. Therefore, the pipeline need update thekustomization.yamlfile. The step makes use ofyqandrealpathCLI. Custom image,sh-tools, will contains these tools. -
Push the changes to GitOps repository: The IntegrationServer resource and the updated
kustomization.yamlfile is then pushed to the GitOps repository under a new branch.bitnami/gitimage is used for this step.
Before the pipeline can execute this custom task need to be deployed.
-
-
Create Pull Request
A custom task that that create a pull request to pull the changes to GitOps repository. The task is from tekton catalog, github-open-pr, but it is not part of the ClusterTask that comes with OpenShift pipeline operator.
Fork repositories
We will need to create Source and Infrastructure git repositories from cloud-native-toolkit-demos organization to your organization.
The Infrastructure repository should already been created on your organization as part of the Build Configuration section. See Create Infrastructure repository.
The GitOps repository, which in our case is the multi-tenancy-gitops-apps repository should already been created from the template as part of the GitOps, Tekton & ArgoCD section.
-
Create the Configuration repository in your GitHub organization
Let's start by making our own copy of the Configuration repository.
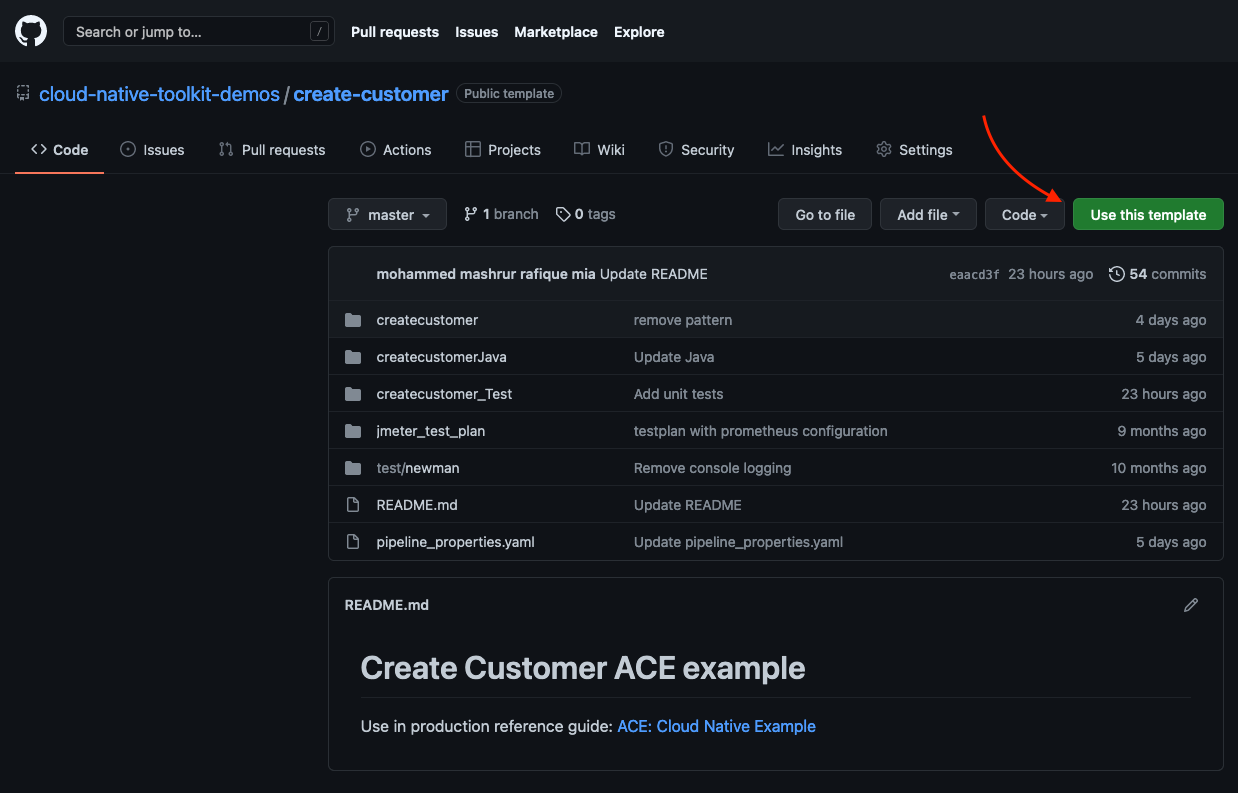
In your browser, navigate to https://github.com/cloud-native-toolkit-demos/create-customer.
Click on Use this template and select your organization, name the repository and click Create repository from template.
Source Template After a few seconds the repository will be present in your chosen account.
-
Review the repository
We can take a look at the content of the repository in the github.com on the browser with vscode.
If you press dot (.) key while you are in your github repository, it will open vscode on the browser. See The dot for a demo how it works.
On the
create-customerrepository within your organization, press the dot (.) key: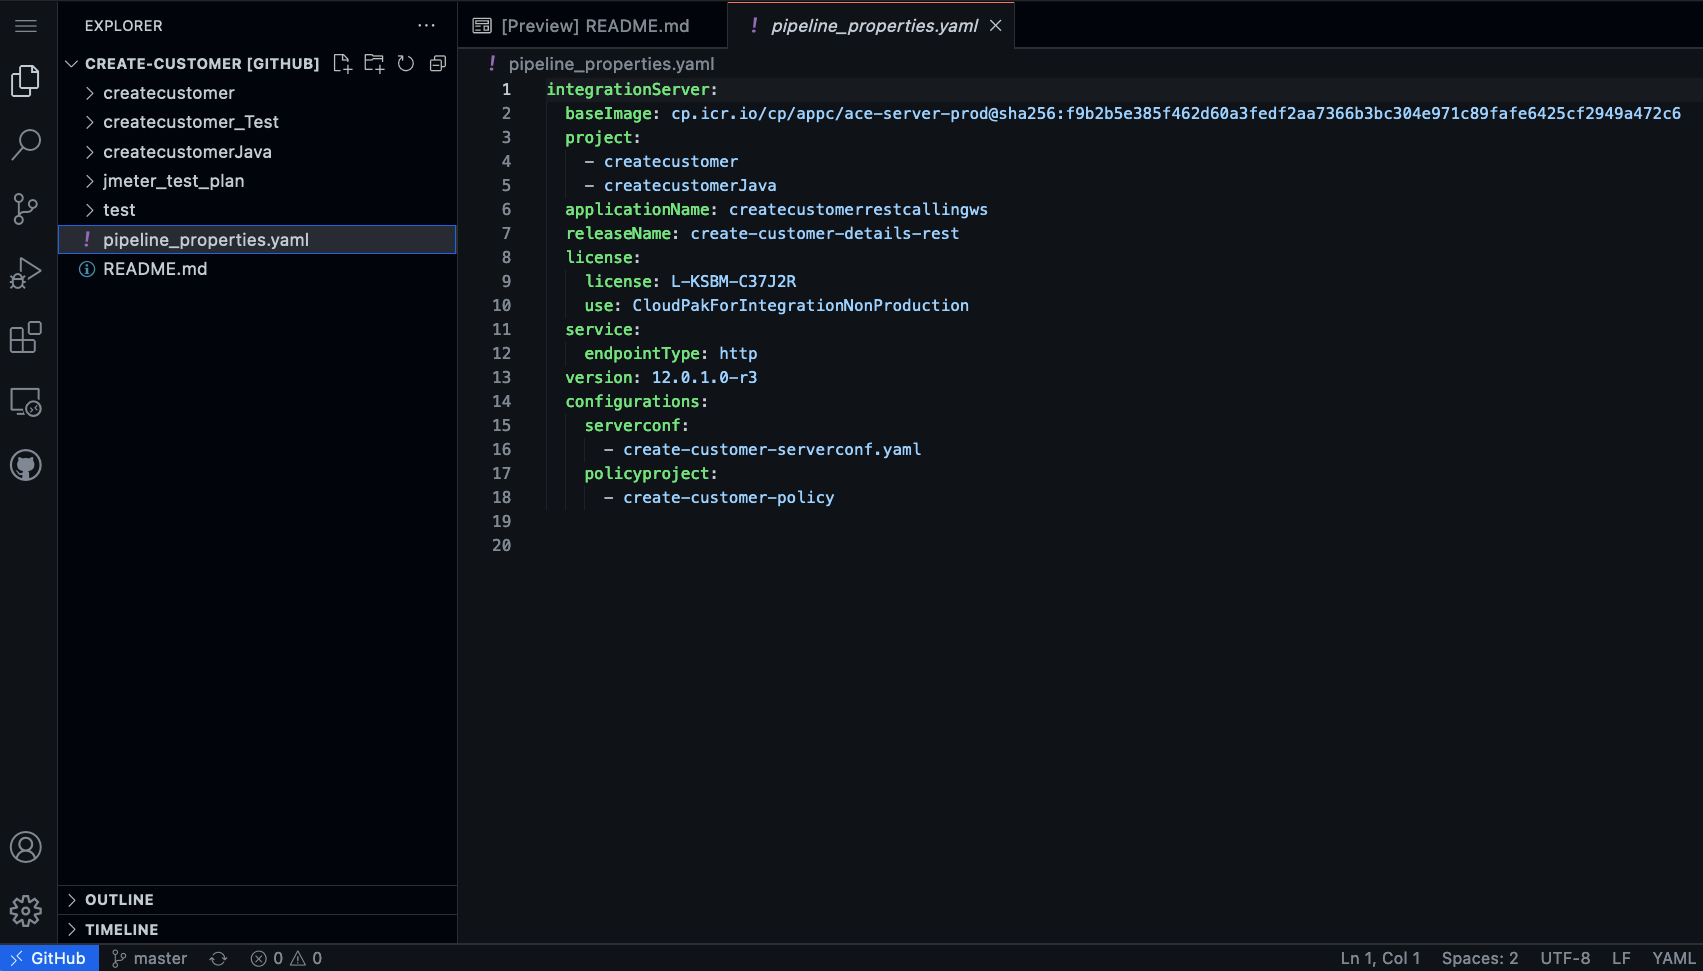
ACE source on github The folders
createcustomer,createcustomerJava, andcreatecustomer_Testhave been directly pushed from ACE toolkit via the Git plugin.The pipeline properties file,
pipeline_properties.yaml, sets up the various properties for the integration server that is to be built. In particular,Property Description baseImageURI of the base image to be used in building the custom integration server image. See IBM App Connect Enterprise server image for various image URIs projectLists the project folders of the ACE application. applicationNameName of the application to be built. This name will used in the URI of the custom integration server releaseNameName of the integration server licenseLicensing information, which includes the License and the use. See Licensing reference for IBM App Connect Operator for more information service.endpointTypeEither httporhttps. In this section of the tutorial we will usehttpversionVersion of the integration server configurationsThe configurations required for this integration server
Set Environment variables
Throughout this chapter we will make use of two environment variables:
GIT_ORG: an environment variable that identifies your GitHub organization.GIT_ROOT: an environment variable that identifies the root folder for your cloned git repositories.
We will make use of these environment variable to save typing and reduce errors. We have made use of these variable in the chapter, GitOps, Tekton & ArgoCD.
Start a terminal window, we need to keep this terminal and the shell running throughout this chapter.
In the following command, replace <git-organization> with the GitHub organization name you've just chosen (e.g. tutorial-org-123):
export GIT_ORG=<git-organization>
export GIT_ROOT=$HOME/git/$GIT_ORG-root
You can verify your environment variables as follows:
echo $GIT_ORG
echo $GIT_ROOT
Deploy Tekton tasks
There are two custom tasks to deploy:
-
Building BAR,
build-bar -
Build integration server,
build-is.
Let's start deploying them.
-
Change to CI environment directory
cd $GIT_ROOT/multi-tenancy-gitops-apps/ace/environments/ci -
Update kustomization to enable custom tasks
build-barandbuild-isOpen
kustomization.yaml($GIT_ROOT/multi-tenancy-gitops-apps/ace/environments/ci/kustomization.yaml) and uncomment:- tasks/build-bar.yaml - tasks/build-is.yaml -
Commit and push the changes
git add .
git commit -am "Deploy build-bar amd build-is tasks"
git push
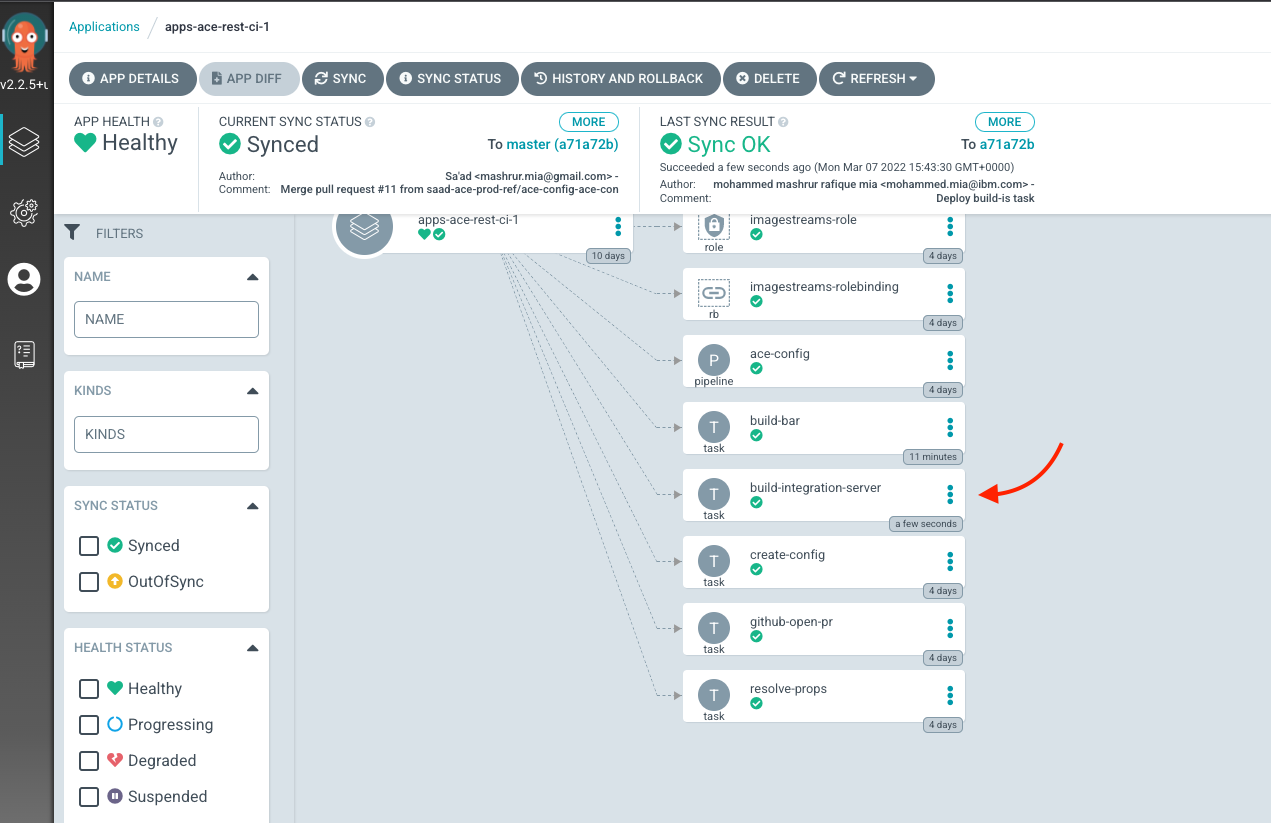
You can verify that ArgoCD deployed the resources using the ArgoCD UI, for apps-ace-rest-ci-1:
Deploy pipeline definition
We are now ready to deploy the integration server pipeline.
-
Change to CI environment directory
cd $GIT_ROOT/multi-tenancy-gitops-apps/ace/environments/ci -
Update kustomization to enable resolve-props tasks
Open
kustomization.yaml($GIT_ROOT/multi-tenancy-gitops-apps/ace/environments/ci/kustomization.yaml) and uncomment:- pipelines/ace-integration-server.yaml -
Commit the and push the change
git add . git commit -m "Deploy ace-integration-server pipeline" git push -
Check the deployment of the pipeline in ArgoCD UI
Under "apps-ace-rest-ci-1" project, you should see that the task has been deployed:
ace-integration-serverpipeline synched by ArgoCD -
Check the deployment of the pipeline in OpenShift UI
You can also verify the deploy on OpenShift UI. From Pipelines > Pipelines, make sure Project
ciis selected from the drop down menu:
ace-integration-serverpipeline in OpenShift UI
Set up SealedSecret
Our integration server pipeline would needs to access Git repositories for source of the ACE application files and the templates for the IntegrationServers objects. In this tutorial we will assume that our configuration repository is a private repository. As noted in this blog, Private Git Repositories, the preferred mechanism for accessing a private Git repository is to create a unique repository SSH key. In this section we will set up this mechanism.
Create SSH key pairs
We will will need two pairs for SSH keys, one for the ACE source repository, one for the infrastructure repository and one for our multi-tenancy-gitops-apps repository. The keys for the infrastructure repository and multi-tenancy-gitops-apps repository should already be created as part of completion of the Build Configuration section. See Create SSH key pairs.
In this sub-section, we will create the key pair for ACE source repository.
-
Change to a directory outside the git repositories
We will generate a pair of SSH keys (public and private) but we do not want to store these in a git repository. In this tutorial, we will assume to create and store the SSH keys in
$HOME/keysdirectory.Create the directory and change to it:
mkdir -p $HOME/keys cd $HOME/keys -
Create ssh key pairs
Using
ssh-keygen, we can create ssh key pair for the configuration repository:ssh-keygen -C "gitops-pipeline/create-customer@github.com/ace-prod-ref" -f create-customer-at-ace-prod-ref-github -N ''Filenames for the keys will start with
create-customer-at-ace-prod-ref-githuband we are not setting a passphrase.If you list the files that are created in the current directory, you should see:
tree .. ├── ace-config-at-ace-prod-ref-github ├── ace-config-at-ace-prod-ref-github.pub ├── ace-infra-at-ace-prod-ref-github ├── ace-infra-at-ace-prod-ref-github.pub ├── create-customer-at-ace-prod-ref-github ├── create-customer-at-ace-prod-ref-github.pub ├── multi-tenancy-gitops-apps-at-ace-prod-ref-github └── multi-tenancy-gitops-apps-at-ace-prod-ref-github.pub 0 directories, 8 filesThe file
create-customer-at-ace-prod-ref-githubandcreate-customer-at-ace-prod-ref-github.pubare created in this step. The others were created in the Build Configuration section.
Upload the public ssh-key
-
Upload the public ssh-key to the ACE source Git repository
The public keys of our pairs need to be uploaded to our Git repositories, as Deploy keys.
Visit your repository, go to Settings, and then to choose Deploy keys on the left hand side menu. For example, for
create-customerrepository: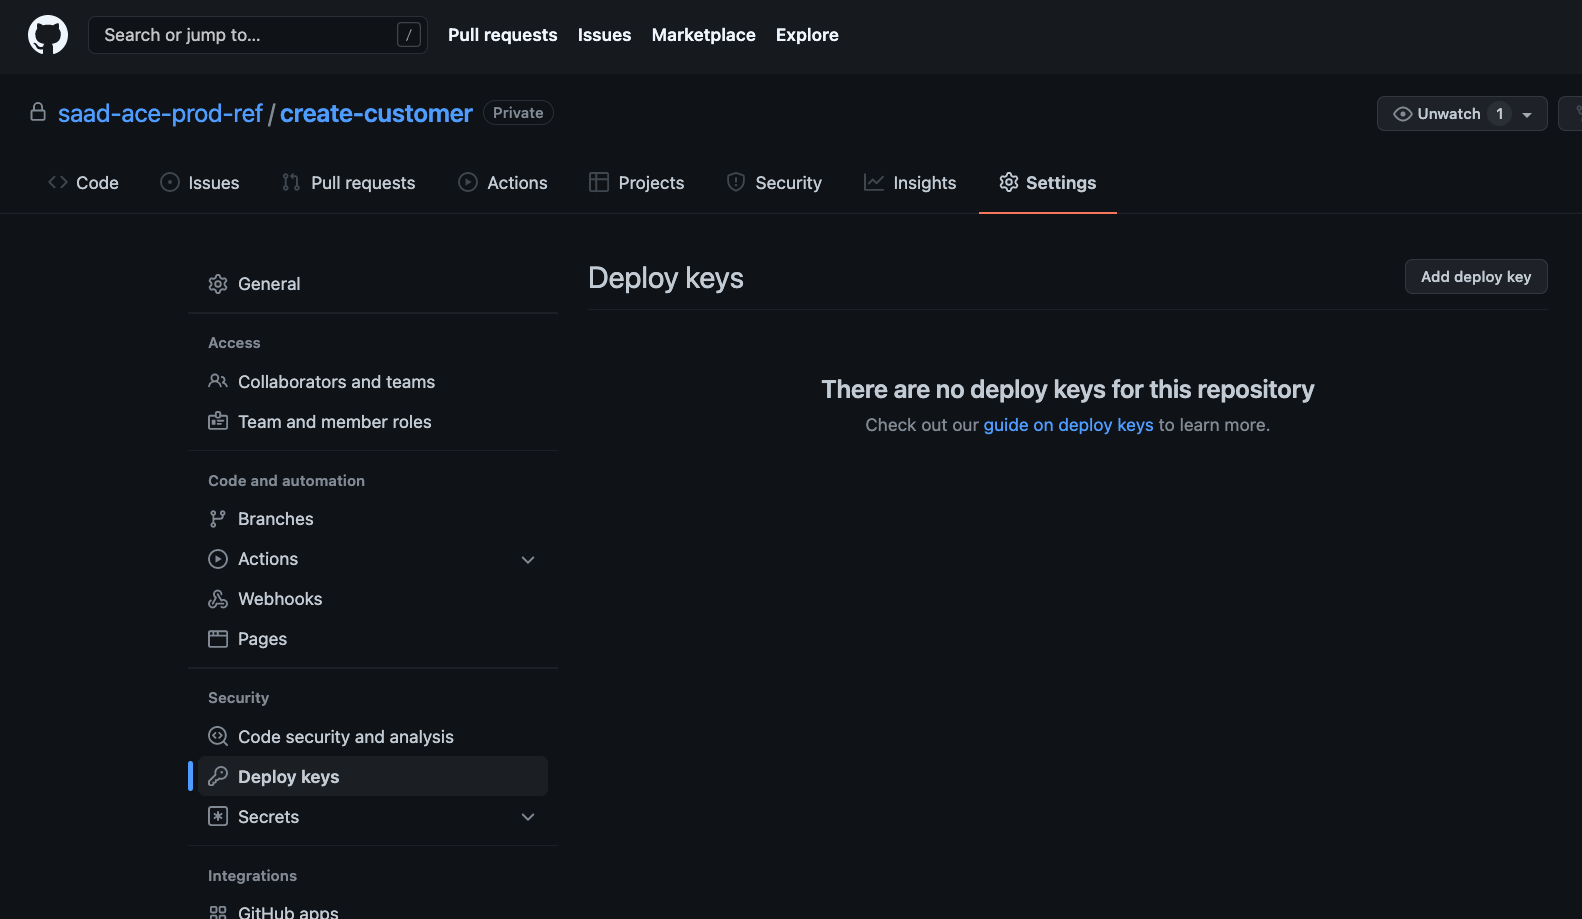
Deploy Key Settings Click on Add deploy key button, give a title (say "gitops-pipeline") and copy the content of public key (for example,
create-customer-at-ace-prod-ref-github.pubfor ace-config repository).Use
pbcopyin MacOSIf you are using MacOS, you can use
pbcopyCLI to copy the public key on your clipboard:cat ~/keys/create-customer-at-ace-prod-ref-github.pub | pbcopy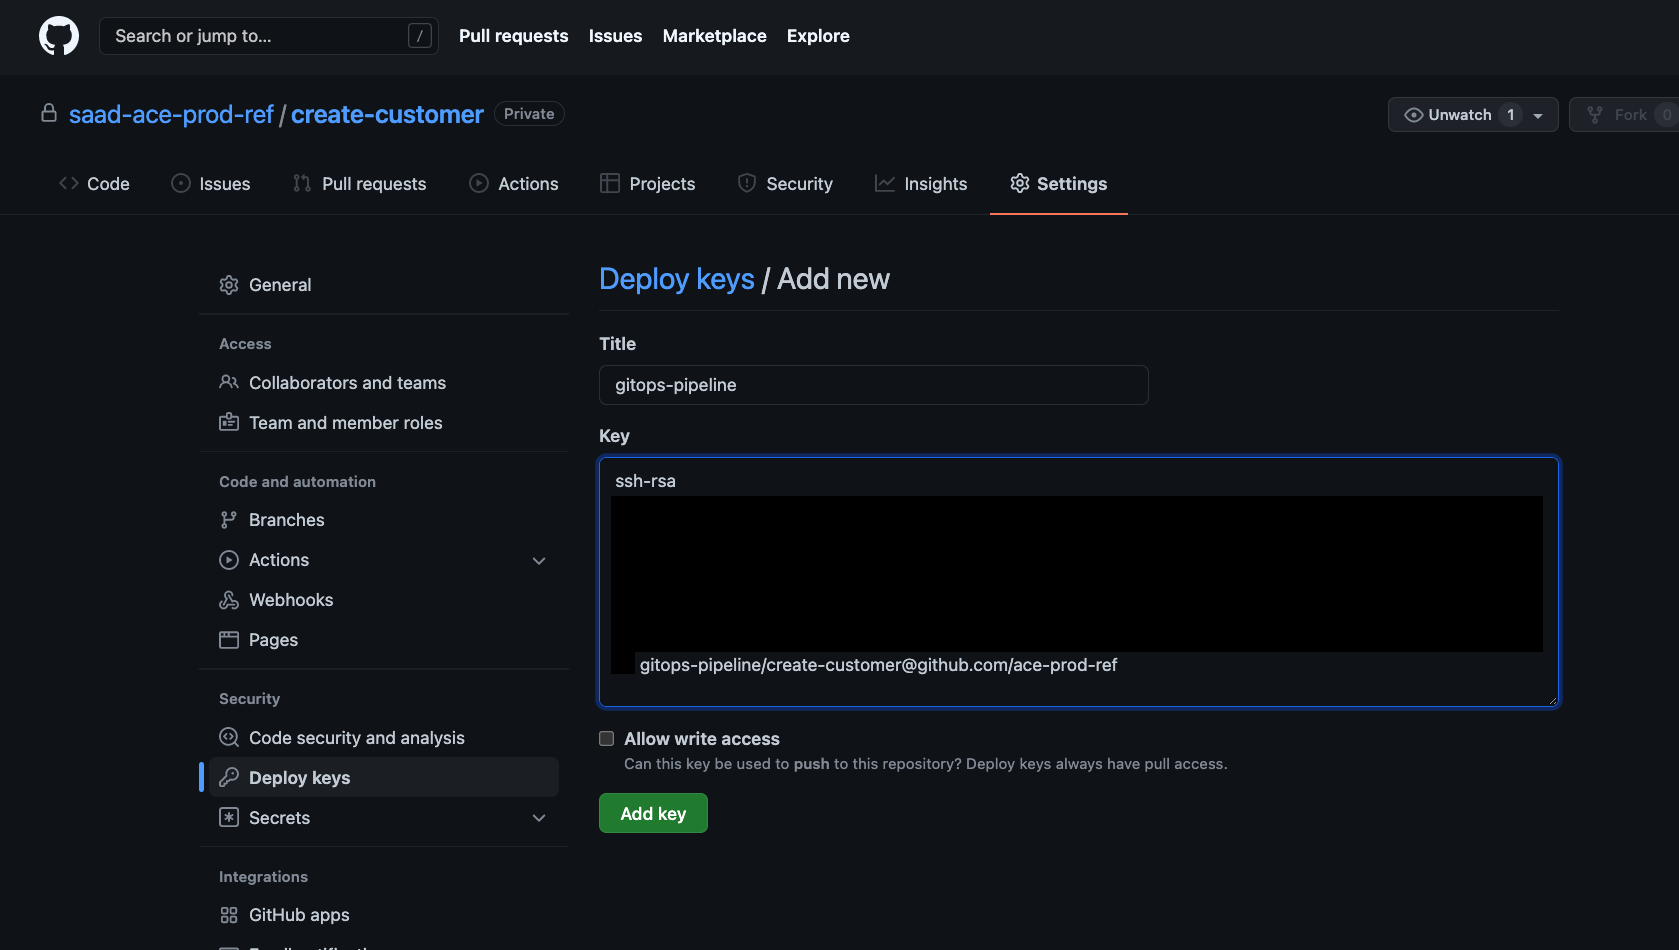
Deploy Key for ACE Source Repository Click on Add key button to the add the deploy key.
Create sealed secrets
The private part of the SSH key need to be used by our pipeline to authenticate itself when cloning the repository. Moreover, the personal access token of the machine user will also be used the pipeline.
The keys and the token can be accessed via a kubernetes secret object. The secret object can be created by GitOps operator, but instead of storing the SSH key in a Secret manifest yaml, we will store it as SealedSecret.
A Secret manifest encodes it's data, but does not encrypts it. Therefore it is not a good idea to store a plain Secret manifest yaml in a git repository. Instead, we will use SealedSecret manifest, which encrypts a Secret manifest and generates a encrypted version of its data content. We can store this encrypted SealedSecret manifest in a Git repository. Once GitOps operator reconciles this object on to the cluster, SealedSecret operator will decrypt it and store it as a secret in the namespace. Only SealedSecret operator decrypt the SealedSecret manifest.
-
Change to GitOps apps repository
cd $GIT_ROOT/multi-tenancy-gitops-appsThis repository maintains application manifests. The private key of our SSH key-pair is an application specific artifact, and therefore it is to be maintained in the application repository.
Change to the directory where sealed secrets are stored
cd ace/environments/ci/secrets -
Run the
gitops-repo-pk-secret.shscript to generateSealedSecrets for SSH deploy keysgitops-repo-pk-secret.shscript make use of three environment variables-
GITOPS_PK_SECRET_NAME: Name of the secret. The name is also used in creating theSealedSecretmanifest yaml file -
GIT_BASEURL: Base URL of the git repository. This is needed for the tekton specific annotation on theSecretobject. It is also needed to generate the host keys. -
SSH_PRIVATE_KEY_PATH: full path to the private key.
Assuming our private key is kept in
$HOME/keysdirectory, then to generate theSealedSecretmanifest, we can execute the script as follows for private key ofcreate-customerdeploy key:GITOPS_PK_SECRET_NAME=create-customer-at-github \ GIT_BASEURL=github.com \ SSH_PRIVATE_KEY_PATH=$HOME/keys/create-customer-at-ace-prod-ref-github \ ./gitops-repo-pk-secret.shA new file, named
git-ssh-pk-create-customer-at-github.yamlwill be created on theace/environments/ci/secretsdirectory.Conventions over configurations
Like the previous section, this guide will follow certain naming convention. For example, the private key for our ACE source GitHub repository,
create-customerwill be stored in a secret namedcreate-customer-at-github. In the later sub-sections, we have scripts that make use of this naming convention. You are free to use any naming conventions, but if you do verify the content of the script before running them.SealedSecretCR for private key oface-infraandmulti-tenancy-gitops-appsshould have already been installed as part of the completion of Build Configuration section. See Create sealed secrets -
-
Check git status
If you check git status with
you should be able to confirm that:git statusOn branch up-to-configuration Your branch is up to date with 'origin/master'. Untracked files: (use "git add <file>..." to include in what will be committed) gitops-repo-pk-secret-create-customer-at-github.yaml nothing added to commit but untracked files present (use "git add" to track) -
Commit the
SealedSecretmanifest to application repositorygit add gitops-repo-pk-secret-create-customer-at-github.yaml git commit -m 'Add SealedSecret for create-customer private key' -
Add the
SealedSecrets onapps-ace-rest-ci-1ArgoCD applicationCI/CD related manifests are configure by
apps-ace-rest-ci-1ArgoCD application, which is configured byace/environments/ci/kustomization.yaml. To add theSealedSecreton the cluster, add the following item underresourcesfield:- secrets/gitops-repo-pk-secret-create-customer-at-github.yamlCommit and push the change
git add .
git commit -m 'Enable sealed secrets for create-customer access'
git push
SealedSecrets for GitHub access token
SealedSecret CR for personal access token of the machine user should have already been installed as part of the completion of Build Configuration section. See Create sealed secrets
Verify the Secret
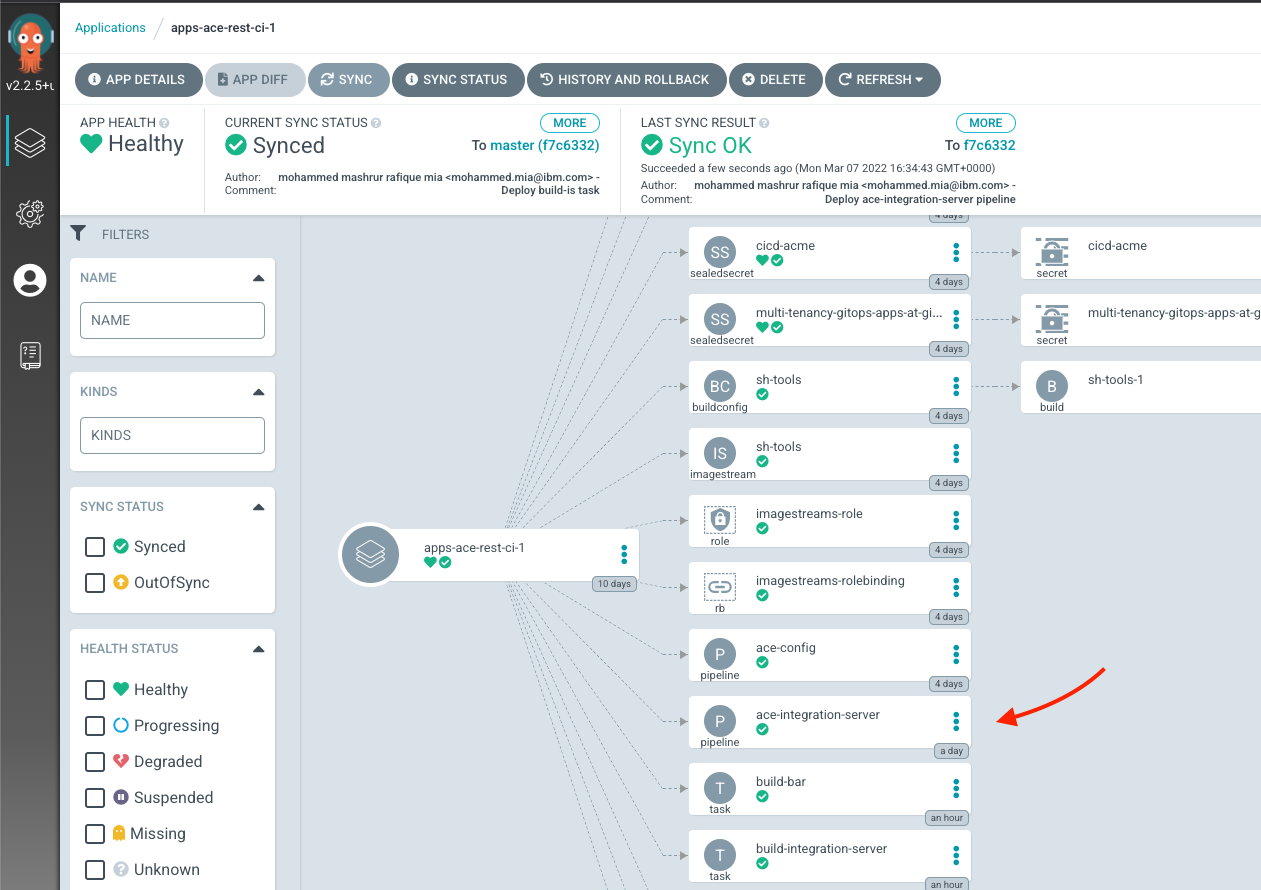
Open up apps-ace-rest-ci-1 on ArgoCD UI:
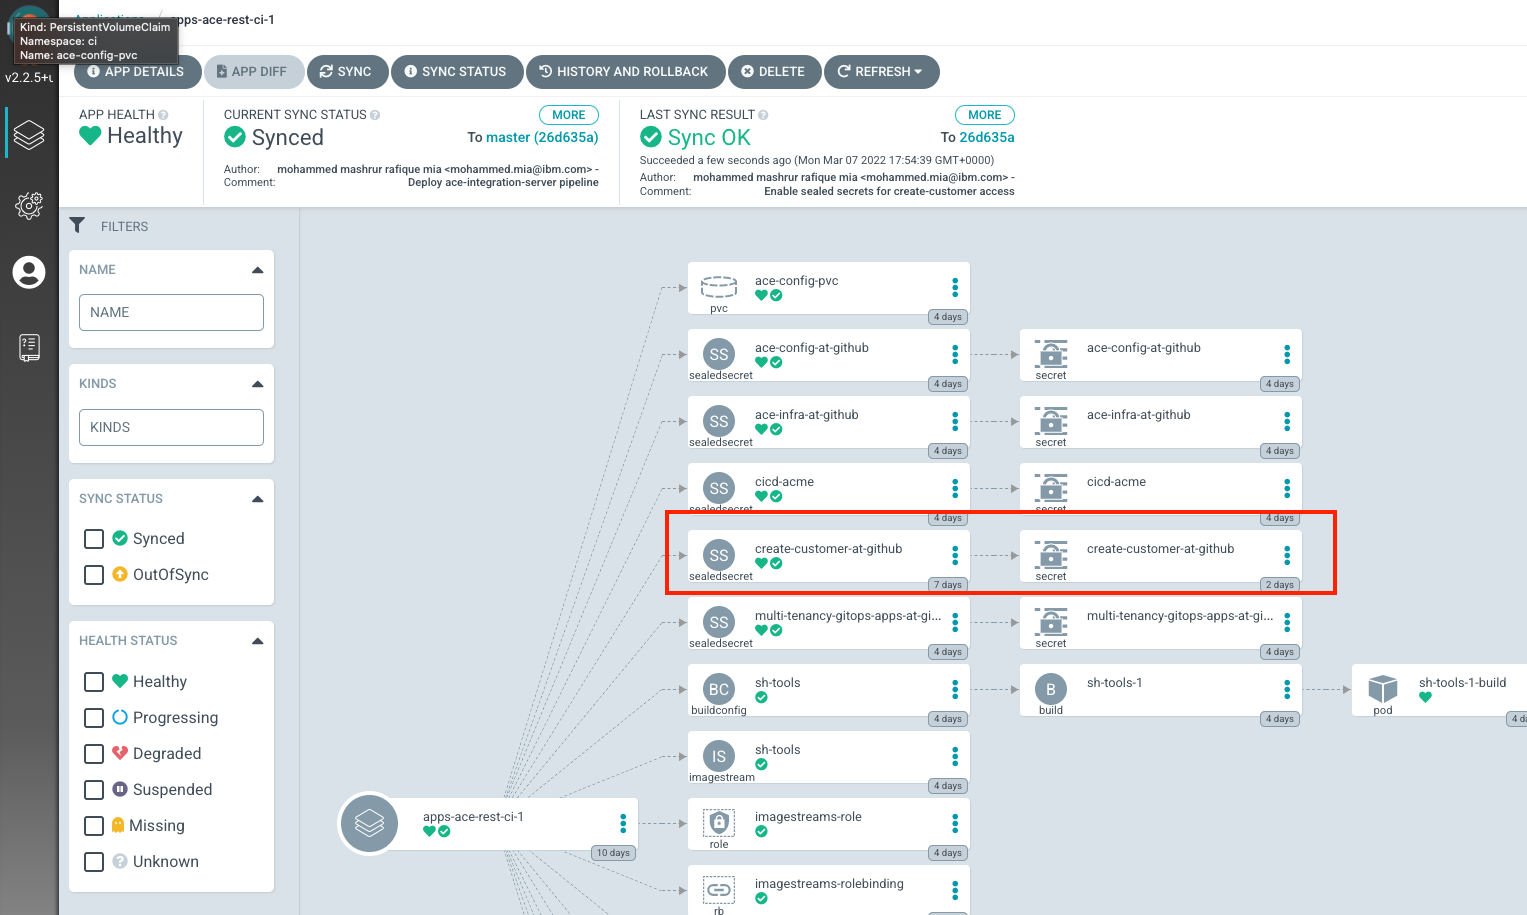
As you can see, we have a new SealedSecret deployed. The SealedSecret operator then decrypted them and created kubernetes Secret object (which are owned by the corresponding SealedSecret objects).
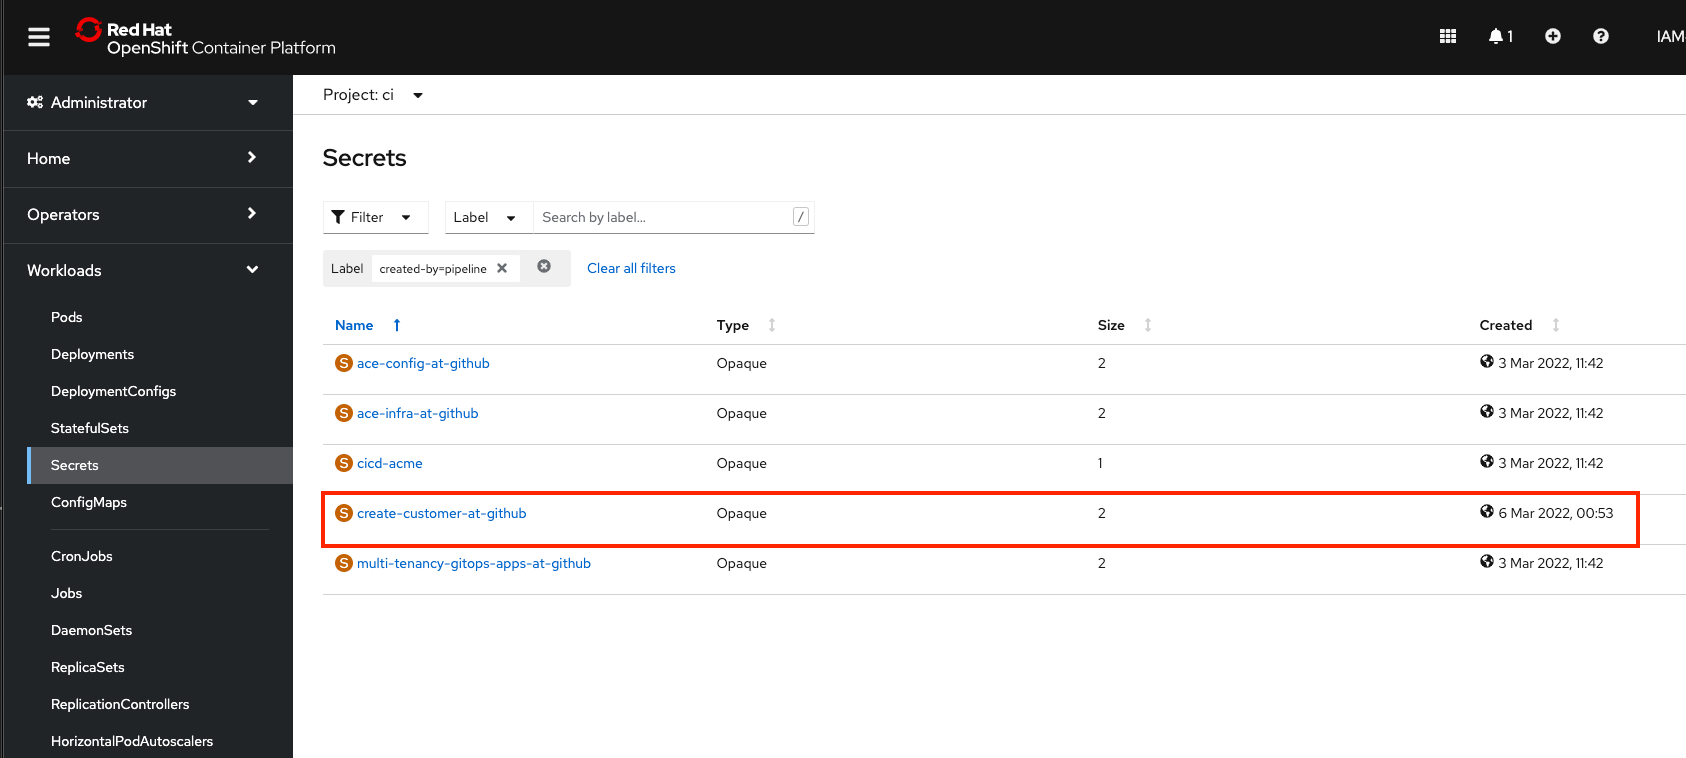
You can also verify that the secret is created from the OCP UI. Go to Workloads > Secrets, make sure ci project is selected. Select Label to filter the secrets and put in created-by=pipeline is the Search box:
Create PVC
-
Change to CI environment directory
cd $GIT_ROOT/multi-tenancy-gitops-apps/ace/environments/ci -
Update kustomization to enable ace-config pvc
Open
kustomization.yaml($GIT_ROOT/multi-tenancy-gitops-apps/ace/environments/ci/kustomization.yaml) and uncomment:- pvc/ace-integration-server.yaml -
Commit the and push the change
git add . git commit -m "Deploy ace-integration-server pvc" git push -
Check the deployment of the task in ArgoCD UI
Under "apps-ace-rest-ci-1" project, you should see that the task has been deployed:
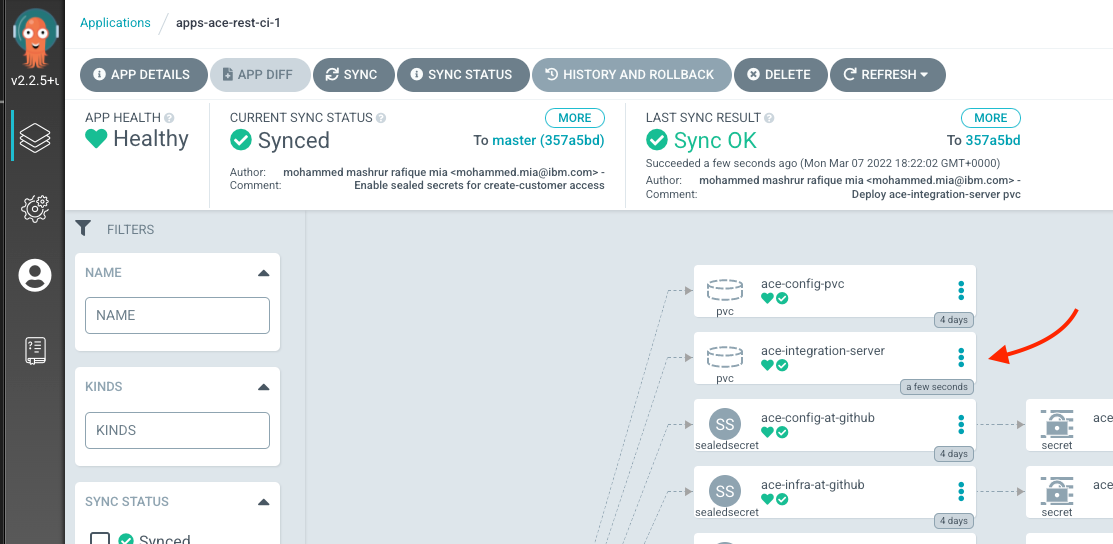
ace-integration-serverPVC synched by ArgoCD -
Check the deployment of the PVC in OpenShift UI
You can also verify the deploy on OpenShift UI. From Storage > PersistentVolumeClaims, make sure Project
ciis selected from the drop down menu: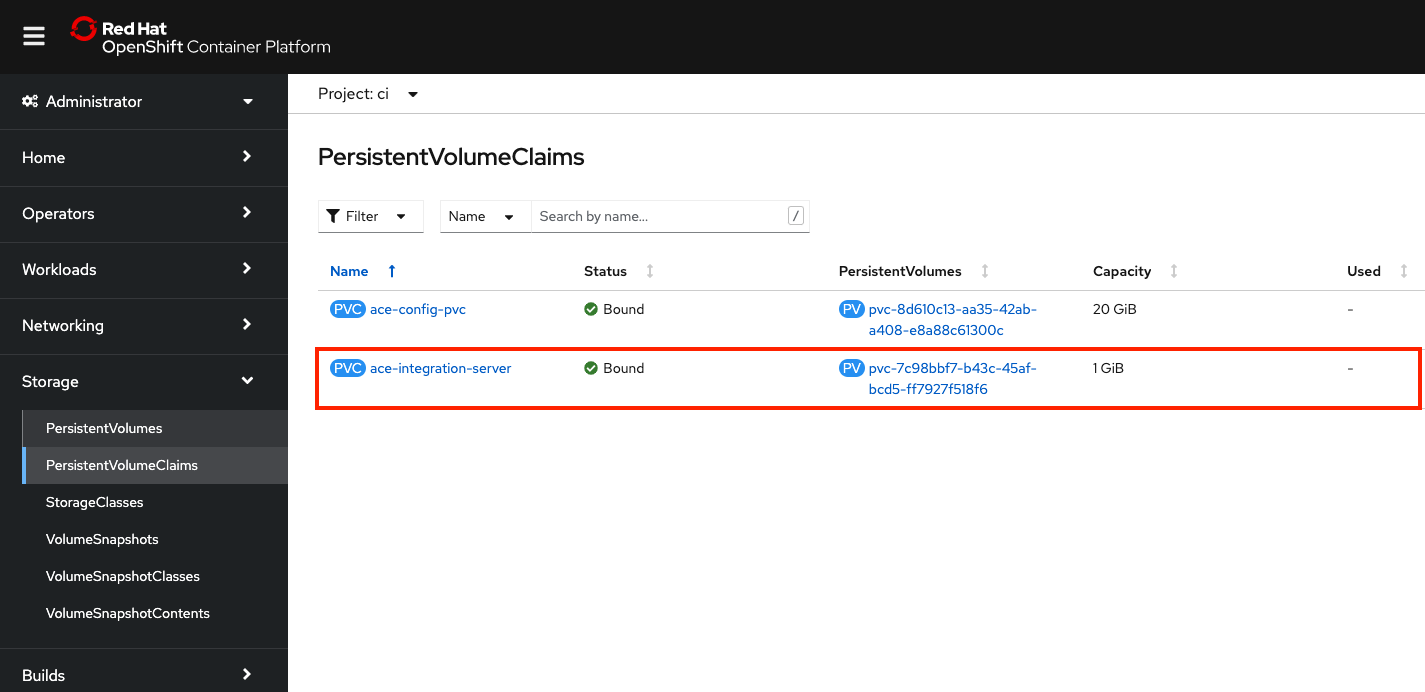
ace-integration-serverPVC in OpenShift UIwait until the PVC bound.
Deploy ibm-entitlement-key
We will make use of ACE server container image which is located in the IBM Cloud Container Registry. You will need an IBM entitlement key to access this registry. We will create a sealedsecret for the entitlement key secret.
-
Object the key*
Follow the instruction to copy the entitlement key from Access your container software.
-
Change to secret environment directory
cd $GIT_ROOT/multi-tenancy-gitops-apps/ace/environments/ci/secrets -
Run the script,
ibm-entitled-key-secret.shIBM_ENTITLEMENT_KEY="<PUT YOUR KEY HERE>" ./ibm-entitlement-key-secret.shreplacing the
<PUT YOUR KEY HERE>with the value of your key.this will create a file,
ibm-entitlement-key-secret.yaml, which you can verify bygit statuswhich should display the following:
On branch up-to-configuration Your branch is up to date with 'origin/master'. Changes not staged for commit: (use "git add <file>..." to update what will be committed) (use "git restore <file>..." to discard changes in working directory) modified: ibm-entitlement-key-secret.yaml no changes added to commit (use "git add" and/or "git commit -a") -
Add and commit the sealed secret
git add ibm-entitlement-key-secret.yaml git commit -m "Add IBM entitlement key" -
Update kustomization to enable IBM entitlement key
Open
kustomization.yaml($GIT_ROOT/multi-tenancy-gitops-apps/ace/environments/ci/kustomization.yaml) and add:- secrets/ibm-entitlement-key-secret.yaml -
Commit and push the change
git add . git commit -m "Deploy IBM entitlment key" git push -
Verify that the key is deployed
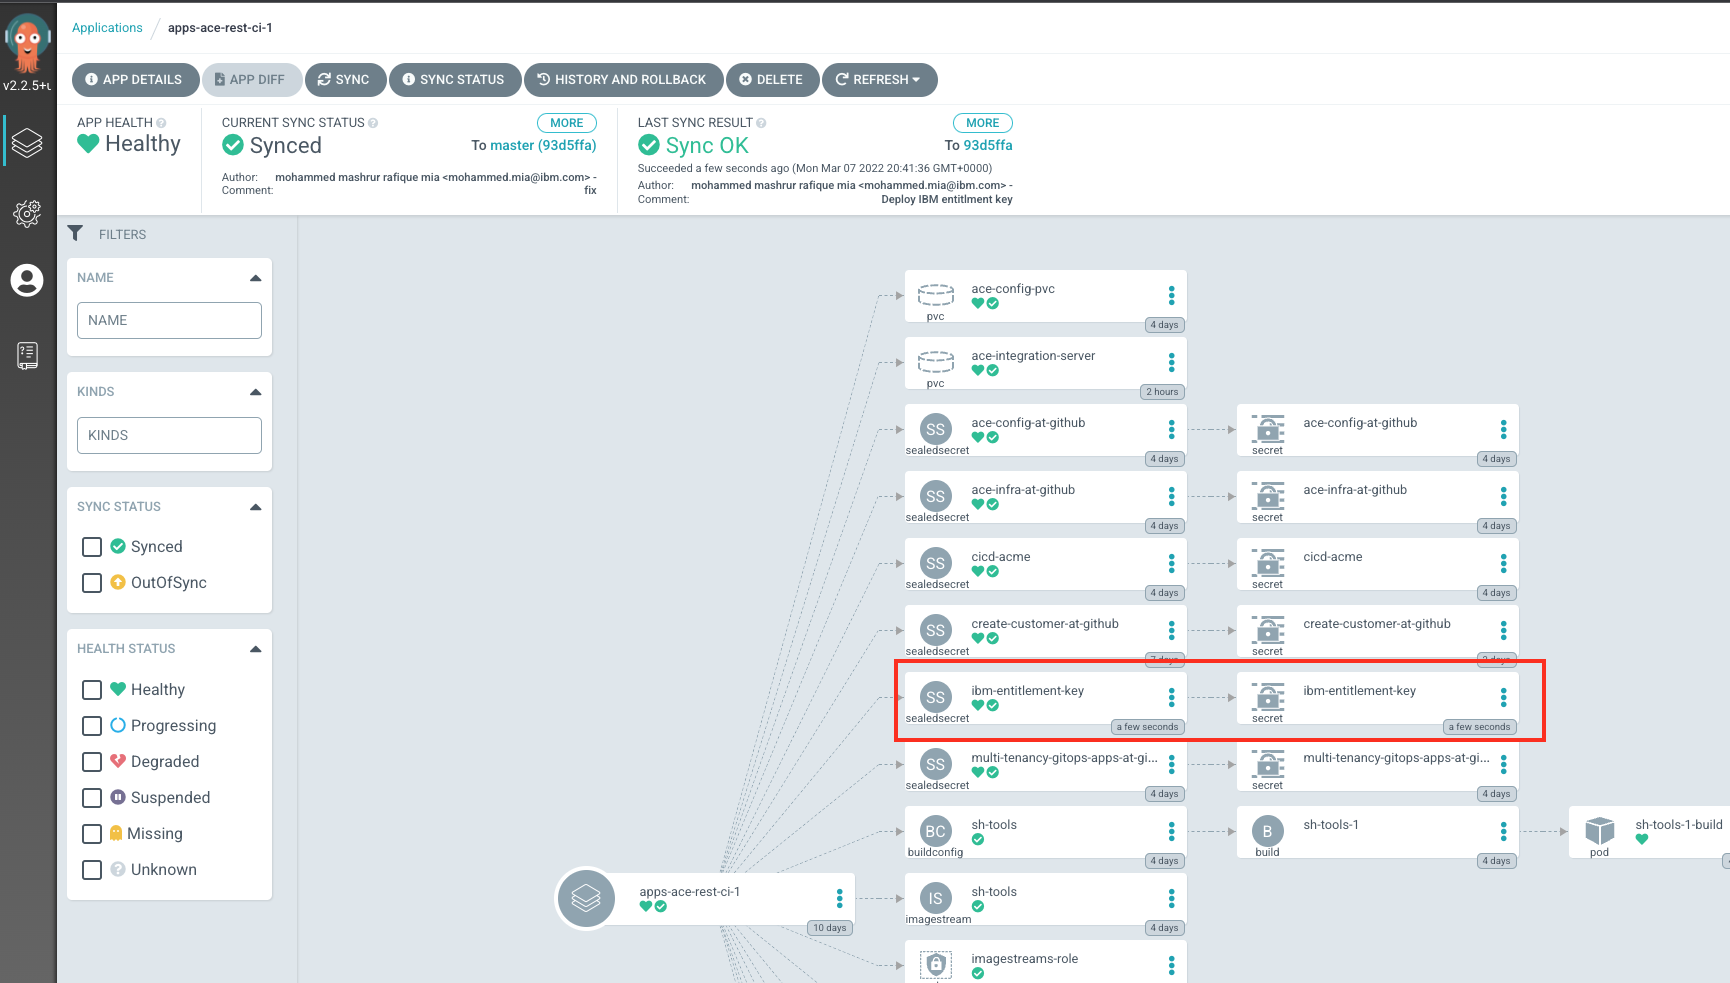
ibm-entitlement-keyon ArgoCD UI
Add key to service account
Our pipeline by defaults run under pipeline service account. In order for our pipeline task, build-is-image to access the ACE server container image from IBM Cloud Container Registry, the ibm-entitlement-key secret needed to added in the service account.
-
Edit the
pipelineservice accountoc edit sa pipeline -n ci -
Add
ibm-entitlement-keyas a new secretScroll to the bottom, where you would see something like
secrets:
- name: pipeline-token-XXXXX
- name: pipeline-dockercfg-XXXXX
add the
ibm-entitlement-keysecretsecrets: - name: pipeline-token-XXXXX - name: pipeline-dockercfg-XXXXX - name: ibm-entitlement-keysave and exit the editor.
-
Verify that the secret has been added
Run
oc get sa pipeline -n ci -o jsonpath='{.secrets[*].name}{"\n"}'and you should see
pipeline-token-XXXXX pipeline-dockercfg-XXXXX ibm-entitlement-key
Deploy ACE Dashboard
Although not strictly necessary, the dashboard is a nice UI to verify your Integration Server deployment and view the metadata.
The Dashboard requires to pull down images from IBM Cloud Container Registry. Therefore, we will also need to deploy ibm-entitlement-key secret.
Deploy ibm-entitlement-key on the dev namespace
-
Change to base secrets directory
cd $GIT_ROOT/multi-tenancy-gitops-apps/ace/environments/base/secrets -
Run the script,
ibm-entitled-key-secret.shIBM_ENTITLEMENT_KEY="<PUT YOUR KEY HERE>" ./ibm-entitlement-key-secret.shreplacing the
<PUT YOUR KEY HERE>with the value of your key.this will create a file,
ibm-entitlement-key-secret.yaml, which you can verify bygit statuswhich should display the following:
On branch up-to-configuration Your branch is up to date with 'origin/master'. Changes not staged for commit: (use "git add <file>..." to update what will be committed) (use "git restore <file>..." to discard changes in working directory) modified: ibm-entitlement-key-secret.yaml no changes added to commit (use "git add" and/or "git commit -a") -
Add and commit the sealed secret
git add ibm-entitlement-key-secret.yaml git commit -m "Add IBM entitlement key" -
Update kustomization to add IBM entitlement key
Open
kustomization.yaml($GIT_ROOT/multi-tenancy-gitops-apps/ace/environments/base/kustomization.yaml) and add:- secrets/ibm-entitlement-key-secret.yaml -
Commit and push the change
git add . git commit -m "Deploy IBM entitlment key" git push -
Verify that the key is deployed
On the ArgoCD application,
apps-ace-rest-dev-1, you should now see the secret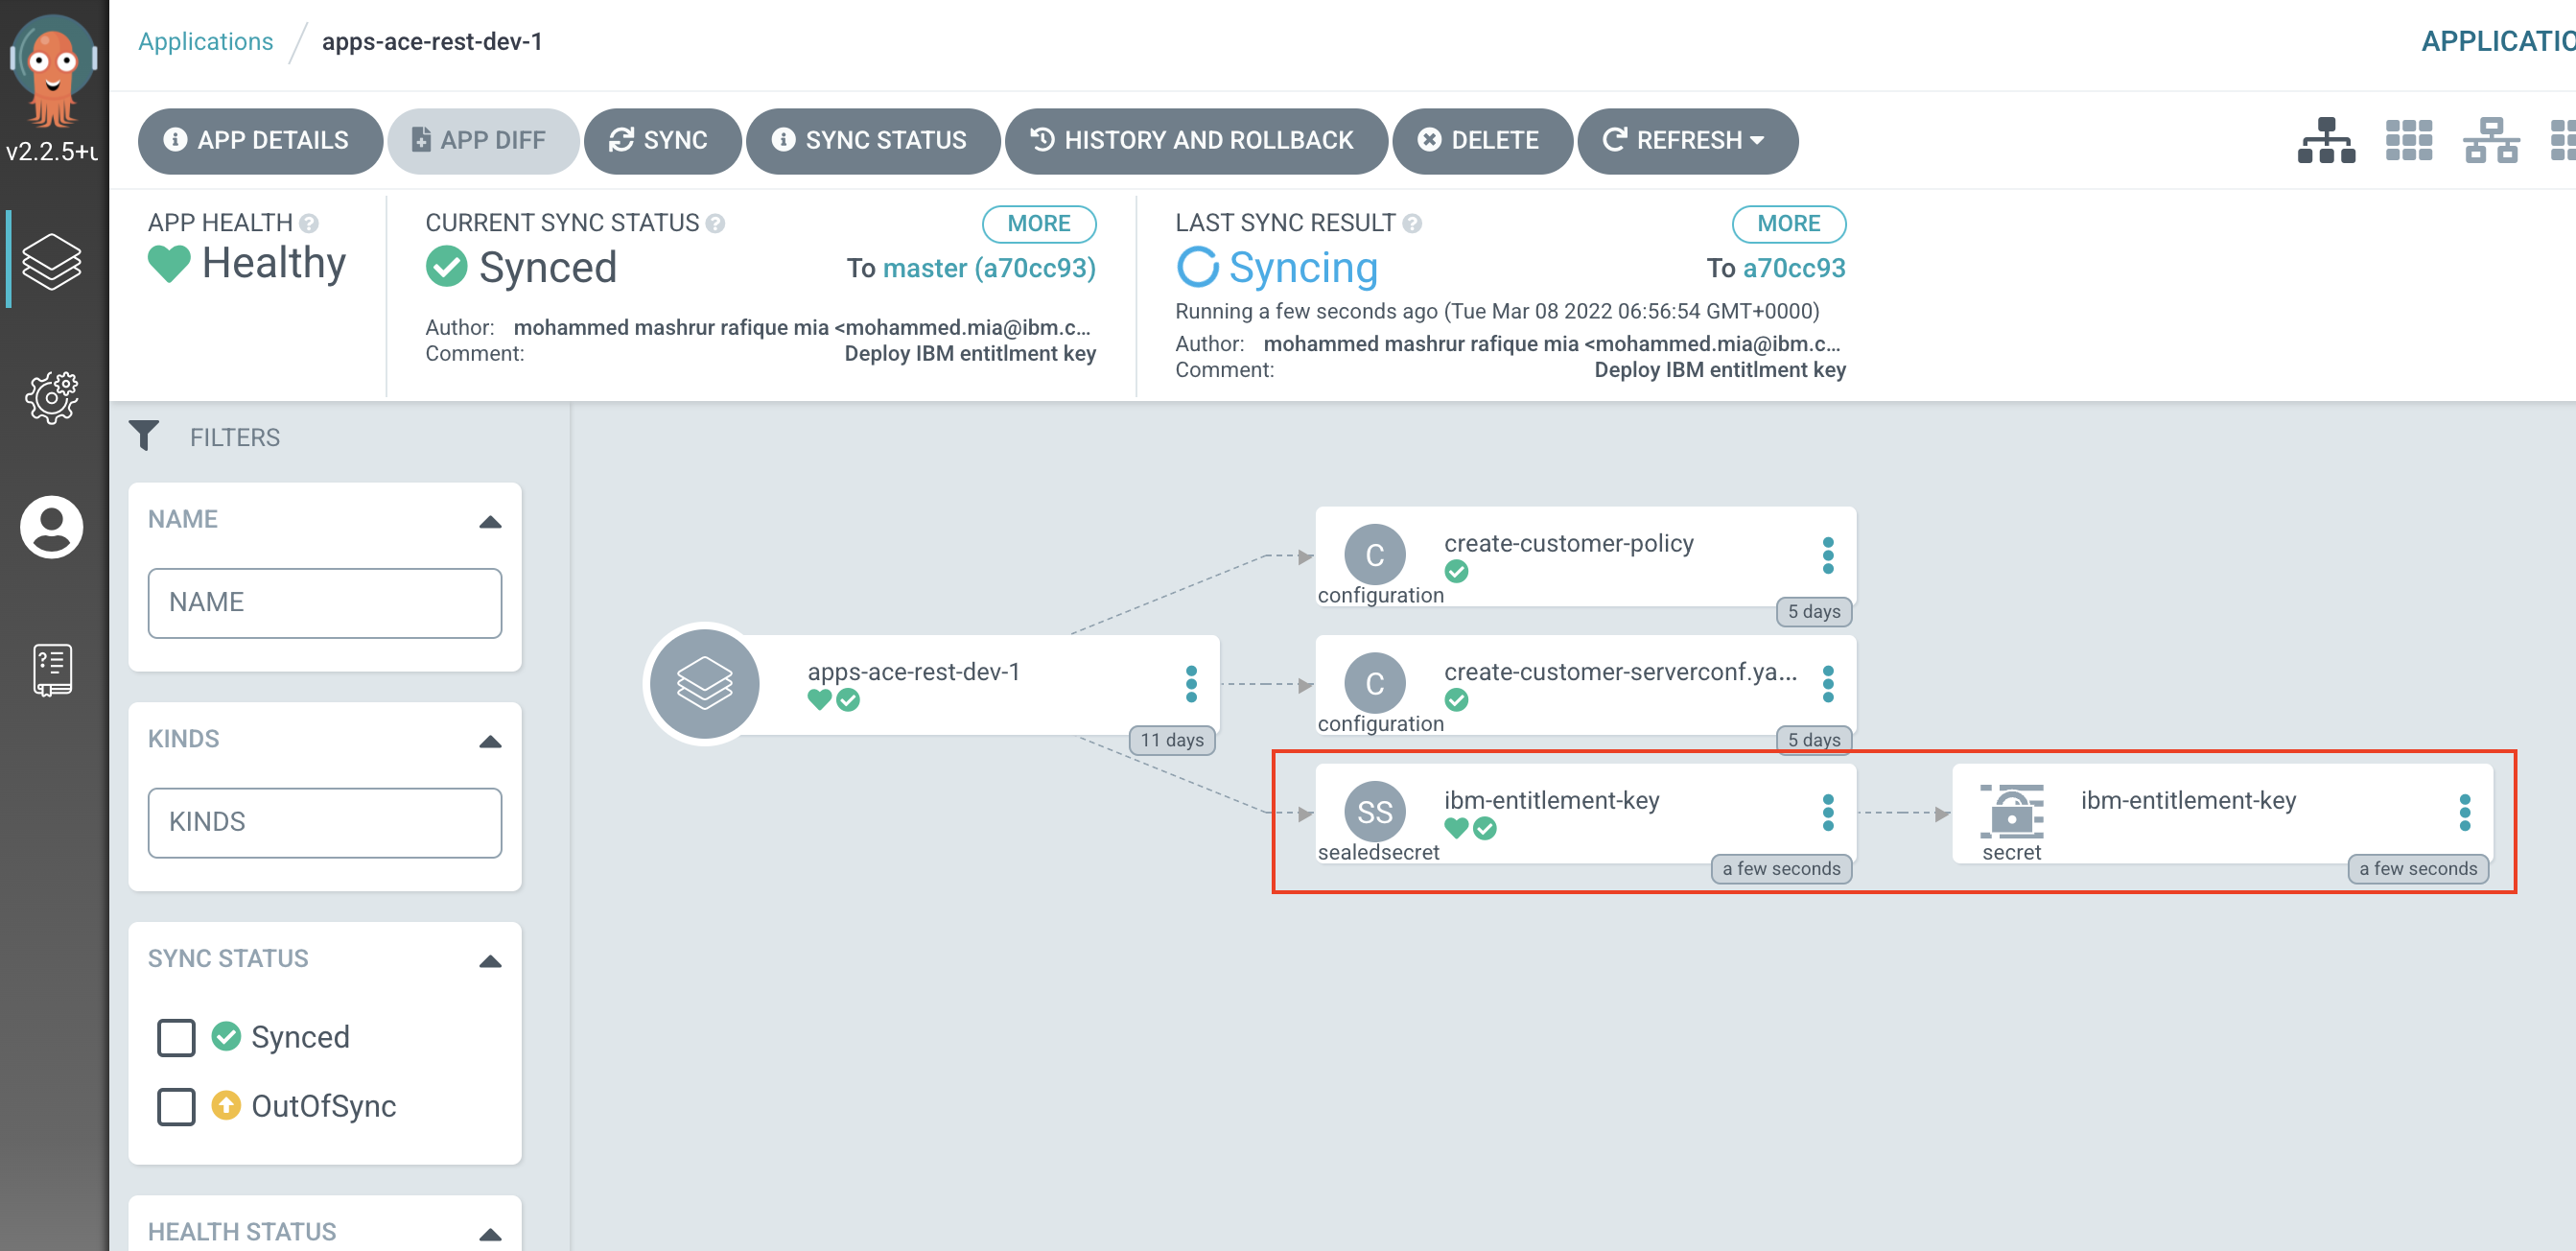
ibm-entitlement-keyon ArgoCD UI
Deploy Dashboard
-
Change to base environment directory
cd $GIT_ROOT/multi-tenancy-gitops-apps/ace/environments/base -
Update kustomization to add ACE dashboard
Open
kustomization.yaml($GIT_ROOT/multi-tenancy-gitops-apps/ace/environments/base/kustomization.yaml) and add:- dashboard/ace-dashboard.yaml -
Commit and push the change
git add . git commit -m "Deploy ACE Dashboard" git push -
Verify that the Dashboard is deployed
On
apps-ace-rest-dev-1argo application application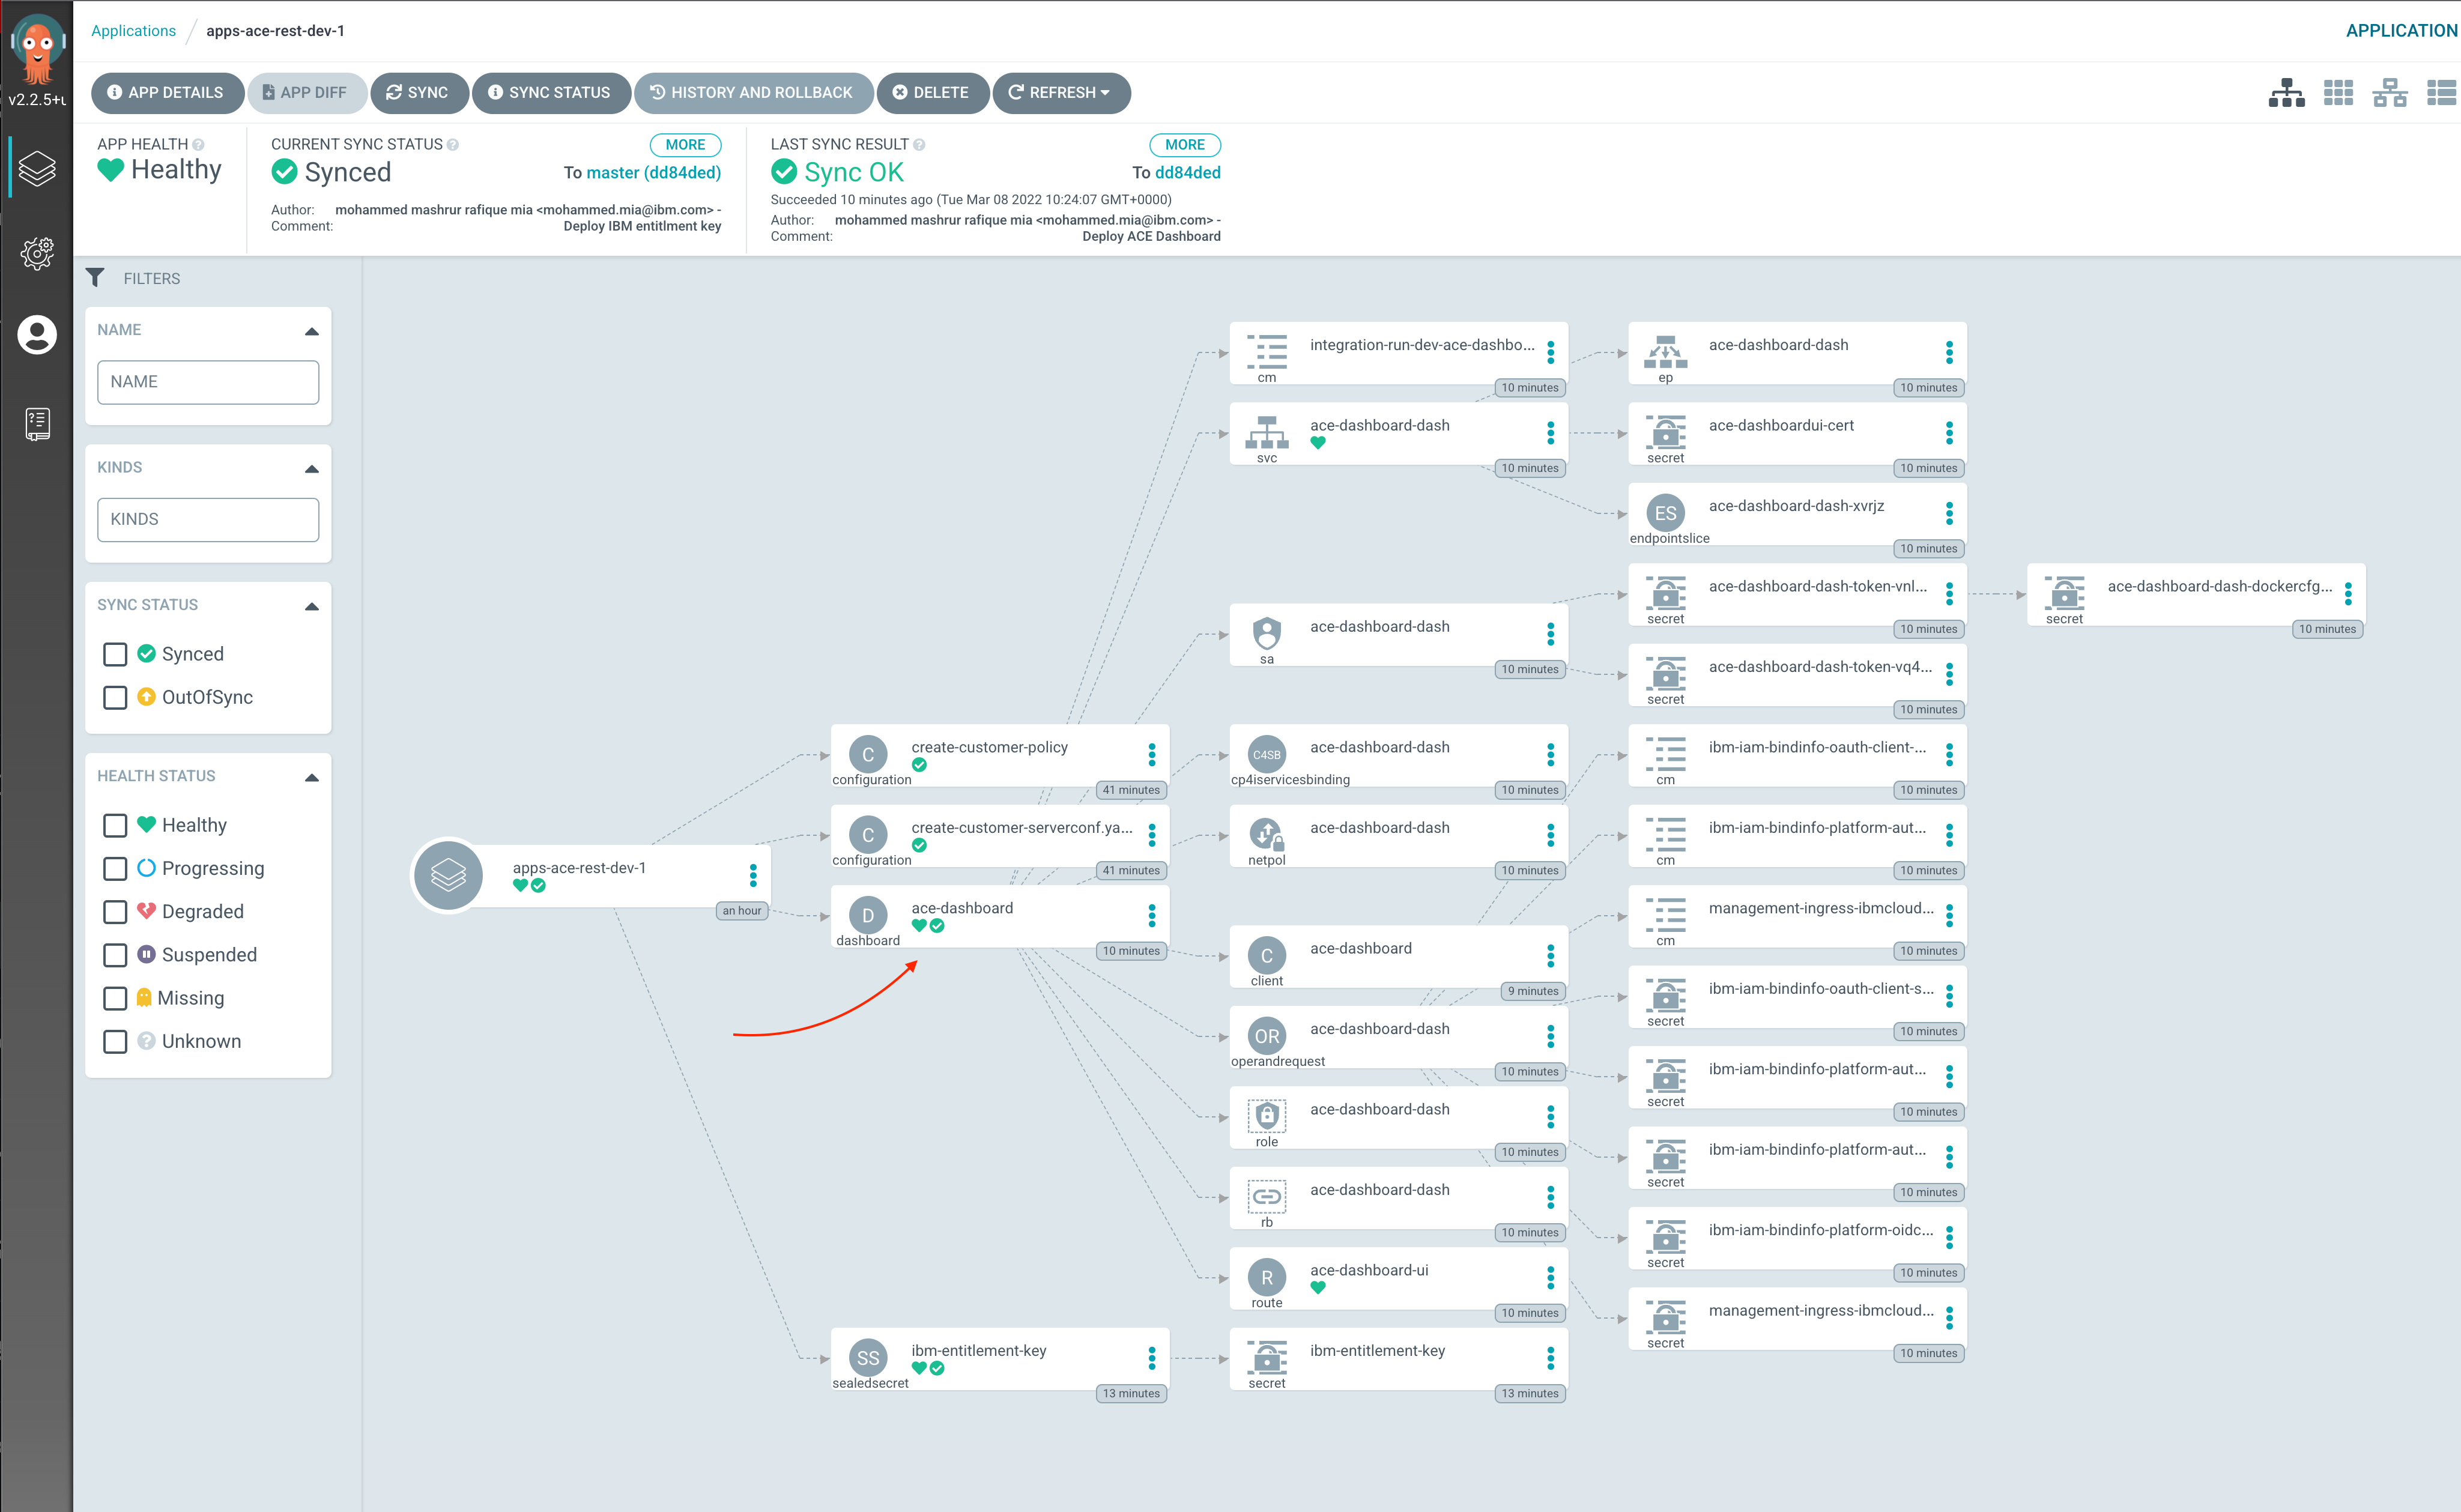
ACE Dashboard on ArgoCD UI The URL for the dashboard can be found on the deployed Dashboard CR:
oc get dashboard ace-dashboard -n dev -o jsonpath='{.status.endpoints[0].uri}{"\n"}'It uses the same username/password as that of the Platform Navigator. The user name is
adminand you can extract the password with:oc extract secret/ibm-iam-bindinfo-platform-auth-idp-credentials --keys=admin_password -n ibm-common-services --to=-Once you log in, you can see the Dashboard:
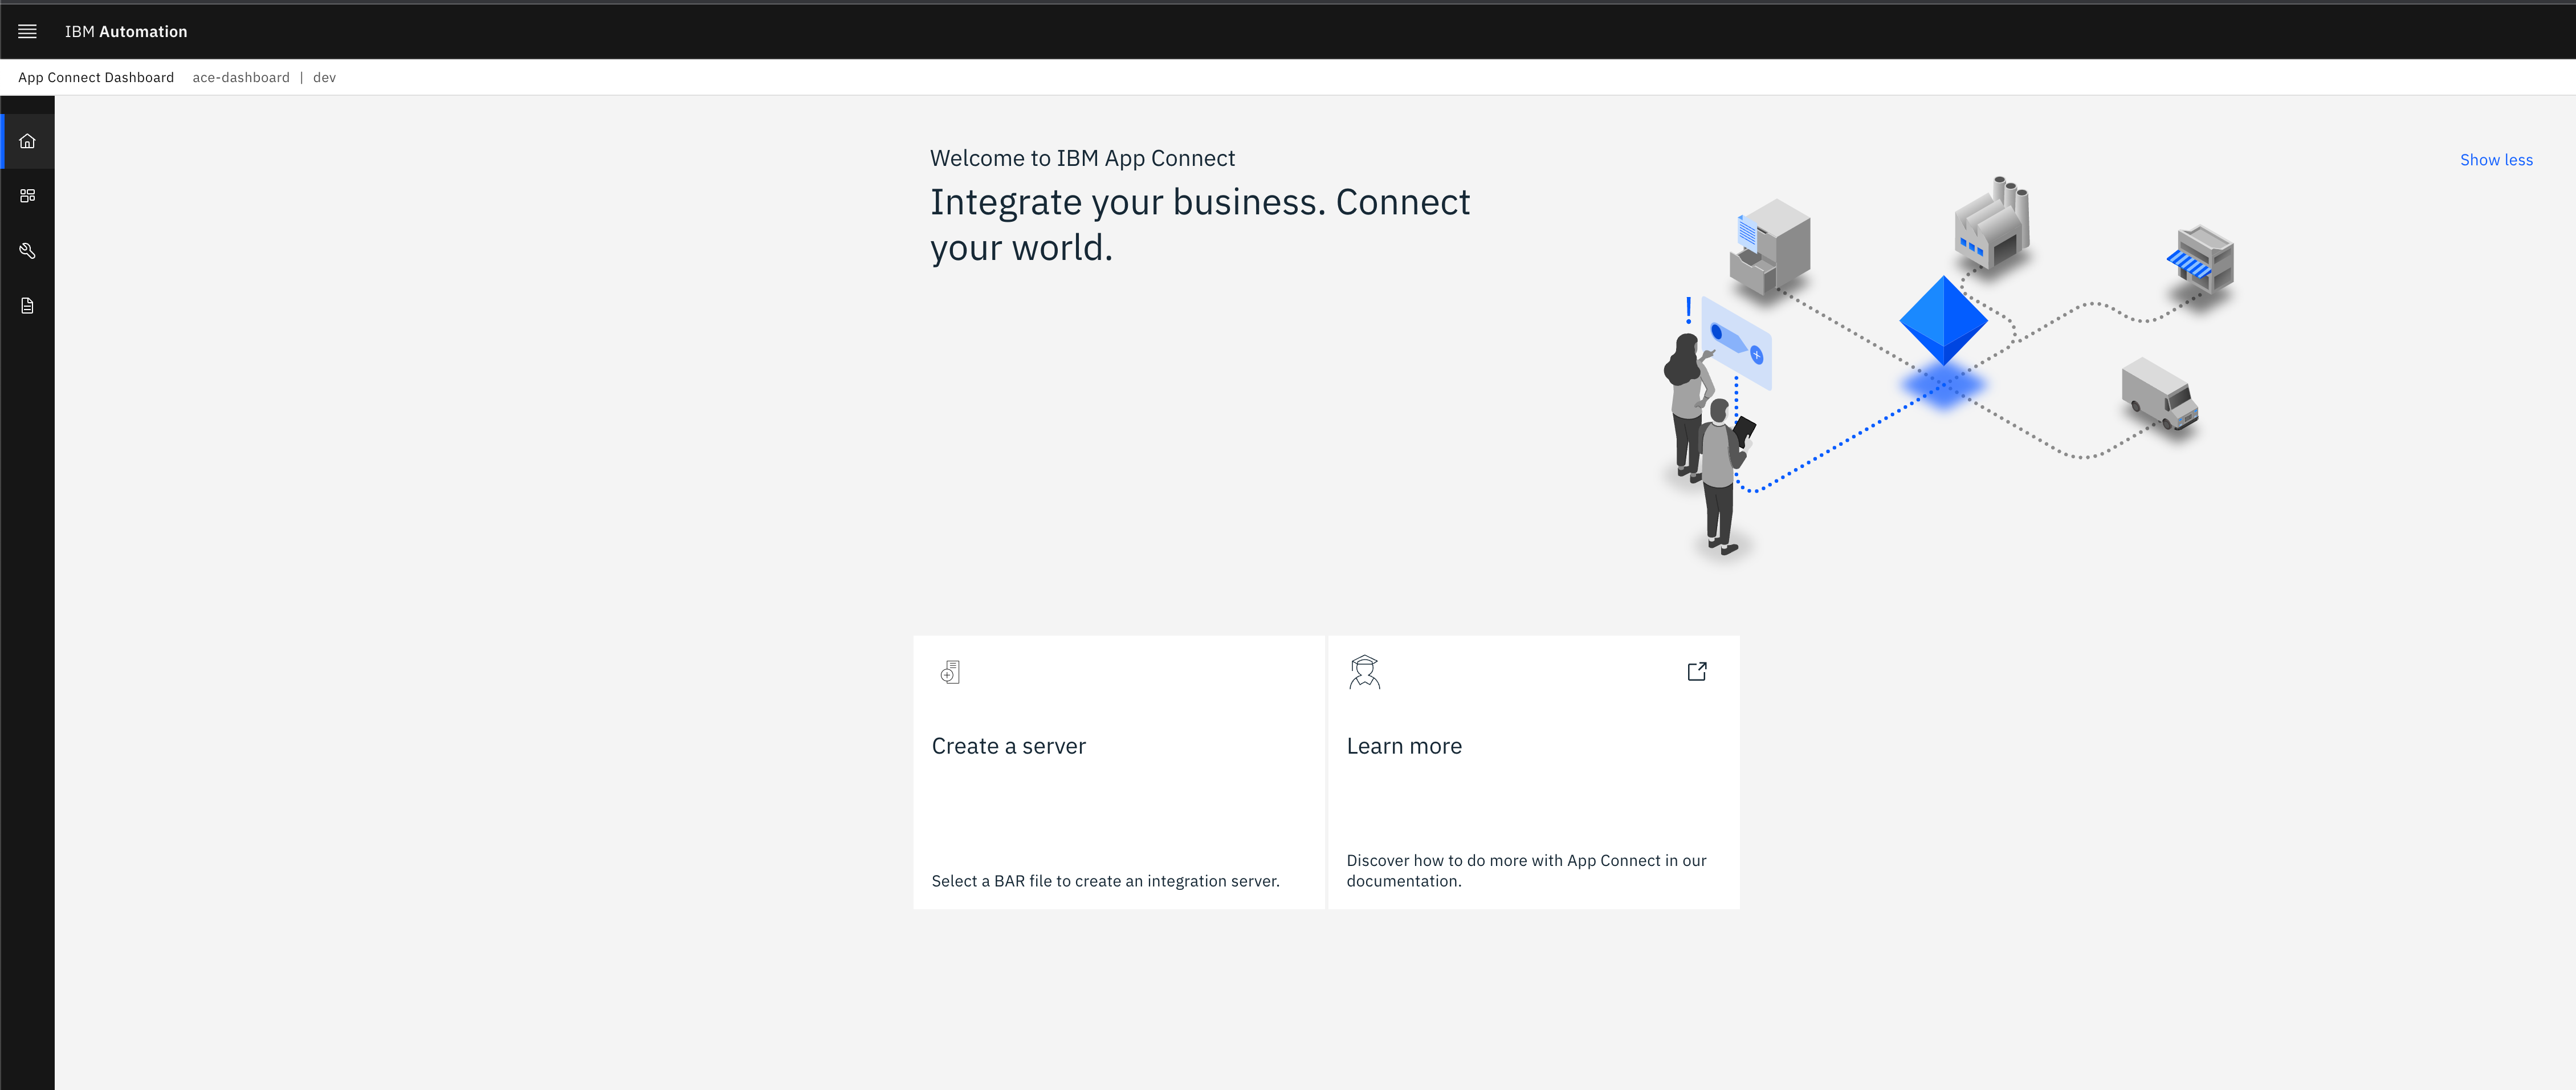
ACE Dashboard Currently it has no integration server.
Run the pipeline
Now that all the tasks, pipeline, and required resources are deployed, we can run the pipeline. We do this by creating a PipelineRun resource which refers to a Pipeline resource. A PipelineRun resource is a running instance of a Pipeline.
A PipelineRun instantiates a Pipeline by setting its parameters and workspaces. Some of the parameters have default values (mostly based on values used in this tutorial), but they can be overridden when creating the PipelineRun instance.
The pipeline has the following parameters:
| Parameter | Description |
|---|---|
is-source-repo-url | URL of the ACE application source repository. In this tutorial we are making use of SSH based URL. |
is-infra-repo-url | URL of the Infrastructure repository. In this tutorial we are making use of SSH based URL. |
git-ops-repo-url | URL of the GitOps repository. In this tutorial we are making use of SSH based URL. |
gitops-apps-repo-full-name | Full repository name of the GitOps repository |
github-pr-title | Title of the pull request. Default is set to a string with the name of the pipeline run. Feel free to update it. |
github-pr-body | Body of the pull request. Default is set to a string with the name of the pipeline run. Feel free to update it. |
github-pr-token-secret-name | Name of the secret that contains the access token of the machine user the pipeline will use to make the pull request. Default is cicd-acme as that's how we set up the secret earlier. |
We will need to set the parameters to the appropriate values. If you are following this tutorial, you would need set the is-source-repo-url, is-infra-repo-url , git-ops-repo-url and gitops-apps-repo-full-name as they do not have a default. Rest of the parameters you can leave them as default for now.
On the other hand, the pipeline has the following workspaces:
| Workspace | Description |
|---|---|
shared-workspace | The PVC where the git-clone task will clone the repositories and other task make use of them. |
ace-source-repo-secret | The secret that contains the SSH private key to authenticate with ACE application source repository. |
ace-infra-repo-secret | The secret that contains the SSH private key to authenticate with Infrastructure repository. |
gitops-repo-secret | The secret that contains the SSH private key to authenticate with GitOps repository. |
For the workspaces,
-
For
shared-workspacewe will set it to PVC,ace-integration-server -
For
ace-source-repo-secretwe will set it to Secret,create-customer-at-github -
For
ace-infra-repo-secretwe will set it to Secret,ace-infra-at-github -
For
gitops-repo-secretwe will set it to Secret,multi-tenancy-gitops-repo-at-github
One way to instantiates a Pipeline is to use the OpenShift Web UI. When running the Configuration pipeline, we used this method. See Run the pipeline
The other method is to use tkn. We will use that in this section
-
Install
tknCLIOn MacOS you can use Homebrew to install
tknbrew install tektoncd-cliFor other operating systems, see
tkn -
Change to pipeline directory
Issue the following command to change to your GitOps repository and the pipeline directory
cd $GIT_ROOT/multi-tenancy-gitops-apps/ace/environments/ci/pipelines -
Run the script
run-ace-is-pipeline.shThe script,
run-ace-is-pipeline.sh,#!/usr/bin/env bash if [ -z ${GIT_ORG} ]; then echo "Please set GIT_ORG when running script"; exit 1; fi if [ -z ${SOURCE_REPO} ]; then echo "Please set SOURCE_REPO when running script"; exit 1; fi tkn -n ci pipeline start \ ace-integration-server \ --param is-source-repo-url=git@github.com:${GIT_ORG}/${SOURCE_REPO}.git \ --param is-infra-repo-url=git@github.com:${GIT_ORG}/ace-infra.git \ --param git-ops-repo-url=git@github.com:${GIT_ORG}/multi-tenancy-gitops-apps.git \ --param gitops-apps-repo-full-name=${GIT_ORG}/multi-tenancy-gitops-apps \ --workspace name=shared-workspace,claimName=ace-integration-server \ --workspace name=ace-infra-repo-secret,secret=ace-infra-at-github \ --workspace name=gitops-repo-secret,secret=multi-tenancy-gitops-apps-at-github \ --workspace name=ace-source-repo-secret,secret=${SOURCE_REPO}-at-githubdepends on two parameters,
GIT_ORGandSOURCE_REPO. The script sets all the parameters and workspaces values when issuingtkncommand to start the pipeline. If you are following this guide as is, due to our naming conventions, you would not need to change the script.Nevertheless, review the script to make sure they have right values.
To start the pipeline, issue the following
SOURCE_REPO=create-customer ./run-ace-is-pipeline.shwhat about
GIT_ORG?It is already part of the shell environment, as we set it up earlier.
You will get an output like the following:
PipelineRun started: ace-integration-server-run-w4x8d

In order to track the PipelineRun progress run:
tkn pipelinerun logs ace-integration-server-run-w4x8d -f -n ci
You can use
tknCLI to check the status of the pipeline, withtkn pipelinerun describecommand. For example, for the above:tkn pipelinerun describe ace-integration-server-run-w4x8d -n ciYou will see the various task running, as well as the parameters and workspaces that have been set:
Name:              ace-integration-server-run-w4x8d
Namespace:         ci
Pipeline Ref:      ace-integration-server
Service Account:   pipeline
Timeout:           1h0m0s
Labels:
app.kubernetes.io/instance=apps-ace-rest-ci-1
tekton.dev/pipeline=ace-integration-server

🌡️  Status

STARTED         DURATION   STATUS
7 minutes ago   ---        Running

📦 Resources

No resources

⚓ Params

NAME                           VALUE
∙ git-ops-repo-url             git@github.com:ace-prod-ref/multi-tenancy-gitops-apps.git
∙ gitops-apps-repo-full-name   ace-prod-ref/multi-tenancy-gitops-apps
∙ is-infra-repo-url            git@github.com:ace-prod-ref/ace-infra.git
∙ is-source-repo-url           git@github.com:ace-prod-ref/create-customer.git

📝 Results

No results

📂 Workspaces

NAME                       SUB PATH   WORKSPACE BINDING
∙ shared-workspace         ---        PersistentVolumeClaim (claimName=ace-integration-server)
∙ ace-infra-repo-secret    ---        Secret (secret=ace-infra-at-github)
∙ gitops-repo-secret       ---        Secret (secret=multi-tenancy-gitops-apps-at-github)
∙ ace-source-repo-secret   ---        Secret (secret=create-customer-at-github)

🗂  Taskruns

NAME                                                            TASK NAME              STARTED         DURATION     STATUS
∙ ace-integration-server-run-csvfx-build-is-image-7v75z         build-is-image         6 minutes ago   ---          Running
∙ ace-integration-server-run-csvfx-build-bar-rnwb2              build-bar              6 minutes ago   14 seconds   Succeeded
∙ ace-integration-server-run-csvfx-resolve-props-cmgps          resolve-props          6 minutes ago   30 seconds   Succeeded
∙ ace-integration-server-run-csvfx-clone-gitops-repo-vmrmk      clone-gitops-repo      6 minutes ago   13 seconds   Succeeded
∙ ace-integration-server-run-csvfx-clone-is-infra-repo-tr9dk    clone-is-infra-repo    6 minutes ago   10 seconds   Succeeded
∙ ace-integration-server-run-csvfx-clone-is-source-repo-xjjkt   clone-is-source-repo   6 minutes ago   12 seconds   Succeeded
On OCP UI
You can also check the pipeline run from OpenShift Web Console. Navigate to Pipelines > Pipelines, and click on the pipeline run link for the pipeline,
ace-integration-server: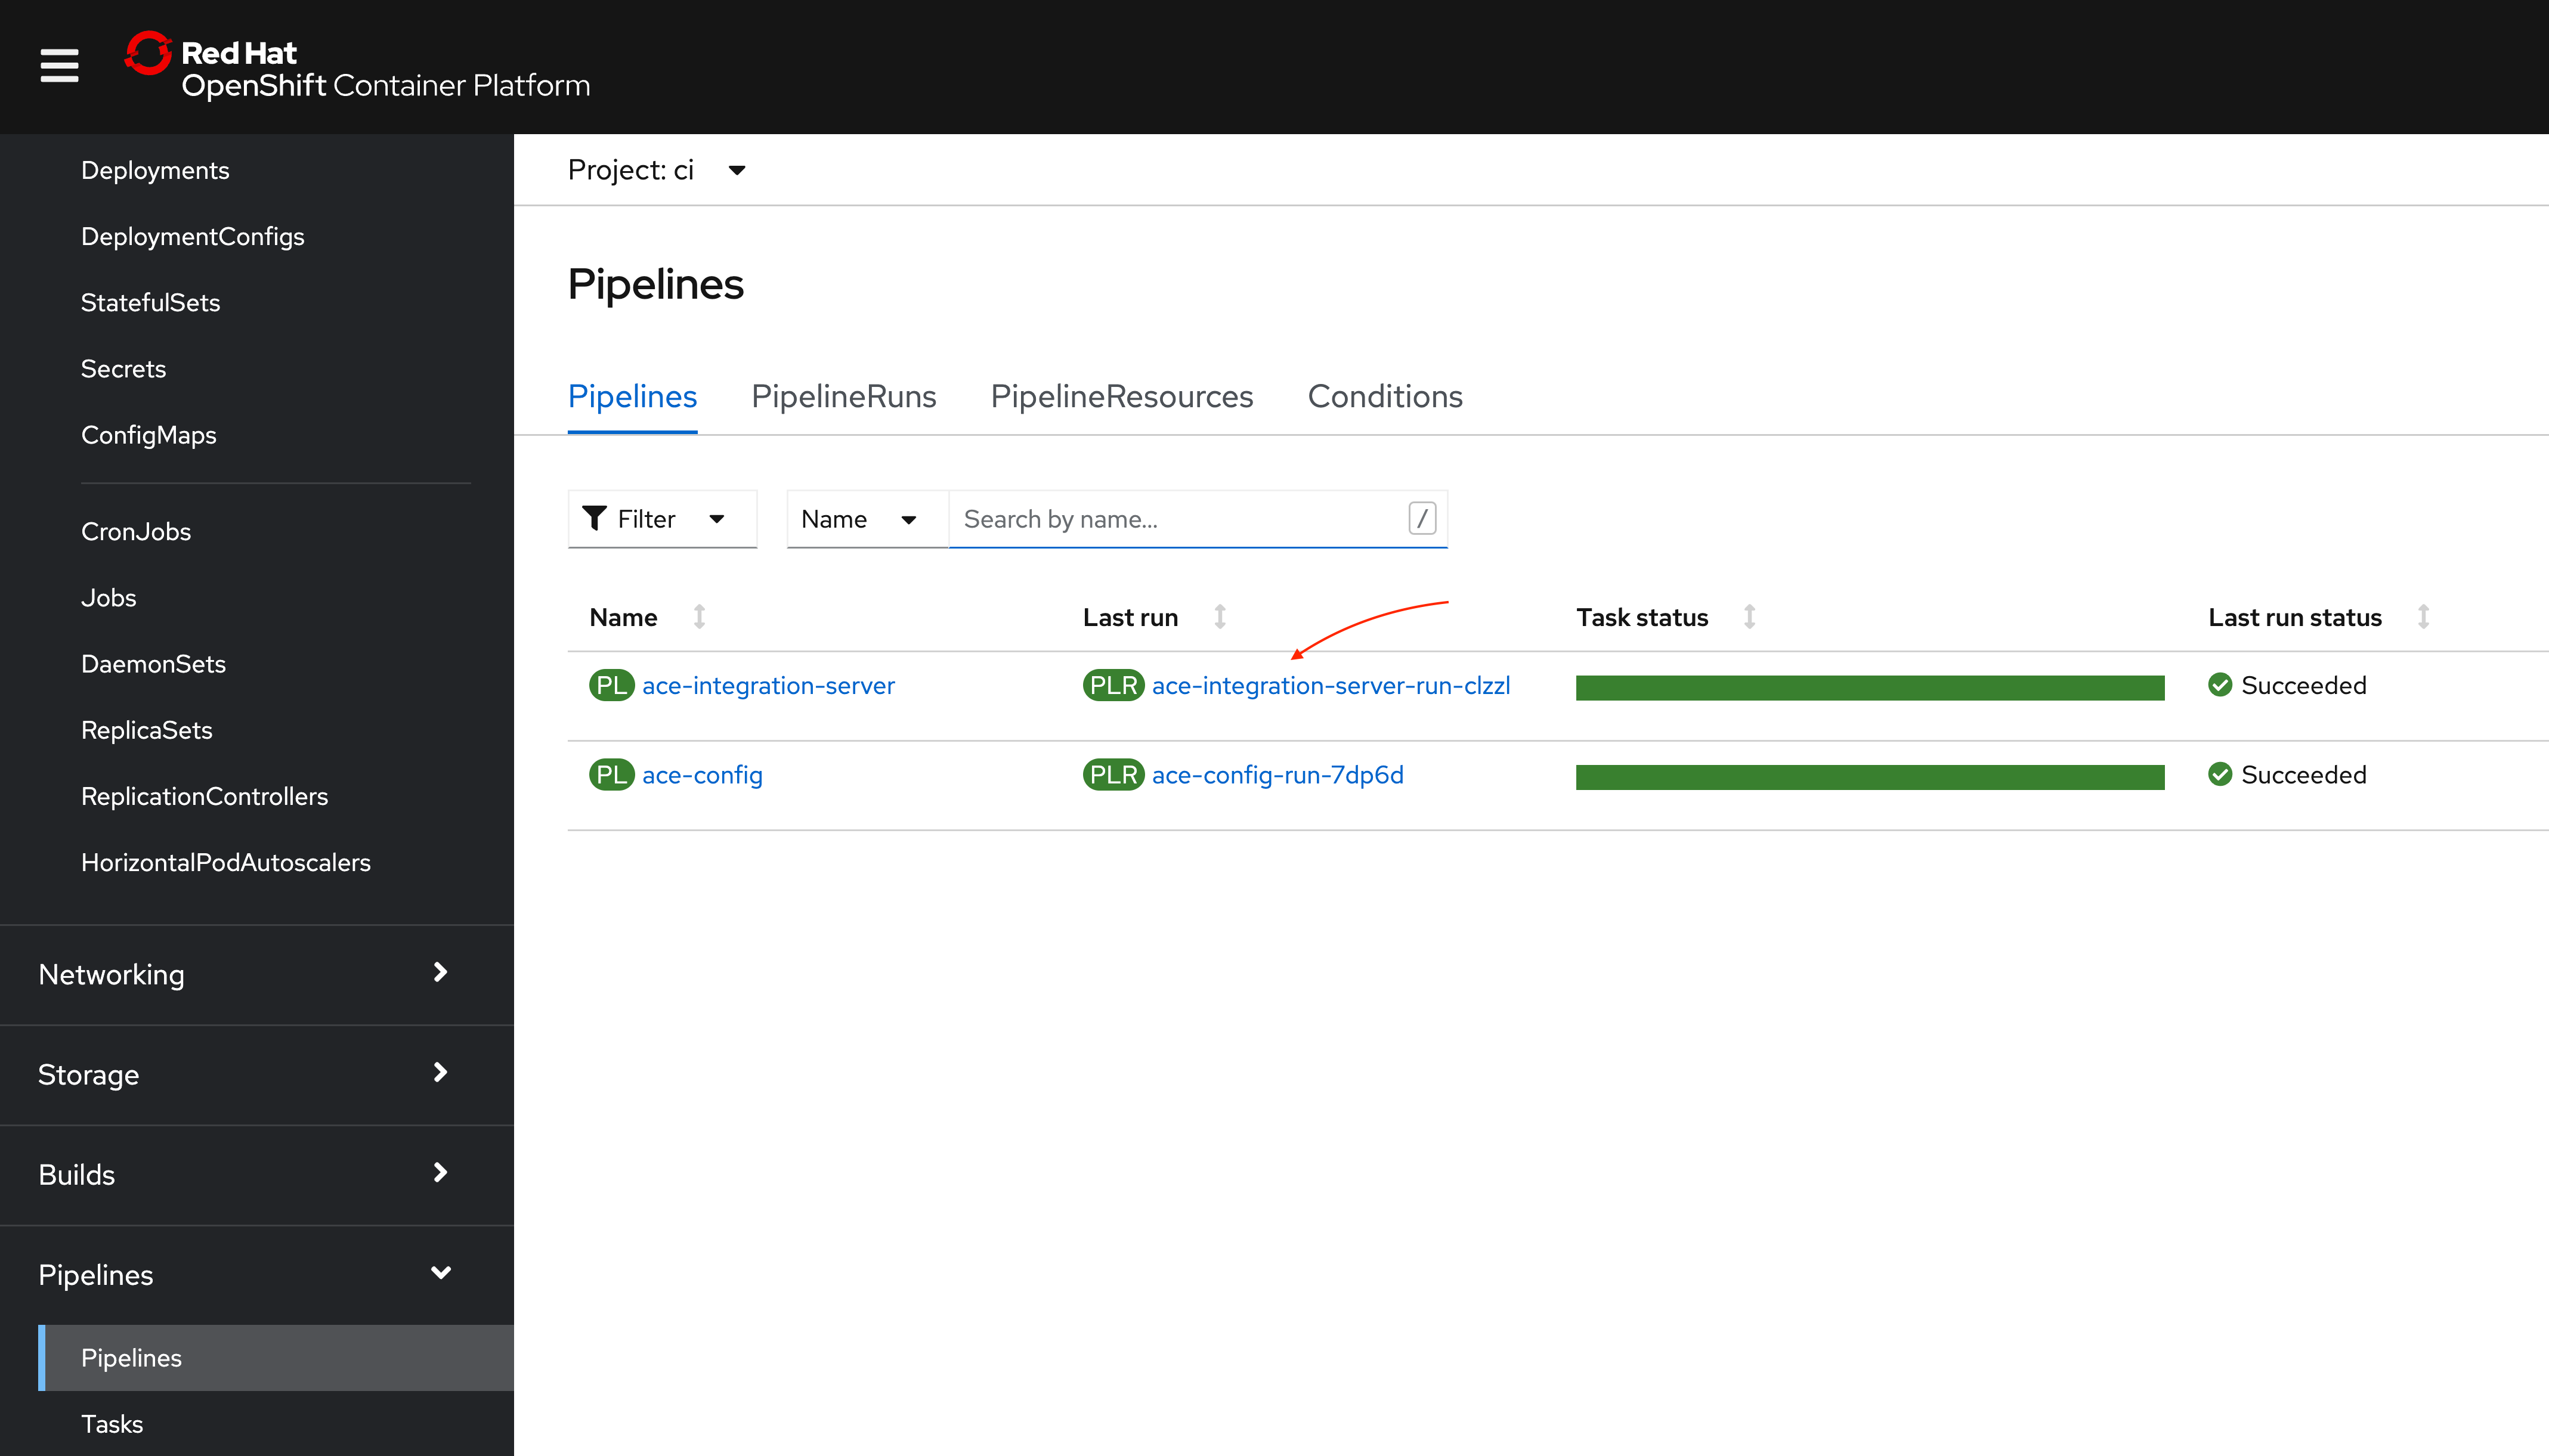
Pipeline run in OpenShift Web Console 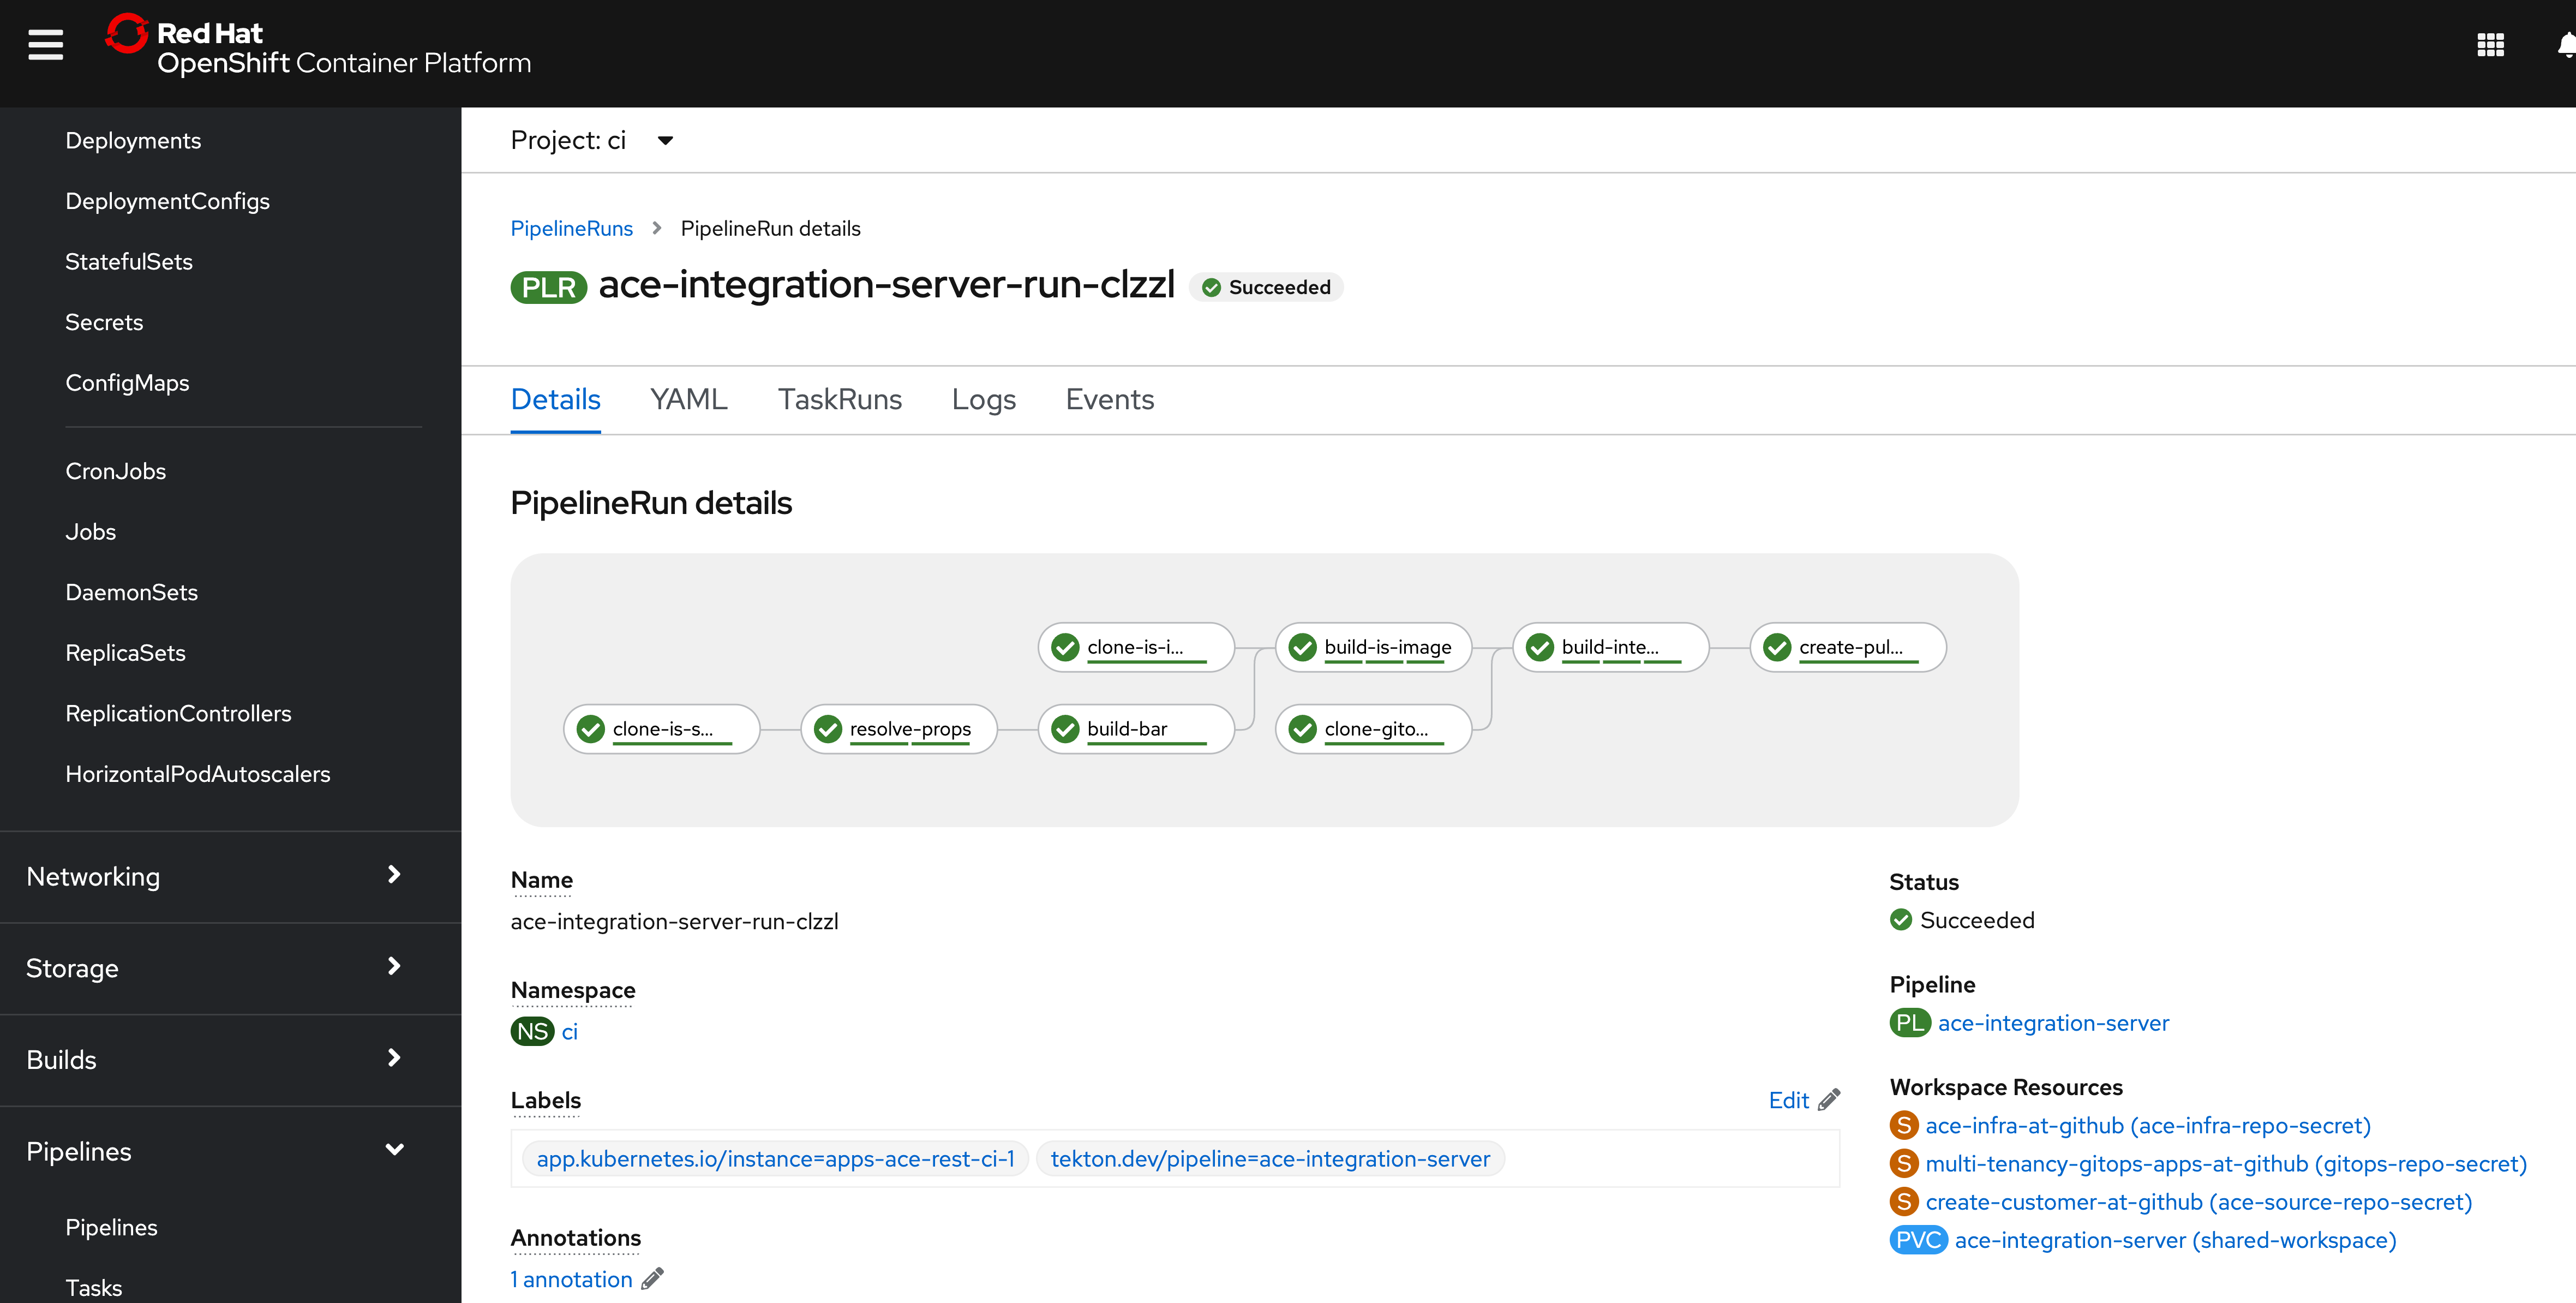
Pipeline run status in OpenShift Web Console Once the pipeline run finishes, a pull request will be created for the to add the
IntegrationServerCR onmulti-tenancy-gitops-appsrepository.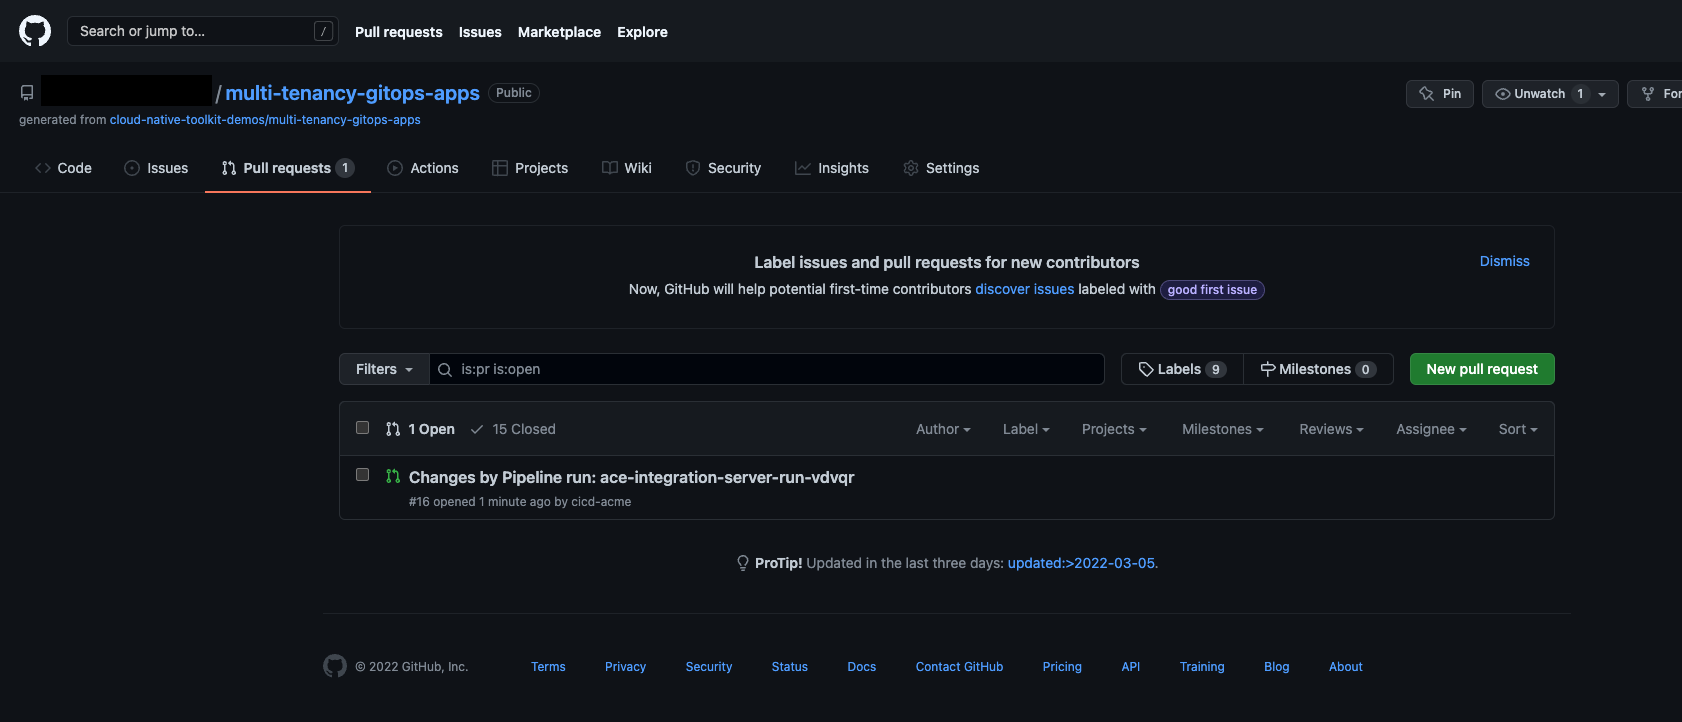
Pull request for ACE integration server And if you check the commits within the pull request, you will see creation of the
IntegrationServerCR and activating inkustomization.yaml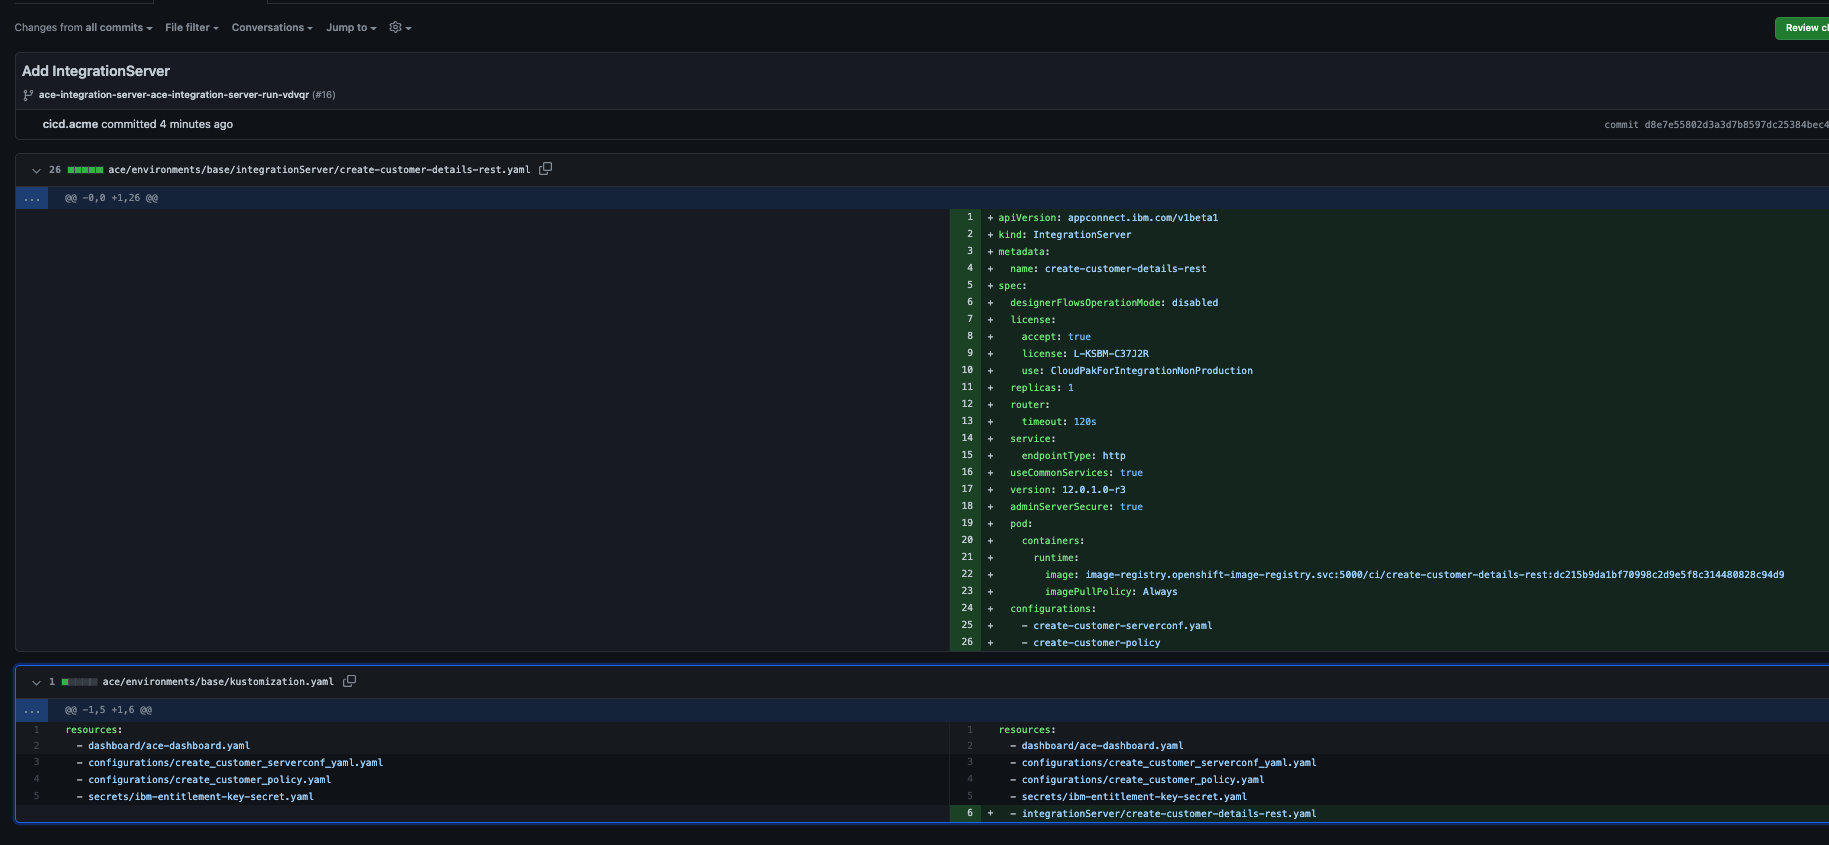
Commit in pull request -
Merge the pull request
From Github Web UI merge the pull request.
-
Verify ArgoCD syncs the
IntegrationServerCROn on the ArgoCD application,
apps-ace-rest-dev-1, you should see theIntegrationServerCR: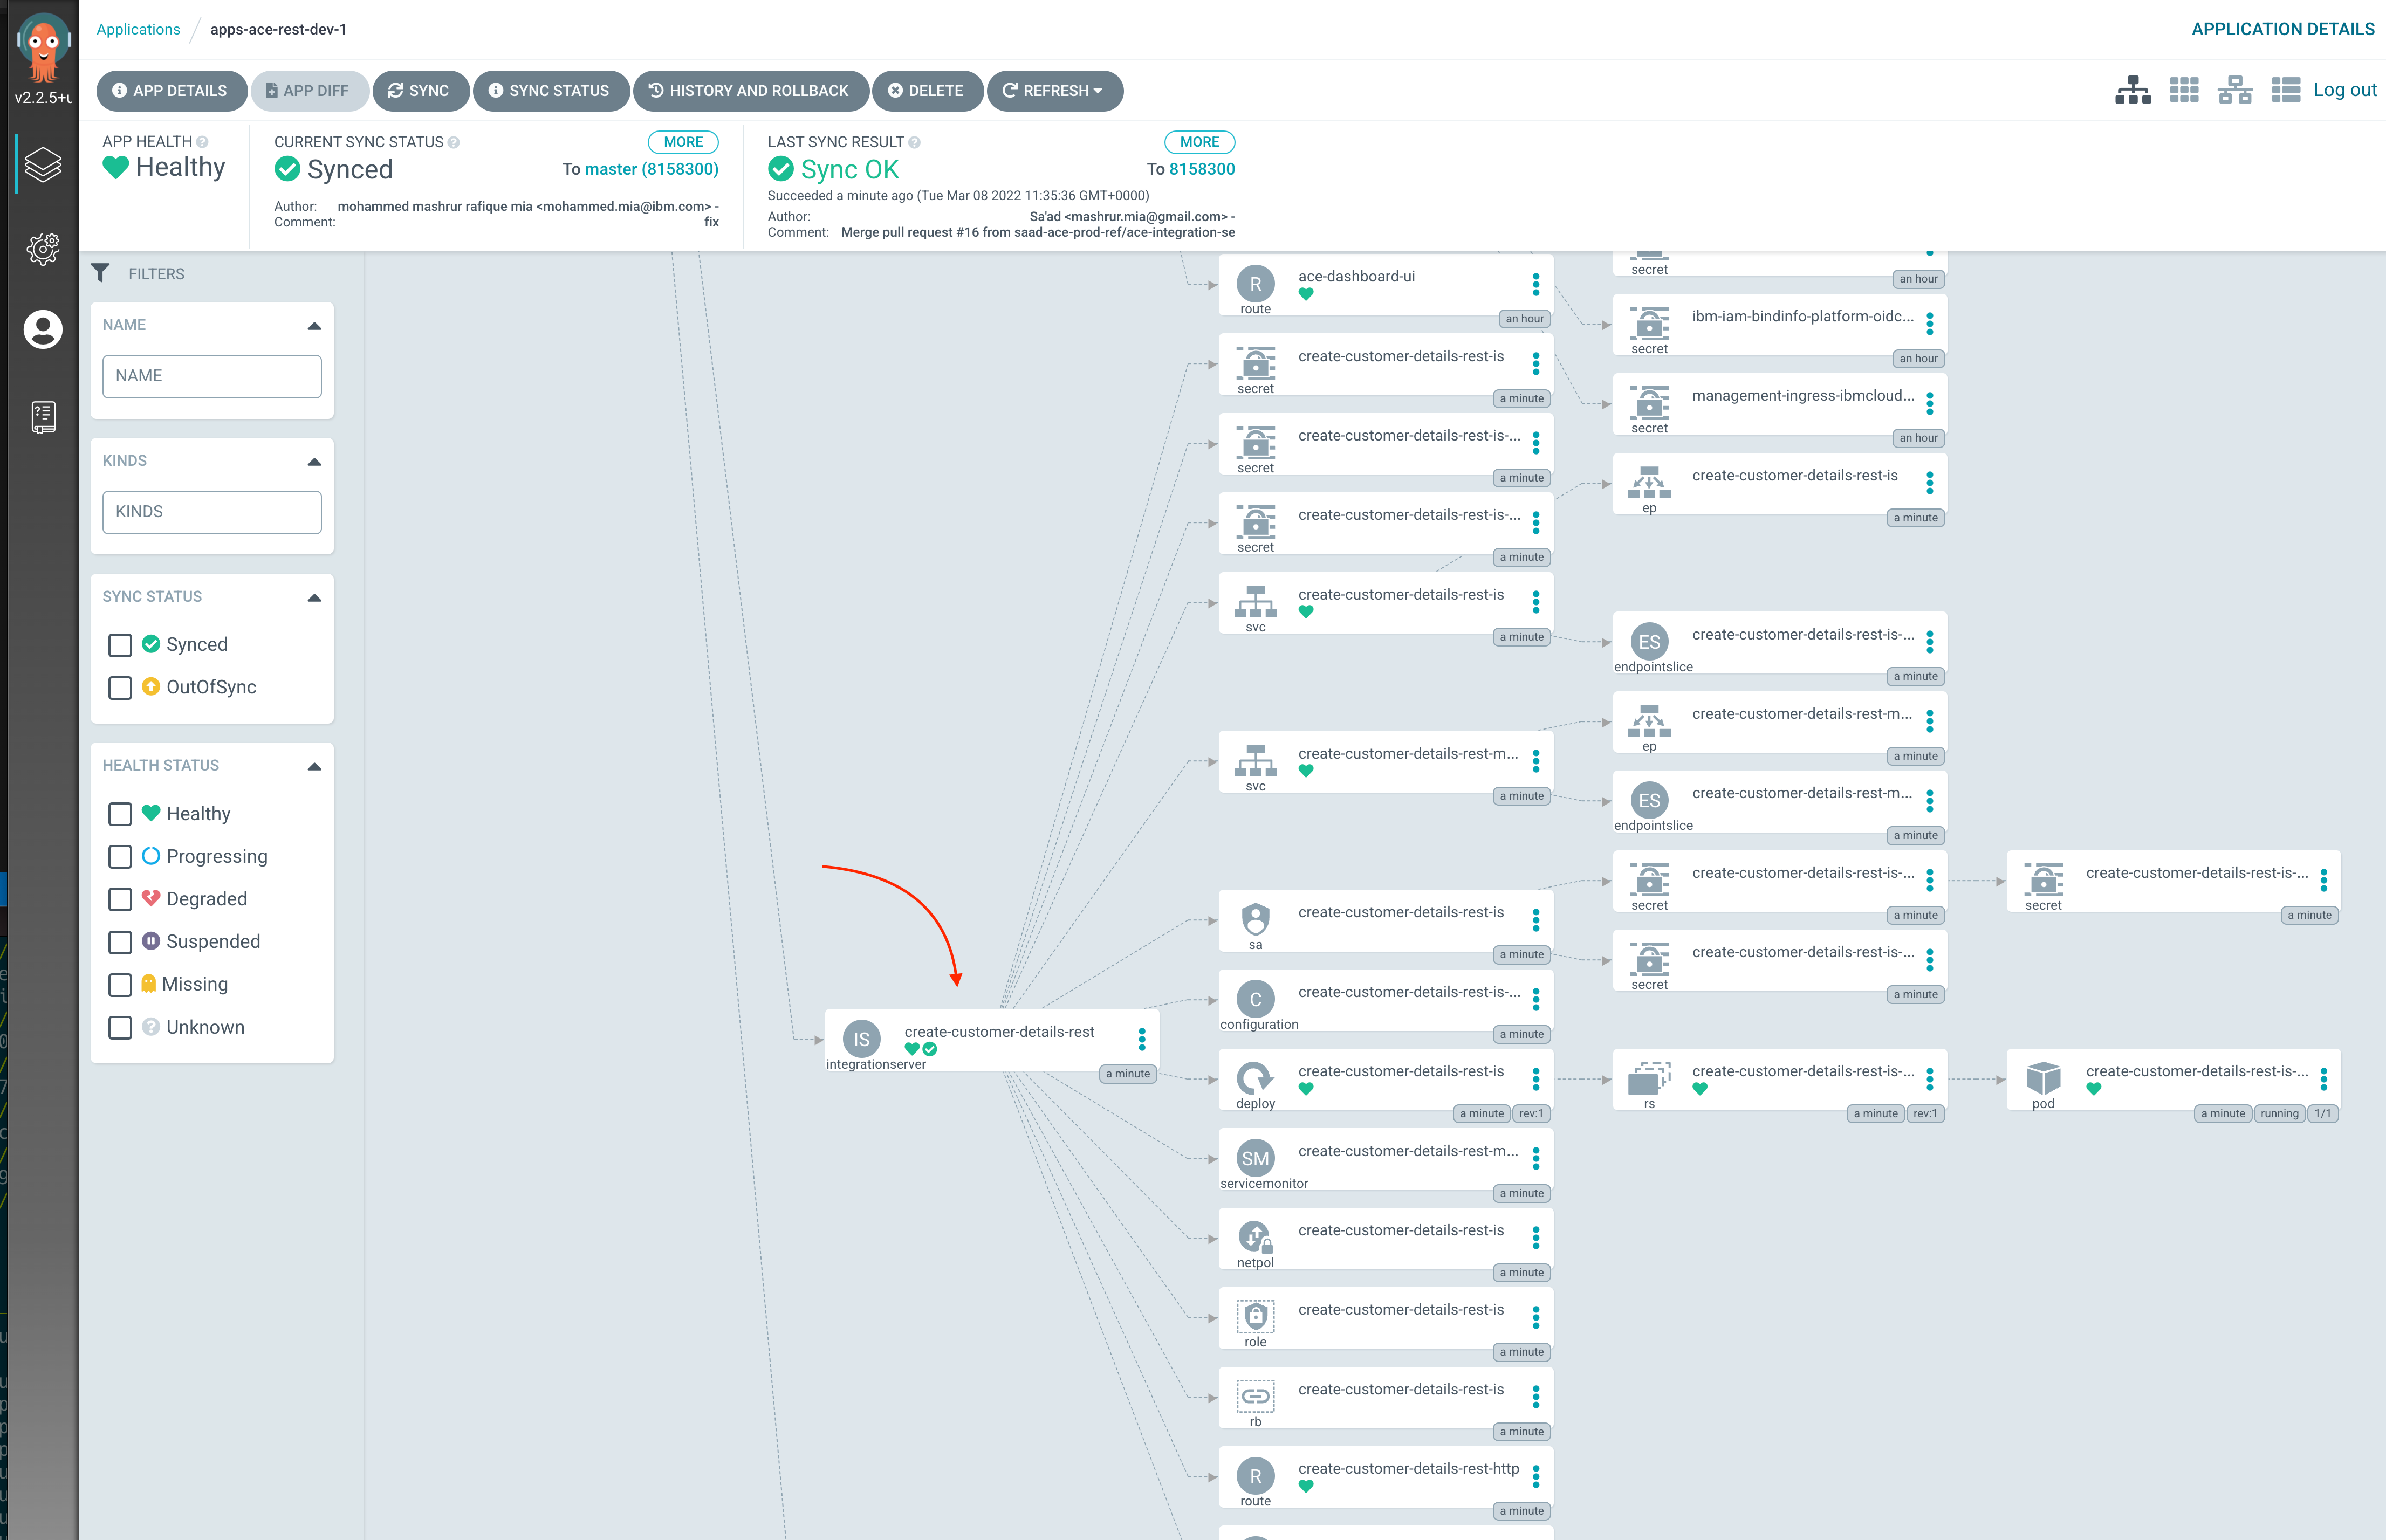
IntegrationServerCR on ArgoCD -
Verify the integration server in ACE Dashboard
On ACE Dashboard, you will now see a new Integration Server:
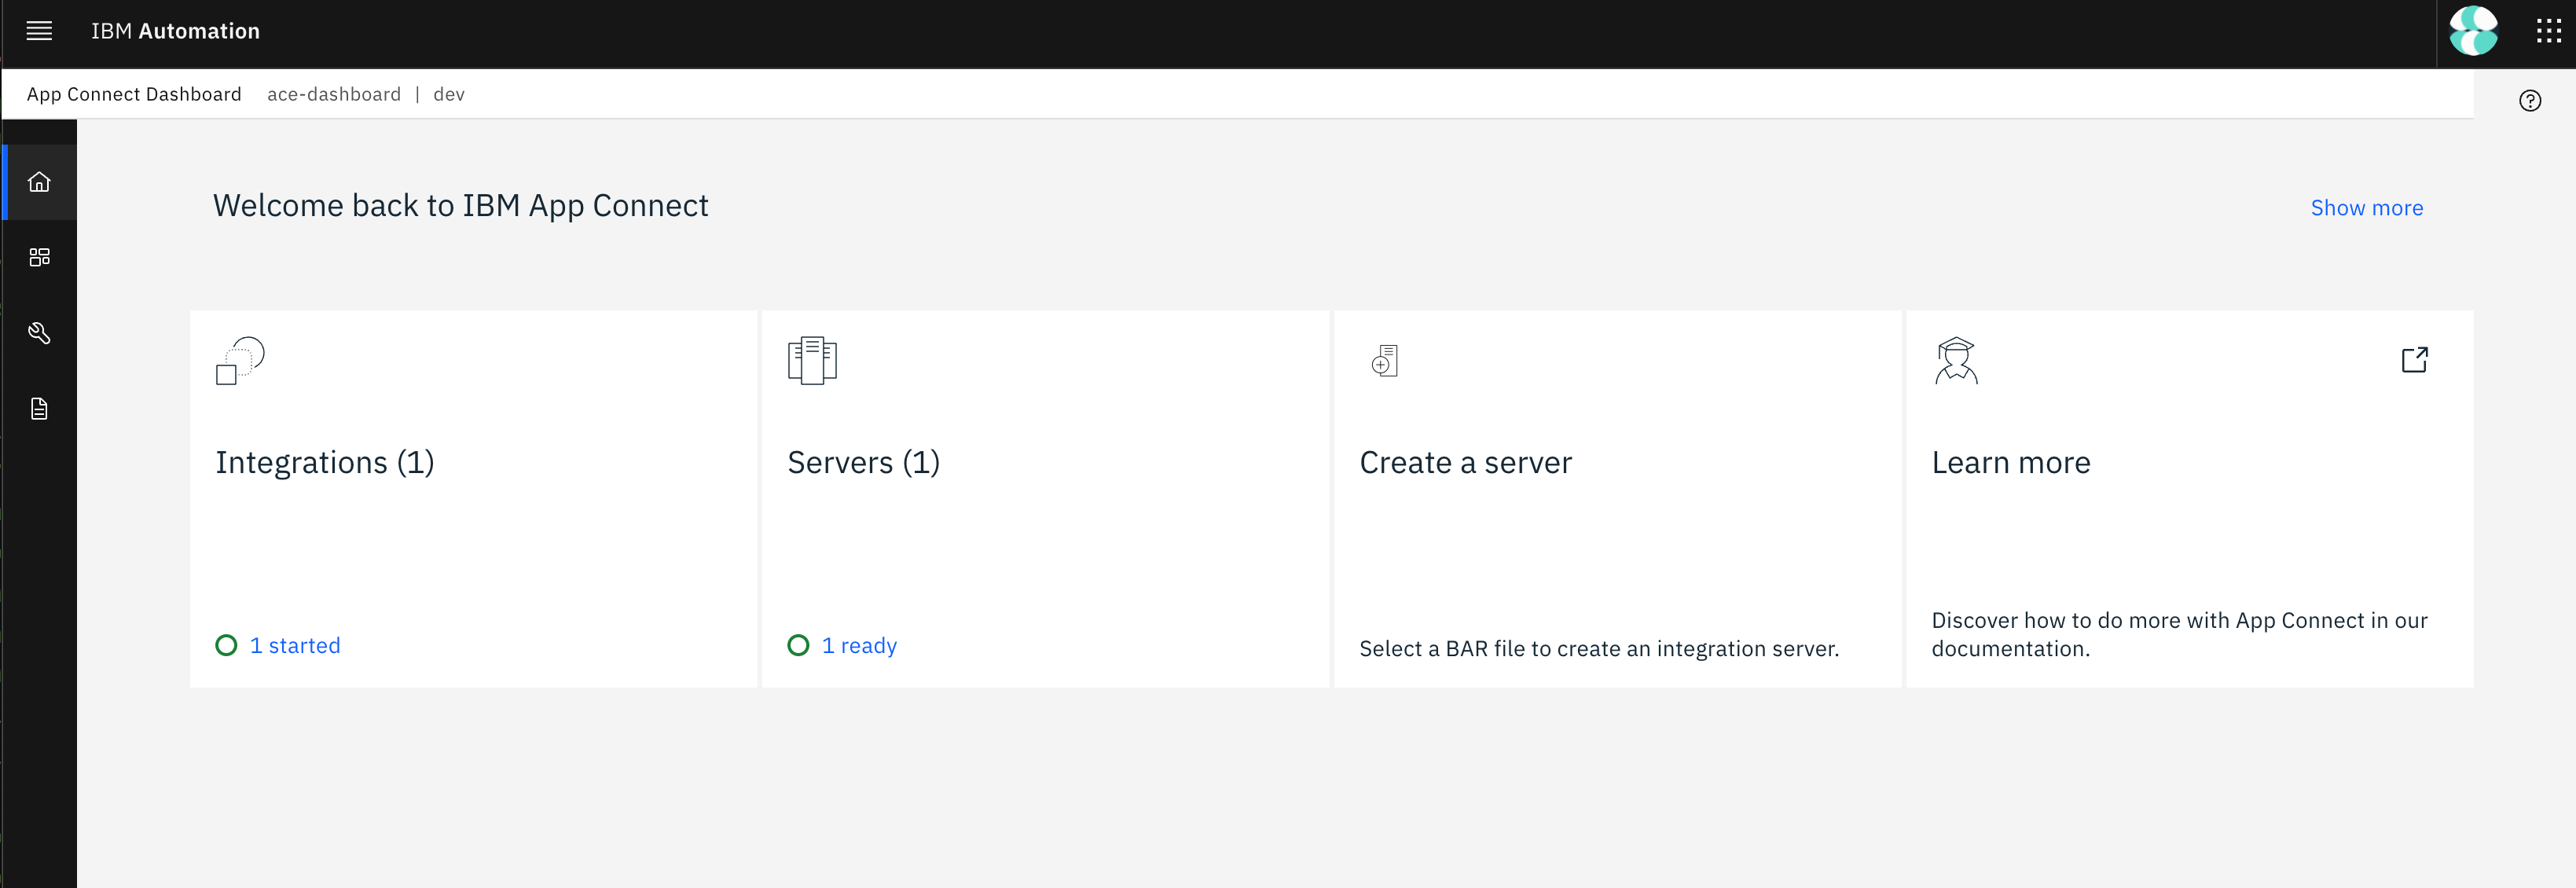
Integration server in ACE Dashboard 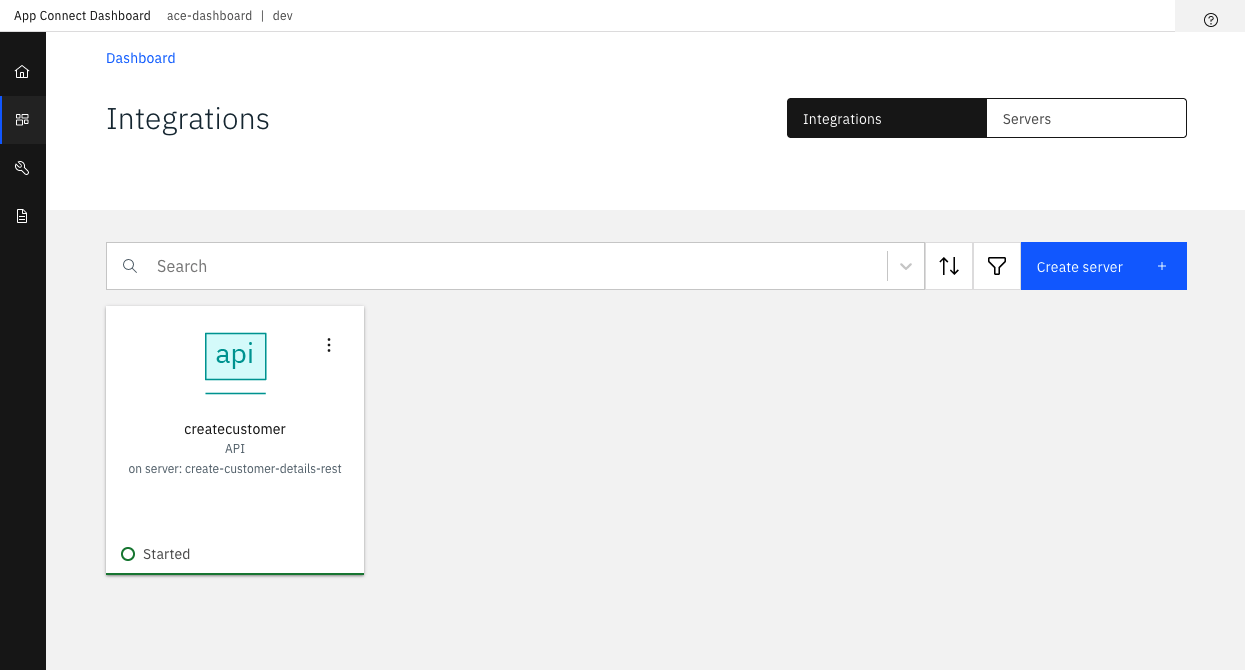
createcustomerAPI on ACE dashboardYou can explore the API on the dashboard. The API will be presented based on the OpenAPI document, currently deployed as part of the
createcustomerACE server.Open the API and navigate to API method,
POST /createcustomer, and click on Try it tab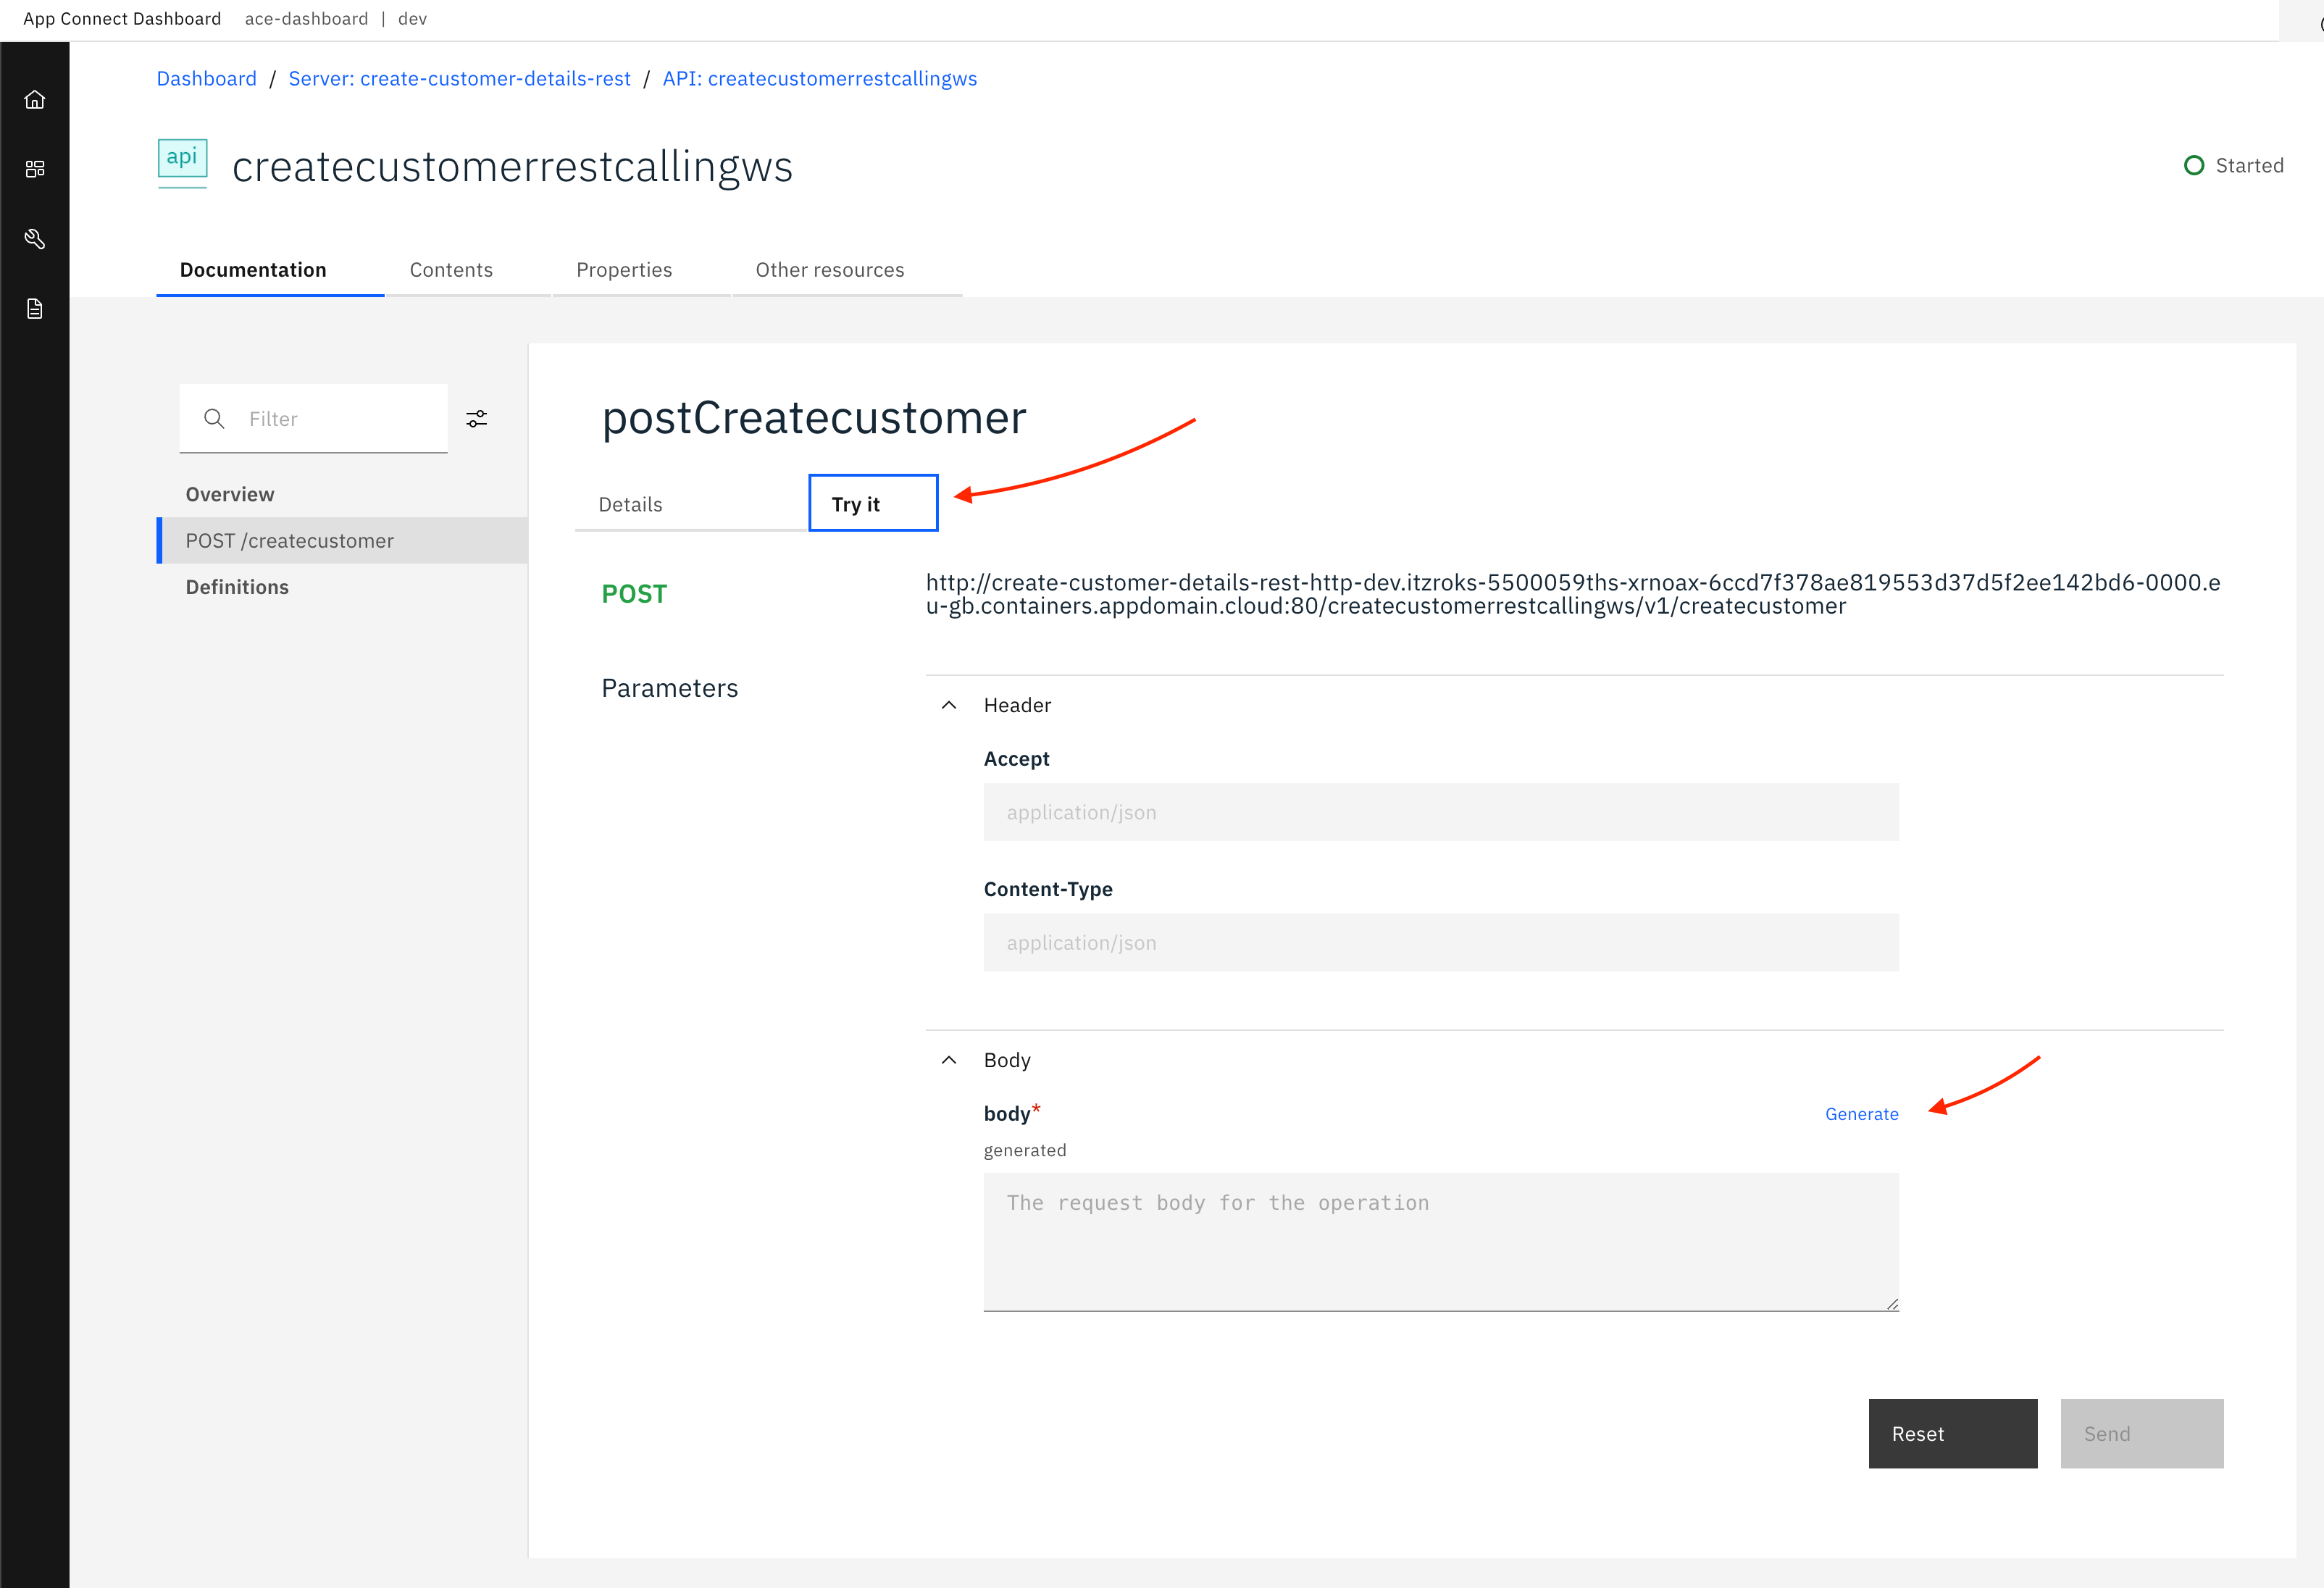
You can write your own payload, or simply generate one. Click Generate to generate a payload:
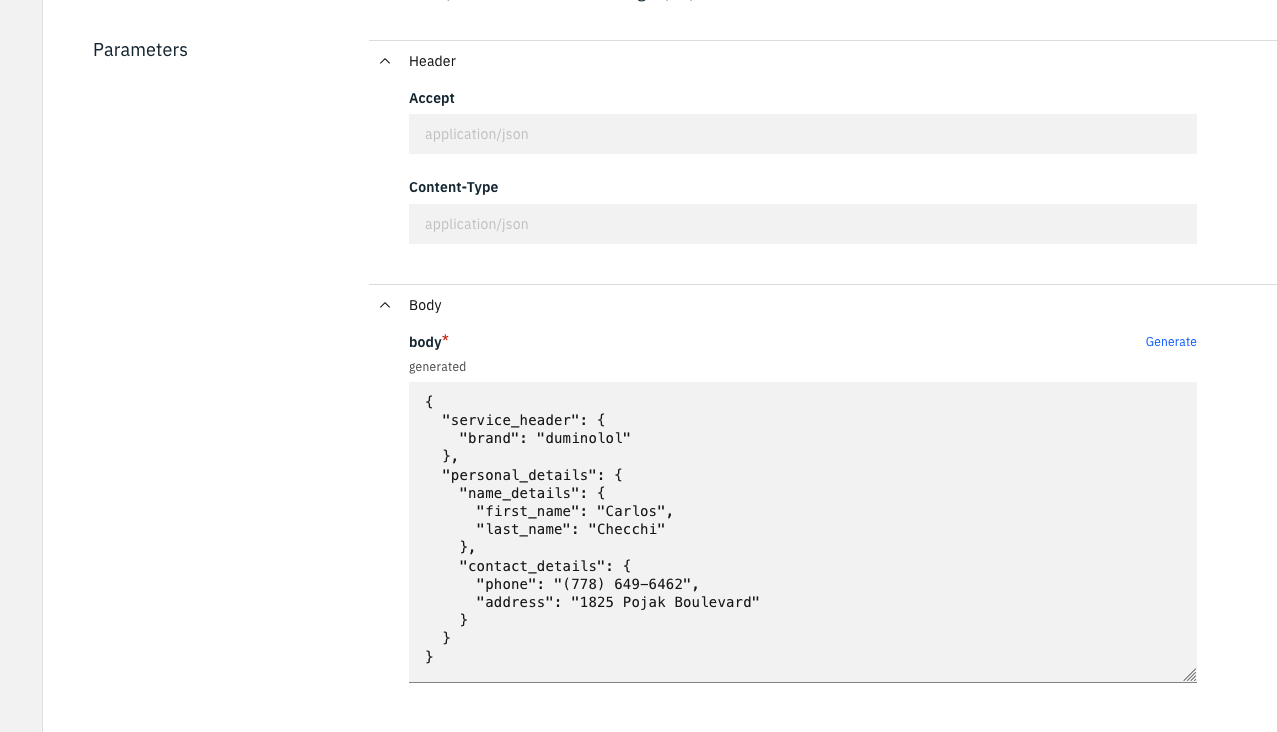
Incorrect phone number generated Notice the phone number format. This is not the format our SOAP server accepts. If we send this request, our SOAP server will send an error back. For instance:
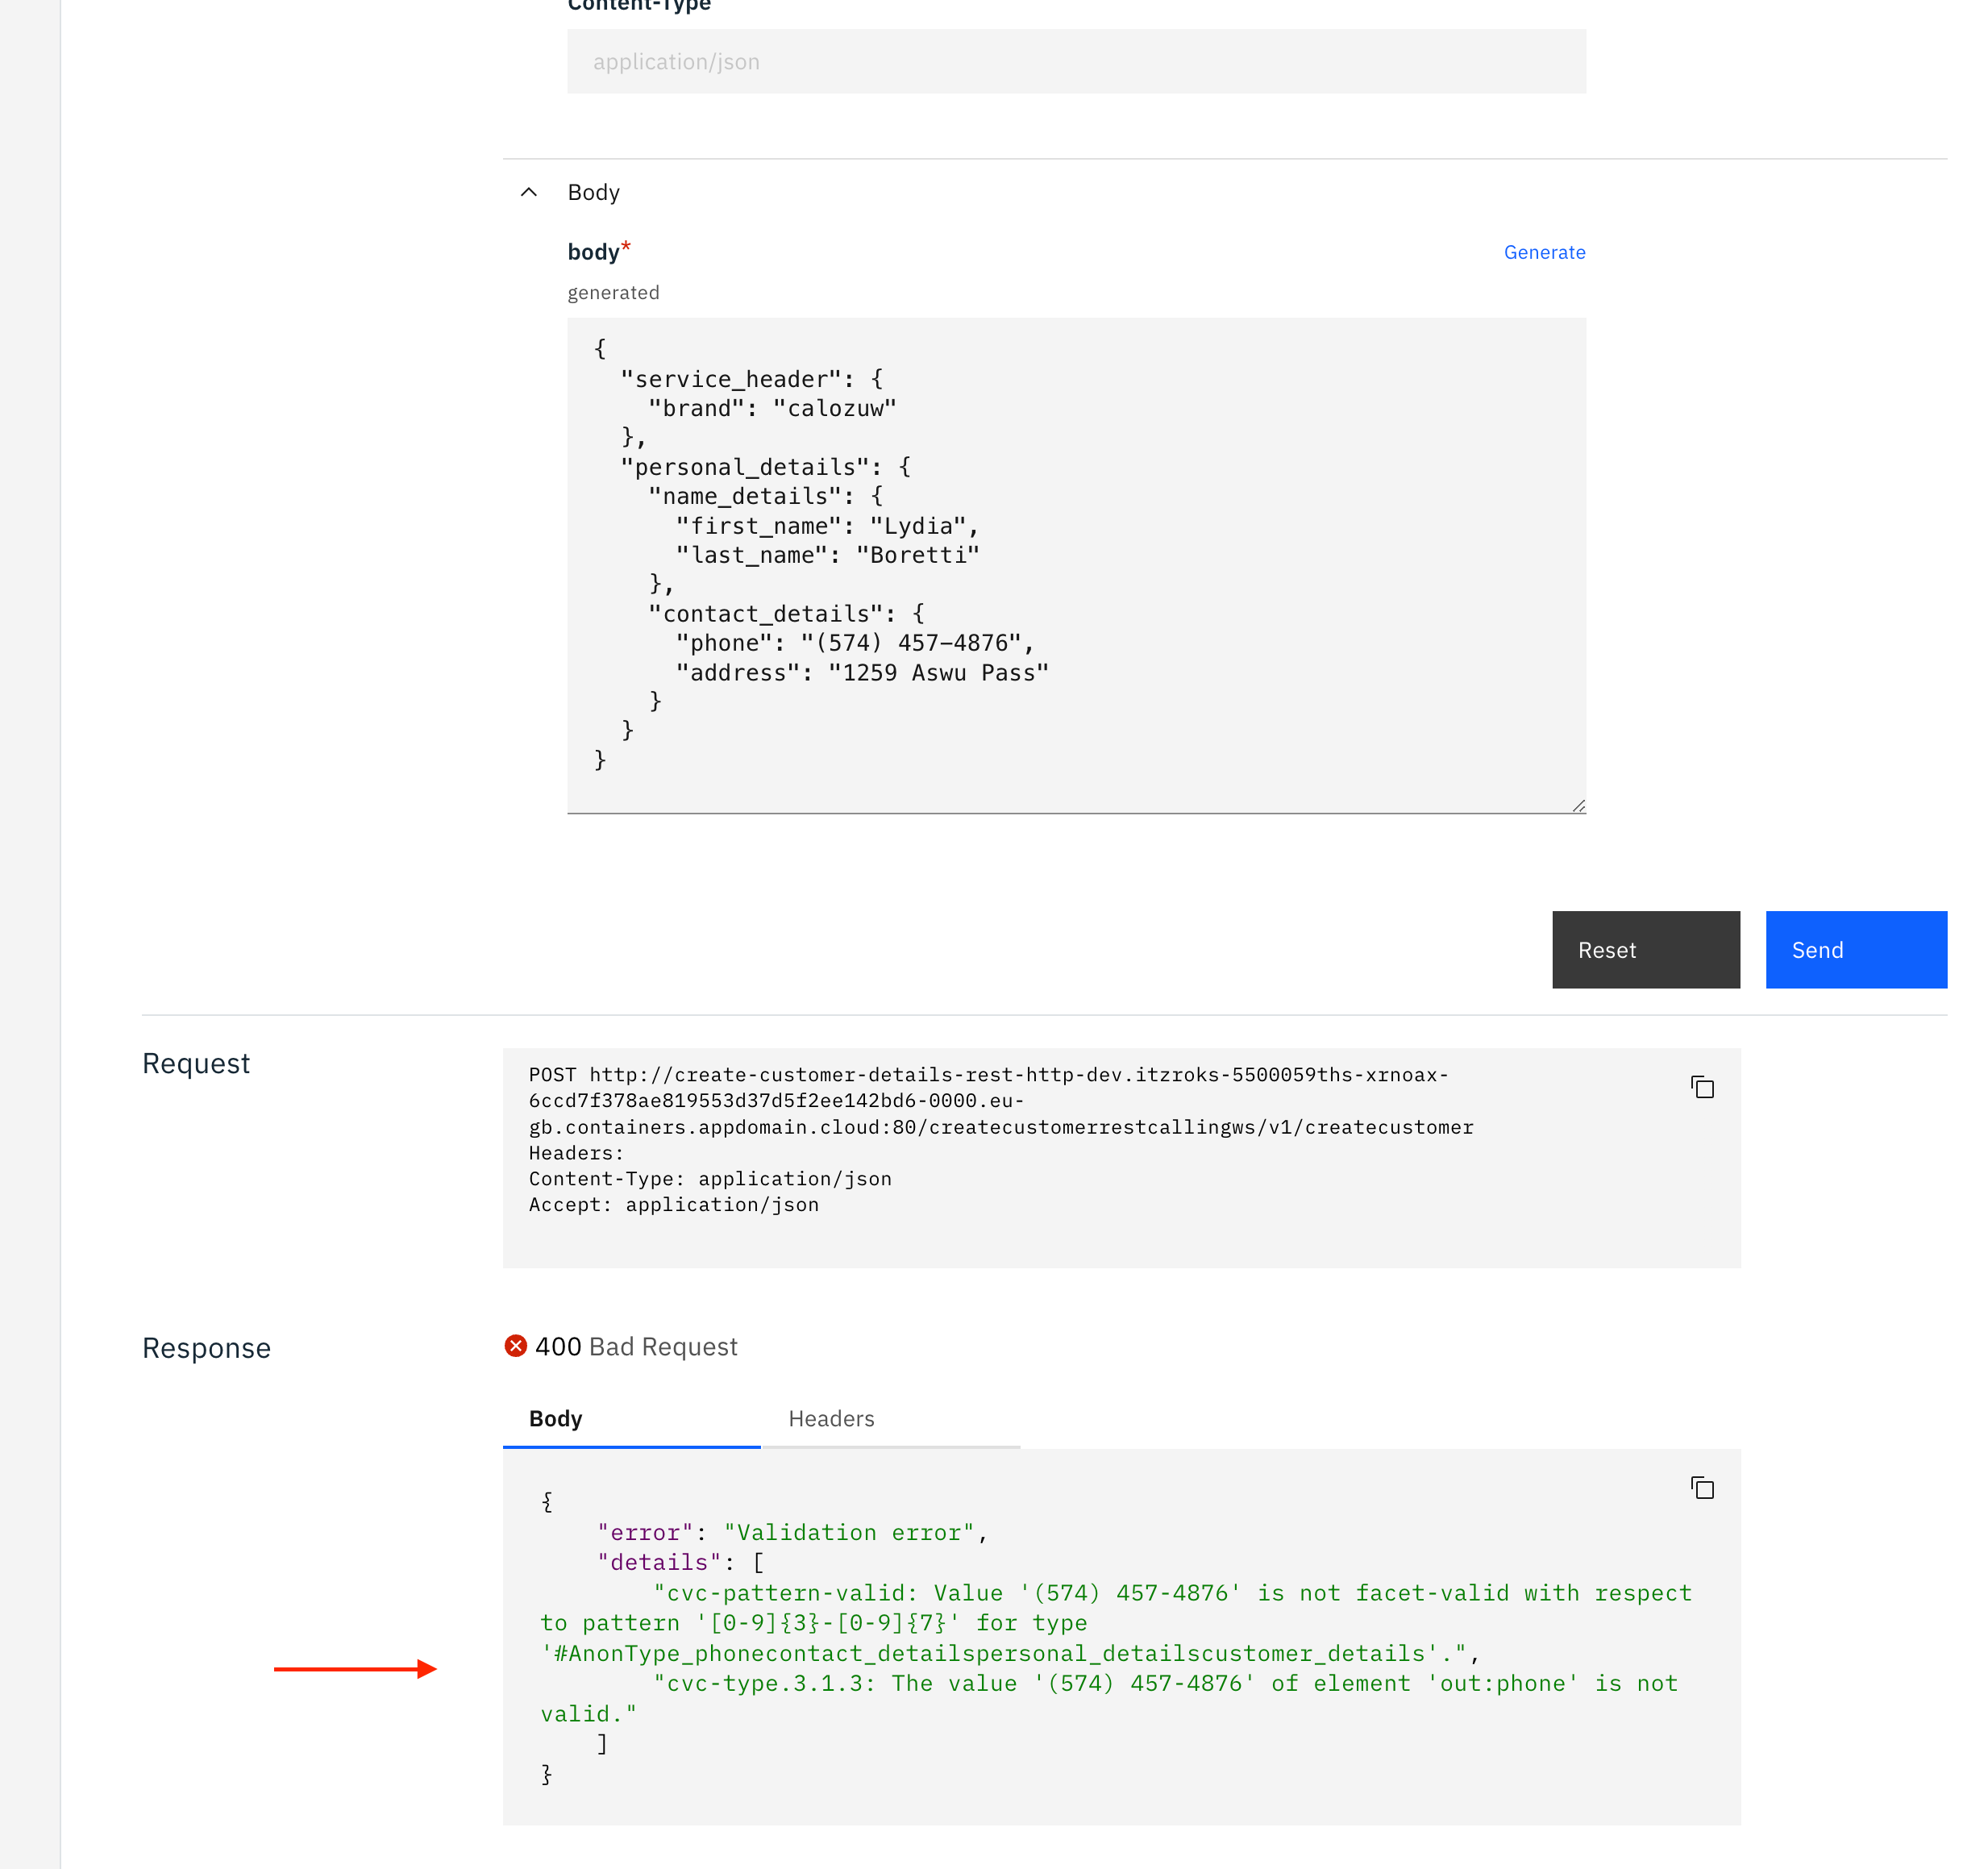
Incorrect phone number format Updating OpenAPI definition for phone number
We will fix the generation of the phone number in the right format in the next section.
You can send a valid request but the setting the phone number in the right format:
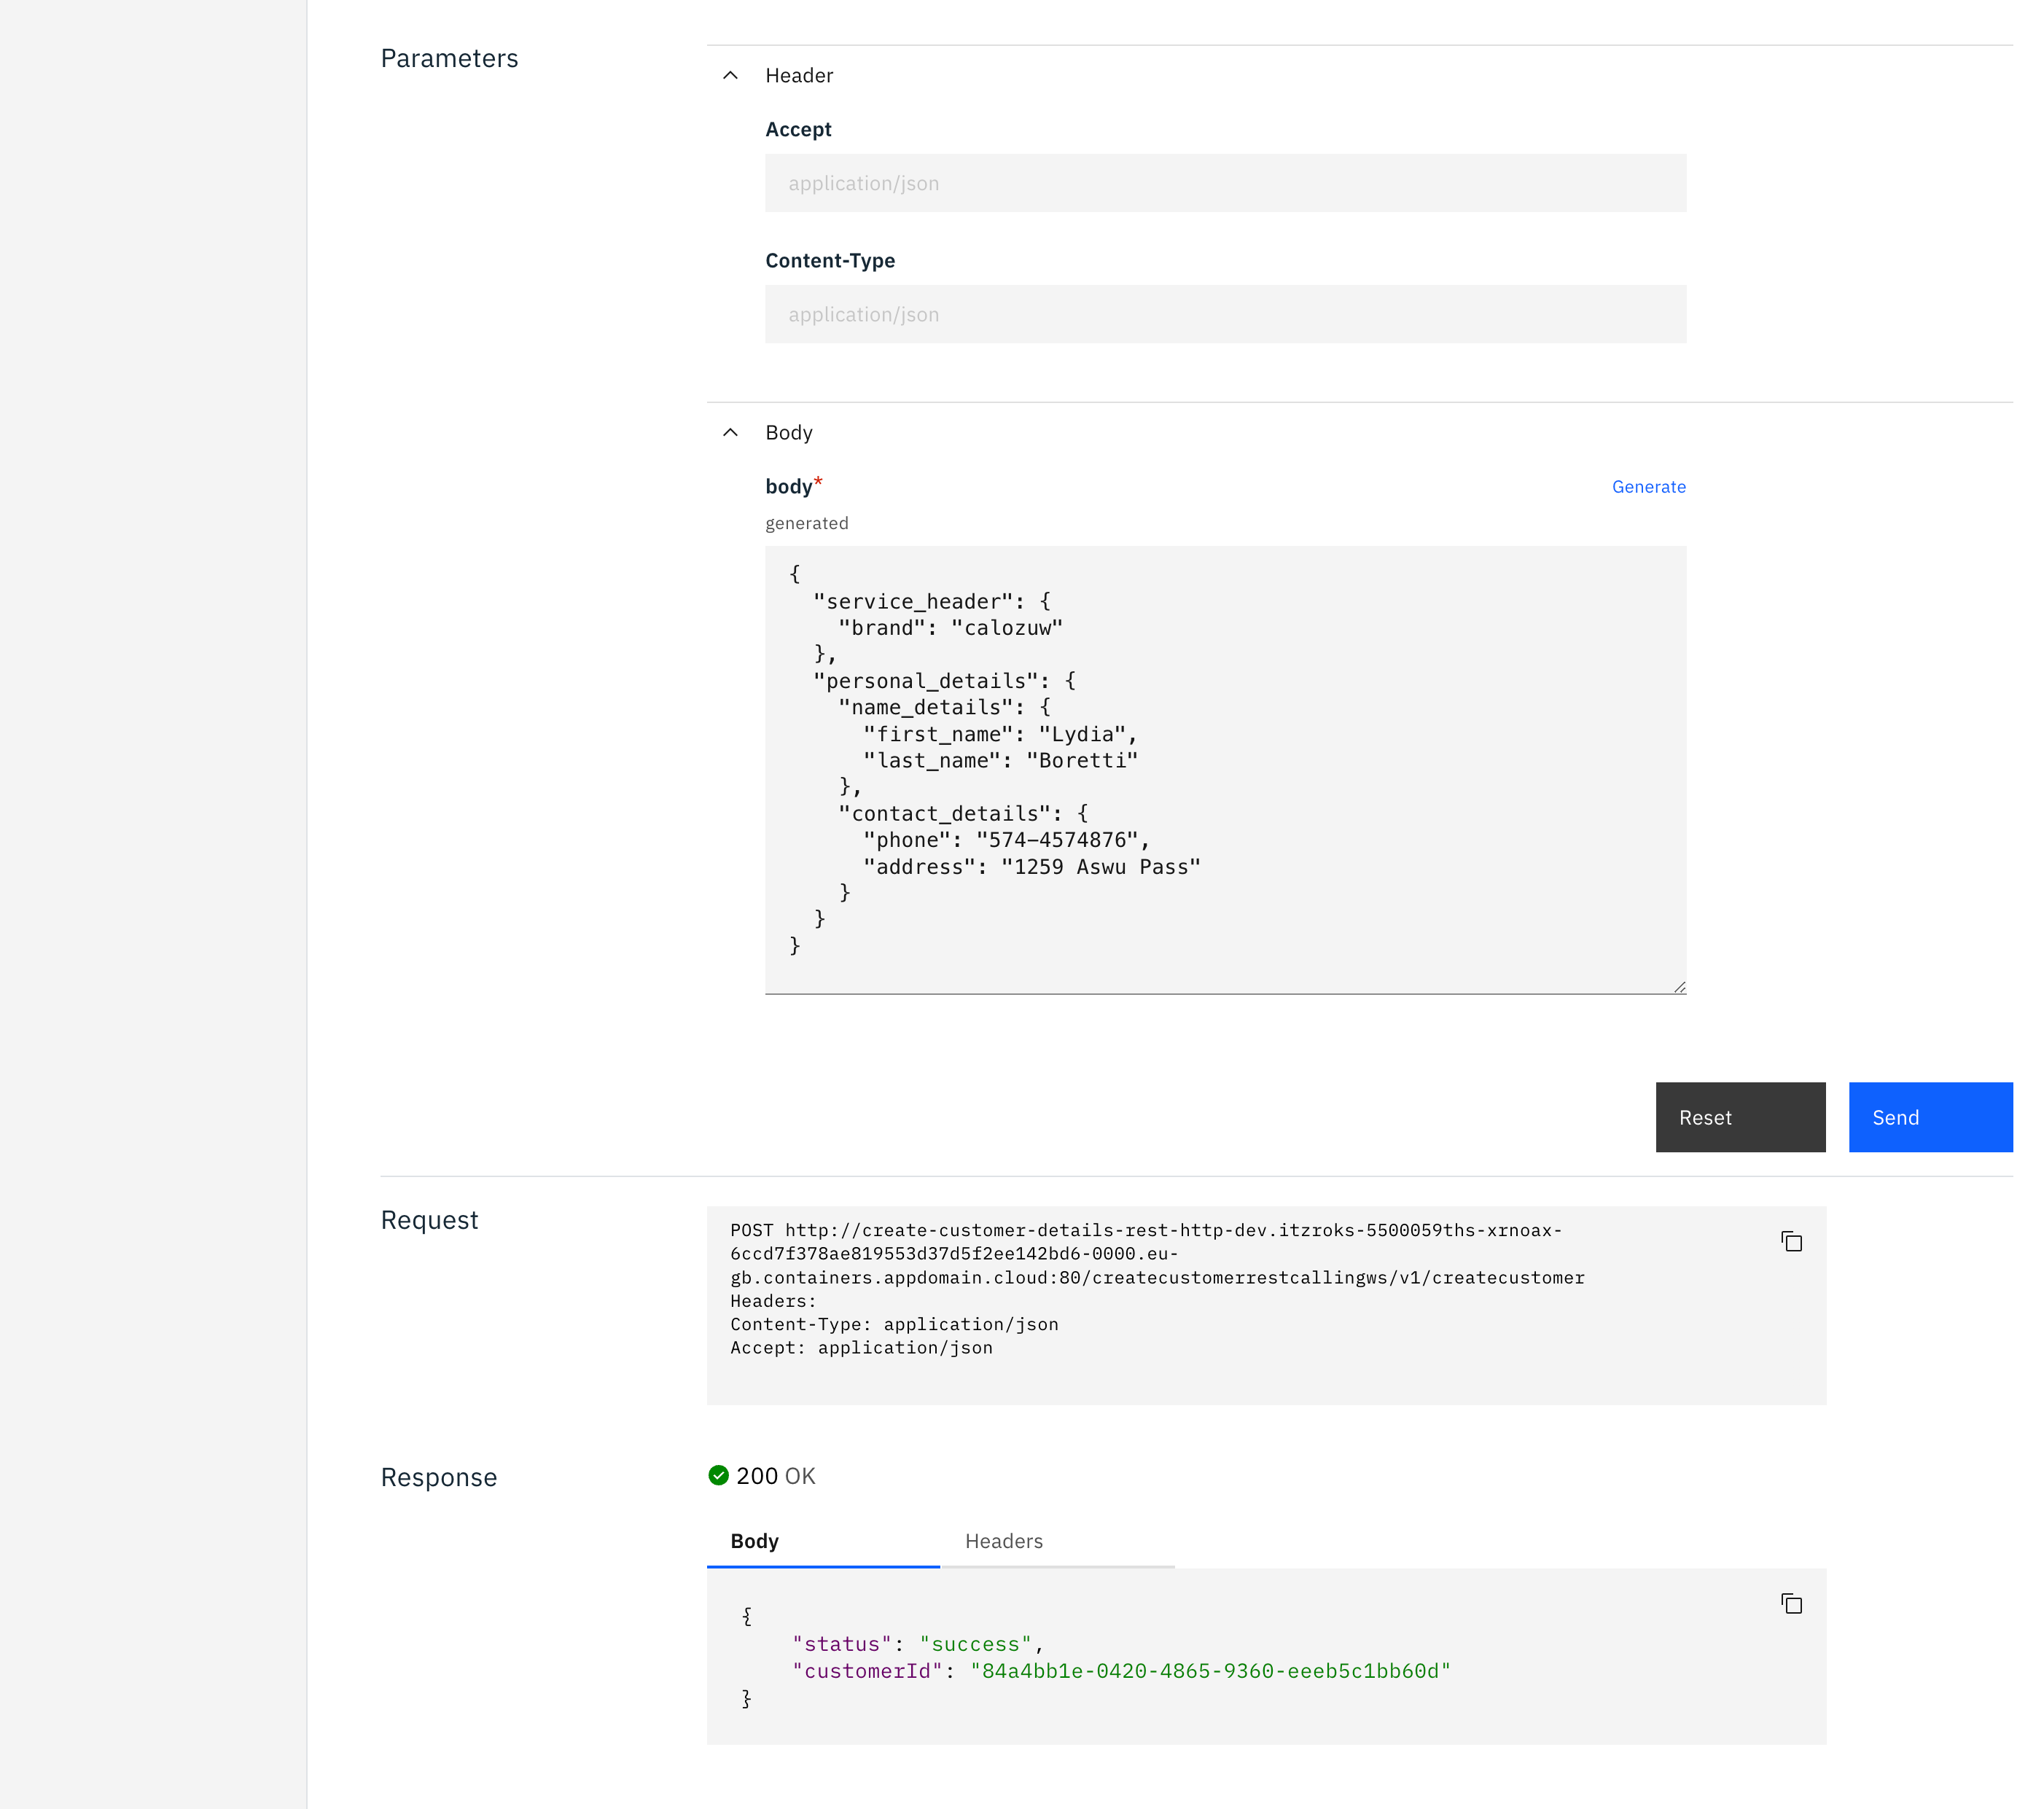
Valid request
This concludes this section.