Deploying Watson Studio on Cloud Pak for Data with ArgoCD
Overview
In this section we're going to complete the installation of Watson Studio on Cloud Pak for Data using GitOps and ArgoCD.

ArgoCD applications will be created for each of these resources. Specifically, ArgoCD applications will keep the cluster synchronized with the application YAML definitions stored in Git.
By the end of this topic we'll have a Watson Studio enabled on Cloud Pak for Data.
Pre-requisites
Tip
In macOS, many of these utilities can be installed using Homebrew.
Please see these instructions for more information about how to install these utilities.
Before attempting this section, you must have completed the following tasks:
- You have reviewed Cloud Pak for Data tutorial and have created an OCP cluster instance.
- You have completed the tutorial section to customize the GitOps repository, install ArgoCD and have installed command line utilities such as
oc,git,treeetc. - You have completed the tutorial section to create the
toolsandibm-common-servicesnamespaces using GitOps. - You have completed the tutorial section to deploy Cloud Pak for Data platform using GitOps.
Please see the previous sections of this guide for information on how to do these tasks.
Deploy services to the cluster
We've deployed IBM Cloud Pak for Data platform using GitOps. We can install additional services such as Watson Studio on this platform.
These components are part of the services layer in our architecture, and that requires us to access /0-bootstrap/single-cluster/2-services within our GitOps repository.
Installing Watson Studio using GitOps requires us to provide image registry access to service accounts zen-admin-sa, zen-editor-sa, zen-norbac-sa and zen-viewer-sa. This is provided through ArgoCD infra application.
-
How to provide service account access
As we saw earlier, the
infraArgoCD application uses the contents of the/0-bootstrap/single-cluster/1-infrafolder to manage infrastructure resources. -
Review ArgoCD infra folder
Let’s reexamine the contents of
0-bootstrap/single-cluster/1-infra/kustomization.yamlto see how ArgoCD manages the resources deployed to the cluster.Issue the following command:
cat 0-bootstrap/single-cluster/1-infra/kustomization.yamlWe can see the contents of the
kustomization.yaml:resources: #- argocd/consolelink.yaml - argocd/consolenotification.yaml - argocd/namespace-ibm-common-services.yaml #- argocd/namespace-ci.yaml #- argocd/namespace-dev.yaml #- argocd/namespace-staging.yaml #- argocd/namespace-prod.yaml #- argocd/namespace-cloudpak.yaml #- argocd/namespace-istio-system.yaml #- argocd/namespace-openldap.yaml - argocd/namespace-sealed-secrets.yaml - argocd/namespace-tools.yaml #- argocd/namespace-instana-agent.yaml #- argocd/namespace-robot-shop.yaml #- argocd/namespace-openshift-storage.yaml #- argocd/namespace-spp.yaml #- argocd/namespace-spp-velero.yaml #- argocd/namespace-baas.yaml #- argocd/namespace-db2.yaml #- argocd/namespace-mq.yaml #- argocd/serviceaccounts-ibm-common-services.yaml #- argocd/serviceaccounts-tools.yaml #- argocd/serviceaccounts-db2.yaml #- argocd/serviceaccounts-mq.yaml #- argocd/scc-wkc-iis.yaml #- argocd/storage.yaml #- argocd/infraconfig.yaml #- argocd/machinesets.yaml patches: - target: group: argoproj.io kind: Application labelSelector: "gitops.tier.layer=infra" patch: |- - op: add path: /spec/source/repoURL value: https://github.com/tutorial-org-123/multi-tenancy-gitops-infra.git - op: add path: /spec/source/targetRevision value: master -
Add service account permissions
Open
0-bootstrap/single-cluster/1-infra/kustomization.yamland make sure following resources are uncommented:- argocd/consolenotification.yaml - argocd/namespace-ibm-common-services.yaml - argocd/namespace-sealed-secrets.yaml - argocd/namespace-tools.yaml - argocd/serviceaccounts-tools.yamlIf you take a diff, and just look for the added services:
git diff | grep "^\+" | grep -v "^\+++"You will have the following. Remember, namespaces and consolenotification were already enabled.
+- argocd/serviceaccounts-tools.yamlThis shows the resources to be deployed for infrastructure.
Commit and push changes to your git repository:
git add .
git commit -s -m "Deploy Watson Studio Service Account Access"
git push origin $GIT_BRANCH
The changes have now been pushed to your GitOps repository:
[master e629db3] Deploy Watson Studio Service Account Access 1 file changed, 1 insertion(+), 1 deletion(-) Enumerating objects: 11, done. Counting objects: 100% (11/11), done. Delta compression using up to 8 threads Compressing objects: 100% (6/6), done. Writing objects: 100% (6/6), 530 bytes | 530.00 KiB/s, done. Total 6 (delta 5), reused 0 (delta 0) remote: Resolving deltas: 100% (5/5), completed with 5 local objects. To https://github.com/tutorial-org-123/multi-tenancy-gitops.git b49dff5..e629db3 master -> master -
The
infraapplication detects the change and resyncsOnce these changes to our GitOps repository are seen by ArgoCD, it will resync the cluster to the desired new state.
Switch to the ArgoCD UI Applications view, filter by
infraproject.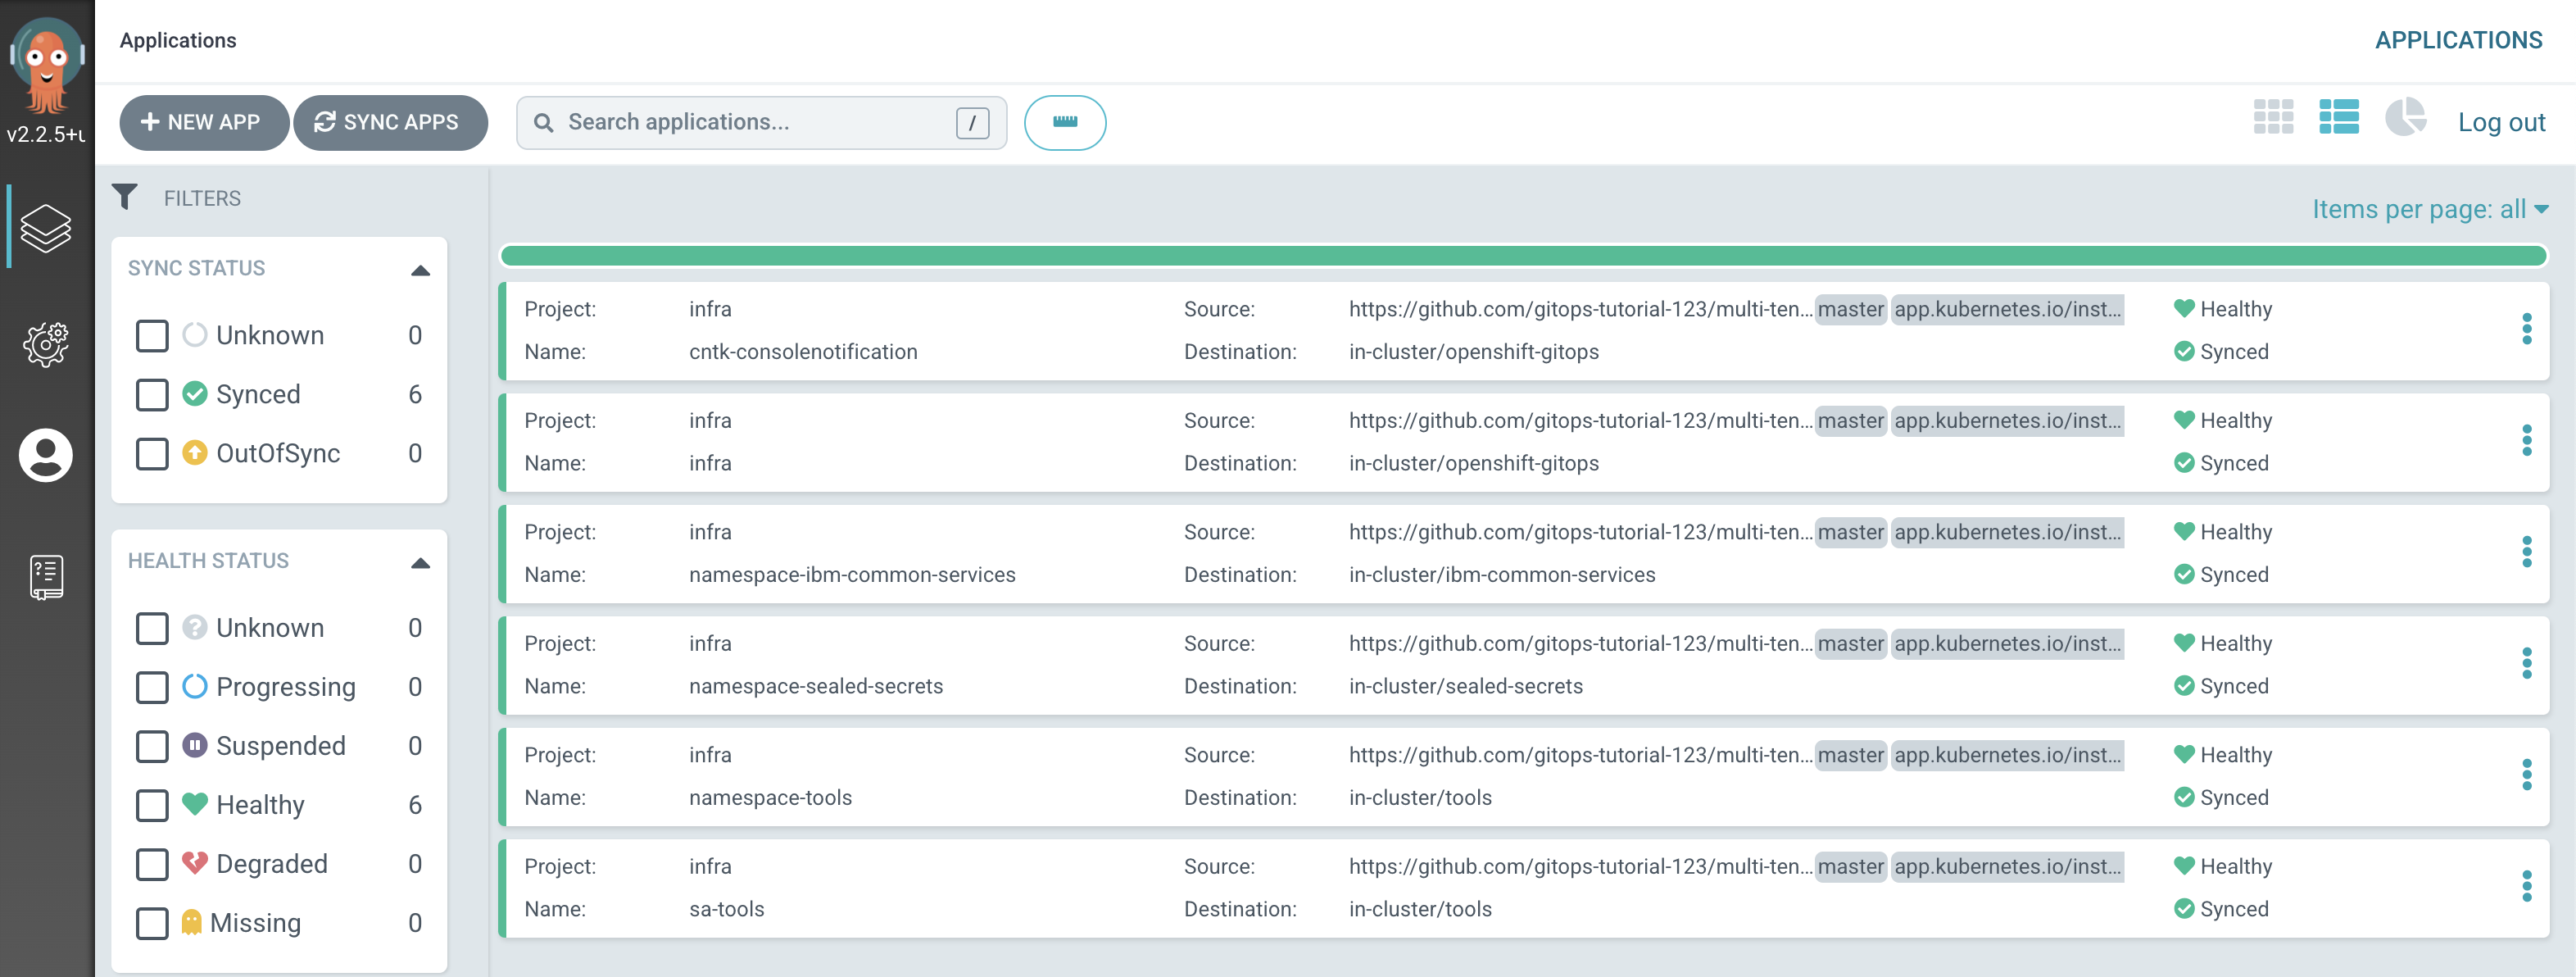
Notice how the
infraapplication has detected the changes and is automatically synching the cluster to create the newsa-toolsArgoCD application.Tip
You can manually
syncandrefreshtheinfraArgoCD application in the UI if you don't want to wait for ArgoCD to detect the change. -
How to deploy services
As we saw earlier, the
servicesapplication uses the contents of the/0-bootstrap/single-cluster/2-servicesfolder to determine which Kubernetes resources should be deployed in the cluster. -
Review ArgoCD services folder
Let’s reexamine the contents of
0-bootstrap/single-cluster/2-services/kustomization.yamlto see how ArgoCD manages the resources deployed to the cluster.Issue the following command:
cat 0-bootstrap/single-cluster/2-services/kustomization.yamlWe can see the contents of the
kustomization.yaml:resources: # IBM Software ## Cloud Pak for Integration #- argocd/operators/ibm-ace-operator.yaml #- argocd/operators/ibm-apic-operator.yaml #- argocd/instances/ibm-apic-instance.yaml #- argocd/instances/ibm-apic-management-portal-instance.yaml #- argocd/instances/ibm-apic-gateway-analytics-instance.yaml #- argocd/operators/ibm-aspera-operator.yaml #- argocd/operators/ibm-assetrepository-operator.yaml #- argocd/operators/ibm-cp4i-operators.yaml #- argocd/operators/ibm-datapower-operator.yaml #- argocd/operators/ibm-eventstreams-operator.yaml #- argocd/operators/ibm-mq-operator.yaml #- argocd/operators/ibm-opsdashboard-operator.yaml #- argocd/operators/ibm-platform-navigator.yaml #- argocd/instances/ibm-platform-navigator-instance.yaml ## Cloud Pak for Business Automation #- argocd/operators/ibm-cp4a-operator.yaml #- argocd/operators/ibm-db2u-operator.yaml #- argocd/operators/ibm-process-mining-operator.yaml #- argocd/instances/ibm-process-mining-instance.yaml ## Cloud Pak for Data - argocd/operators/ibm-cpd-scheduling-operator.yaml #- argocd/instances/ibm-cpd-scheduling-instance.yaml - argocd/operators/ibm-cpd-platform-operator.yaml - argocd/instances/ibm-cpd-instance.yaml #- argocd/operators/ibm-cpd-ws-operator.yaml #- argocd/instances/ibm-cpd-ws-instance.yaml #- argocd/operators/ibm-cpd-wkc-operator.yaml #- argocd/instances/ibm-cpd-wkc-instance.yaml ## Cloud Pak for Security #- argocd/operators/ibm-cp4s-operator.yaml #- argocd/instances/ibm-cp4sthreatmanagements-instance.yaml ## IBM Foundational Services / Common Services #- argocd/operators/ibm-foundations.yaml #- argocd/instances/ibm-foundational-services-instance.yaml #- argocd/operators/ibm-automation-foundation-core-operator.yaml #- argocd/operators/ibm-automation-foundation-operator.yaml #- argocd/operators/ibm-license-service-operator.yaml #- argocd/instances/ibm-license-service-instance.yaml ## IBM Catalogs - argocd/operators/ibm-catalogs.yaml # B2BI #- argocd/instances/ibm-sfg-db2.yaml #- argocd/instances/ibm-sfg-mq.yaml #- argocd/instances/ibm-sfg-b2bi-setup.yaml #- argocd/instances/ibm-sfg-b2bi.yaml # Required for IBM MQ #- argocd/instances/openldap.yaml # Required for IBM ACE, IBM MQ #- argocd/operators/cert-manager.yaml #- argocd/instances/cert-manager-instance.yaml # Sealed Secrets - argocd/instances/sealed-secrets.yaml # CICD #- argocd/operators/grafana-operator.yaml #- argocd/instances/grafana-instance.yaml #- argocd/instances/grafana-instana.yaml #- argocd/instances/artifactory.yaml #- argocd/instances/chartmuseum.yaml #- argocd/instances/developer-dashboard.yaml #- argocd/instances/swaggereditor.yaml #- argocd/instances/sonarqube.yaml #- argocd/instances/pact-broker.yaml # In OCP 4.7+ we need to install openshift-pipelines and possibly privileged scc to the pipeline serviceaccount #- argocd/operators/openshift-pipelines.yaml # Service Mesh #- argocd/operators/elasticsearch.yaml #- argocd/operators/jaeger.yaml #- argocd/operators/kiali.yaml #- argocd/operators/openshift-service-mesh.yaml #- argocd/instances/openshift-service-mesh-instance.yaml # Monitoring #- argocd/instances/instana-agent.yaml #- argocd/instances/instana-robot-shop.yaml # Spectrum Protect Plus #- argocd/operators/spp-catalog.yaml #- argocd/operators/spp-operator.yaml #- argocd/instances/spp-instance.yaml #- argocd/operators/oadp-operator.yaml #- argocd/instances/oadp-instance.yaml #- argocd/instances/baas-instance.yaml patches: - target: group: argoproj.io kind: Application labelSelector: "gitops.tier.layer=services,gitops.tier.source=git" patch: |- - op: add path: /spec/source/repoURL value: https://github.com/tutorial-org-123/multi-tenancy-gitops-services.git - op: add path: /spec/source/targetRevision value: master - target: group: argoproj.io kind: Application labelSelector: "gitops.tier.layer=applications,gitops.tier.source=git" patch: |- - op: add path: /spec/source/repoURL value: https://github.com/tutorial-org-123/multi-tenancy-gitops-apps.git - op: add path: /spec/source/targetRevision value: master - target: group: argoproj.io kind: Application labelSelector: "gitops.tier.layer=services,gitops.tier.source=helm" patch: |- - op: add path: /spec/source/repoURL value: https://charts.cloudnativetoolkit.dev - target: name: ibm-automation-foundation-operator patch: |- - op: add path: /spec/source/helm/parameters/- value: name: spec.channel value: v1.1 -
Add the services layer to the cluster
Note
The
Watson Studioinstance requires a RWX storageclass and it is set tomanaged-nfs-storageby default in the ArgoCD Application0-bootstrap/single-cluster/2-services/argocd/instances/ibm-cp4d-watson-studio-instance.yaml. This storageclass is available for Red Hat OpenShift on IBM Cloud cluster provisioned from IBM Technology Zone with NFS storage selected.Open
0-bootstrap/single-cluster/2-services/kustomization.yamland make sure following resources are uncommented:# Cloud Pak for Data - argocd/operators/ibm-cpd-scheduling-operator.yaml - argocd/operators/ibm-cpd-platform-operator.yaml - argocd/instances/ibm-cpd-instance.yaml - argocd/operators/ibm-cpd-ws-operator.yaml - argocd/instances/ibm-cpd-ws-instance.yaml # IBM Catalogs - argocd/operators/ibm-catalogs.yaml # Sealed Secrets - argocd/instances/sealed-secrets.yamlIf you take a diff, and just look for the added services:
git diff | grep "^\+" | grep -v "^\+++"You will have the following. Remember, CP4D platform resources were already enabled.
+- argocd/operators/ibm-cpd-ws-operator.yaml
+- argocd/instances/ibm-cpd-ws-instance.yaml
This shows the resources to be deployed for services.
Commit and push changes to your git repository:
git add .
git commit -s -m "Deploy Watson Studio"
git push origin $GIT_BRANCH
The changes have now been pushed to your GitOps repository:
[master 162f6ed] Deploy Watson Studio
 1 file changed, 2 insertions(+), 2 deletions(-)
Enumerating objects: 11, done.
Counting objects: 100% (11/11), done.
Delta compression using up to 8 threads
Compressing objects: 100% (6/6), done.
Writing objects: 100% (6/6), 520 bytes | 520.00 KiB/s, done.
Total 6 (delta 5), reused 0 (delta 0)
remote: Resolving deltas: 100% (5/5), completed with 5 local objects.
To https://github.com/tutorial-org-123/multi-tenancy-gitops.git
   b49dff5..162f6ed  master -> master
The intention of this operation is to indicate that we'd like the resources declared in
0-bootstrap/single-cluster/2-services/kustomization.yamlto be deployed in the cluster. Like theinfraArgoCD application, the resources created by theservicesArgoCD application will manage the Kubernetes relevant services resources applied to the cluster. -
The
servicesapplication detects the change and resyncsOnce these changes to our GitOps repository are seen by ArgoCD, it will resync the cluster to the desired new state.
Switch to the ArgoCD UI Applications view, click on the
servicesapplication to see the start of this resync process: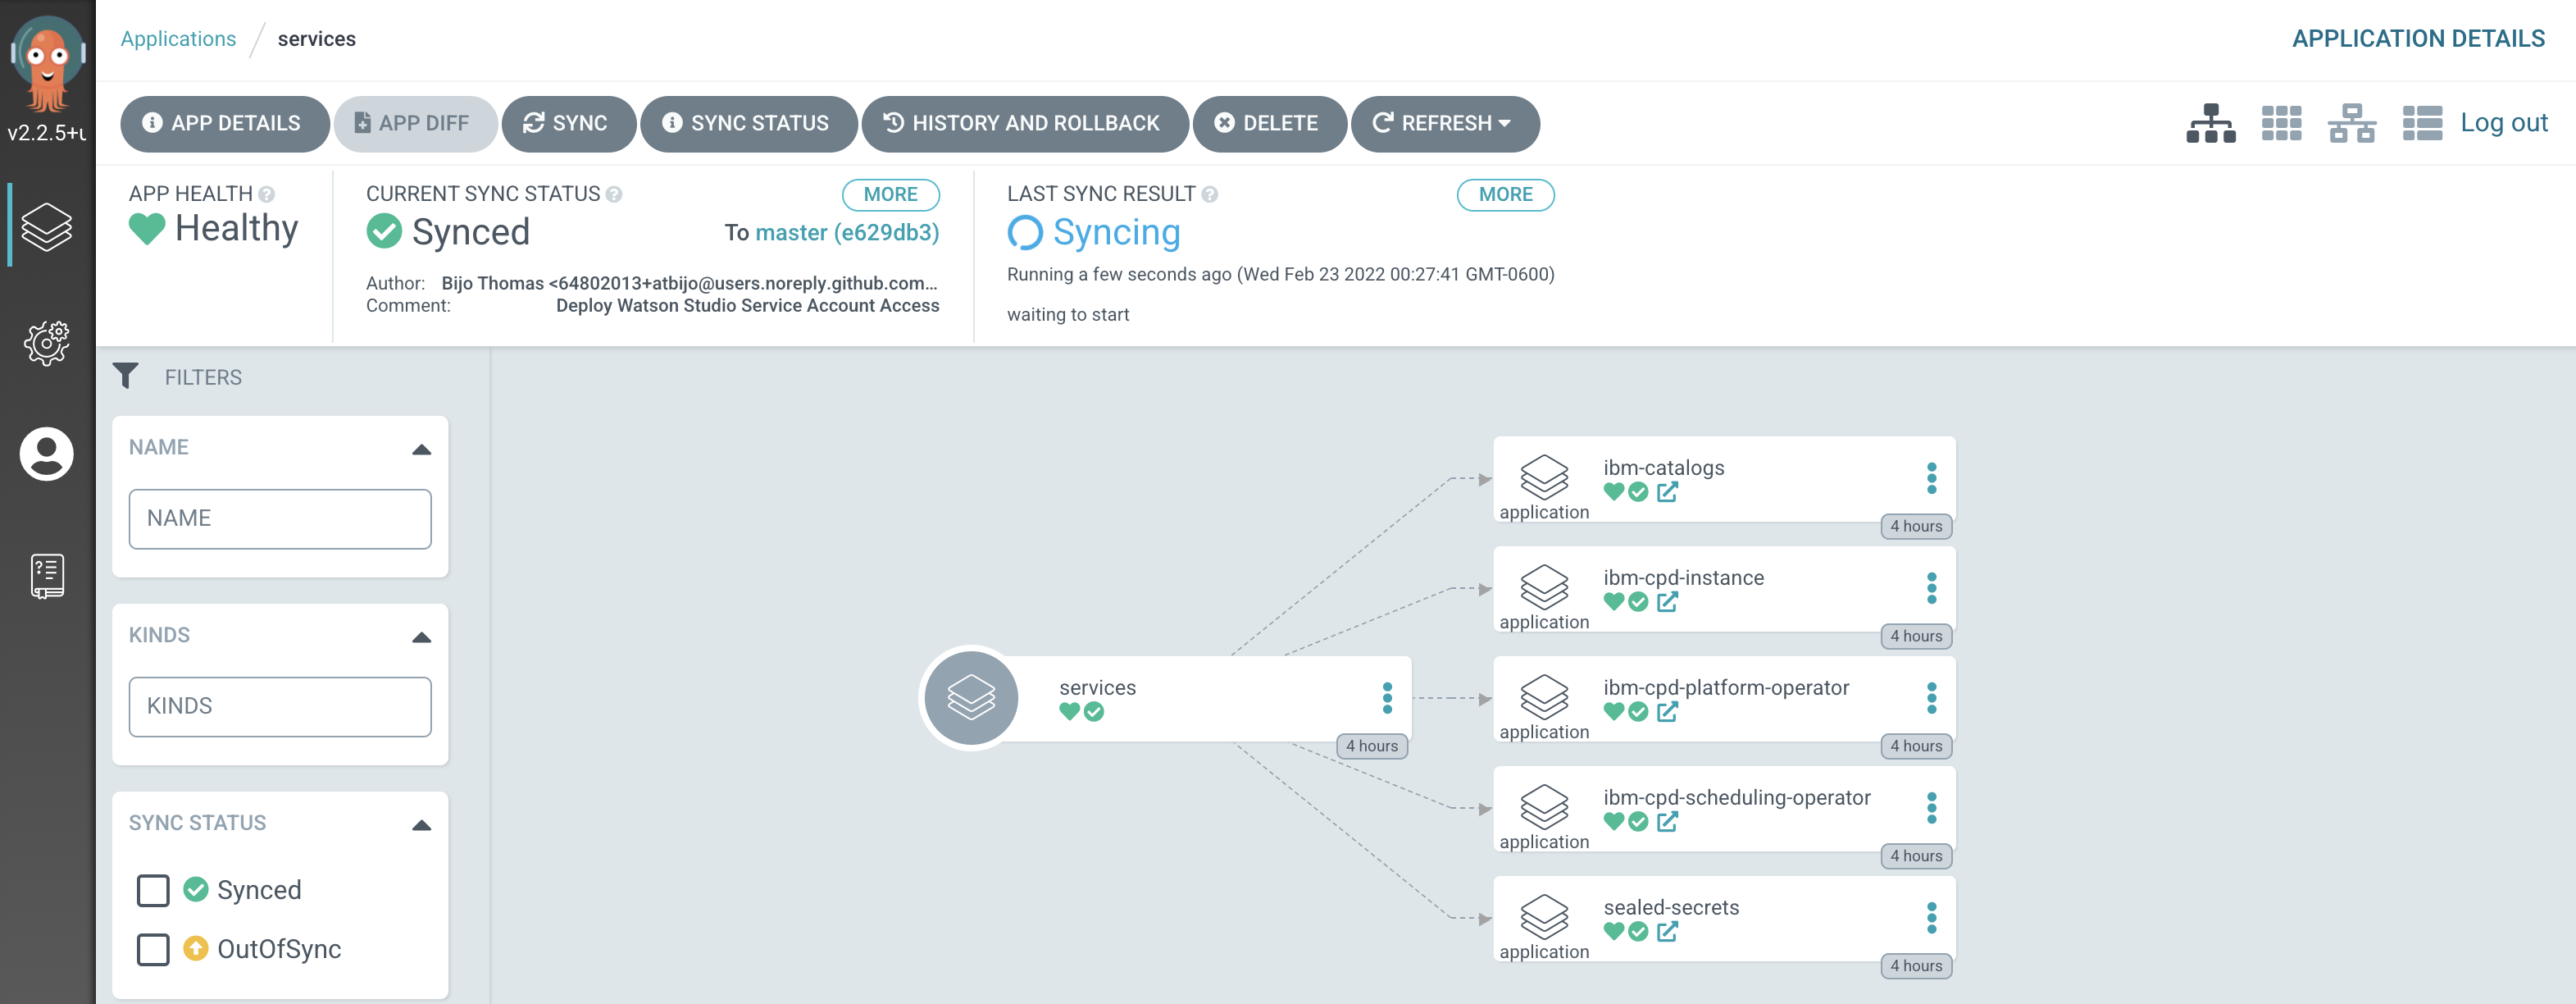
Notice how the
servicesapplication has detected the changes and is automatically synching the cluster.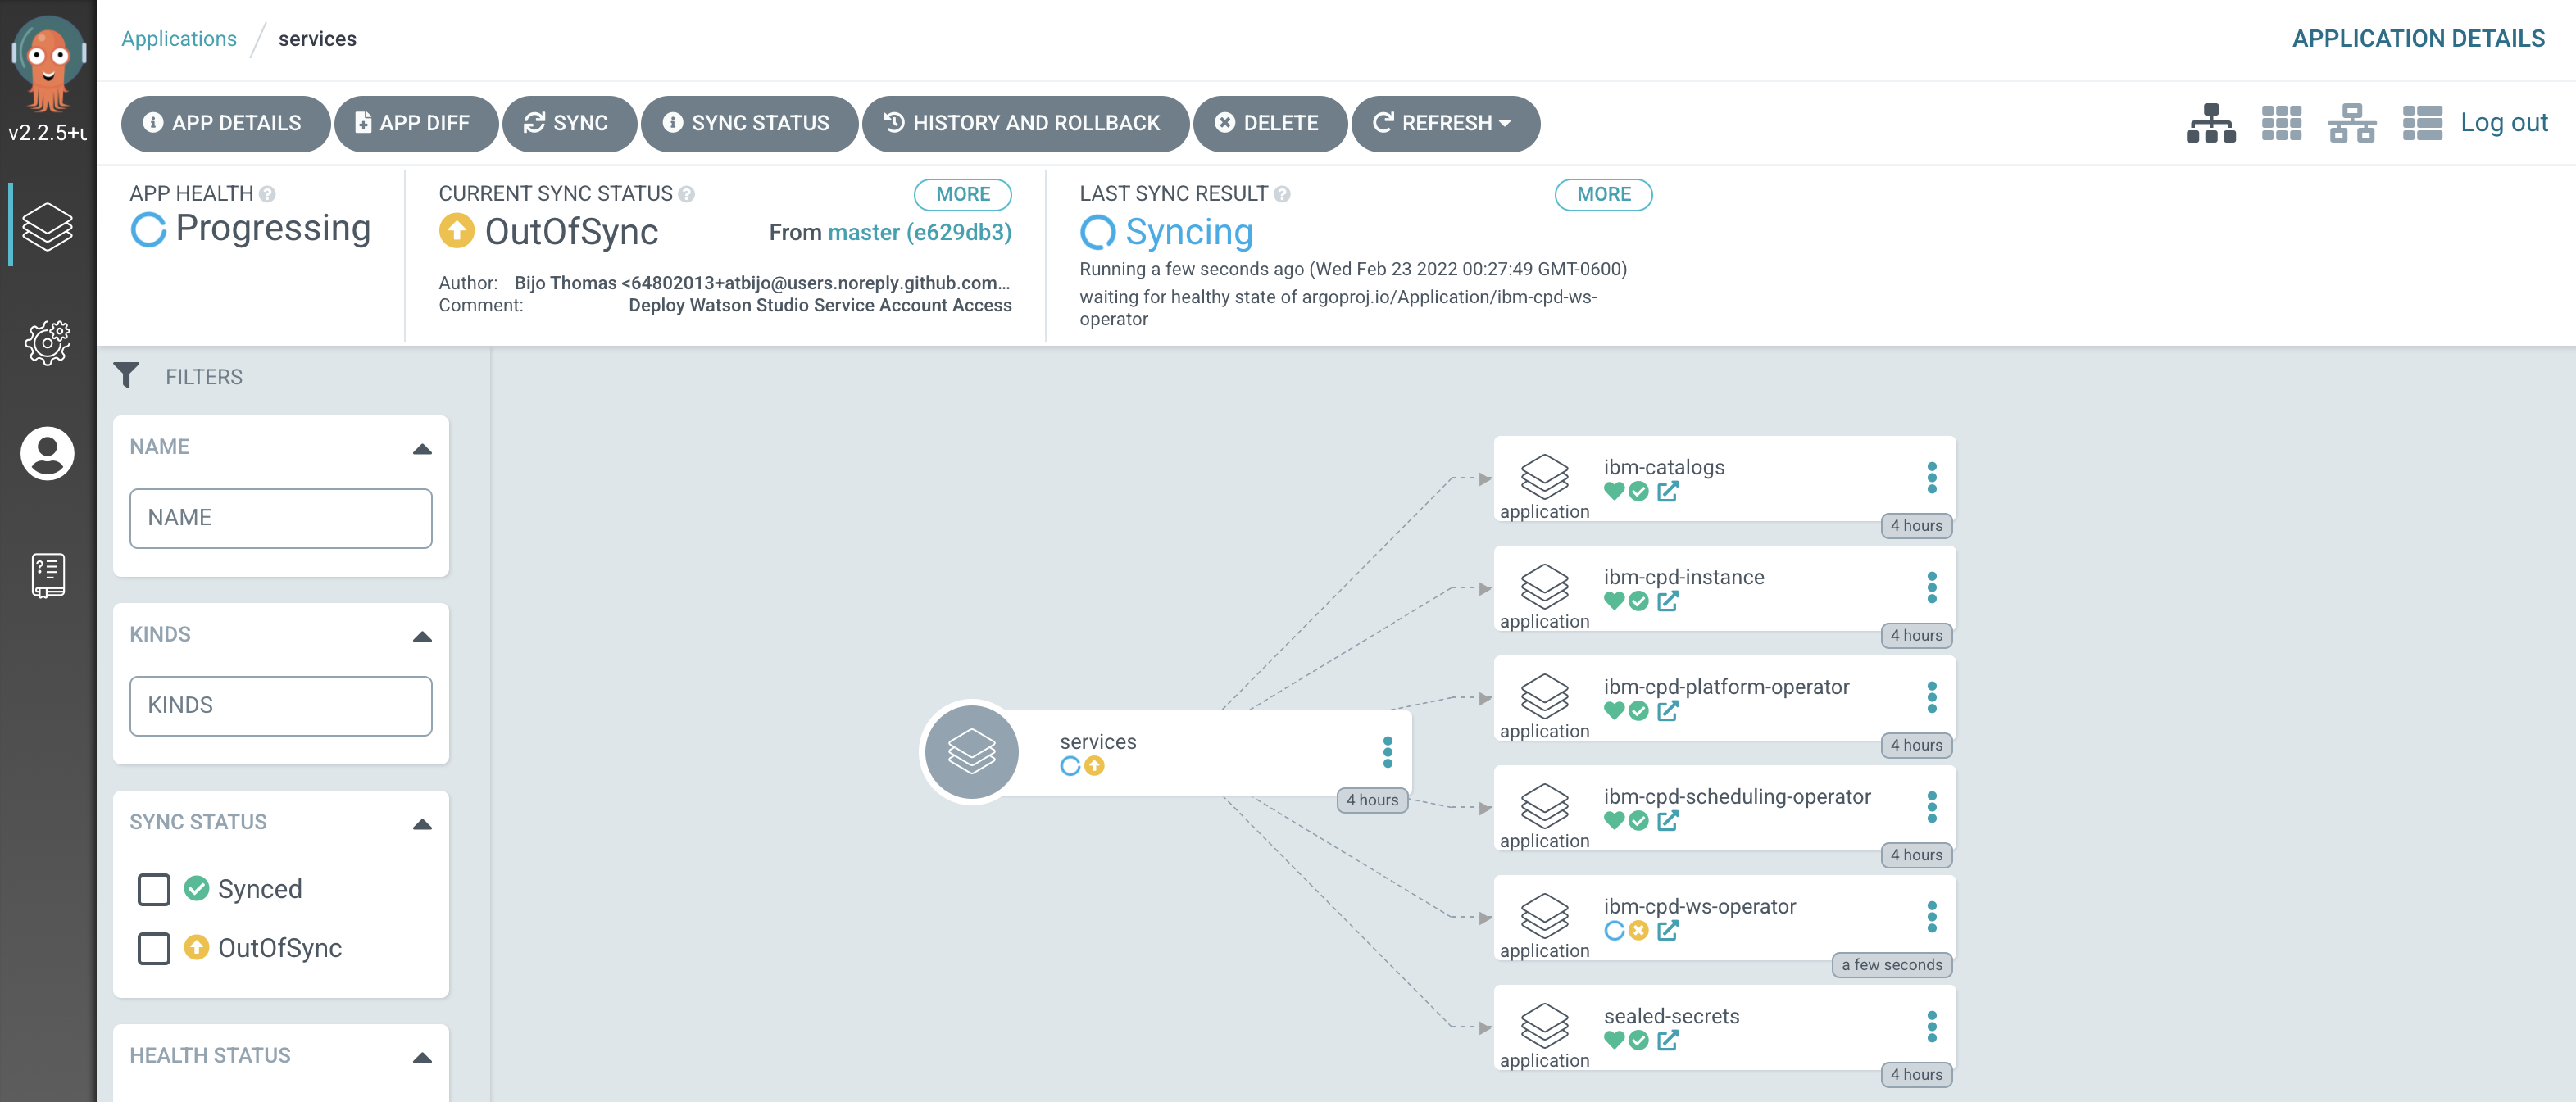
Tip
You can manually
syncandrefreshtheservicesArgoCD application in the UI if you don't want to wait for ArgoCD to detect the change. -
The new ArgoCD applications
After a short while, you'll see lots of new ArgoCD applications have been created to manage the services we have deployed by modifying
kustomization.yamlunder0-bootstrap/single-cluster/2-servicesfolder: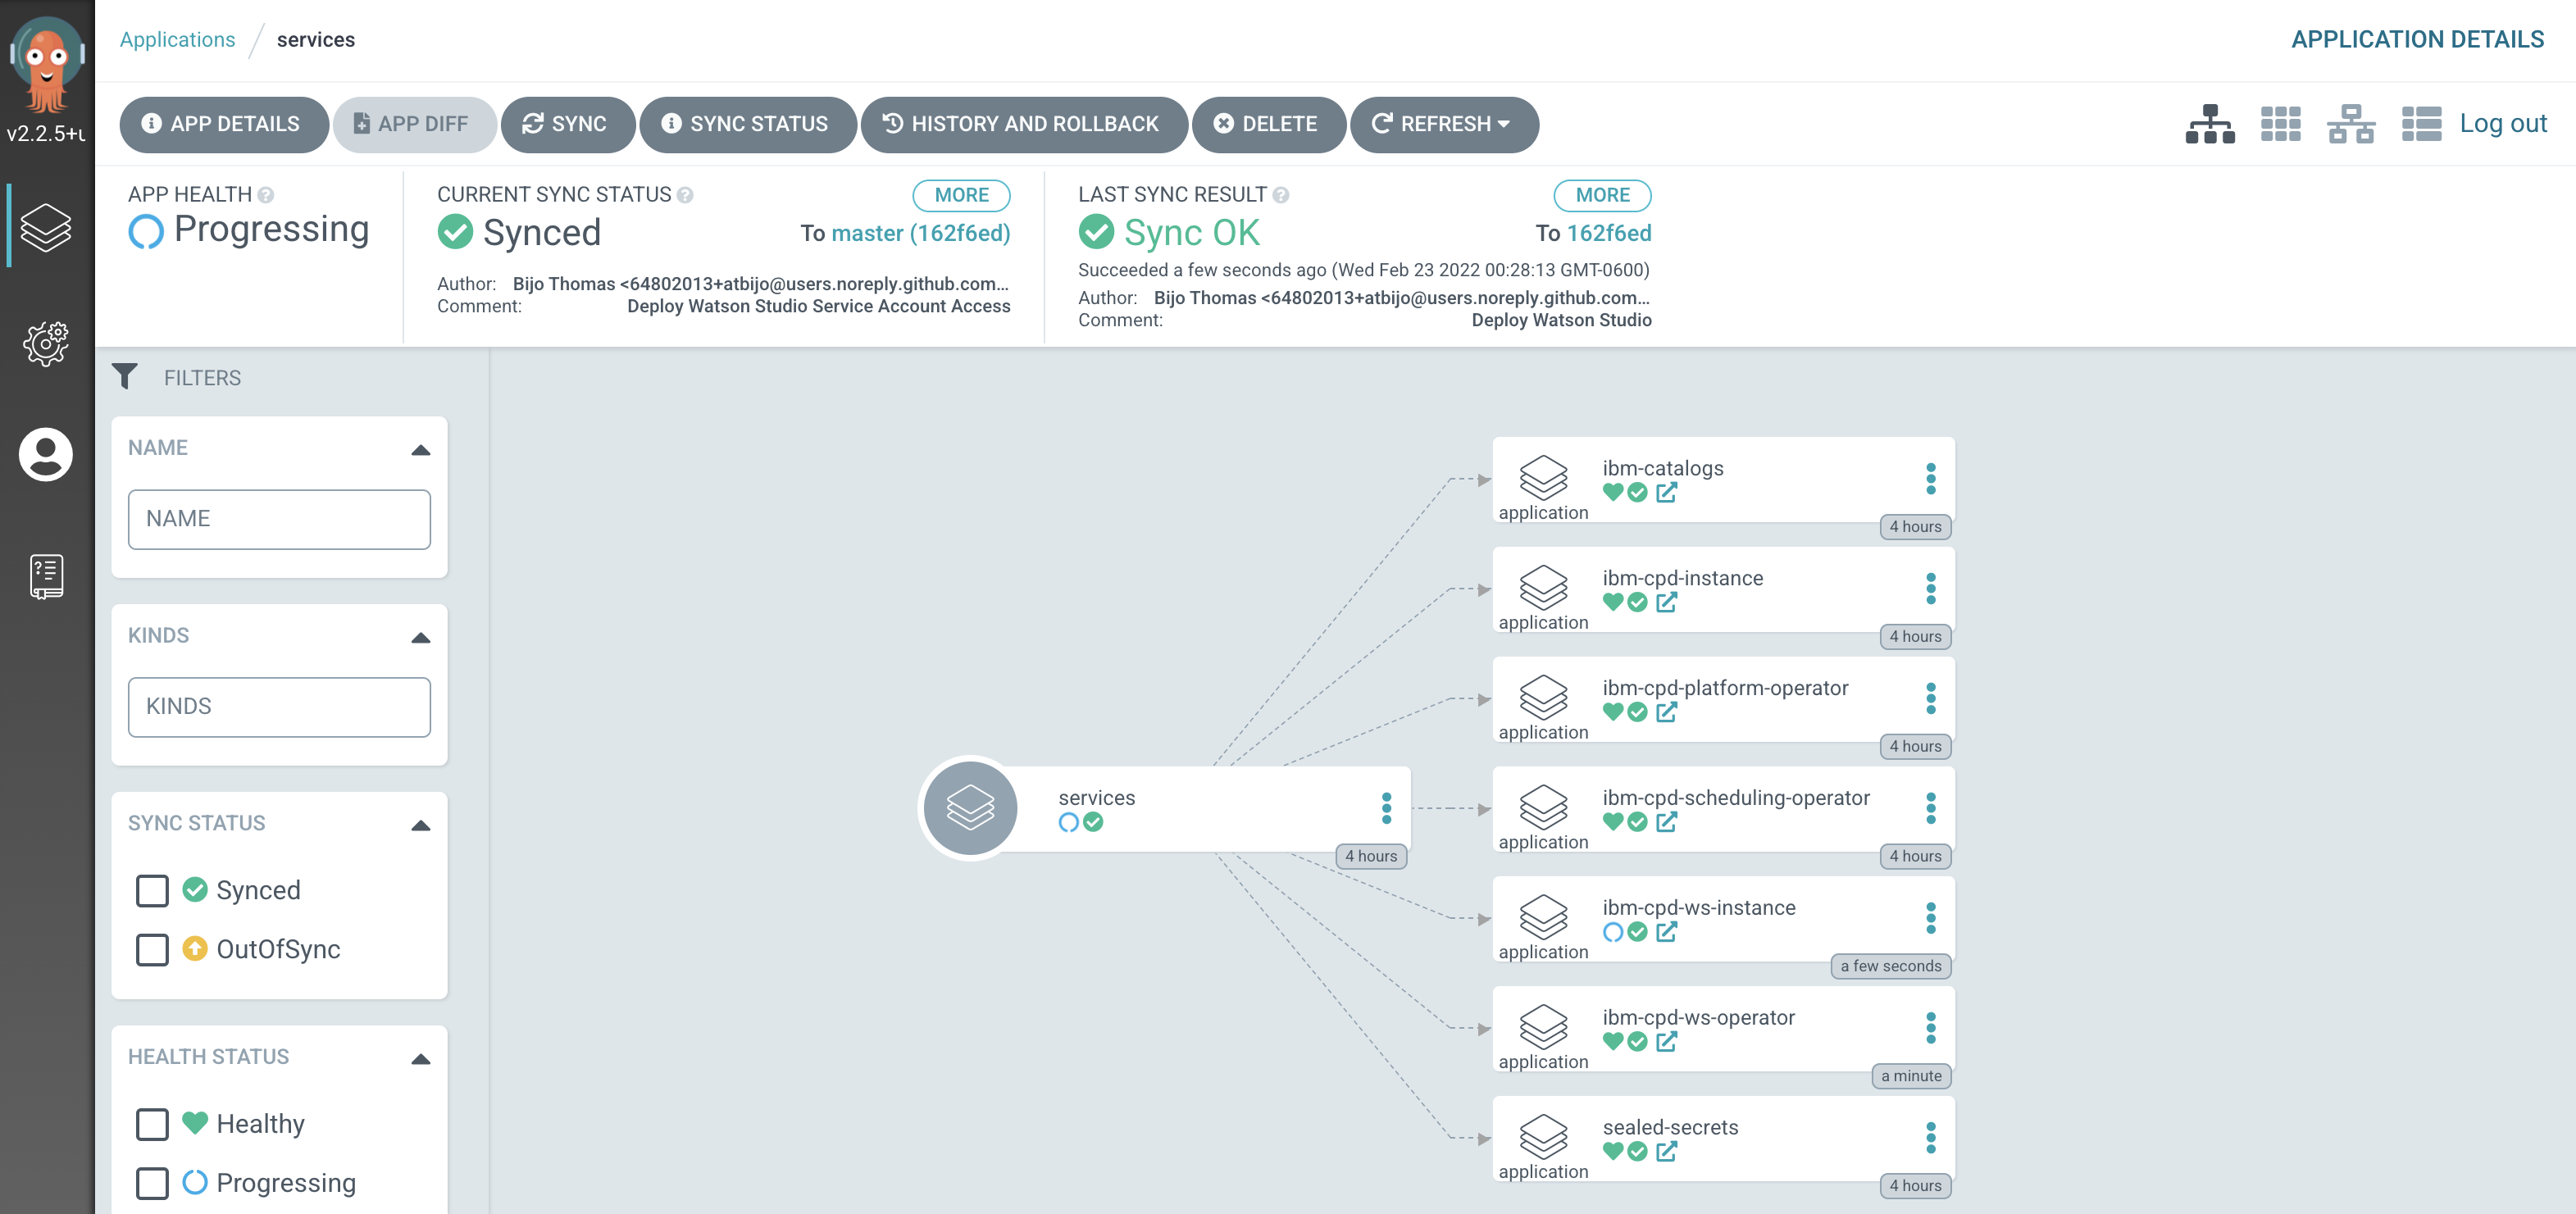
See how most ArgoCD applications are
Syncedalmost immediately, but some spend time inProgressing.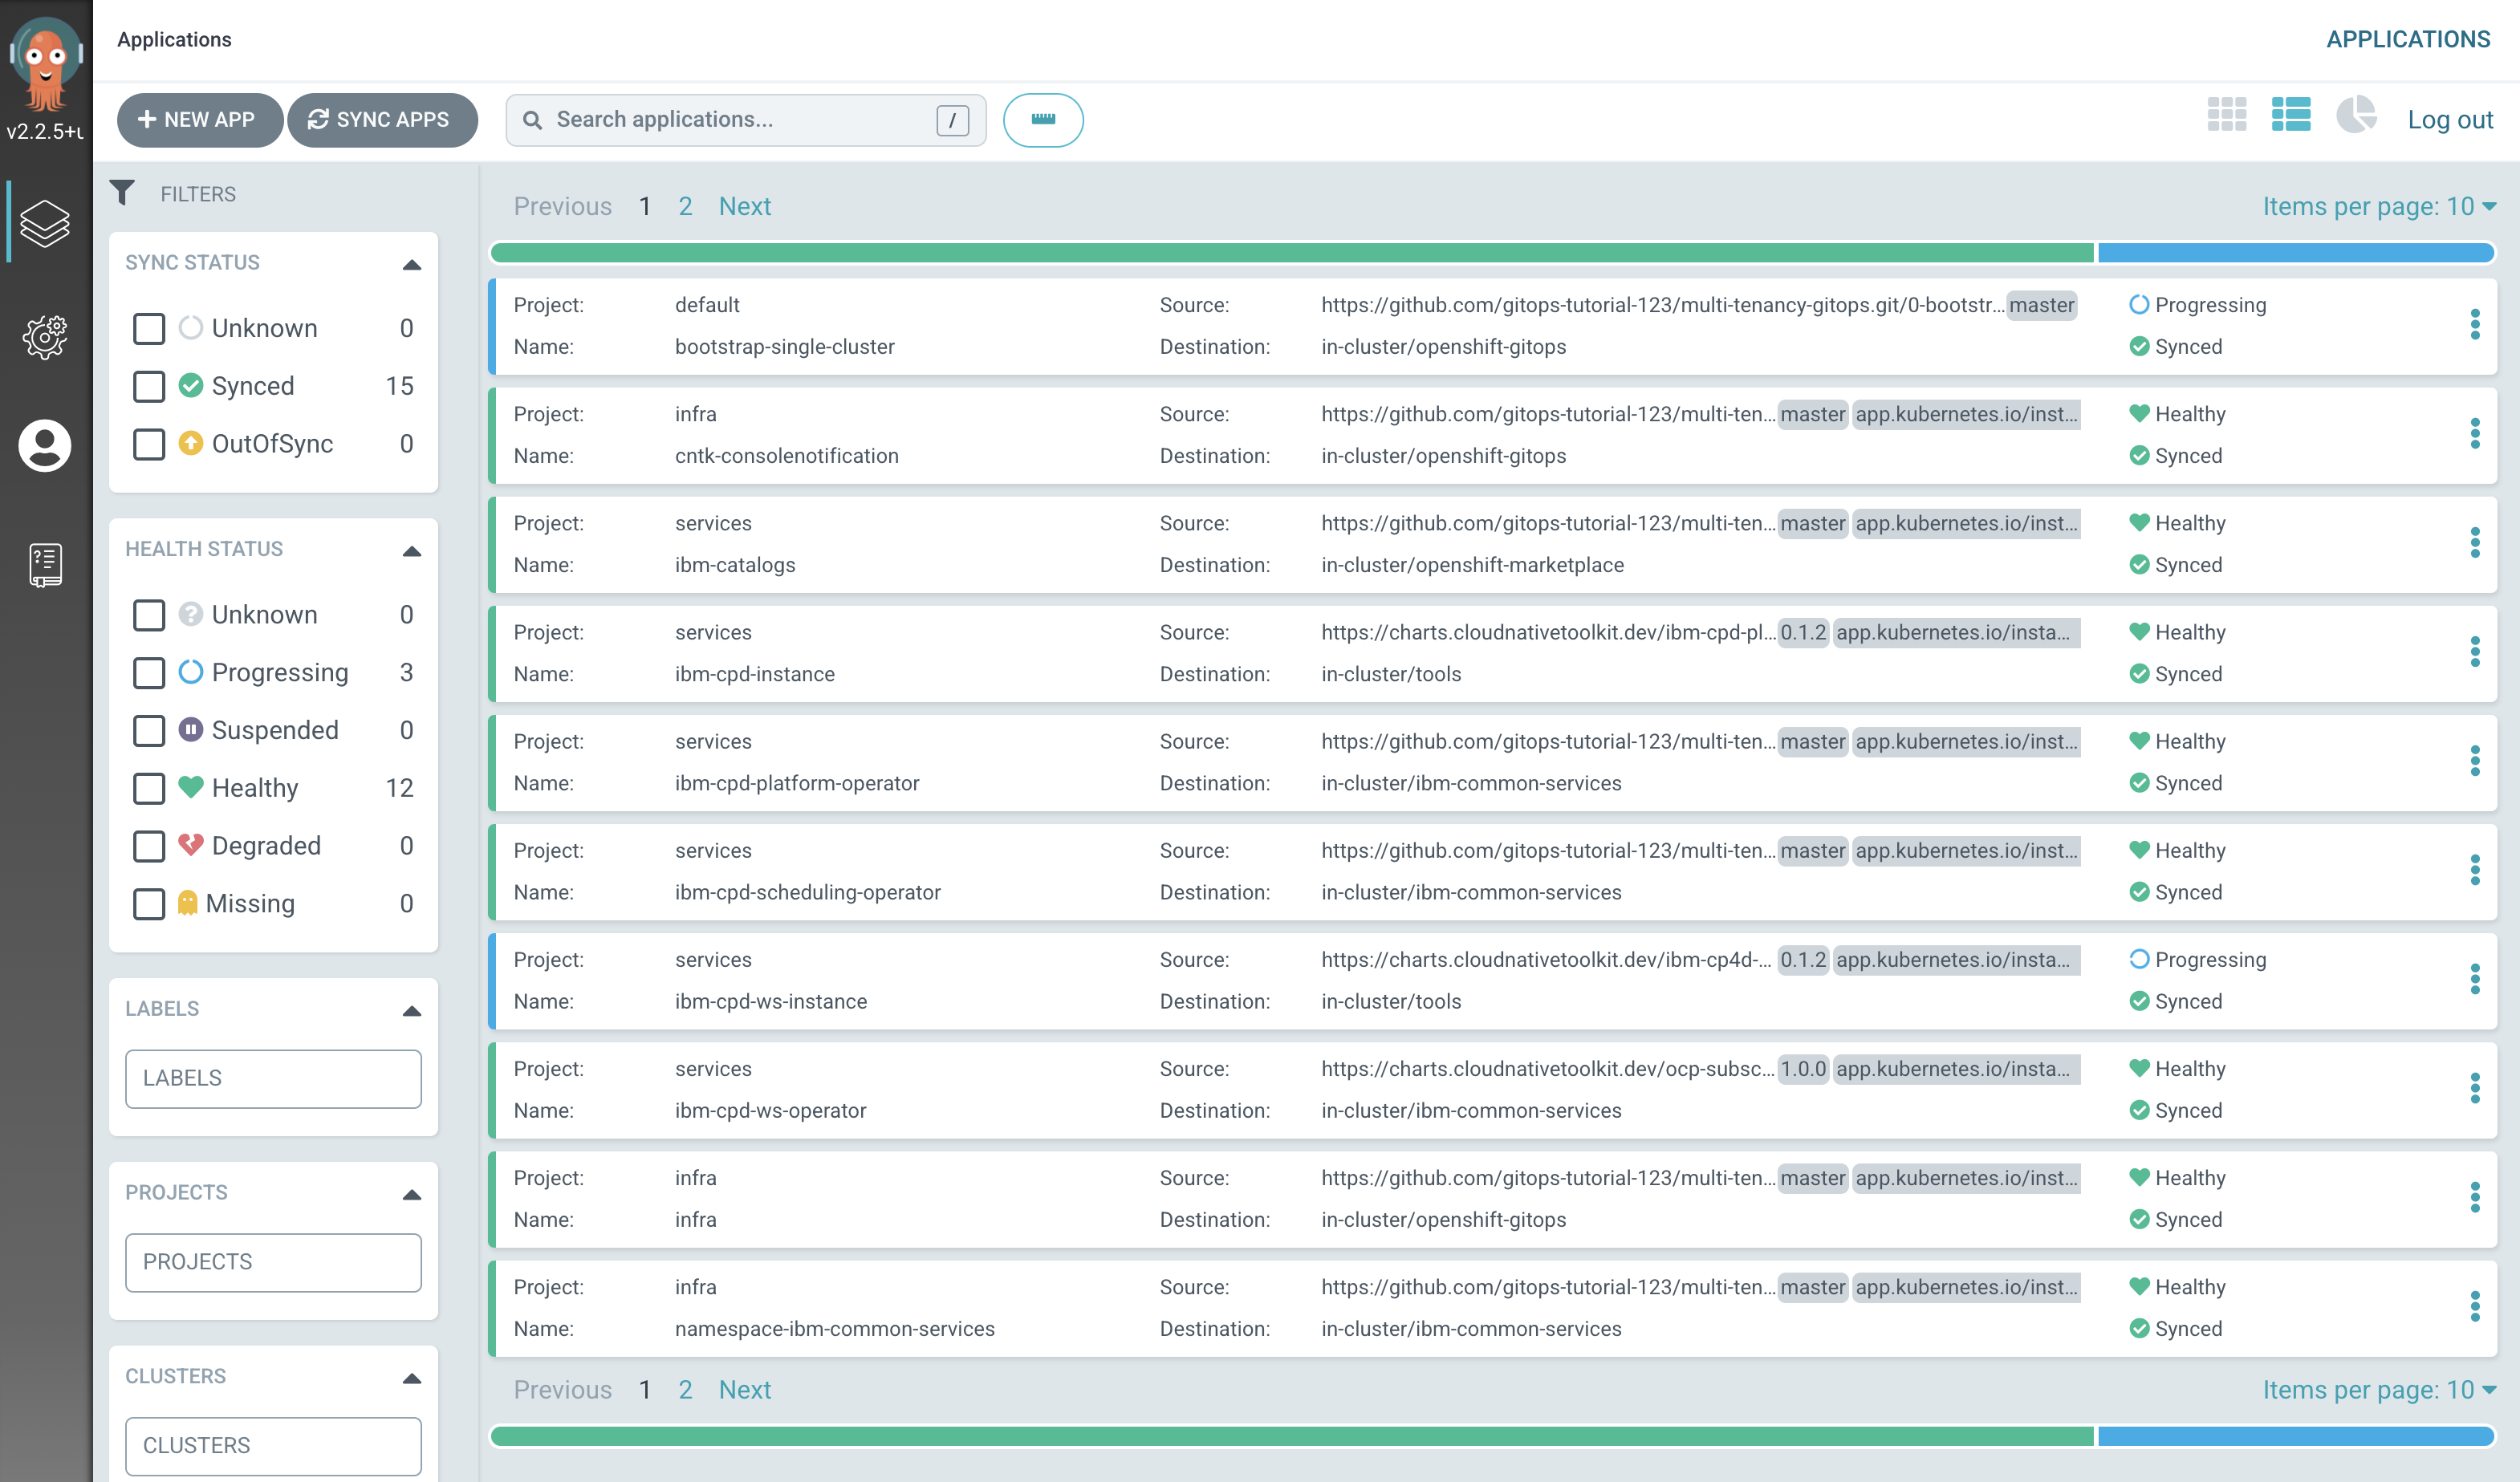
Notice how many more
SyncedArgoCD applications are now in the cluster; these are as a result of the newly added services layer in our architecture. -
Verify that Watson Studio has been deployed successfully.
Switch to the ArgoCD UI Applications view, wait for all ArgoCD applications to become
SyncedandHealthy: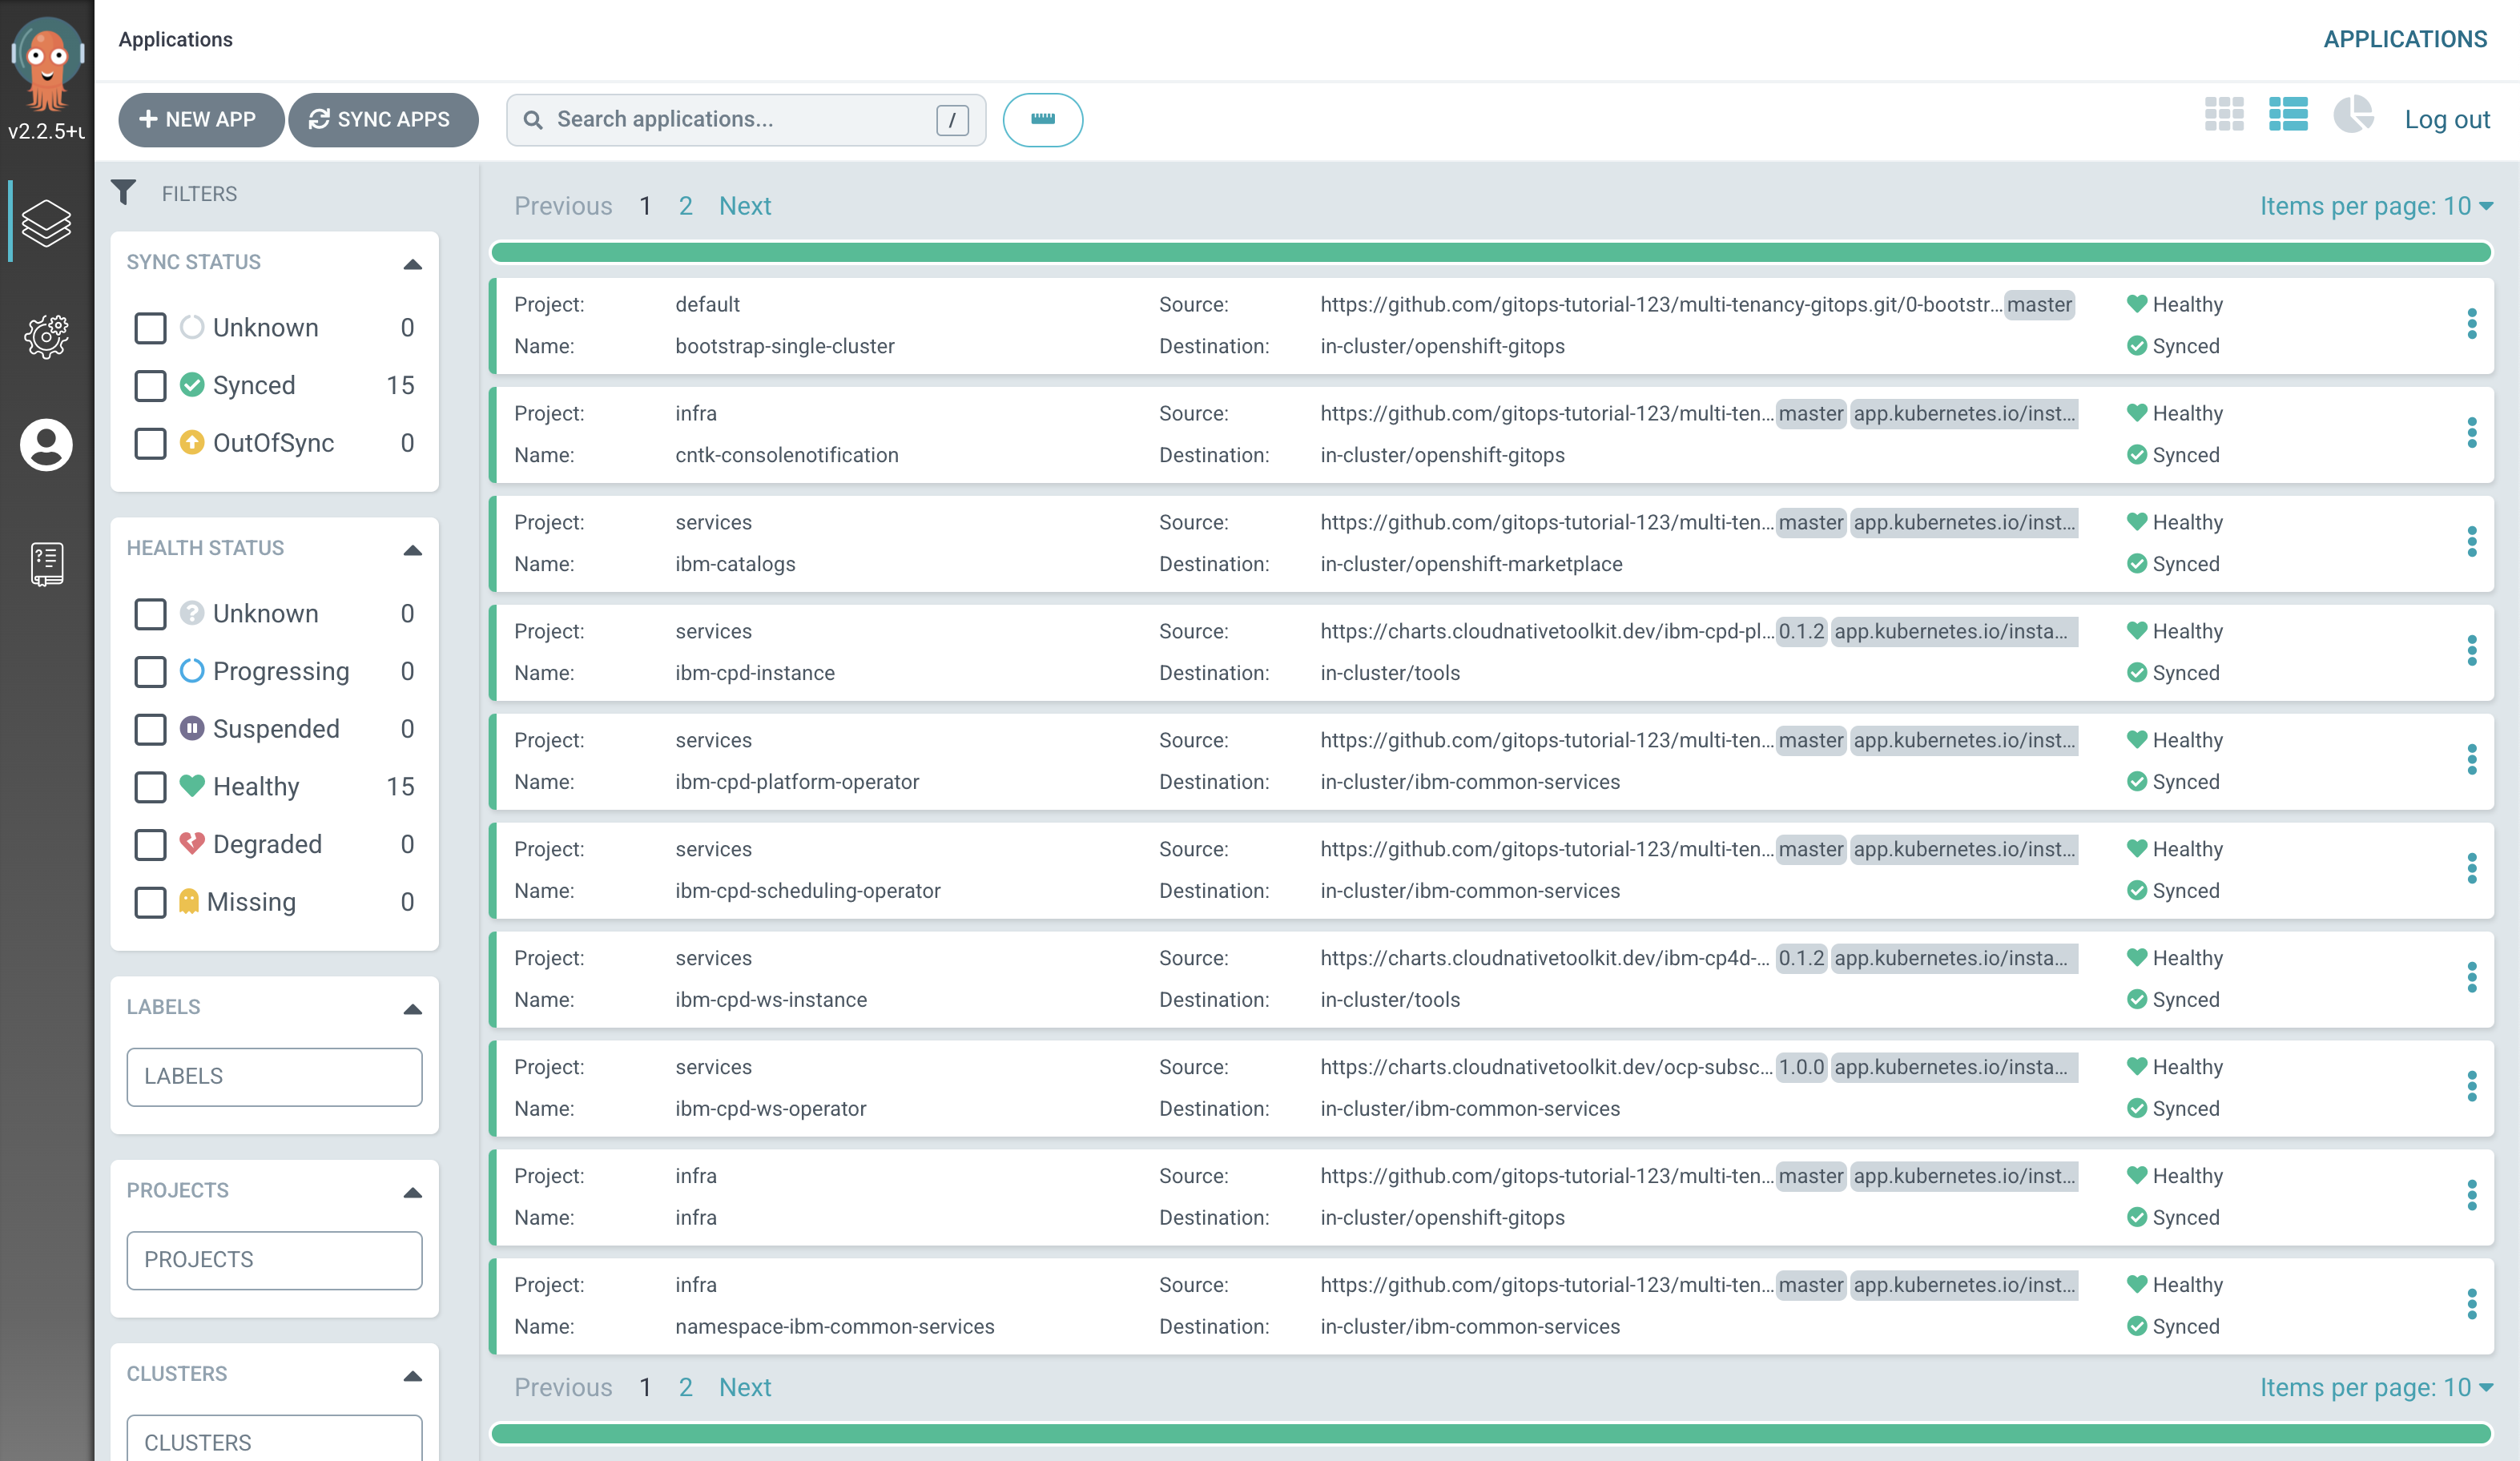
Note
The installation of Watson Studio will take approximately 2 hours.
Alternatively, issue the following command on terminal and wait for the expected output.
watch "oc get WS ws-cr -n tools -o jsonpath=\"{.status.wsStatus} {'\n'}\""Expected output =
CompletedTip
Press Ctrl+C on your keyboard to exit out of watch window.
We can now access the Cloud Pak for Data web client and see that Watson Studio is installed.
-
Access the IBM Cloud Pak for Data web client
Retrieve the URL for the IBM Cloud Pak for Data web client and and open it in a browser.
echo https://`oc get ZenService lite-cr -n tools -o jsonpath="{.status.url}{'\n'}"`Retrieve the
adminpasswordoc extract secret/admin-user-details -n tools --keys=initial_admin_password --to=-Log in to the IBM Cloud Pak for Data web client with the
admincredentials.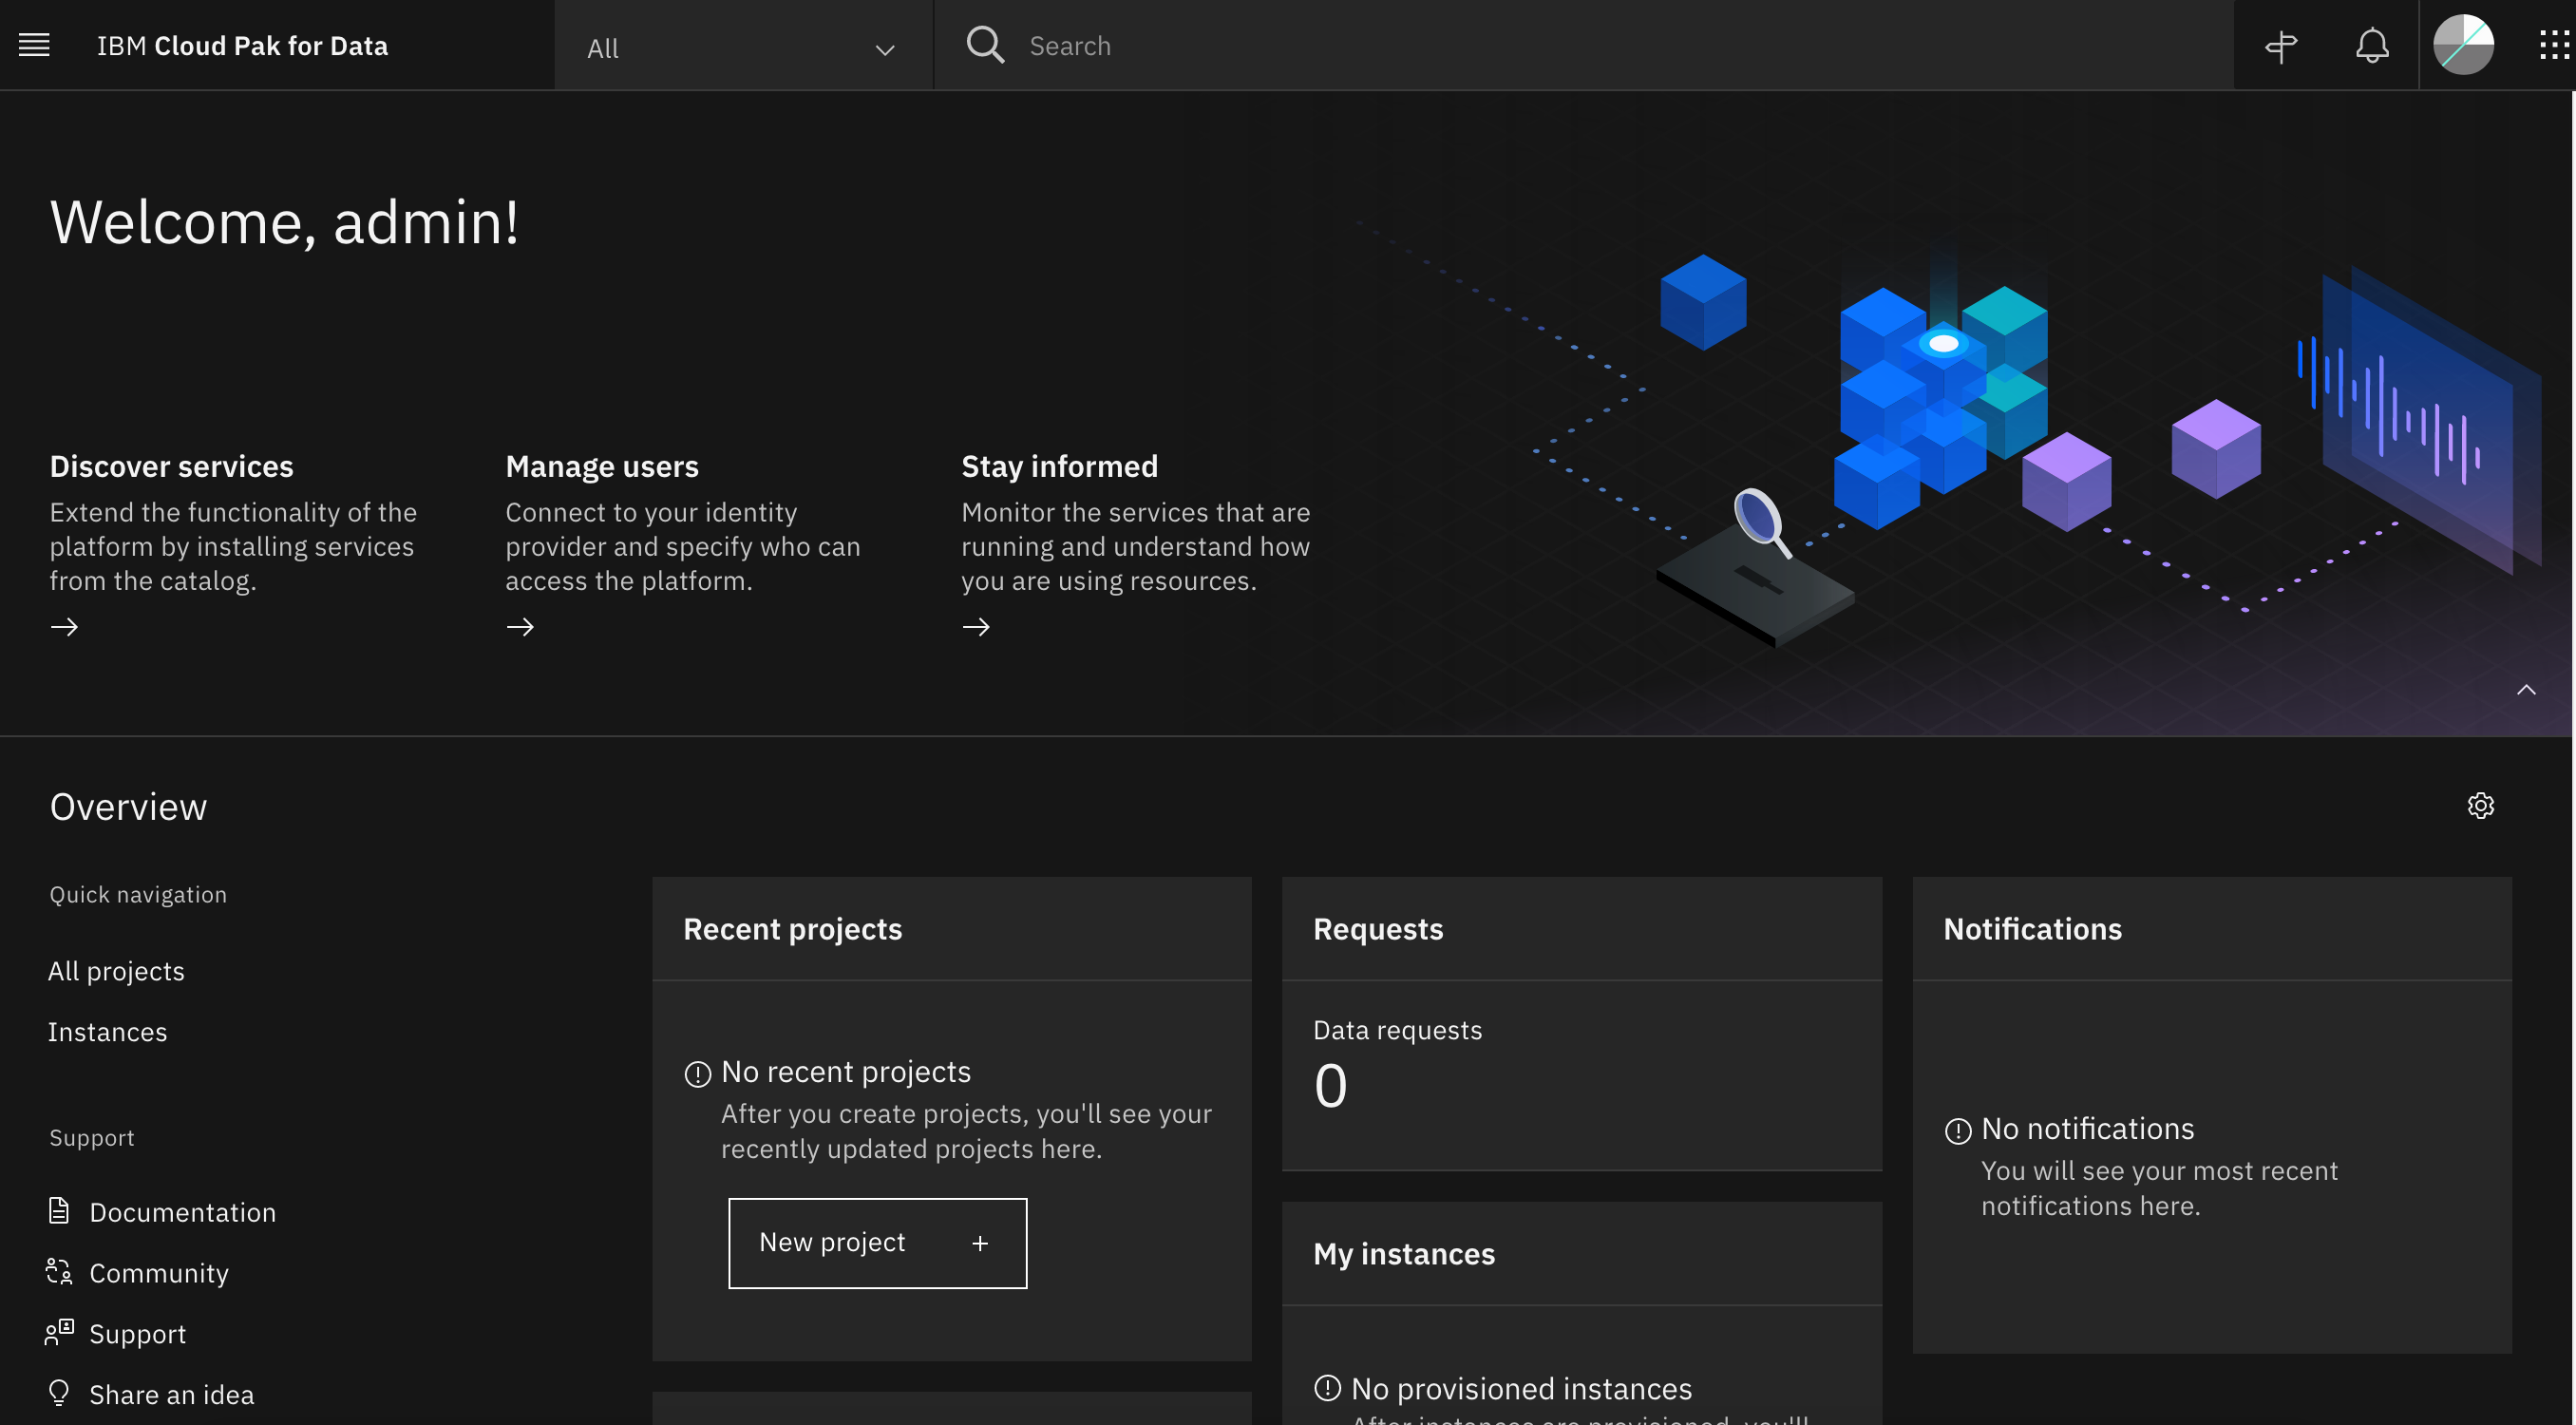
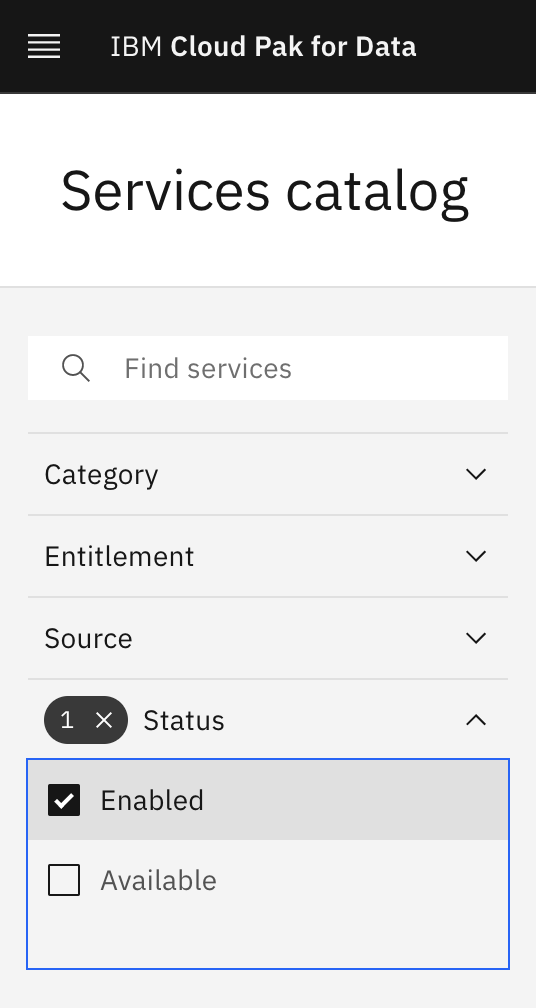
Click on the navigation menu icon on the top left corner. Click on Services menu option to expand it, then select Services catalog.
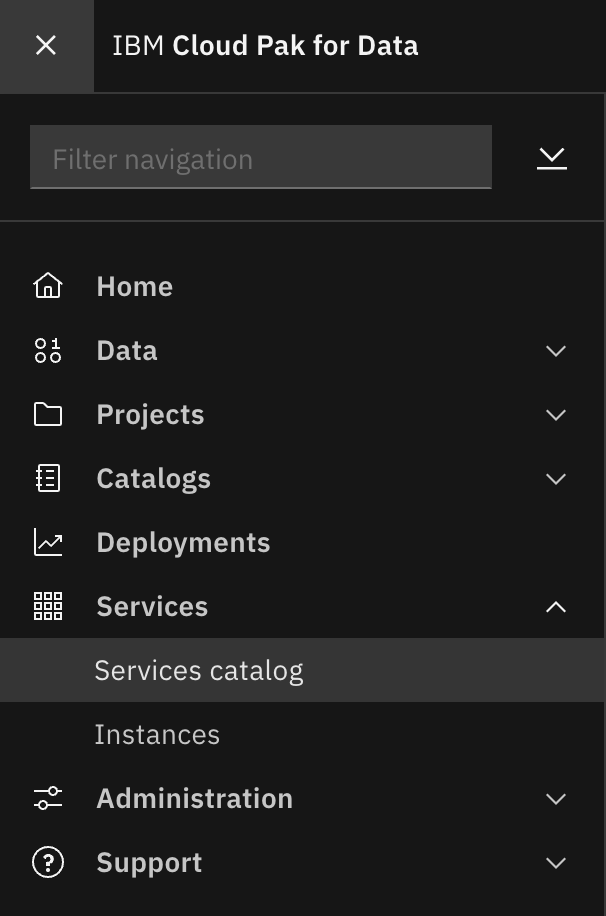
Under Status, select "Enabled" to display only the services that are installed and enabled in Cloud Pak for Data.
Notice the
Enabledtag next to Watson Studio. There might be other enabled services as well.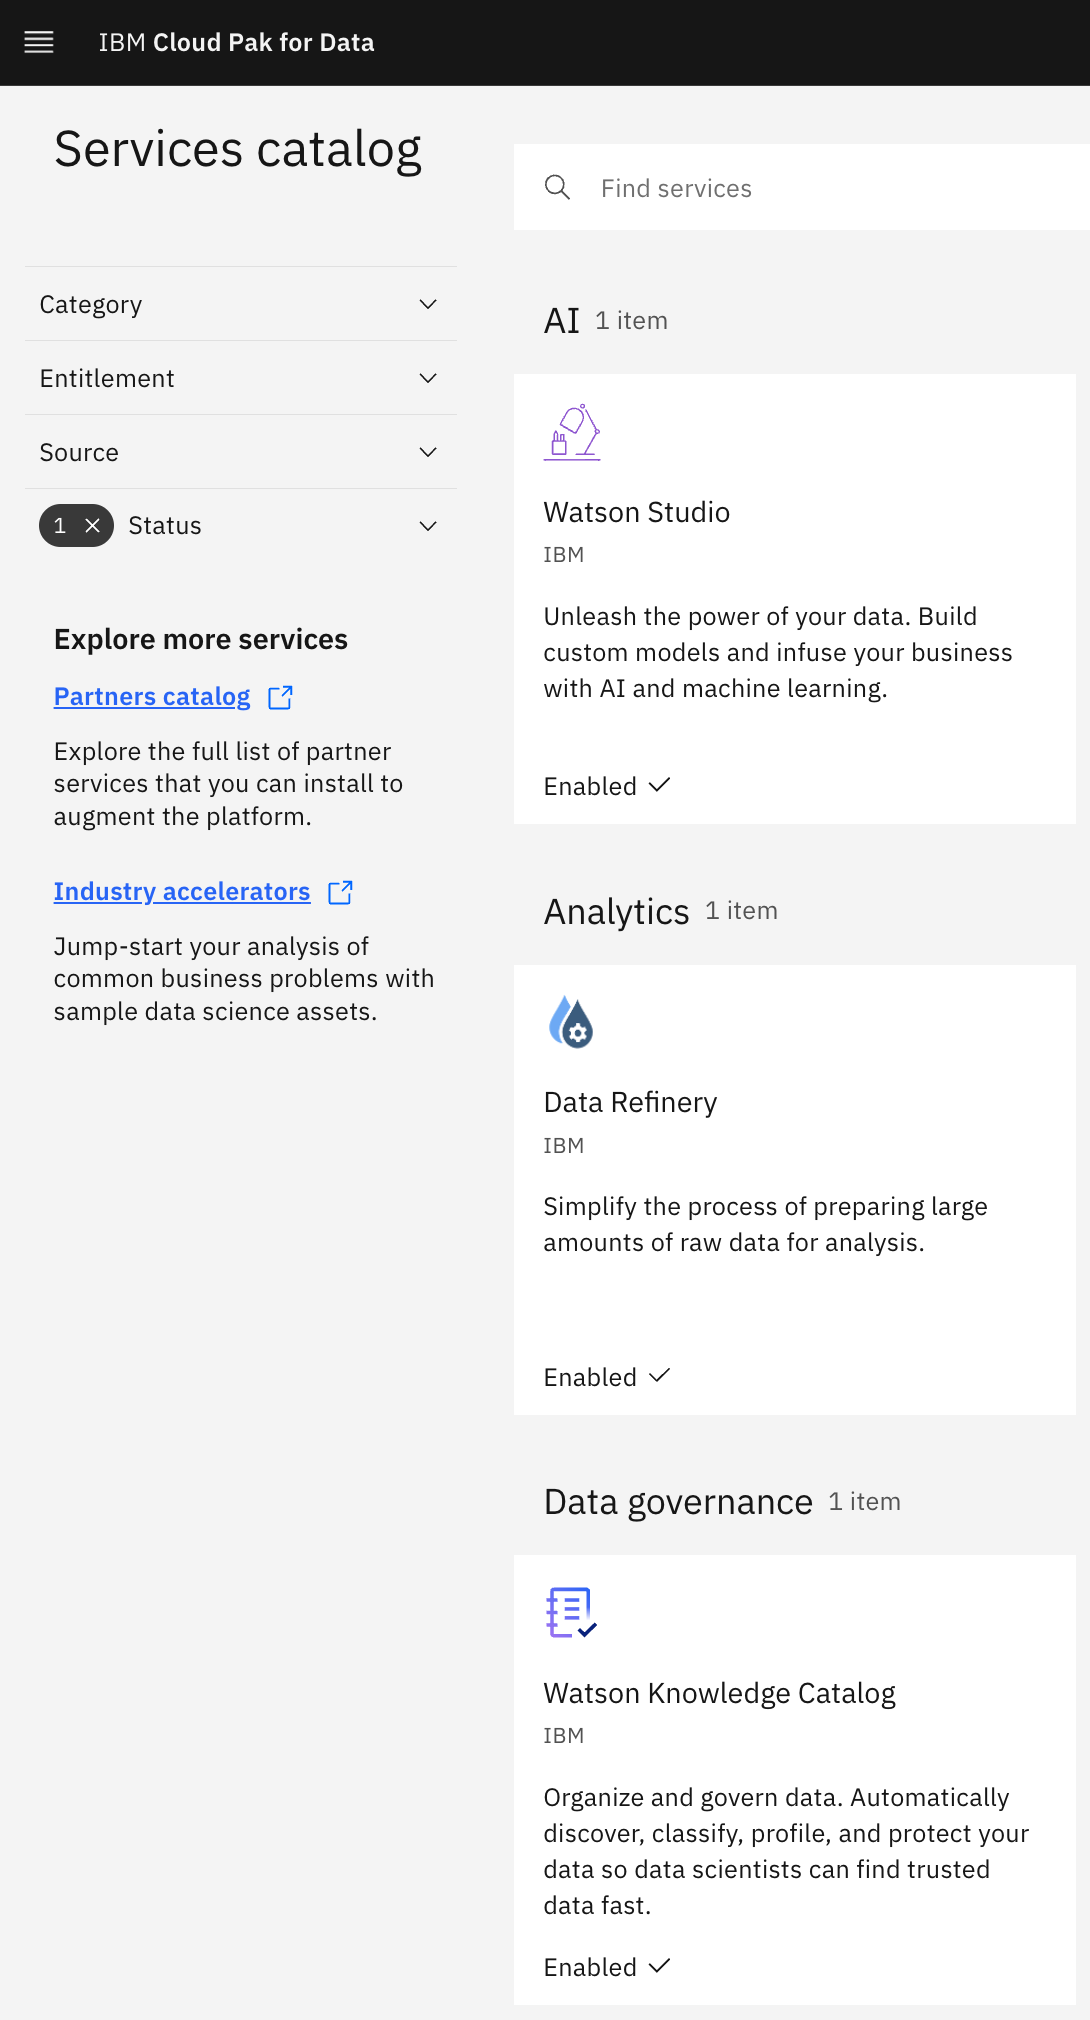
Congratulations!
You've installed Watson Studio on Cloud Pak for Data. We installed it into the tools namespaces we created previously.
This chapter is now complete.