Deploying Cloud Pak for Data platform with ArgoCD
Overview
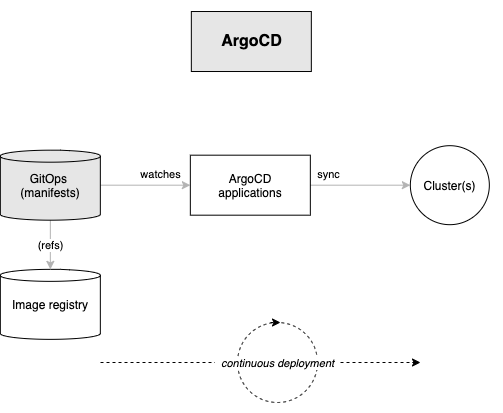
In the previous section of this chapter, we used GitOps to create the ArgoCD applications that installed and managed the tools and ibm-common-services namespaces in the cluster.
In this section we're going to complete the installation of all the necessary services required by Cloud Pak for Data platform:
We'll examine these highlighted components in more detail throughout this section of the tutorial; here's an overview of their function.
ArgoCD applications will be created for each of these resources. Specifically, ArgoCD applications will keep the cluster synchronized with the application YAML definitions stored in Git.
This section will reinforce our understanding of GitOps. We will then be ready to create CP4D applications that use the infrastructure we previously created and these services we are going to install further.
In this topic, we're going to:
- Deploy services to the cluster using GitOps
- Explore the ArgoCD applications that manage these services
- Review how ArgoCD projects work
- See how
infraandservicesArgoCD applications manage the infrastructure and services layers in our architecture.
By the end of this topic we'll have a CP4D platform installed.
Pre-requisites
Tip
In macOS, many of these utilities can be installed using Homebrew.
Please see these instructions for more information about how to install these utilities.
Before attempting this section, you must have completed the following tasks:
-
You have created an OCP cluster instance.
-
You have completed the tutorial section to customize the GitOps repository, install ArgoCD and have installed command line utilities such as
oc,git,treeetc. - You have installed
watchcommand. - You have completed the tutorial section to create the
toolsandibm-common-servicesnamespaces using GitOps.
Please see the previous sections of this guide for information on how to do these tasks.
Post cluster provisioning tasks
Red Hat OpenShift cluster
- An OpenShift v4.8 cluster is required.
CLI tools
-
Install the OpenShift CLI
oc(version 4.8) . The binary can be downloaded from the Help menu from the OpenShift Console.Download oc cli
-
Log in from a terminal window.
oc login --token=<token> --server=<server>
IBM Entitlement Key
-
The
IBM Entitlement Keyis required to pull IBM Cloud Pak specific container images from the IBM Entitled Registry. To get an entitlement key,- Log in to MyIBM Container Software Library with an IBMid and password associated with the entitled software.
- Select the View library option to verify your entitlement(s).
- Select the Get entitlement key to retrieve the key.
-
In the following command, replace
<entitlement_key>with the value ofIBM Entitlement Keyretrieved in the previous step.TOKEN=<entitlement_key> -
A Secret containing the entitlement key is created in the
toolsnamespace.oc create secret docker-registry ibm-entitlement-key -n tools \ --docker-username=cp \ --docker-password="$TOKEN" \ --docker-server=cp.icr.iowhich confirms that the
ibm-entitlement-keysecret has been created:secret/ibm-entitlement-key created
Deploy services to the cluster
We've just had our first successful GitOps experience, using an ArgoCD application to create the tools and ibm-common-services namespaces in our cluster. There are few more components to create: IBM Cloud Pak for Data, IBM Catalog and Sealed secrets.
These components are part of the services layer in our architecture, and that requires us to access /0-bootstrap/single-cluster/2-services within our GitOps repository.
-
Review deployed resources
As we saw earlier, the
bootstrap-single-clusterapplication uses the contents of the/0-bootstrap/single-clusterfolder to determine which Kubernetes resources should be deployed in the cluster.Issue the following command to see what's currently deployed in the cluster:
cat 0-bootstrap/single-cluster/kustomization.yamlresources: - 1-infra/1-infra.yaml # - 2-services/2-services.yaml # - 3-apps/3-apps.yaml patches: - target: group: argoproj.io kind: Application labelSelector: "gitops.tier.layer=gitops" patch: |- - op: add path: /spec/source/repoURL value: https://github.com/tutorial-org-123/multi-tenancy-gitops.git - op: add path: /spec/source/targetRevision value: master - target: group: argoproj.io kind: AppProject labelSelector: "gitops.tier.layer=infra" patch: |- - op: add path: /spec/sourceRepos/- value: https://github.com/tutorial-org-123/multi-tenancy-gitops.git - op: add path: /spec/sourceRepos/- value: https://github.com/tutorial-org-123/multi-tenancy-gitops-infra.git - target: group: argoproj.io kind: AppProject labelSelector: "gitops.tier.layer=services" patch: |- - op: add path: /spec/sourceRepos/- value: https://github.com/tutorial-org-123/multi-tenancy-gitops.git - op: add path: /spec/sourceRepos/- value: https://github.com/tutorial-org-123/multi-tenancy-gitops-services.git - target: group: argoproj.io kind: AppProject labelSelector: "gitops.tier.layer=applications" patch: |- - op: add path: /spec/sourceRepos/- value: https://github.com/tutorial-org-123/multi-tenancy-gitops.git - op: add path: /spec/sourceRepos/- value: https://github.com/tutorial-org-123/multi-tenancy-gitops-apps.gitThis shows how only infrastructure ArgoCD applications -- and therefore their managed resources such as
toolsandibm-common-servicesnamespaces -- are deployed in the cluster. -
Review ArgoCD services folder
Let’s examine the
0-bootstrap/single-cluster/2-services/kustomization.yamlto see how ArgoCD manages the resources deployed to the cluster.Issue the following command:
cat 0-bootstrap/single-cluster/2-services/kustomization.yamlWe can see the contents of the
kustomization.yaml:resources: # IBM Software ## Cloud Pak for Integration #- argocd/operators/ibm-ace-operator.yaml #- argocd/operators/ibm-apic-operator.yaml #- argocd/instances/ibm-apic-instance.yaml #- argocd/instances/ibm-apic-management-portal-instance.yaml #- argocd/instances/ibm-apic-gateway-analytics-instance.yaml #- argocd/operators/ibm-aspera-operator.yaml #- argocd/operators/ibm-assetrepository-operator.yaml #- argocd/operators/ibm-cp4i-operators.yaml #- argocd/operators/ibm-datapower-operator.yaml #- argocd/operators/ibm-eventstreams-operator.yaml #- argocd/operators/ibm-mq-operator.yaml #- argocd/operators/ibm-opsdashboard-operator.yaml #- argocd/operators/ibm-platform-navigator.yaml #- argocd/instances/ibm-platform-navigator-instance.yaml ## Cloud Pak for Business Automation #- argocd/operators/ibm-cp4a-operator.yaml #- argocd/operators/ibm-db2u-operator.yaml #- argocd/operators/ibm-process-mining-operator.yaml #- argocd/instances/ibm-process-mining-instance.yaml ## Cloud Pak for Data #- argocd/operators/ibm-cpd-scheduling-operator.yaml #- argocd/instances/ibm-cpd-scheduling-instance.yaml #- argocd/operators/ibm-cpd-platform-operator.yaml #- argocd/instances/ibm-cpd-instance.yaml #- argocd/operators/ibm-cpd-ws-operator.yaml #- argocd/instances/ibm-cpd-ws-instance.yaml #- argocd/operators/ibm-cpd-wkc-operator.yaml #- argocd/instances/ibm-cpd-wkc-instance.yaml ## Cloud Pak for Security #- argocd/operators/ibm-cp4s-operator.yaml #- argocd/instances/ibm-cp4sthreatmanagements-instance.yaml ## IBM Foundational Services / Common Services #- argocd/operators/ibm-foundations.yaml #- argocd/instances/ibm-foundational-services-instance.yaml #- argocd/operators/ibm-automation-foundation-core-operator.yaml #- argocd/operators/ibm-automation-foundation-operator.yaml #- argocd/operators/ibm-license-service-operator.yaml #- argocd/instances/ibm-license-service-instance.yaml ## IBM Catalogs #- argocd/operators/ibm-catalogs.yaml # B2BI #- argocd/instances/ibm-sfg-db2.yaml #- argocd/instances/ibm-sfg-mq.yaml #- argocd/instances/ibm-sfg-b2bi-setup.yaml #- argocd/instances/ibm-sfg-b2bi.yaml # Required for IBM MQ #- argocd/instances/openldap.yaml # Required for IBM ACE, IBM MQ #- argocd/operators/cert-manager.yaml #- argocd/instances/cert-manager-instance.yaml # Sealed Secrets #- argocd/instances/sealed-secrets.yaml # CICD #- argocd/operators/grafana-operator.yaml #- argocd/instances/grafana-instance.yaml #- argocd/instances/grafana-instana.yaml #- argocd/instances/artifactory.yaml #- argocd/instances/chartmuseum.yaml #- argocd/instances/developer-dashboard.yaml #- argocd/instances/swaggereditor.yaml #- argocd/instances/sonarqube.yaml #- argocd/instances/pact-broker.yaml # In OCP 4.7+ we need to install openshift-pipelines and possibly privileged scc to the pipeline serviceaccount #- argocd/operators/openshift-pipelines.yaml # Service Mesh #- argocd/operators/elasticsearch.yaml #- argocd/operators/jaeger.yaml #- argocd/operators/kiali.yaml #- argocd/operators/openshift-service-mesh.yaml #- argocd/instances/openshift-service-mesh-instance.yaml # Monitoring #- argocd/instances/instana-agent.yaml #- argocd/instances/instana-robot-shop.yaml # Spectrum Protect Plus #- argocd/operators/spp-catalog.yaml #- argocd/operators/spp-operator.yaml #- argocd/instances/spp-instance.yaml #- argocd/operators/oadp-operator.yaml #- argocd/instances/oadp-instance.yaml #- argocd/instances/baas-instance.yaml patches: - target: group: argoproj.io kind: Application labelSelector: "gitops.tier.layer=services,gitops.tier.source=git" patch: |- - op: add path: /spec/source/repoURL value: https://github.com/tutorial-org-123/multi-tenancy-gitops-services.git - op: add path: /spec/source/targetRevision value: master - target: group: argoproj.io kind: Application labelSelector: "gitops.tier.layer=applications,gitops.tier.source=git" patch: |- - op: add path: /spec/source/repoURL value: https://github.com/tutorial-org-123/multi-tenancy-gitops-apps.git - op: add path: /spec/source/targetRevision value: master - target: group: argoproj.io kind: Application labelSelector: "gitops.tier.layer=services,gitops.tier.source=helm" patch: |- - op: add path: /spec/source/repoURL value: https://charts.cloudnativetoolkit.dev - target: name: ibm-automation-foundation-operator patch: |- - op: add path: /spec/source/helm/parameters/- value: name: spec.channel value: v1.1 -
Add the services layer to the cluster
Note
The
IBM Cloud Pak for Datainstance requires a RWX storageclass and it is set tomanaged-nfs-storageby default in the ArgoCD Application0-bootstrap/single-cluster/2-services/argocd/instances/ibm-cpd-instance.yaml. This storageclass is available for Red Hat OpenShift on IBM Cloud cluster provisioned from IBM Technology Zone with NFS storage selected.Open
0-bootstrap/single-cluster/2-services/kustomization.yamland uncomment the below resources:# Cloud Pak for Data - argocd/operators/ibm-cpd-scheduling-operator.yaml - argocd/operators/ibm-cpd-platform-operator.yaml - argocd/instances/ibm-cpd-instance.yaml # IBM Catalogs - argocd/operators/ibm-catalogs.yaml # Sealed Secrets - argocd/instances/sealed-secrets.yamlIf you take a diff, and just look for the added services:
git diff | grep "^\+" | grep -v "^\+++"You will have the following
+- argocd/operators/ibm-cpd-scheduling-operator.yaml
+- argocd/operators/ibm-cpd-platform-operator.yaml
+- argocd/instances/ibm-cpd-instance.yaml
+- argocd/operators/ibm-catalogs.yaml
+- argocd/instances/sealed-secrets.yaml
which shows the resources to be deployed for services.
Commit and push changes to your git repository:
git add .
git commit -s -m "Initial boostrap setup for services"
git push origin $GIT_BRANCH
The changes have now been pushed to your GitOps repository:
[master 8fac253] Initial boostrap setup for services
 1 file changed, 5 insertions(+), 5 deletions(-)
Enumerating objects: 11, done.
Counting objects: 100% (11/11), done.
Delta compression using up to 8 threads
Compressing objects: 100% (6/6), done.
Writing objects: 100% (6/6), 547 bytes | 547.00 KiB/s, done.
Total 6 (delta 5), reused 0 (delta 0)
remote: Resolving deltas: 100% (5/5), completed with 5 local objects.
To https://github.com/tutorial-org-123/multi-tenancy-gitops.git
   b49dff5..8fac253  master -> master
The intention of this operation is to indicate that we'd like the resources declared in
0-bootstrap/single-cluster/2-services/kustomization.yamlto be deployed in the cluster. Like theinfraArgoCD application, the resources created by theservicesArgoCD application will manage the Kubernetes relevant services resources applied to the cluster. -
Activate the services in the GitOps repo
Access the
0-bootstrap/single-cluster/kustomization.yaml:cat 0-bootstrap/single-cluster/kustomization.yamlLet us deploy
servicesresources to the cluster. Open0-bootstrap/single-cluster/kustomization.yamland uncomment2-services/2-services.yamlas follows:resources: - 1-infra/1-infra.yaml - 2-services/2-services.yaml # - 3-apps/3-apps.yaml patches: - target: group: argoproj.io kind: Application labelSelector: "gitops.tier.layer=gitops" patch: |- - op: add path: /spec/source/repoURL value: https://github.com/tutorial-org-123/multi-tenancy-gitops.git - op: add path: /spec/source/targetRevision value: master - target: group: argoproj.io kind: AppProject patch: |- - op: add path: /spec/sourceRepos/- value: https://charts.cloudnativetoolkit.dev - target: group: argoproj.io kind: AppProject labelSelector: "gitops.tier.layer=infra" patch: |- - op: add path: /spec/sourceRepos/- value: https://github.com/tutorial-org-123/multi-tenancy-gitops.git - op: add path: /spec/sourceRepos/- value: https://github.com/tutorial-org-123/multi-tenancy-gitops-infra.git - target: group: argoproj.io kind: AppProject labelSelector: "gitops.tier.layer=services" patch: |- - op: add path: /spec/sourceRepos/- value: https://github.com/tutorial-org-123/multi-tenancy-gitops.git - op: add path: /spec/sourceRepos/- value: https://github.com/tutorial-org-123/multi-tenancy-gitops-services.git - op: add path: /spec/sourceRepos/- value: https://github.com/tutorial-org-123/multi-tenancy-gitops-apps.git - op: add path: /spec/sourceRepos/- value: https://charts.cloudnativetoolkit.dev - target: group: argoproj.io kind: AppProject labelSelector: "gitops.tier.layer=applications" patch: |- - op: add path: /spec/sourceRepos/- value: https://github.com/tutorial-org-123/multi-tenancy-gitops.git - op: add path: /spec/sourceRepos/- value: https://github.com/tutorial-org-123/multi-tenancy-gitops-apps.gitOnce we push this change to GitHub, it will be seen by the
bootstrap-single-clusterapplication in ArgoCD, and the resources it refers to will be applied to the cluster. -
Push GitOps changes to GitHub
Let’s make these GitOps changes visible to the ArgoCD
bootstrap-single-clusterapplication via GitHub.Add all changes in the current folder to a git index, commit them, and push them to GitHub:
git add .
git commit -s -m "Deploying services"
git push origin $GIT_BRANCH
The changes have now been pushed to your GitOps repository:
[master 3c4a56d] Deploying services
 1 file changed, 1 insertion(+), 1 deletion(-)
Enumerating objects: 9, done.
Counting objects: 100% (9/9), done.
Delta compression using up to 8 threads
Compressing objects: 100% (5/5), done.
Writing objects: 100% (5/5), 441 bytes | 441.00 KiB/s, done.
Total 5 (delta 4), reused 0 (delta 0)
remote: Resolving deltas: 100% (4/4), completed with 4 local objects.
To https://github.com/tutorial-org-123/multi-tenancy-gitops.git
   533602c..3c4a56d  master -> master
This change to the GitOps repository can now be used by ArgoCD.
-
The
bootstrap-single-clusterapplication detects the change and resyncsOnce these changes to our GitOps repository are seen by ArgoCD, it will resync the cluster to the desired new state.
Switch to the ArgoCD UI Applications view, click on the
bootstrap-single-clusterapplication to see the start of this resync process: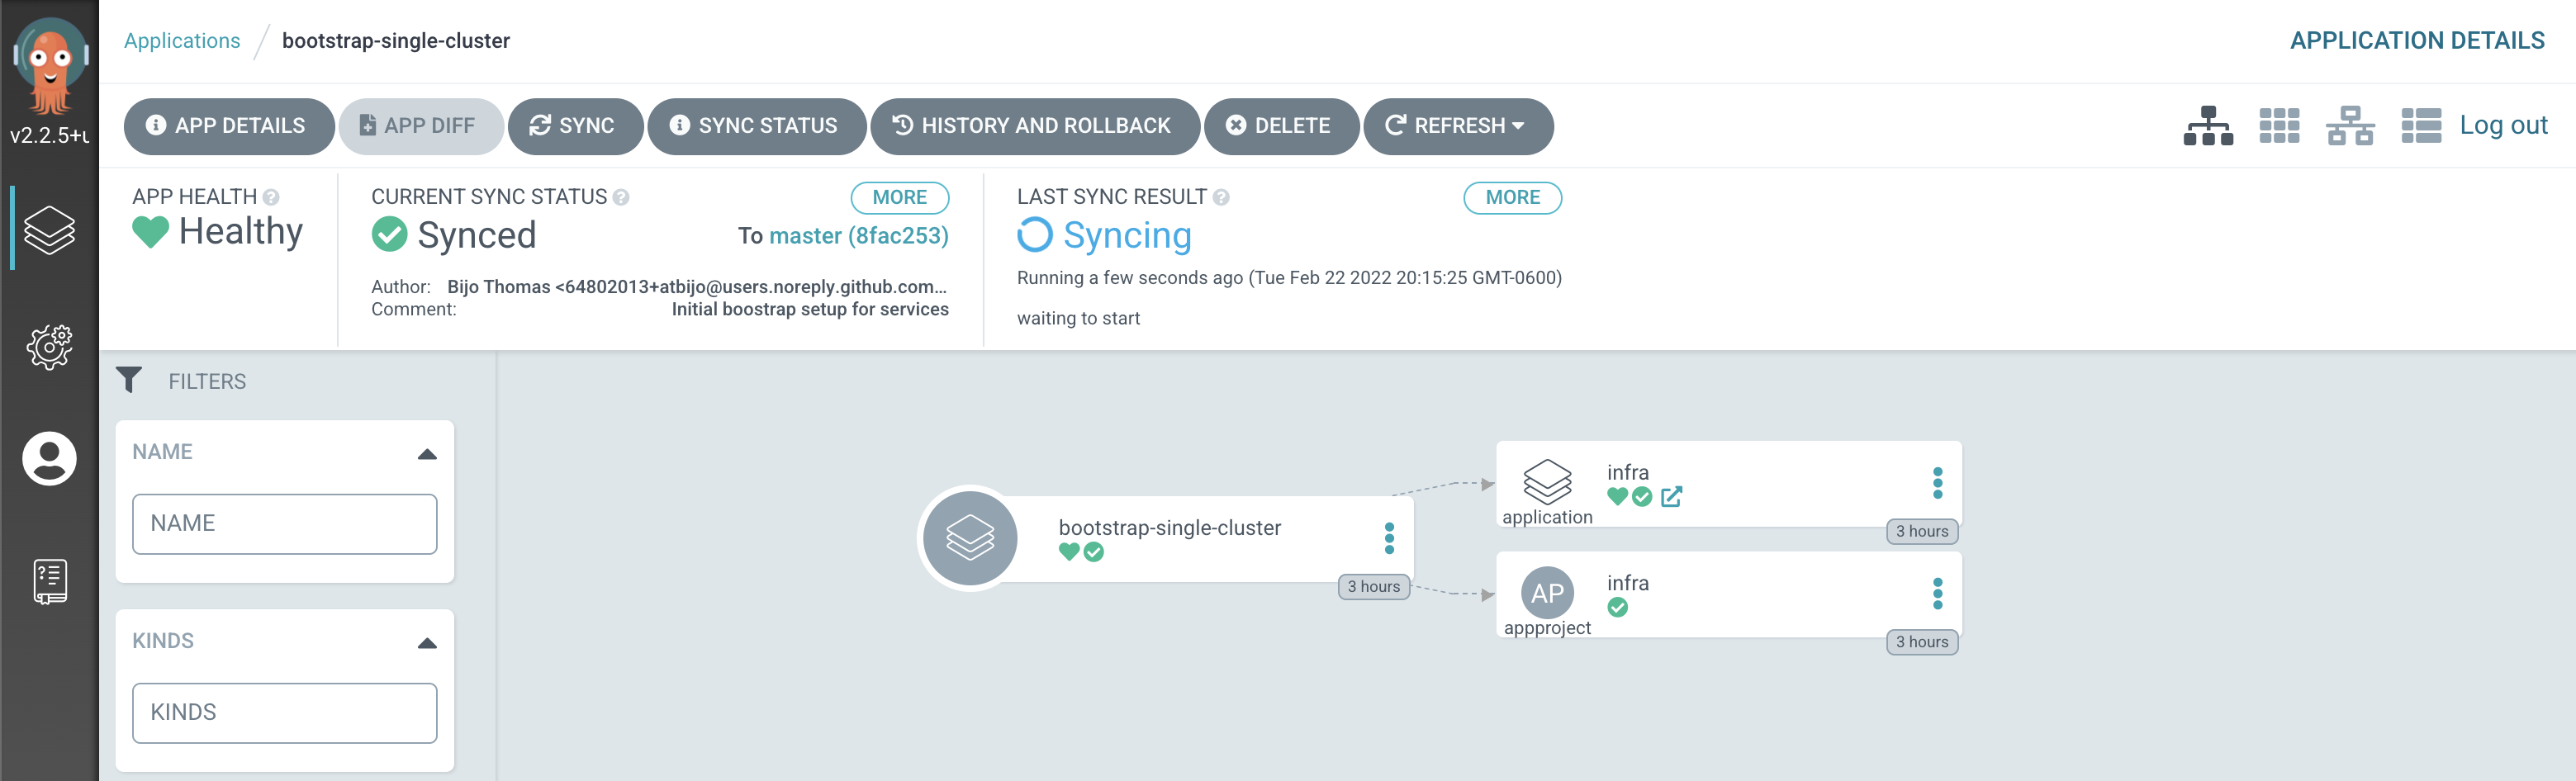
Notice how the
bootstrap-single-clusterapplication has detected the changes and is automatically synching the cluster.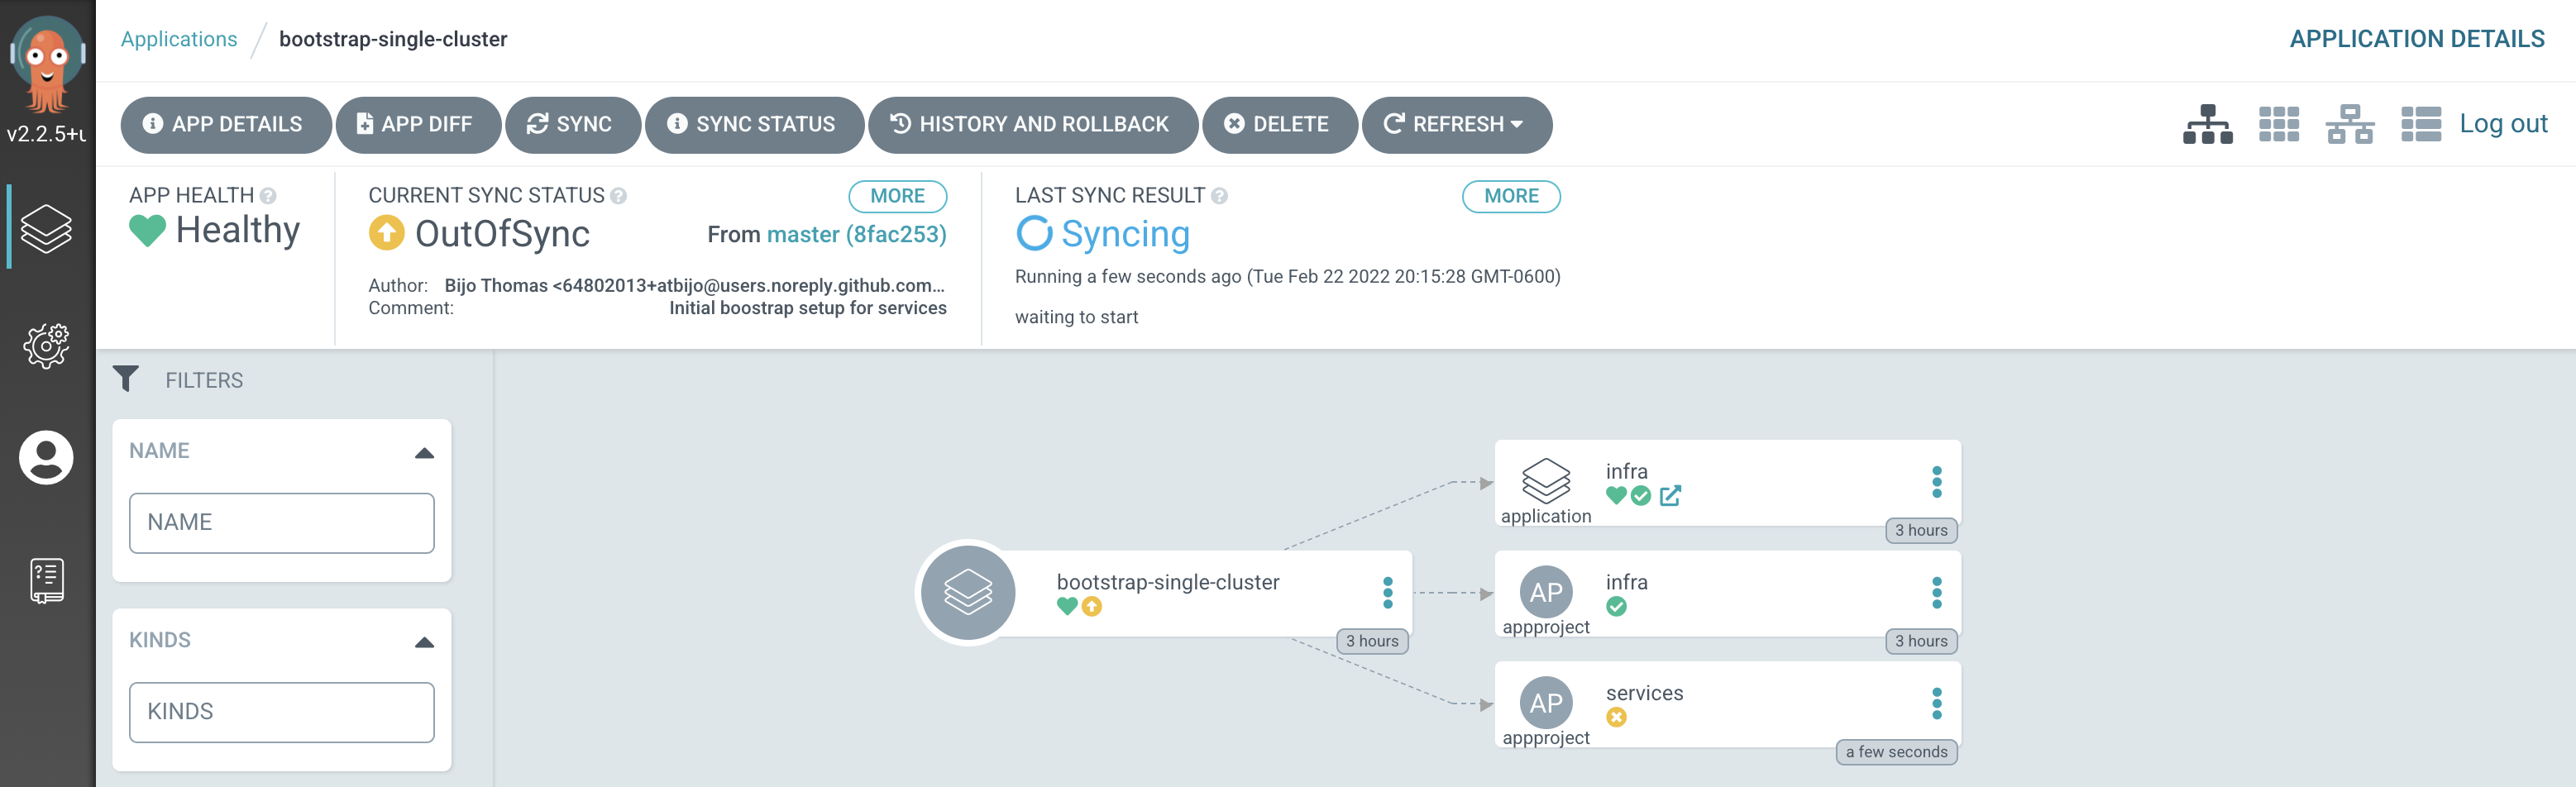
Tip
You can manually
syncthebootstrap-single-clusterArgoCD application in the UI if you don't want to wait for ArgoCD to detect the change. -
The new ArgoCD applications
After a short while, you'll see lots of new ArgoCD applications have been created to manage the services we have deployed by modifying
kustomization.yamlunder0-bootstrap/single-cluster/2-servicesfolder: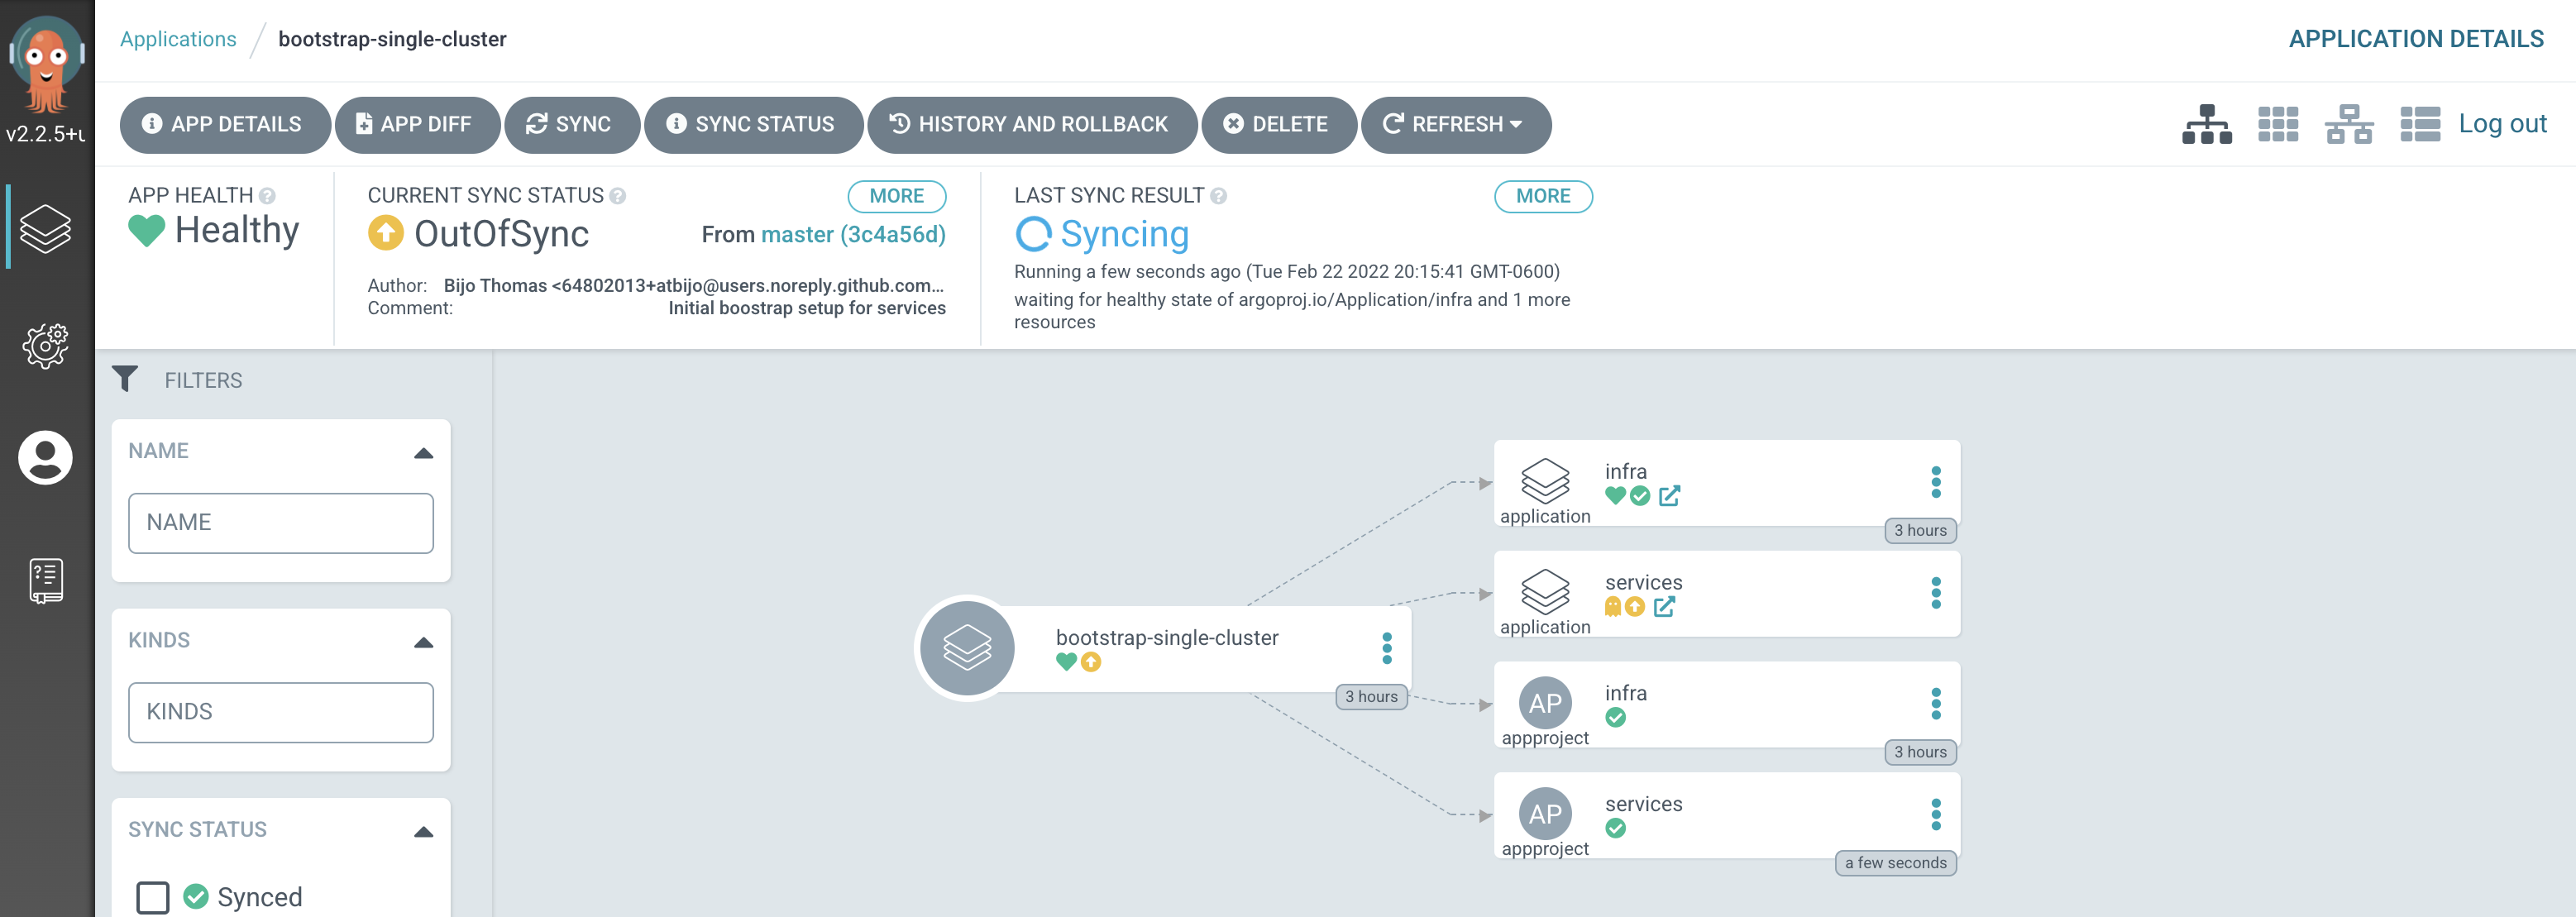
See how most ArgoCD applications are
Syncedalmost immediately, but some spend time inProgressing.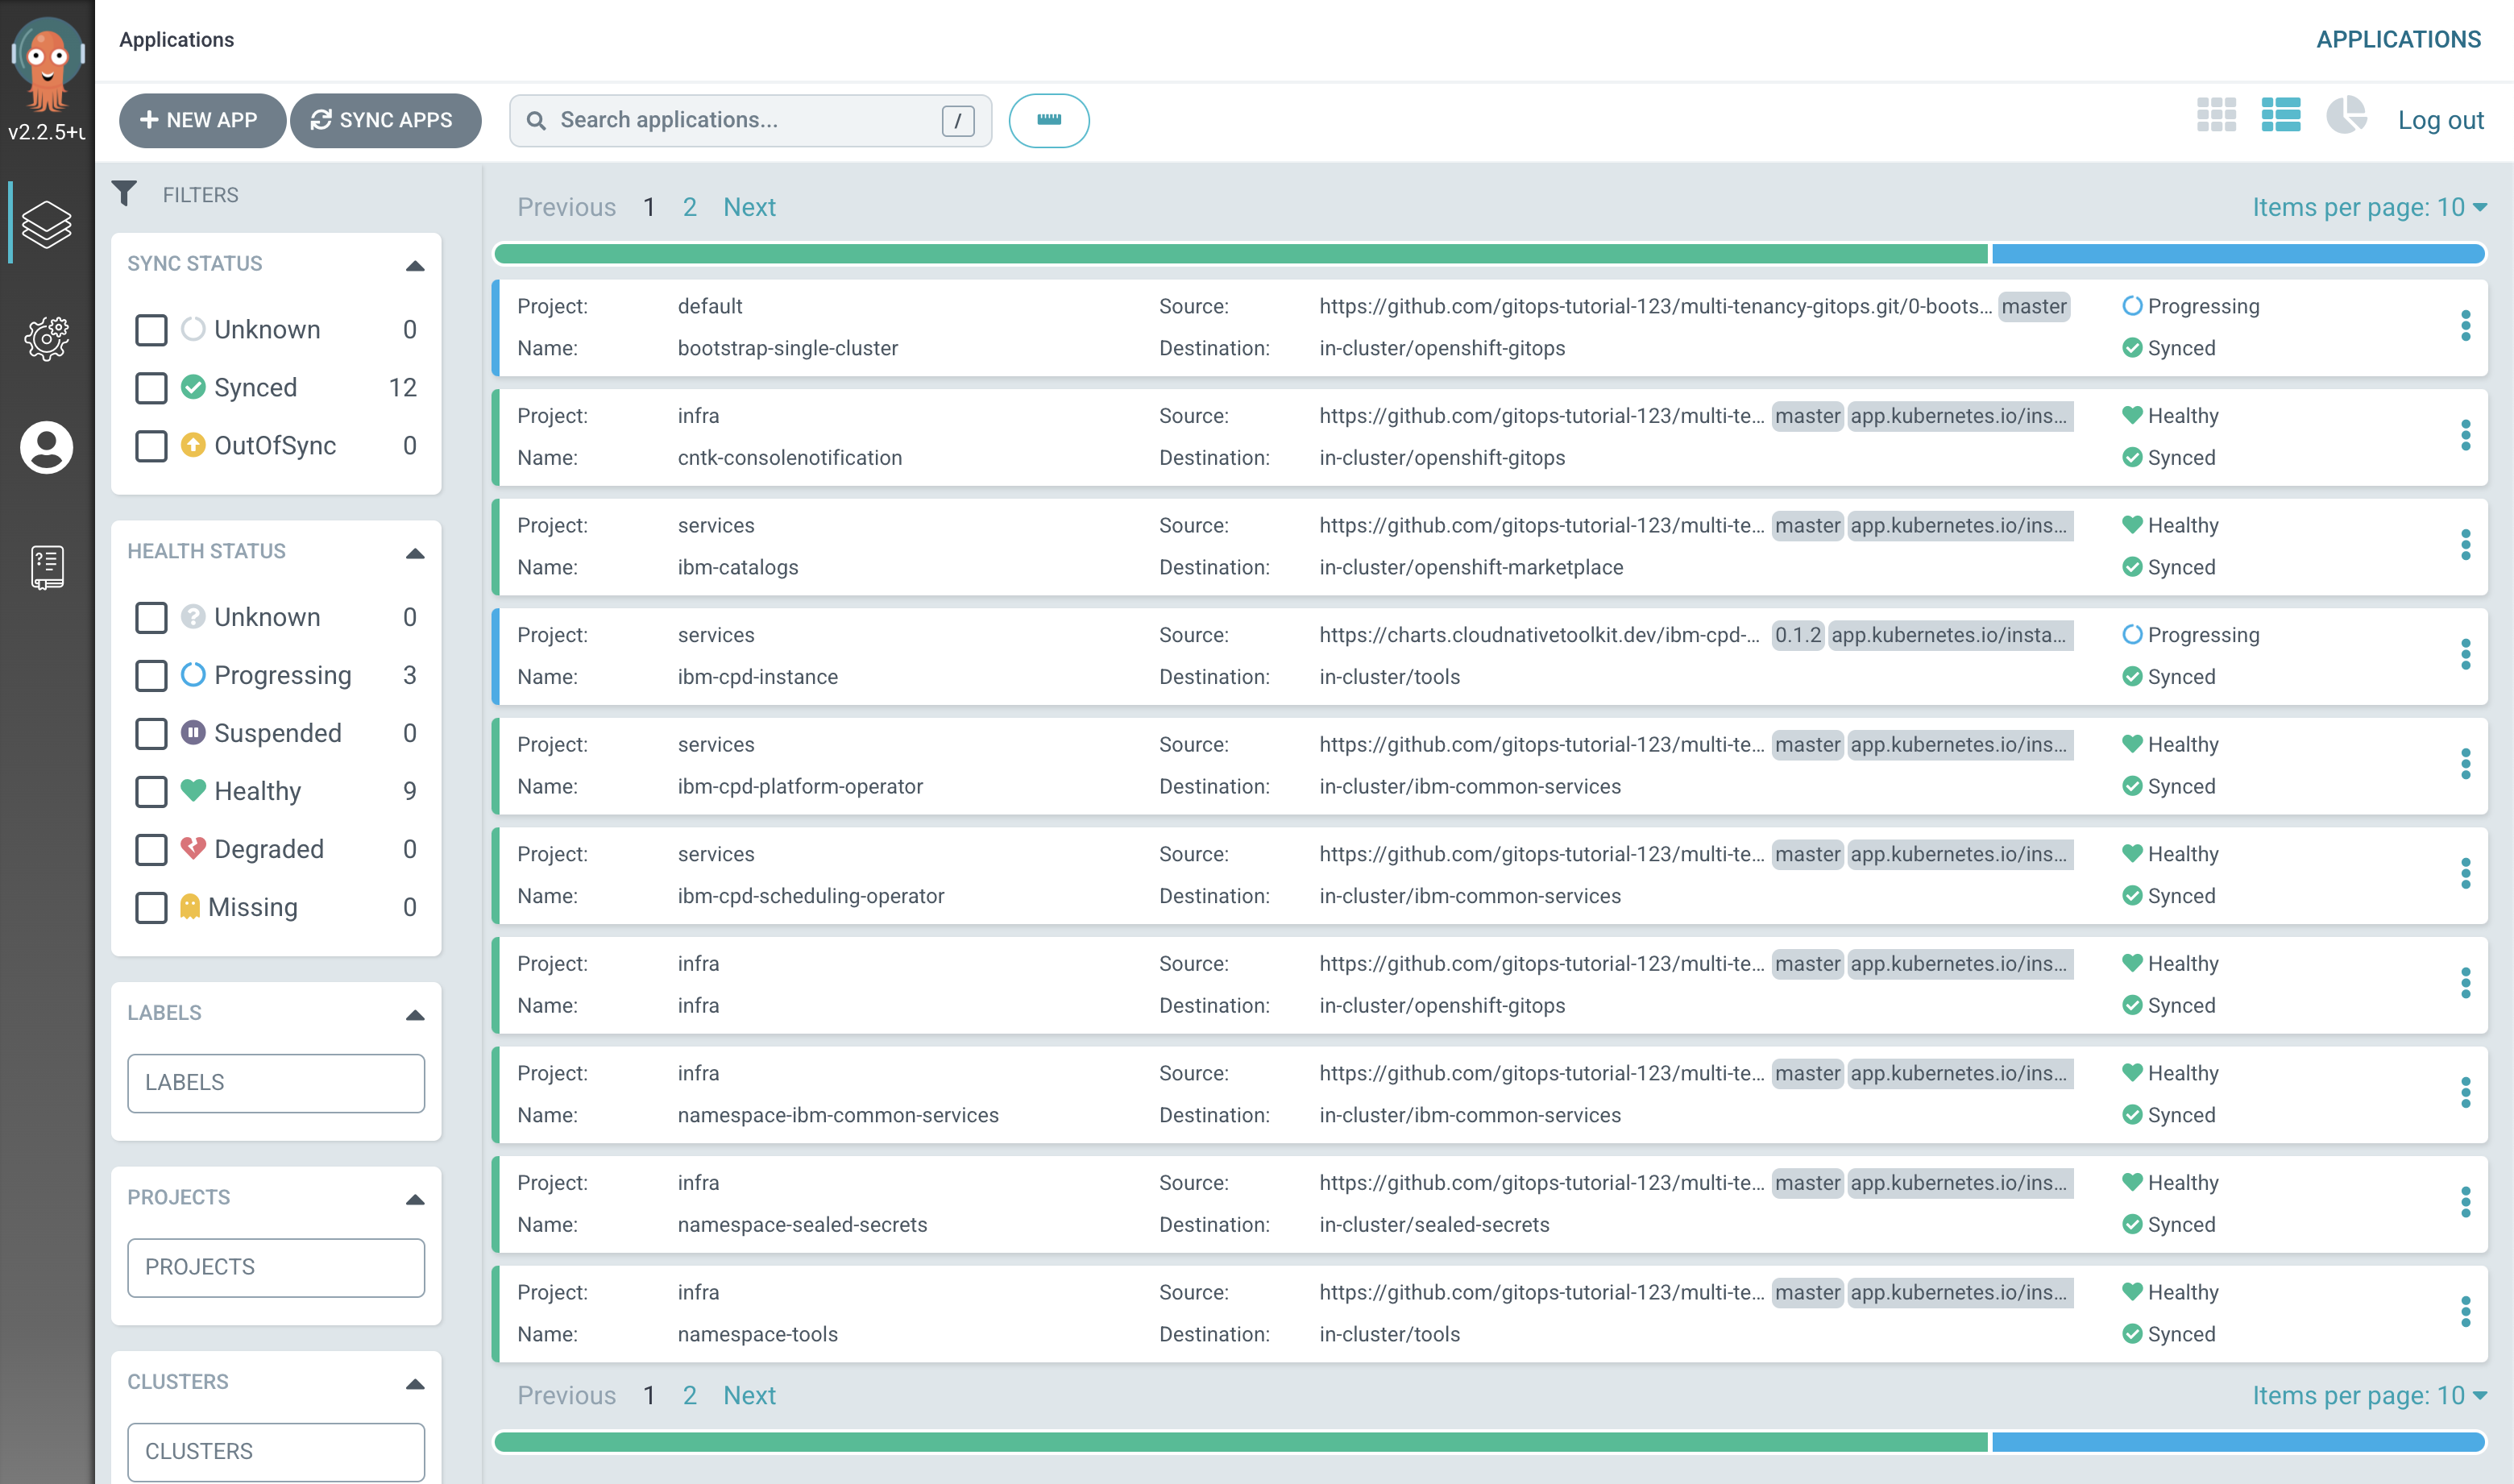
Notice how many more
SyncedArgoCD applications are now in the cluster; these are as a result of the newly added services layer in our architecture. -
The
servicesapplicationLet's examine the ArgoCD application that manage the services in our reference architecture.
In the ArgoCD UI Applications view, click on the icon for the
servicesapplication, which may be stillProgressing:Tip
Use the
Projectsfilter on ArgoCD UI to only show applications inservicesproject to help locate theservicesapplication.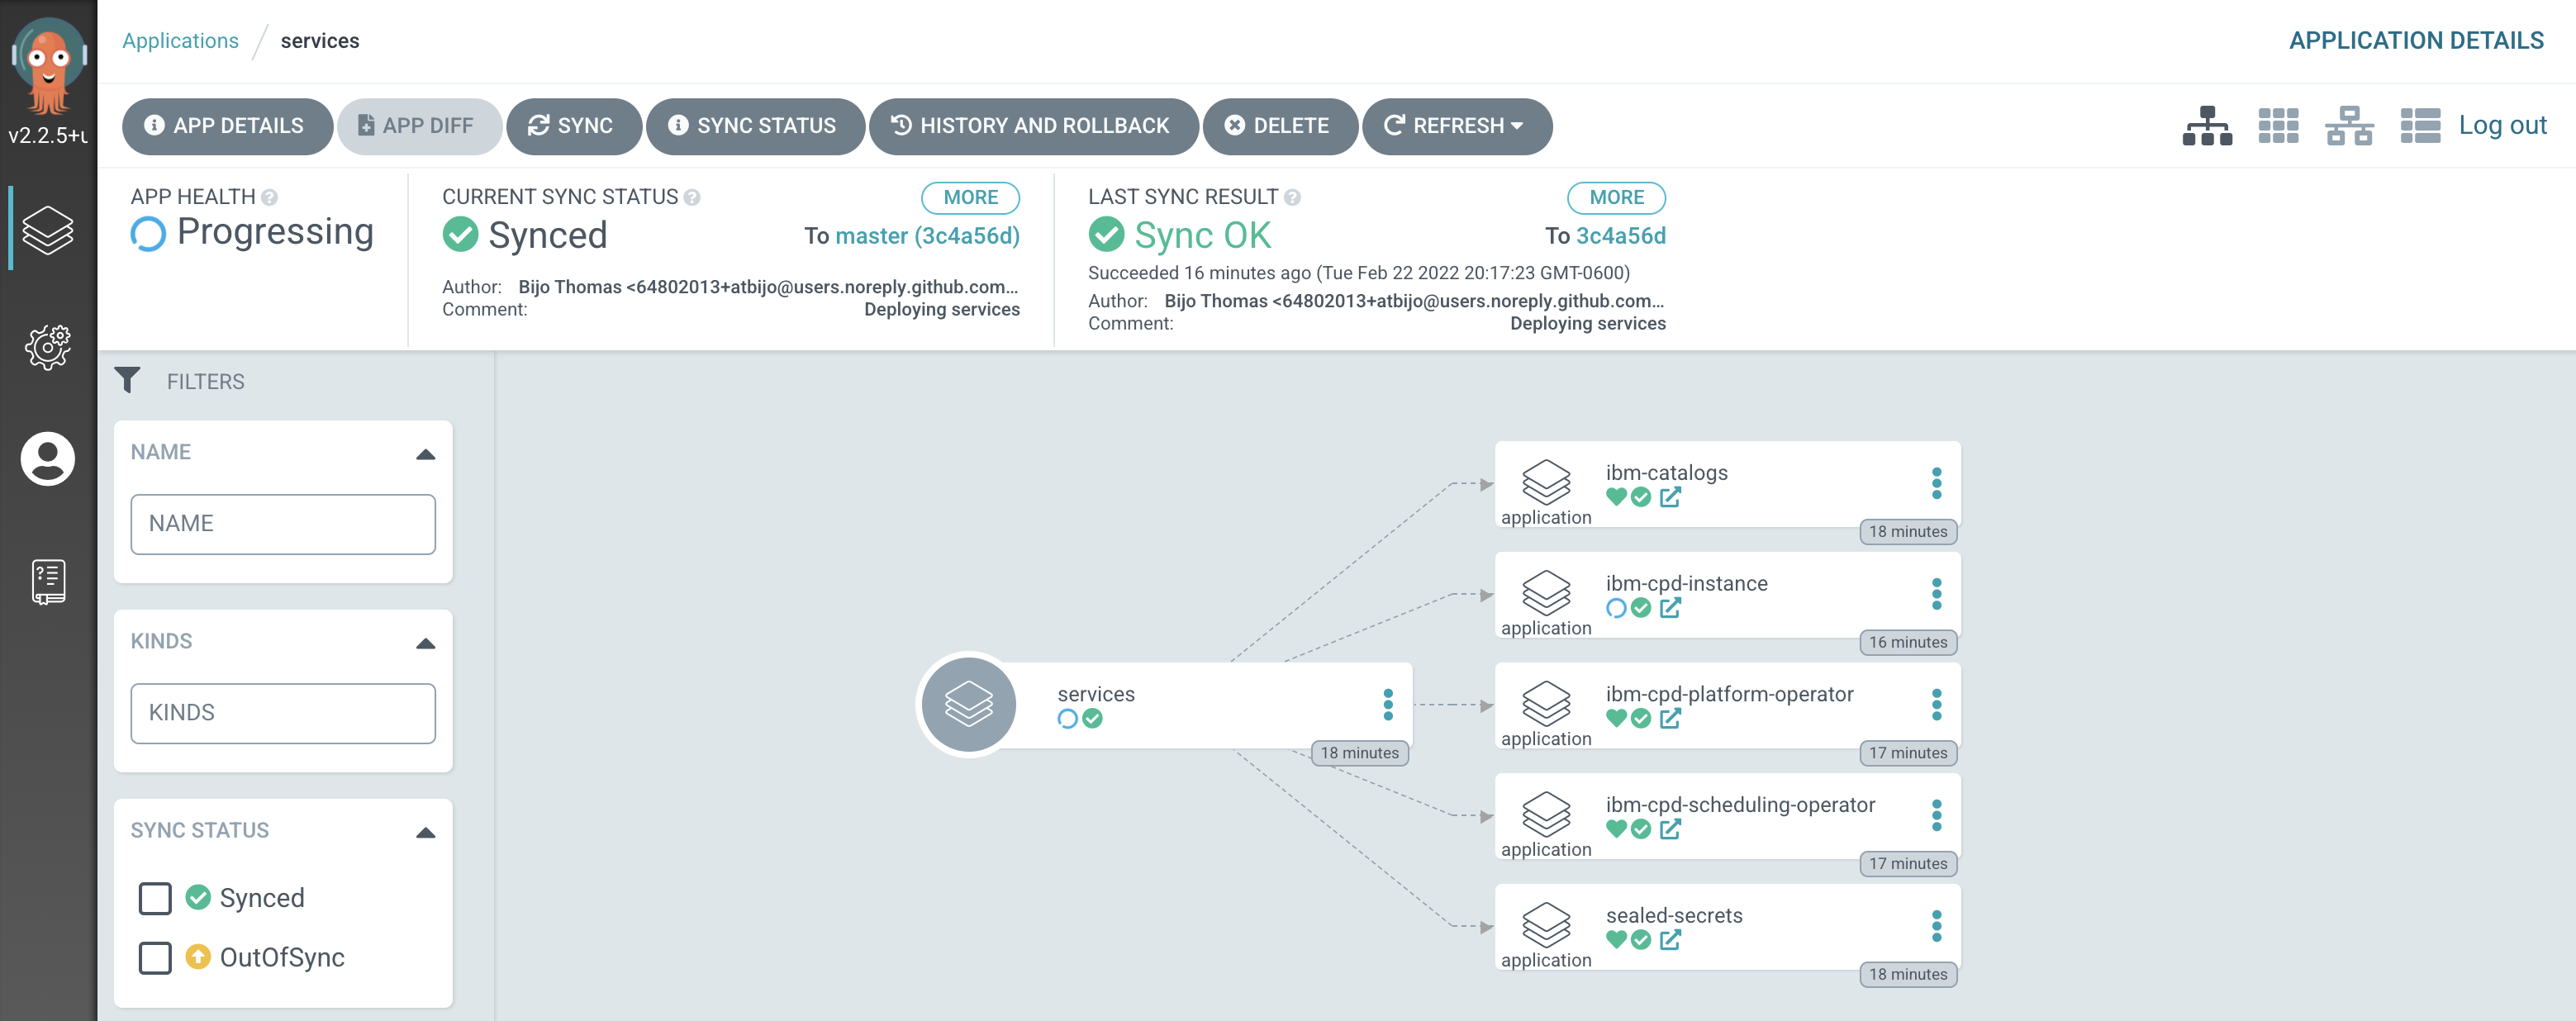
We can see that the
servicesArgoCD application creates several ArgoCD applications, each of which is responsible for applying specific YAMLs to the cluster according to the folder the ArgoCD application is watching.It’s the
servicesArgoCD application that watches the0-bootstrap/single-cluster/2-servicesfolder for ArgoCD applications that apply service resources to our cluster.We’ll continually reinforce these relationships as we work through the tutorial. You might like to spend some time exploring the ArgoCD UI and ArgoCD YAMLs before you proceed, though it’s not necessary, as you’ll get lots of practice as we proceed.
-
The
servicesArgoCD projectAs we've seen in the ArgoCD UI, the
servicesArgoCD application is responsible for creating the ArgoCD applications that manage the services within the cluster. Let's examine their definitions to see how they do this.Issue the following command:
cat 0-bootstrap/single-cluster/2-services/2-services.yamlThe following YAML may initially look a little intimidating; we'll discuss the major elements below:
---
apiVersion: argoproj.io/v1alpha1
kind: AppProject
metadata:
  name: services
  labels:
    gitops.tier.layer: services
spec:
  sourceRepos: [] # Populated by kustomize patches in 2-services/kustomization.yaml
  destinations:
  - namespace: tools
    server: https://kubernetes.default.svc
  - namespace: ibm-common-services
    server: https://kubernetes.default.svc
  - namespace: cloudpak
    server: https://kubernetes.default.svc
  - namespace: redhat-operators
    server: https://kubernetes.default.svc
  - namespace: openshift-operators
    server: https://kubernetes.default.svc
  - namespace: openshift-marketplace
    server: https://kubernetes.default.svc
  - namespace: ci
    server: https://kubernetes.default.svc
  - namespace: dev
    server: https://kubernetes.default.svc
  - namespace: staging
    server: https://kubernetes.default.svc
  - namespace: prod
    server: https://kubernetes.default.svc
  - namespace: sealed-secrets
    server: https://kubernetes.default.svc
  - namespace: istio-system
    server: https://kubernetes.default.svc
  - namespace: openldap
    server: https://kubernetes.default.svc
  - namespace: instana-agent
    server: https://kubernetes.default.svc
  - namespace: openshift-gitops
    server: https://kubernetes.default.svc
  - namespace: spp
    server: https://kubernetes.default.svc
  - namespace: spp-velero
    server: https://kubernetes.default.svc
  - namespace: baas
    server: https://kubernetes.default.svc
  - namespace: robot-shop
    server: https://kubernetes.default.svc
  - namespace: db2
    server: https://kubernetes.default.svc
  - namespace: mq
    server: https://kubernetes.default.svc
  clusterResourceWhitelist:
  # TODO: SCC needs to be moved to 1-infra, here for now for artifactory
  - group: "security.openshift.io"
    kind: SecurityContextConstraints
  - group: "console.openshift.io"
    kind: ConsoleLink
  - group: "apps"
    kind: statefulsets
  - group: "apps"
    kind: deployments
  - group: ""
    kind: services
  - group: ""
    kind: configmaps
  - group: ""
    kind: secrets
  - group: ""
    kind: serviceaccounts
  - group: "batch"
    kind: jobs
  - group: ""
    kind: roles
  - group: "route.openshift.io"
    kind: routes
  - group: ""
    kind: RoleBinding
  - group: "rbac.authorization.k8s.io"
    kind: ClusterRoleBinding
  - group: "rbac.authorization.k8s.io"
    kind: ClusterRole
  - group: apiextensions.k8s.io
    kind: CustomResourceDefinition
  - group: policy
    kind: PodSecurityPolicy
  - group: ""
    kind: PersistentVolume
  roles:
  # A role which provides read-only access to all applications in the project
  - name: read-only
    description: Read-only privileges to my-project
    policies:
    - p, proj:my-project:read-only, applications, get, my-project/*, allow
    groups:
    - argocd-admins
---
apiVersion: argoproj.io/v1alpha1
kind: Application
metadata:
  name: services
  annotations:
    argocd.argoproj.io/sync-wave: "200"
  labels:
    gitops.tier.layer: gitops
spec:
  destination:
    namespace: openshift-gitops
    server: https://kubernetes.default.svc
  project: services
  source: # repoURL  and targetRevision populated by kustomize patches in 2-services/kustomization.yaml
    path: 0-bootstrap/single-cluster/2-services
  syncPolicy:
    automated:
      prune: true
      selfHeal: true
Notice how this YAML defines three ArgoCD resources: a
servicesproject which manages all the necessary services that are needed by the applications.Notice how the
destinationsfor theservicesproject are limited to selected namespaces such astoolsandibm-common-services-- as well as a few others that we'll use in other parts of the tutorial. Thesedestinationsrestrict the namespaces where ArgoCD applications in theservicesproject can manage resources.The same is true for
clusterResourceWhiteList. It limits the Kubernetes resources that can be managed toconfigmaps,deploymentsandrolebindingsamongst others.In summary, we see that the
serviceproject is used to group all the ArgoCD applications that will manage the services in our cluster. These ArgoCD applications can only perform specific actions on specific resource types in specific namespaces. See how ArgoCD is acting as a well-governed administrator. -
The similar structure of
servicesandinfraArgoCD applicationsEven though we didn't closely examine the
infraArgoCD application YAML in the previous topic, it has has a very similar structure to the ArgoCDservicesapplications we've just examined.Type the following command to list the ArgoCD
infraapp YAML.cat 0-bootstrap/single-cluster/1-infra/1-infra.yamlAgain, although this YAML might look a little intimidating, the overall structure is the same as for
services:--- apiVersion: argoproj.io/v1alpha1 kind: AppProject metadata: name: infra labels: gitops.tier.layer: infra spec: sourceRepos: [] # Populated by kustomize patches in 1-infra/kustomization.yaml destinations: - namespace: ci server: https://kubernetes.default.svc - namespace: dev server: https://kubernetes.default.svc - namespace: staging server: https://kubernetes.default.svc - namespace: prod server: https://kubernetes.default.svc - namespace: sealed-secrets server: https://kubernetes.default.svc - namespace: tools server: https://kubernetes.default.svc - namespace: db2 server: https://kubernetes.default.svc - namespace: mq server: https://kubernetes.default.svc - namespace: ibm-common-services server: https://kubernetes.default.svc - namespace: cloudpak server: https://kubernetes.default.svc - namespace: istio-system server: https://kubernetes.default.svc - namespace: openldap server: https://kubernetes.default.svc - namespace: instana-agent server: https://kubernetes.default.svc - namespace: openshift-gitops server: https://kubernetes.default.svc - namespace: openshift-machine-api server: https://kubernetes.default.svc - namespace: openshift-storage server: https://kubernetes.default.svc - namespace: openshift-monitoring server: https://kubernetes.default.svc - namespace: openshift-cluster-node-tuning-operator server: https://kubernetes.default.svc - namespace: spp server: https://kubernetes.default.svc - namespace: spp-velero server: https://kubernetes.default.svc - namespace: baas server: https://kubernetes.default.svc - namespace: robot-shop server: https://kubernetes.default.svc clusterResourceWhitelist: - group: "" kind: Namespace - group: "" kind: RoleBinding - group: "rbac.authorization.k8s.io" kind: ClusterRole - group: "security.openshift.io" kind: SecurityContextConstraints - group: "console.openshift.io" kind: ConsoleNotification - group: "console.openshift.io" kind: ConsoleLink - group: "machine.openshift.io" kind: MachineSet - group: "machineconfiguration.openshift.io" kind: MachineConfigPool - group: "machineconfiguration.openshift.io" kind: ContainerRuntimeConfig - group: "tuned.openshift.io" kind: Tuned - group: "batch" kind: Job roles: # A role which provides read-only access to all applications in the project - name: read-only description: Read-only privileges to my-project policies: - p, proj:my-project:read-only, applications, get, my-project/*, allow groups: - argocd-admins --- apiVersion: argoproj.io/v1alpha1 kind: Application metadata: name: infra annotations: argocd.argoproj.io/sync-wave: "100" labels: gitops.tier.layer: gitops spec: destination: namespace: openshift-gitops server: https://kubernetes.default.svc project: infra source: # repoURL and targetRevision populated by kustomize patches in 1-infra/kustomization.yaml path: 0-bootstrap/single-cluster/1-infra syncPolicy: automated: prune: true selfHeal: trueAs with the
2-services.yaml, we can see- An ArgoCD project called
infra. ArgoCD applications defined in this project will be limited by thedestinations:andclusterResourceWhitelist:specified in the YAML. - An ArgoCD app called
infra. This is the ArgoCD application that we used in the previous section of the tutorial. It watches thepath: 0-bootstrap/single-cluster/1-infrafolder for ArgoCD applications that it applied to the cluster. It was these applications that managed thetoolsandibm-common-servicesnamespaces for example.
- An ArgoCD project called
-
Verify that IBM Cloud Pak for Data has been deployed successfully.
Switch to the ArgoCD UI Applications view, wait for all ArgoCD applications to become
SyncedandHealthy: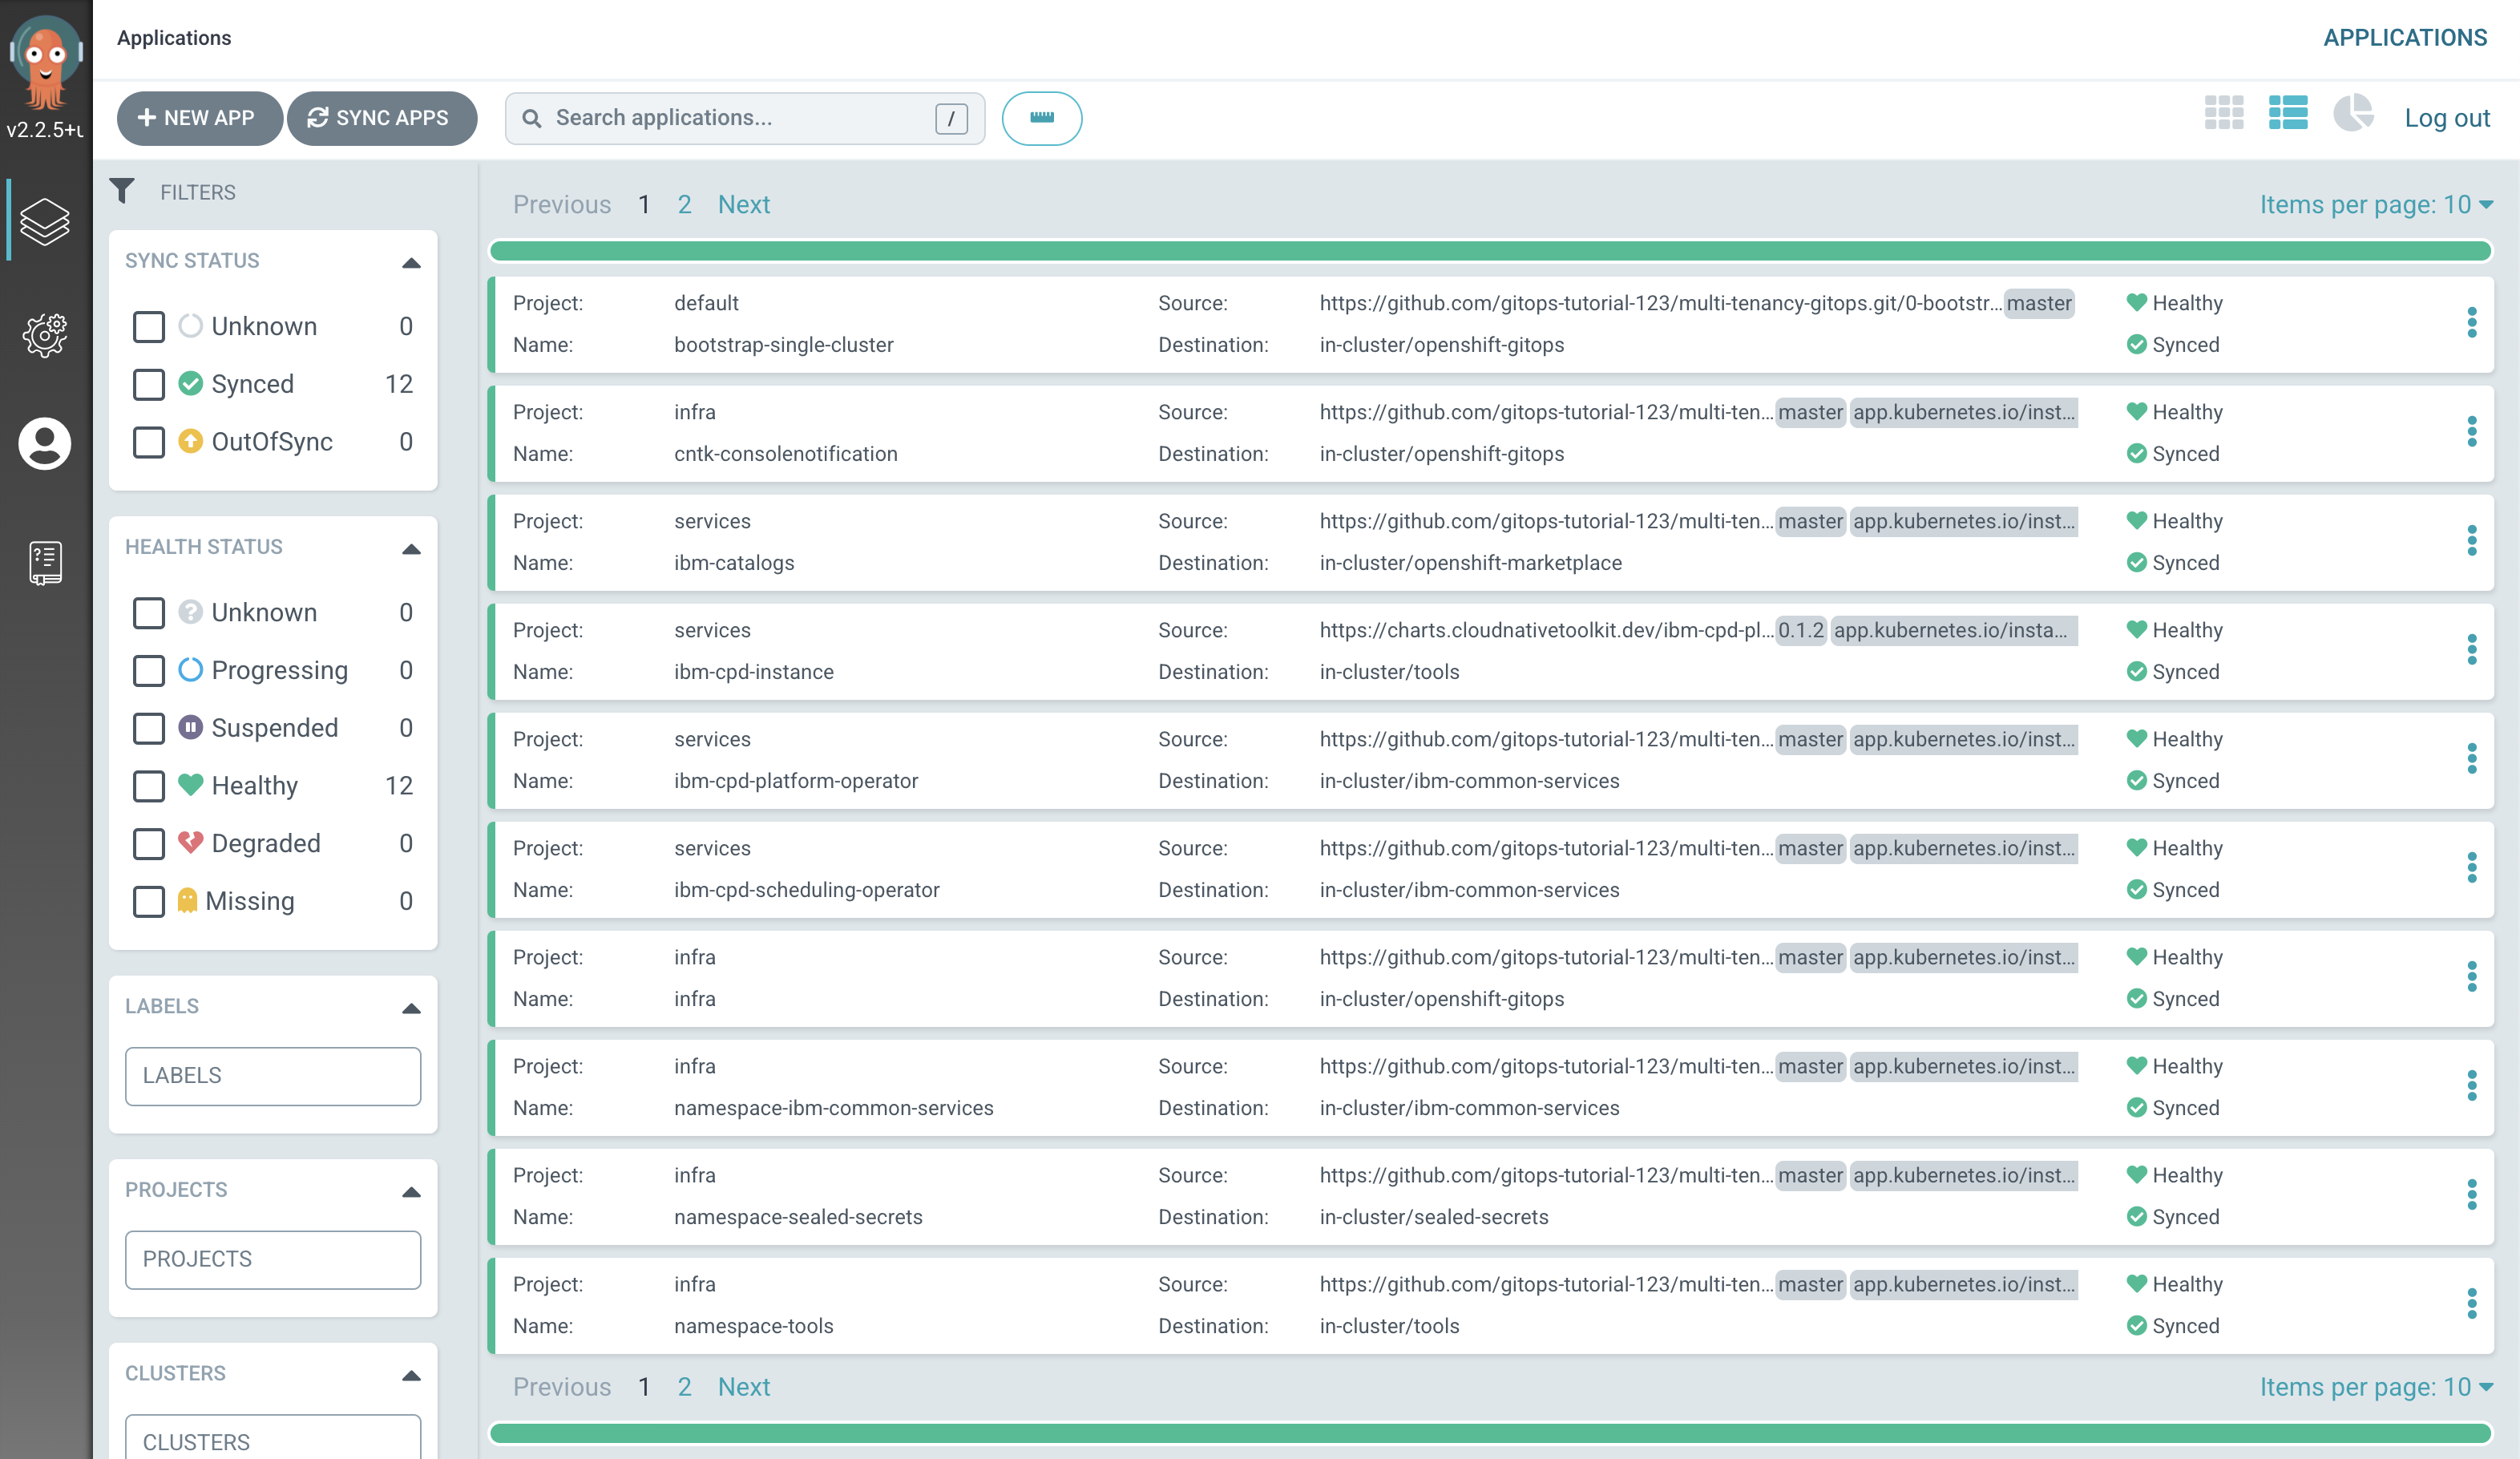
Note
The installation of IBM Cloud Pak for Data platform will take approximately 30 minutes.
Alternatively, issue the following command on terminal and wait for the expected output.
watch "oc get ZenService lite-cr -n tools -o jsonpath=\"{.status.zenStatus}{'\n'}\""Expected output =
CompletedTip
Press Ctrl+C on your keyboard to exit out of watch window.
IBM Cloud Pak for Data platform has been installed. We can now access the Cloud Pak for Data web client.
-
Access the IBM Cloud Pak for Data web client
Retrieve the URL for the IBM Cloud Pak for Data web client and and open it in a browser.
echo https://`oc get ZenService lite-cr -n tools -o jsonpath="{.status.url}{'\n'}"`Retrieve the
adminpasswordoc extract secret/admin-user-details -n tools --keys=initial_admin_password --to=-Log in to the IBM Cloud Pak for Data web client with the
admincredentials.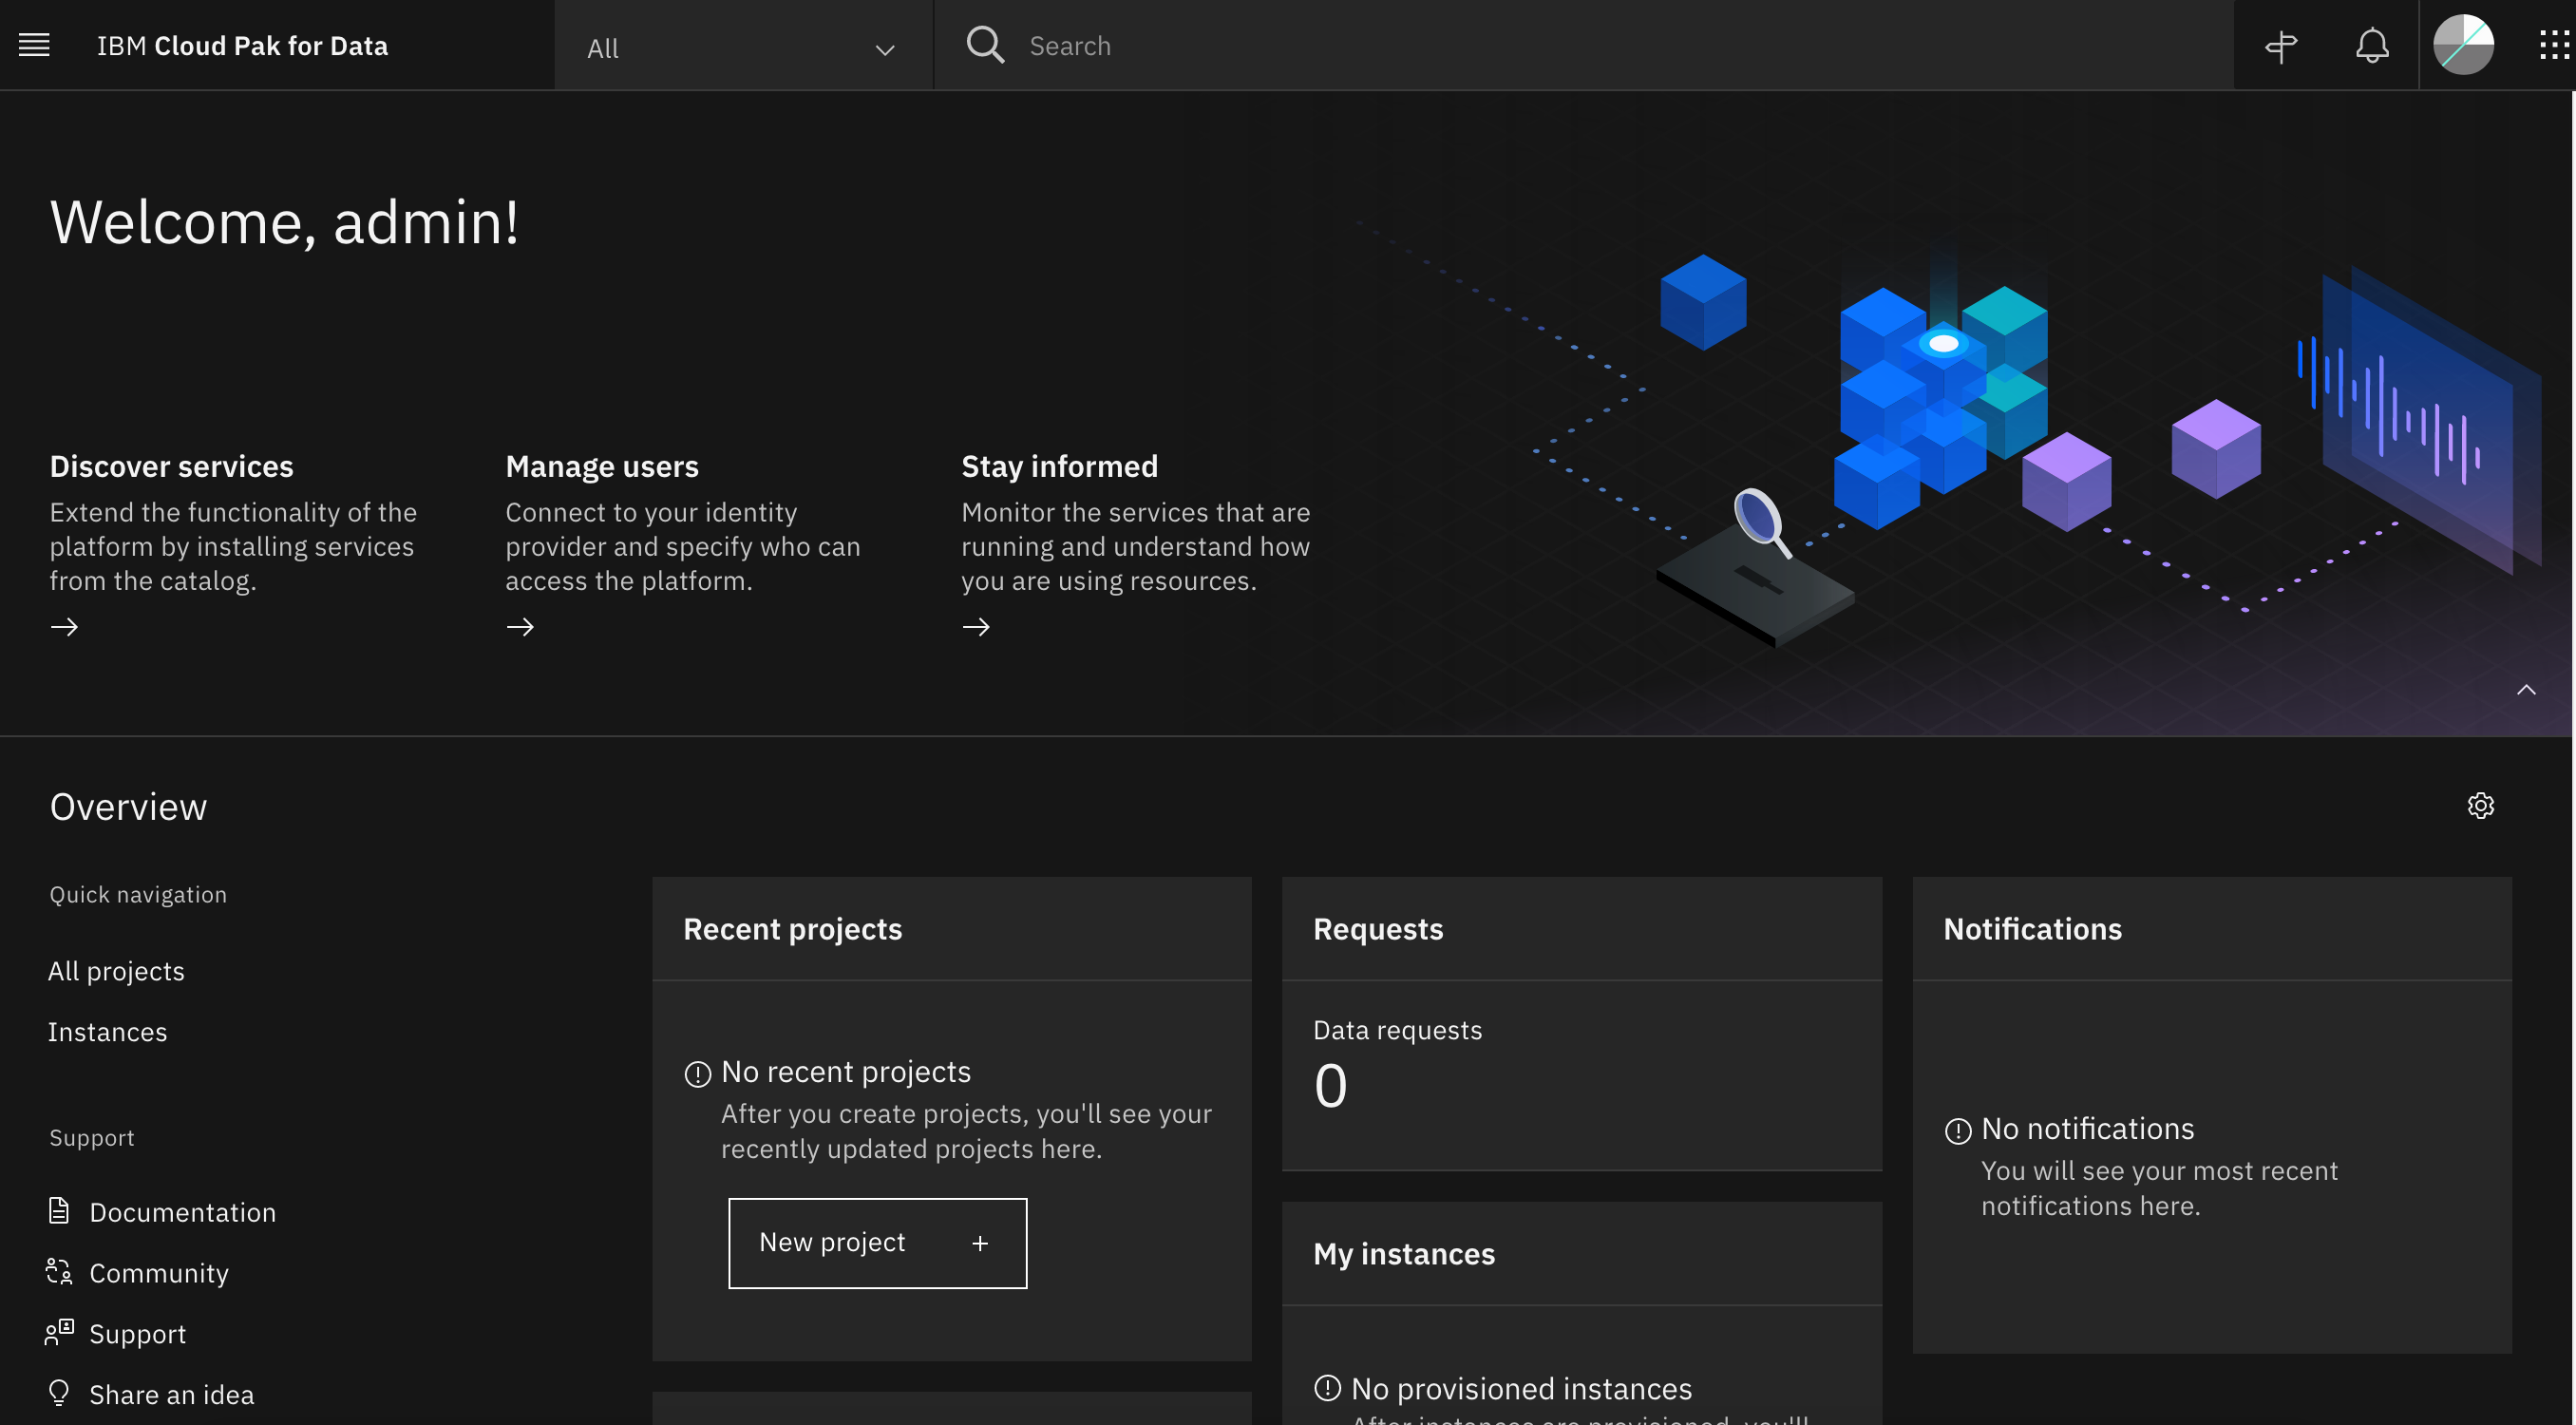
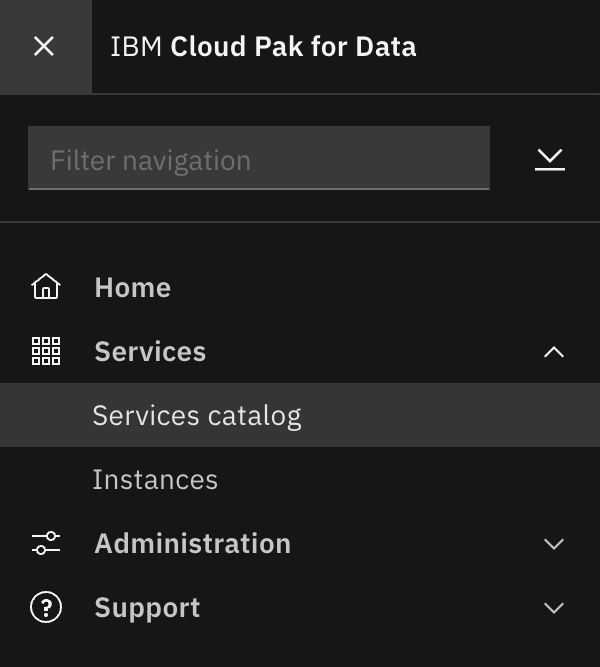
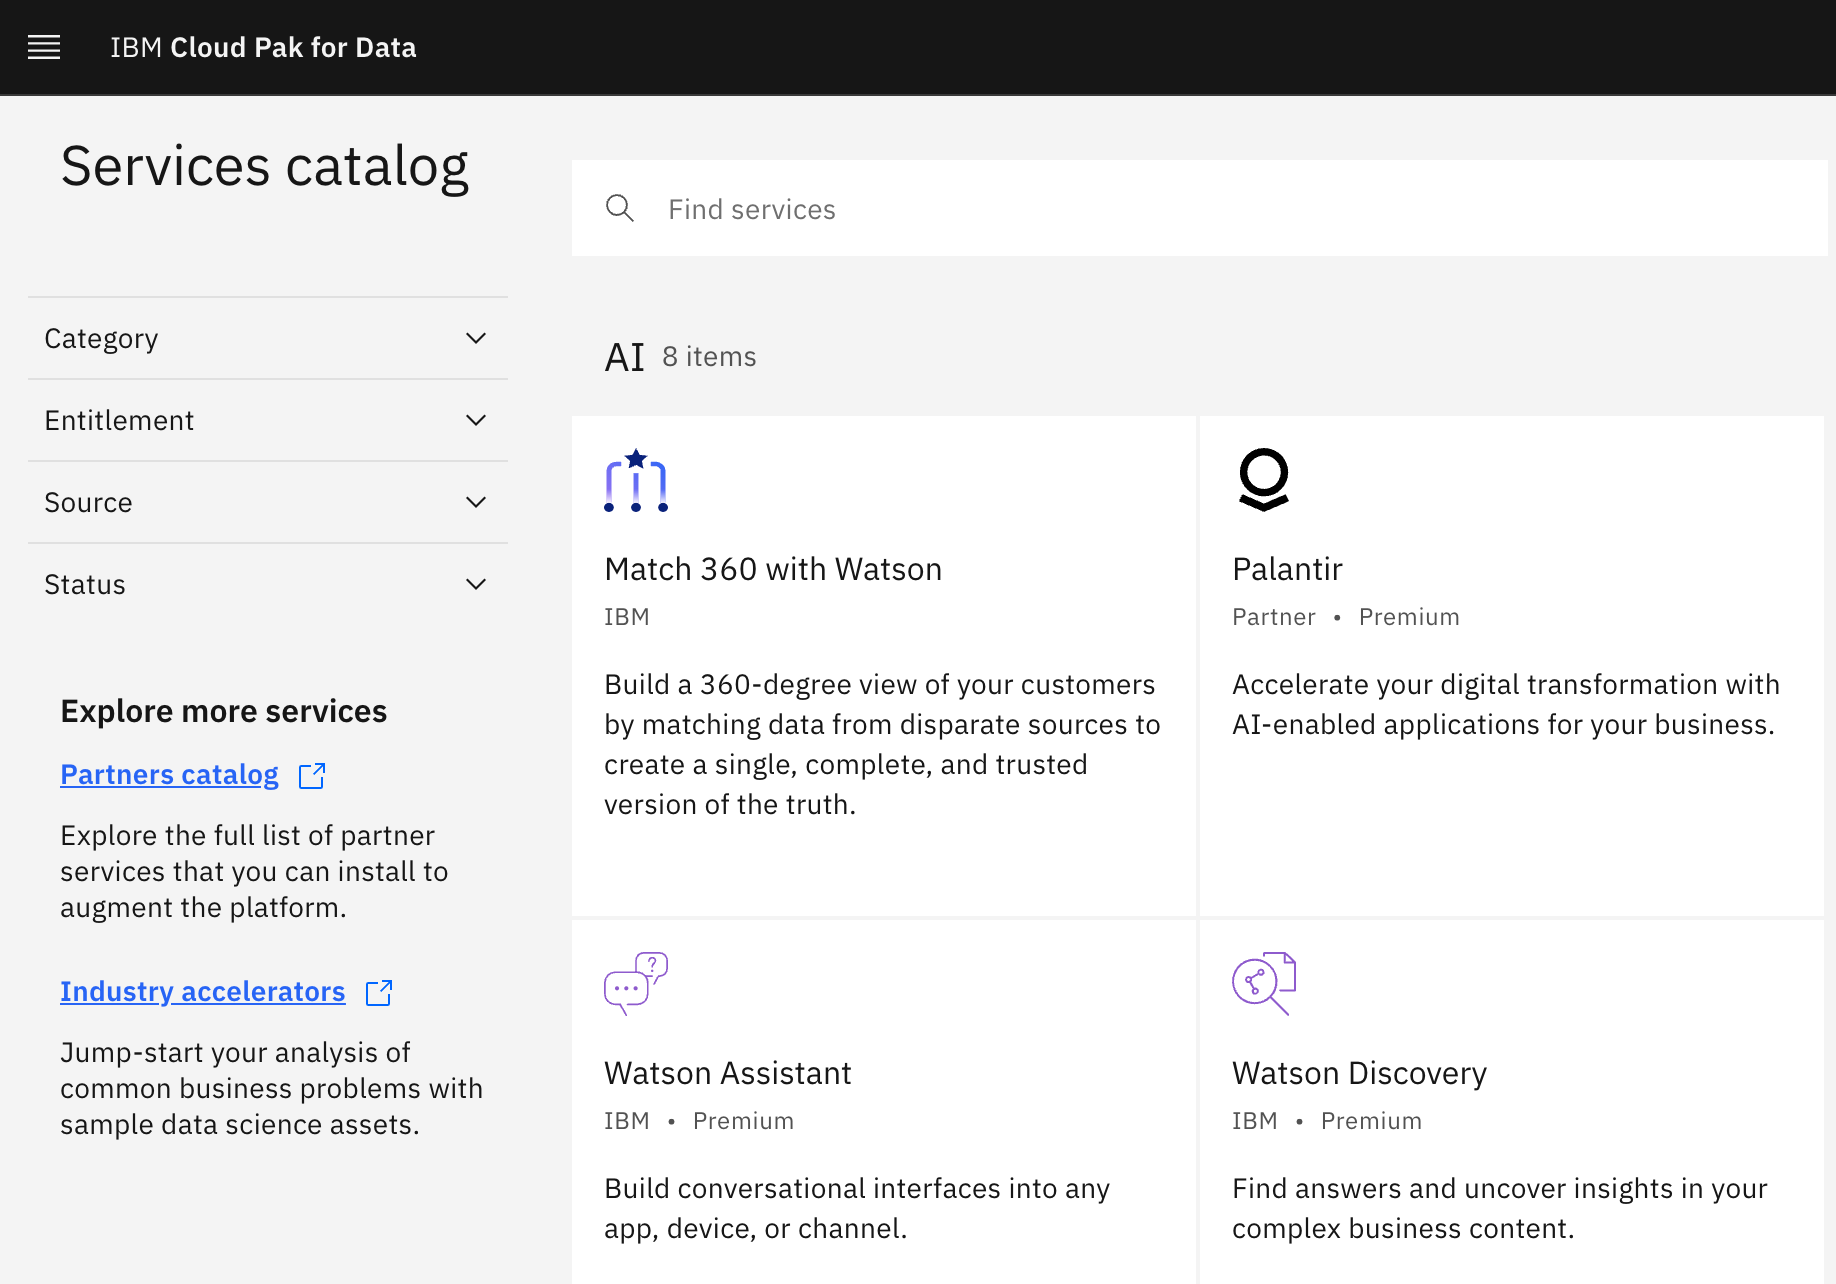
Click on the navigation menu icon on the top left corner. Click on Services menu option to expand it, then select Services catalog.
The various services available to be deployed in IBM Cloud Pak for Data catalog will be displayed.
Other important ArgoCD features
In this final section of this chapter, let's explore ArgoCD features you may have noticed as you explored different YAML files in this chapter:
SyncWave
-
Using
SyncWaveto control deployment sequencingWhen ArgoCD uses a GitOps repository to apply ArgoCD applications to the cluster, it applies all ArgoCD applications concurrently. Even though Kubernetes use of eventual consistency means that resources which depend on each other can be deployed in any order, it often makes sense to help deploy certain resources in a certain order. This can avoid spurious error messages or wasted compute resources for example.
Let's compare two ArgoCD YAML files.
Firstly, let's examine the
namespace-toolsin the infrastructure layer:cat 0-bootstrap/single-cluster/1-infra/argocd/namespace-tools.yamlwhich shows the ArgoCD application YAML:
apiVersion: argoproj.io/v1alpha1
kind: Application
metadata:
  name: namespace-tools
  labels:
    gitops.tier.layer: infra
  annotations:
    argocd.argoproj.io/sync-wave: "100"
...
Then examine the
sonarqubein the services layer:cat 0-bootstrap/single-cluster/2-services/argocd/instances/sonarqube.yamlwhich shows the ArgoCD application YAML:
apiVersion: argoproj.io/v1alpha1
kind: Application
metadata:
  name: sonarqube
  annotations:
    argocd.argoproj.io/sync-wave: "250"
  labels:
    gitops.tier.group: cntk
    gitops.tier.layer: services
    gitops.tier.source: git
  finalizers:
    - resources-finalizer.argocd.argoproj.io
...
Notice the use of
sync-wave: "100"fornamespace-toolsand how it contrasts withsync-wave: "250"forsonarqube. The lower100will be deployed before the higher sync-wave250because it only makes sense to deploy the pipelines into thetoolsnamespace, after thetoolsnamespace has been created.You are free to choose any number for
sync-wave. In our deployment, we have chosen100-199for infrastructure,200-299for services and300-399for applications; it provides alignment with high level folder numbering such as1-infraand so on.In our tutorial, we incrementally add infrastructure, services and applications so that you can understand how everything fits together incrementally. This makes
sync-waveless important than in a real-world system, where you might be making updates to each of these deployed layers simultaneously. In such cases the use ofsync-waveprovides a high degree of confidence in the effectiveness of a deployment change because all changes go through in the correct order.
Congratulations!
You've installed IBM Cloud Pak for Data platform. We installed it into the tools namespaces we created previously.
This chapter is now complete. In the following chapters, we're going to use this platform to deploy further services to the cluster.