Getting started with GitOps
In the cluster configuration of this chapter, we installed the fundamental components for continuous deployment into our cluster. These included a sample GitOps repository, and ArgoCD.
In this section we're going to customize and enable the GitOps repository, so that we can install CP4D and all of the components that go along with that. We will examine these components in more detail throughout this section of the tutorial as well.
In this topic, we're going to:
- Explore the sample GitOps repository in a little more detail
- Customize the GitOps repository for our cluster
- Connect ArgoCD to the customized GitOps repository
- Bootstrap the cluster
- Explore how the
toolsnamespace is created - Try out some dynamic changes to the cluster with ArgoCD
- Explore how ArgoCD manages configuration drift
By the end of this topic we'll have a cluster up and running, having used GitOps to do it. We'll fully understand how ArgoCD manages cluster change and configuration drift.
Pre-requisites
Before attempting this section, you must have completed the previous section of this tutorial where you created your Red Hat OpenShift cluster(s) and customized the GitOps repository and ArgoCD. Please see the previous sections of this guide for information on how to do these tasks.
The sample GitOps repository
Let's understand how GitOps works in practice by using it to install the components we've highlighted in the above diagram.
Let's first look at the high level structure of the multi-tenancy-gitops GitOps repository.
-
Ensure you're logged in to the cluster
Tip
Ensure you're in the terminal window that you used to set up your cluster, i.e. in the
multi-tenancy-gitopssubfolder.Log into your OCP cluster, substituting the
--tokenand--serverparameters with your values:oc login --token=<token> --server=<server>If you are unsure of these values, click your user ID in the OpenShift web console and select "Copy Login Command".
-
Locate your GitOps repository
If necessary, change to the root of your GitOps repository, which is stored in the
$GIT_ROOTenvironment variable.Issue the following command to change to your GitOps repository:
cd $GIT_ROOT cd multi-tenancy-gitops -
Explore the high level folder structure
Use the following command to display the folder structure:
tree . -d -L 2We can see the different folders in the GitOps repository:
.
├── 0-bootstrap
│   ├── others
│   └── single-cluster
├── doc
│   ├── diagrams
│   ├── experimental
│   ├── images
│   └── scenarios
├── scripts
│   └── bom
└── setup
    ├── ocp47
    └── ocp4x
The
0-bootstrapfolder is the key folder that contains different profiles for different cluster topologies. A Cluster Profile such assingle-clusterwill control resources are deployed to a single cluster. We'll be using thesingle-clusterprofile, although you can see that other profiles are available.There are other folders containing utility scripts and some documentation; we'll explore these later.
-
The
0-bootstrapfolderThe process of installing components into a cluster is called bootstrapping because it's the first thing that happens to a cluster after it has been created. We will bootstrap our cluster using the
0-bootstrapfolder in themulti-tenancyrepository.Let us examine the
0-bootstrapfolder structure:tree ./0-bootstrap/ -d -L 2We can see the different folders:
./0-bootstrap/
├── others
│   ├── 1-shared-cluster
│   ├── 2-isolated-cluster
│   └── 3-multi-cluster
└── single-cluster
    ├── 1-infra
    ├── 2-services
    └── 3-apps
Notice the different cluster profiles. We're going to use the
single-clusterprofile. See how this profile has three sub-folders corresponding to three layers of components: infrastructure, services and applications. Every component in our architecture will be in one of these layers. -
The
single-clusterprofile in more detailUse the following command to display
single-clusterfolder in more detail:tree ./0-bootstrap/single-cluster/ -L 2We can see the different folders:
./0-bootstrap/single-cluster/
├── 1-infra
│   ├── 1-infra.yaml
│   ├── argocd
│   └── kustomization.yaml
├── 2-services
│   ├── 2-services.yaml
│   ├── argocd
│   └── kustomization.yaml
├── 3-apps
│   ├── 3-apps.yaml
│   ├── argocd
│   └── kustomization.yaml
├── bootstrap.yaml
└── kustomization.yaml
Again, see the different layers of the architecture: infrastructure, service and application.
Notice how each of these high level folders (
1-infra,2-services,3-applications) has anargocdfolder. Theseargocdfolders contain the ArgoCD applications that control which resources in that architectural layer are deployed to the cluster. -
ArgoCD applications
Later in this tutorial, we'll see in detail how these ArgoCD applications work. For now, let's explore the range of ArgoCD applications that control the infrastructure components deployed to the cluster.
Type the following command :
tree 0-bootstrap/single-cluster/1-infra/It shows a list of ArgoCD applications that are used to manage Kubernetes infrastructure resources:
0-bootstrap/single-cluster/1-infra/
├── 1-infra.yaml
├── argocd
│   ├── consolelink.yaml
│   ├── consolenotification.yaml
│   ├── infraconfig.yaml
│   ├── machinesets.yaml
│   ├── namespace-baas.yaml
│   ├── namespace-ci.yaml
│   ├── namespace-cloudpak.yaml
│   ├── namespace-db2.yaml
│   ├── namespace-dev.yaml
│   ├── namespace-ibm-common-services.yaml
│   ├── namespace-instana-agent.yaml
│   ├── namespace-istio-system.yaml
│   ├── namespace-mq.yaml
│   ├── namespace-openldap.yaml
│   ├── namespace-openshift-storage.yaml
│   ├── namespace-prod.yaml
│   ├── namespace-robot-shop.yaml
│   ├── namespace-sealed-secrets.yaml
│   ├── namespace-spp-velero.yaml
│   ├── namespace-spp.yaml
│   ├── namespace-staging.yaml
│   ├── namespace-tools.yaml
│   ├── scc-wkc-iis.yaml
│   ├── serviceaccounts-db2.yaml
│   ├── serviceaccounts-ibm-common-services.yaml
│   ├── serviceaccounts-mq.yaml
│   ├── serviceaccounts-tools.yaml
│   └── storage.yaml
└── kustomization.yaml
Notice the many
namespace-YAMLs; we'll see in a moment how these each define an ArgoCD application dedicated to managing a Kubernetes namespace in our cluster. theserviceaccount-YAMLs can similarly manage service accounts.There are similar ArgoCD applications for the service and application layers. Feel free to examine their corresponding folders; we will look at them in more detail later.
-
A word on terminology
As we get started with ArgoCD, it can be easy to confuse the term ArgoCD application with your application. That's because ArgoCD uses the term application to refer to a Kubernetes custom resource that was initially designed to manage a set of application resources. However, an ArgoCD application can automate the deployment of any Kubernetes resource within a cluster, such as a namespace, as we'll see a little later.
Customizing the GitOps repositories
Let's now customize our repository to deploy Kubernetes resources to our cluster.
The cloned GitOps configuration repositories needs to be customized for your cluster. The ArgoCD Application and AppProject resources and kustomization.yaml resources contains environment variables which will need to be updated to your specific GitHub organization and branch.
Have a look at the following kustomization.yaml as an example of what will need to be updated.
cat 0-bootstrap/single-cluster/1-infra/kustomization.yaml
resources:
#- argocd/consolelink.yaml
#- argocd/consolenotification.yaml
#- argocd/namespace-ibm-common-services.yaml
#- argocd/namespace-ci.yaml
#- argocd/namespace-dev.yaml
#- argocd/namespace-staging.yaml
#- argocd/namespace-prod.yaml
#- argocd/namespace-cloudpak.yaml
#- argocd/namespace-istio-system.yaml
#- argocd/namespace-openldap.yaml
#- argocd/namespace-sealed-secrets.yaml
#- argocd/namespace-tools.yaml
#- argocd/namespace-instana-agent.yaml
#- argocd/namespace-robot-shop.yaml
#- argocd/namespace-openshift-storage.yaml
#- argocd/namespace-spp.yaml
#- argocd/namespace-spp-velero.yaml
#- argocd/namespace-baas.yaml
#- argocd/namespace-db2.yaml
#- argocd/namespace-mq.yaml
#- argocd/serviceaccounts-ibm-common-services.yaml
#- argocd/serviceaccounts-tools.yaml
#- argocd/serviceaccounts-db2.yaml
#- argocd/serviceaccounts-mq.yaml
#- argocd/scc-wkc-iis.yaml
#- argocd/storage.yaml
#- argocd/infraconfig.yaml
#- argocd/machinesets.yaml
patches:
- target:
    group: argoproj.io
    kind: Application
    labelSelector: "gitops.tier.layer=infra"
  patch: |-
    - op: add
      path: /spec/source/repoURL
      value: ${GIT_BASEURL}/${GIT_ORG}/${GIT_GITOPS_INFRA}
    - op: add
      path: /spec/source/targetRevision
      value: ${GIT_GITOPS_INFRA_BRANCH}
Once we've customized the local repository, we'll push our updates back to our repository branch on GitHub where it can be accessed by ArgoCD.
-
Run the customization script
Let's customize the cloned
multi-tenancy-gitopsrepository with the relevant values for our cluster.The sample GitOps repository provides the
set-git-source.shscript to make this task easy.Run script to replace the git url and branch to your git organization where you created the git repositories:
GIT_ORG=$GIT_ORG GIT_BRANCH=master ./scripts/set-git-source.shThe script will list customizations it will use and all the files that it customizes:
Setting kustomization patches to https://github.com/tutorial-org-123/multi-tenancy-gitops.git on branch master
Setting kustomization patches to https://github.com/tutorial-org-123/multi-tenancy-gitops-infra.git on branch master
Setting kustomization patches to https://github.com/tutorial-org-123/multi-tenancy-gitops-services.git on branch master
Setting kustomization patches to https://github.com/tutorial-org-123/multi-tenancy-gitops-apps.git on branch master
done replacing variables in kustomization.yaml files
git commit and push changes now
You can examine your local clone of the GitOps repository to verify these customizations. You should see lots of amended ArgoCD YAMLs that point to your GitOps repository on GitHub.
This script has also made some customizations that we'll use much later in the tutorial; we'll refer to those at the relevant time.
-
Add the changes to a git index, ready to push to GitHub
We've now customized our local clone of the
multi-tenancy-gitopsrepository. Let's commit these changes and make the customized repository available to the cluster via GitHub.Add all changes in the current folder to a git index:
git add . -
Commit the changes to git
Use the following command to create a commit record:
git commit -s -m "GitOps customizations for organization and cluster"See the Git commit message for the customized files:
[master a900c39] GitOps customizations for organization and cluster 46 files changed, 176 insertions(+), 176 deletions(-) -
Set your GitOps repository branch
For this guide, we will be using the
masterbranch for themulti-tenancy-gitopsrepository.export GIT_BRANCH=masterYou can verify your
$GIT_BRANCHas follows:echo $GIT_BRANCH -
Push changes to GitHub
Push this commit back to the branch on GitHub:
git push origin $GIT_BRANCHThe changes have now been pushed to your GitOps repository:
Enumerating objects: 51, done.
Counting objects: 100% (51/51), done.
Delta compression using up to 8 threads
Compressing objects: 100% (30/30), done.
Writing objects: 100% (30/30), 3.92 KiB | 174.00 KiB/s, done.
Total 30 (delta 21), reused 0 (delta 0), pack-reused 0
remote: Resolving deltas: 100% (21/21), completed with 10 local objects.
To https://github.com/tutorial-org-123/multi-tenancy-gitops.git
   d95eca5..a900c39  master -> master
Connect ArgoCD to the GitOps repository
Let's now connect your customized GitOps repository to the instance of ArgoCD running in the cluster. Once connected, ArgoCD will use the contents of the repository to create necessary resources.
-
Locate your GitOps repository
If necessary, change to the root of your GitOps repository, which is stored in the
$GIT_ROOTenvironment variable.Issue the following command to change to your GitOps repository:
cd $GIT_ROOT cd multi-tenancy-gitops -
Review ArgoCD infrastructure folder
Let's examine the
0-bootstrap/single-cluster/1-infra/kustomization.yamlto see how ArgoCD manages the resources deployed to the cluster.Issue the following command:
cat 0-bootstrap/single-cluster/1-infra/kustomization.yamlWe can see the contents of the
kustomization.yaml:resources: #- argocd/consolelink.yaml #- argocd/consolenotification.yaml #- argocd/namespace-ibm-common-services.yaml #- argocd/namespace-ci.yaml #- argocd/namespace-dev.yaml #- argocd/namespace-staging.yaml #- argocd/namespace-prod.yaml #- argocd/namespace-cloudpak.yaml #- argocd/namespace-istio-system.yaml #- argocd/namespace-openldap.yaml #- argocd/namespace-sealed-secrets.yaml #- argocd/namespace-tools.yaml #- argocd/namespace-instana-agent.yaml #- argocd/namespace-robot-shop.yaml #- argocd/namespace-openshift-storage.yaml #- argocd/namespace-spp.yaml #- argocd/namespace-spp-velero.yaml #- argocd/namespace-baas.yaml #- argocd/namespace-db2.yaml #- argocd/namespace-mq.yaml #- argocd/serviceaccounts-ibm-common-services.yaml #- argocd/serviceaccounts-tools.yaml #- argocd/serviceaccounts-db2.yaml #- argocd/serviceaccounts-mq.yaml #- argocd/scc-wkc-iis.yaml #- argocd/storage.yaml #- argocd/infraconfig.yaml #- argocd/machinesets.yaml patches: - target: group: argoproj.io kind: Application labelSelector: "gitops.tier.layer=infra" patch: |- - op: add path: /spec/source/repoURL value: https://github.com/tutorial-org-123/multi-tenancy-gitops-infra.git - op: add path: /spec/source/targetRevision value: masterNotice that the resources that needs to be applied to the cluster are all
inactivateand commented out.Let us
enablethe resources that are needed by un-commenting them. -
Deploy Kubernetes resources with
kustomization.yamlOpen
0-bootstrap/single-cluster/1-infra/kustomization.yamland uncomment the below resources:argocd/consolenotification.yaml argocd/namespace-ibm-common-services.yaml argocd/namespace-sealed-secrets.yaml argocd/namespace-tools.yamlYou will have the following resources un-commented for infrastructure:
resources:
#- argocd/consolelink.yaml
- argocd/consolenotification.yaml
- argocd/namespace-ibm-common-services.yaml
#- argocd/namespace-ci.yaml
#- argocd/namespace-dev.yaml
#- argocd/namespace-staging.yaml
#- argocd/namespace-prod.yaml
#- argocd/namespace-cloudpak.yaml
#- argocd/namespace-istio-system.yaml
#- argocd/namespace-openldap.yaml
- argocd/namespace-sealed-secrets.yaml
- argocd/namespace-tools.yaml
#- argocd/namespace-instana-agent.yaml
#- argocd/namespace-robot-shop.yaml
#- argocd/namespace-openshift-storage.yaml
#- argocd/namespace-spp.yaml
#- argocd/namespace-spp-velero.yaml
#- argocd/namespace-baas.yaml
#- argocd/namespace-db2.yaml
#- argocd/namespace-mq.yaml
#- argocd/serviceaccounts-ibm-common-services.yaml
#- argocd/serviceaccounts-tools.yaml
#- argocd/serviceaccounts-db2.yaml
#- argocd/serviceaccounts-mq.yaml
#- argocd/scc-wkc-iis.yaml
#- argocd/storage.yaml
#- argocd/infraconfig.yaml
#- argocd/machinesets.yaml
patches:
- target:
    group: argoproj.io
    kind: Application
    labelSelector: "gitops.tier.layer=infra"
  patch: |-
    - op: add
      path: /spec/source/repoURL
      value: https://github.com/tutorial-org-123/multi-tenancy-gitops-infra.git
    - op: add
      path: /spec/source/targetRevision
      value: master
Commit and push changes to your git repository:
git add .
git commit -s -m "Intial boostrap setup for infrastructure"
git push origin $GIT_BRANCH
The changes have now been pushed to your GitOps repository:
[master aa591ea] Intial boostrap setup for infrastructure 1 file changed, 4 insertions(+), 4 deletions(-) Enumerating objects: 11, done. Counting objects: 100% (11/11), done. Delta compression using up to 8 threads Compressing objects: 100% (6/6), done. Writing objects: 100% (6/6), 576 bytes | 576.00 KiB/s, done. Total 6 (delta 5), reused 0 (delta 0) remote: Resolving deltas: 100% (5/5), completed with 5 local objects. To https://github.com/tutorial-org-123/multi-tenancy-gitops.git a900c39..aa591ea master -> master -
Examine
bootstrap.yamlresiding in0-bootstrap/single-cluster/.The
bootstrap.yamlfile is used to create our first ArgoCD application calledbootstrap-single-cluster. This initial ArgoCD application will create all the other ArgoCD applications that control the application, service, and infrastructure resources (such as the tools and ibm-common-services namespaces) deployed to the cluster.Examine the YAML that defines the ArgoCD bootstrap application:
cat 0-bootstrap/single-cluster/bootstrap.yamlNotice also how this ArgoCD application has been customized to use the GitOps repository repoURL:
https://github.com/tutorial-org-123/multi-tenancy-gitops.git.apiVersion: argoproj.io/v1alpha1 kind: Application metadata: name: bootstrap-single-cluster namespace: openshift-gitops spec: destination: namespace: openshift-gitops server: https://kubernetes.default.svc project: default source: path: 0-bootstrap/single-cluster repoURL: https://github.com/tutorial-org-123/multi-tenancy-gitops.git targetRevision: master syncPolicy: automated: prune: true selfHeal: trueMost importantly, see how
path: 0-bootstrap/single-clusterrefers to the0-bootstrap/single-clusterfolder within this repository. This will result in the creation of individual ArgoCD applications to manage our cluster resources.Access the
0-bootstrap/single-cluster/kustomization.yaml:cat 0-bootstrap/single-cluster/kustomization.yamlLet us for now only deploy
infraresources to the cluster. Open0-bootstrap/single-cluster/kustomization.yamland comment out the2-services/2-services.yamland3-apps/3-apps.yamlas follows:resources: - 1-infra/1-infra.yaml # - 2-services/2-services.yaml # - 3-apps/3-apps.yaml patches: - target: group: argoproj.io kind: Application labelSelector: "gitops.tier.layer=gitops" patch: |- - op: add path: /spec/source/repoURL value: https://github.com/tutorial-org-123/multi-tenancy-gitops.git - op: add path: /spec/source/targetRevision value: master - target: group: argoproj.io kind: AppProject labelSelector: "gitops.tier.layer=infra" patch: |- - op: add path: /spec/sourceRepos/- value: https://github.com/tutorial-org-123/multi-tenancy-gitops.git - op: add path: /spec/sourceRepos/- value: https://github.com/tutorial-org-123/multi-tenancy-gitops-infra.git - target: group: argoproj.io kind: AppProject labelSelector: "gitops.tier.layer=services" patch: |- - op: add path: /spec/sourceRepos/- value: https://github.com/tutorial-org-123/multi-tenancy-gitops.git - op: add path: /spec/sourceRepos/- value: https://github.com/tutorial-org-123/multi-tenancy-gitops-services.git - target: group: argoproj.io kind: AppProject labelSelector: "gitops.tier.layer=applications" patch: |- - op: add path: /spec/sourceRepos/- value: https://github.com/tutorial-org-123/multi-tenancy-gitops.git - op: add path: /spec/sourceRepos/- value: https://github.com/tutorial-org-123/multi-tenancy-gitops-apps.gitCommit and push changes to your git repository:
git add .
git commit -s -m "Using only infra"
git push origin $GIT_BRANCH
The changes have now been pushed to your GitOps repository:
[master aeb56c6] Using only infra 1 file changed, 2 insertions(+), 2 deletions(-) Enumerating objects: 9, done. Counting objects: 100% (9/9), done. Delta compression using up to 8 threads Compressing objects: 100% (5/5), done. Writing objects: 100% (5/5), 456 bytes | 456.00 KiB/s, done. Total 5 (delta 4), reused 0 (delta 0) remote: Resolving deltas: 100% (4/4), completed with 4 local objects. To https://github.com/tutorial-org-123/multi-tenancy-gitops.git e3f696d..aeb56c6 master -> master -
Apply ArgoCD
bootstrap.yamlRecall that you pushed the customized local copy of the GitOps repository to your GitHub account. The repository contains a
bootstrap-single-clusterArgoCD application that is watching this repository and using its contents to manage the cluster.When the
bootstrap-single-clusterArgoCD application is applied to the cluster, it will continuously ensure that all the activated resources are applied to the cluster.Apply the bootstrap YAML to the cluster:
oc apply -f 0-bootstrap/single-cluster/bootstrap.yamlKubernetes will confirm that the
bootstrapArgoCD application has been created:application.argoproj.io/bootstrap-single-cluster createdThe
bootstrapArgoCD application will watch the0-bootstrap/single-clusterfolder in our GitOps repository on GitHub.In this way, as resources are added to the infrastructure, service and application folders, they will be deployed to the cluster automatically.
This is therefore the only direct cluster operation we need to perform; from now on, all cluster operations will be performed via Git operations to this repository.
-
Verify the bootstrap deployment
Verify that the bootstrap ArgoCD application is running with the following command:
oc get app/bootstrap-single-cluster -n openshift-gitopsYou should see that the bootstrap application was recently updated:
NAME SYNC STATUS HEALTH STATUS bootstrap-single-cluster Synced HealthyHEALTH_STATUSmay temporarily showMissing; simply re-issue the command to confirm it moves toHealthy. -
Using the UI to view the newly deployed ArgoCD applications
In the previous section of this chapter you logged on to the ArgoCD web console. Switch back to that console, refresh the page and you should see the
bootstrap-single-clusterArgoCD application together with many other ArgoCD applications:Tip
You may need to select
Listview rather than theTilesview.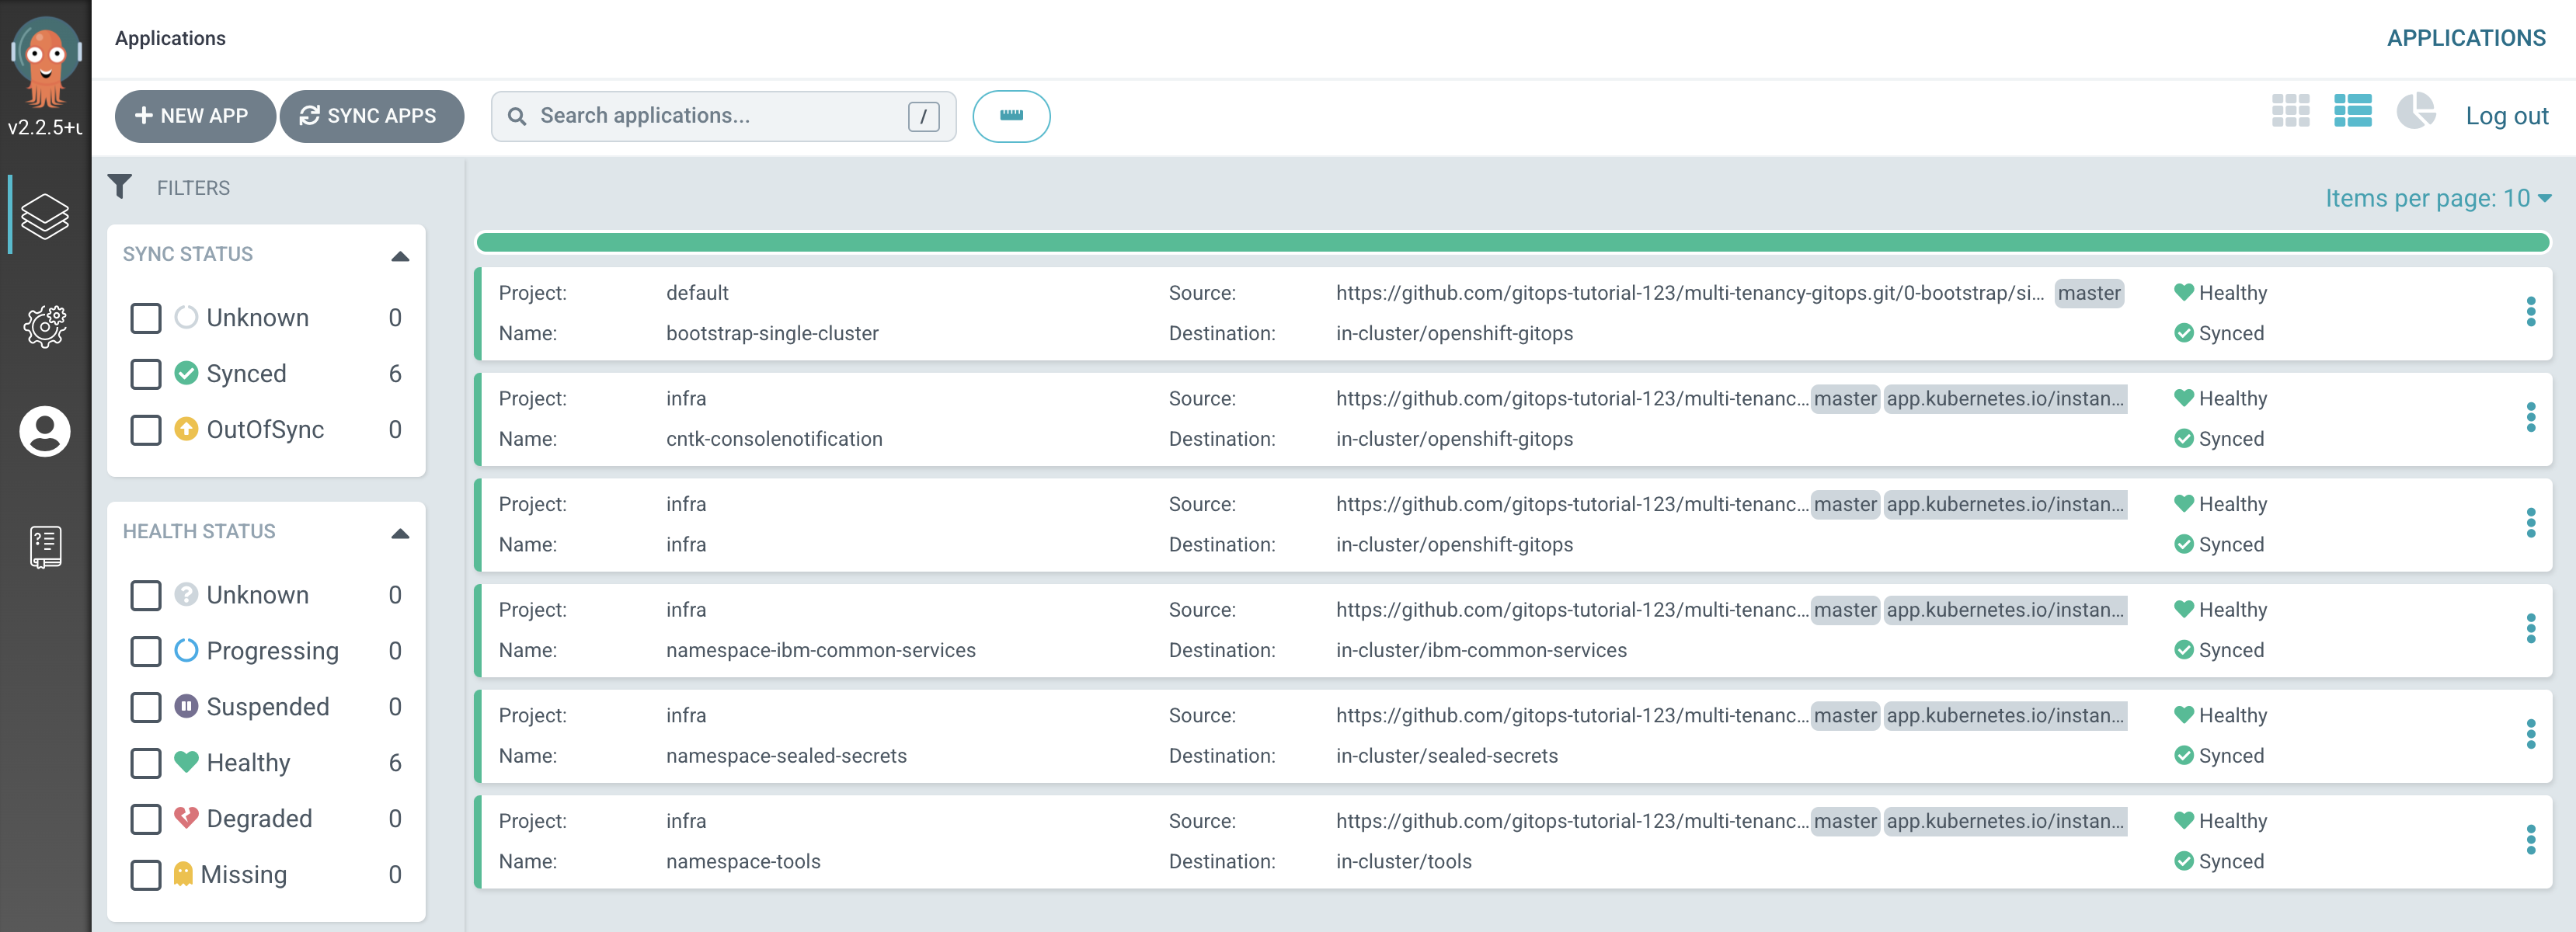
We can see that six ArgoCD applications have been deployed to the cluster as a result of applying
bootstrap.yaml. In the next section of the tutorial, we'll examine these applications to see how and why they were created, but for now let's focus on one of them -- thenamespace-toolsArgoCD application. -
Examining the
namespace-toolsArgoCD application resourcesLet's examine the Kubernetes resources applied to the cluster by the
namespace-toolsArgoCD application.In the ArgoCD application list, click on
namespace-tools: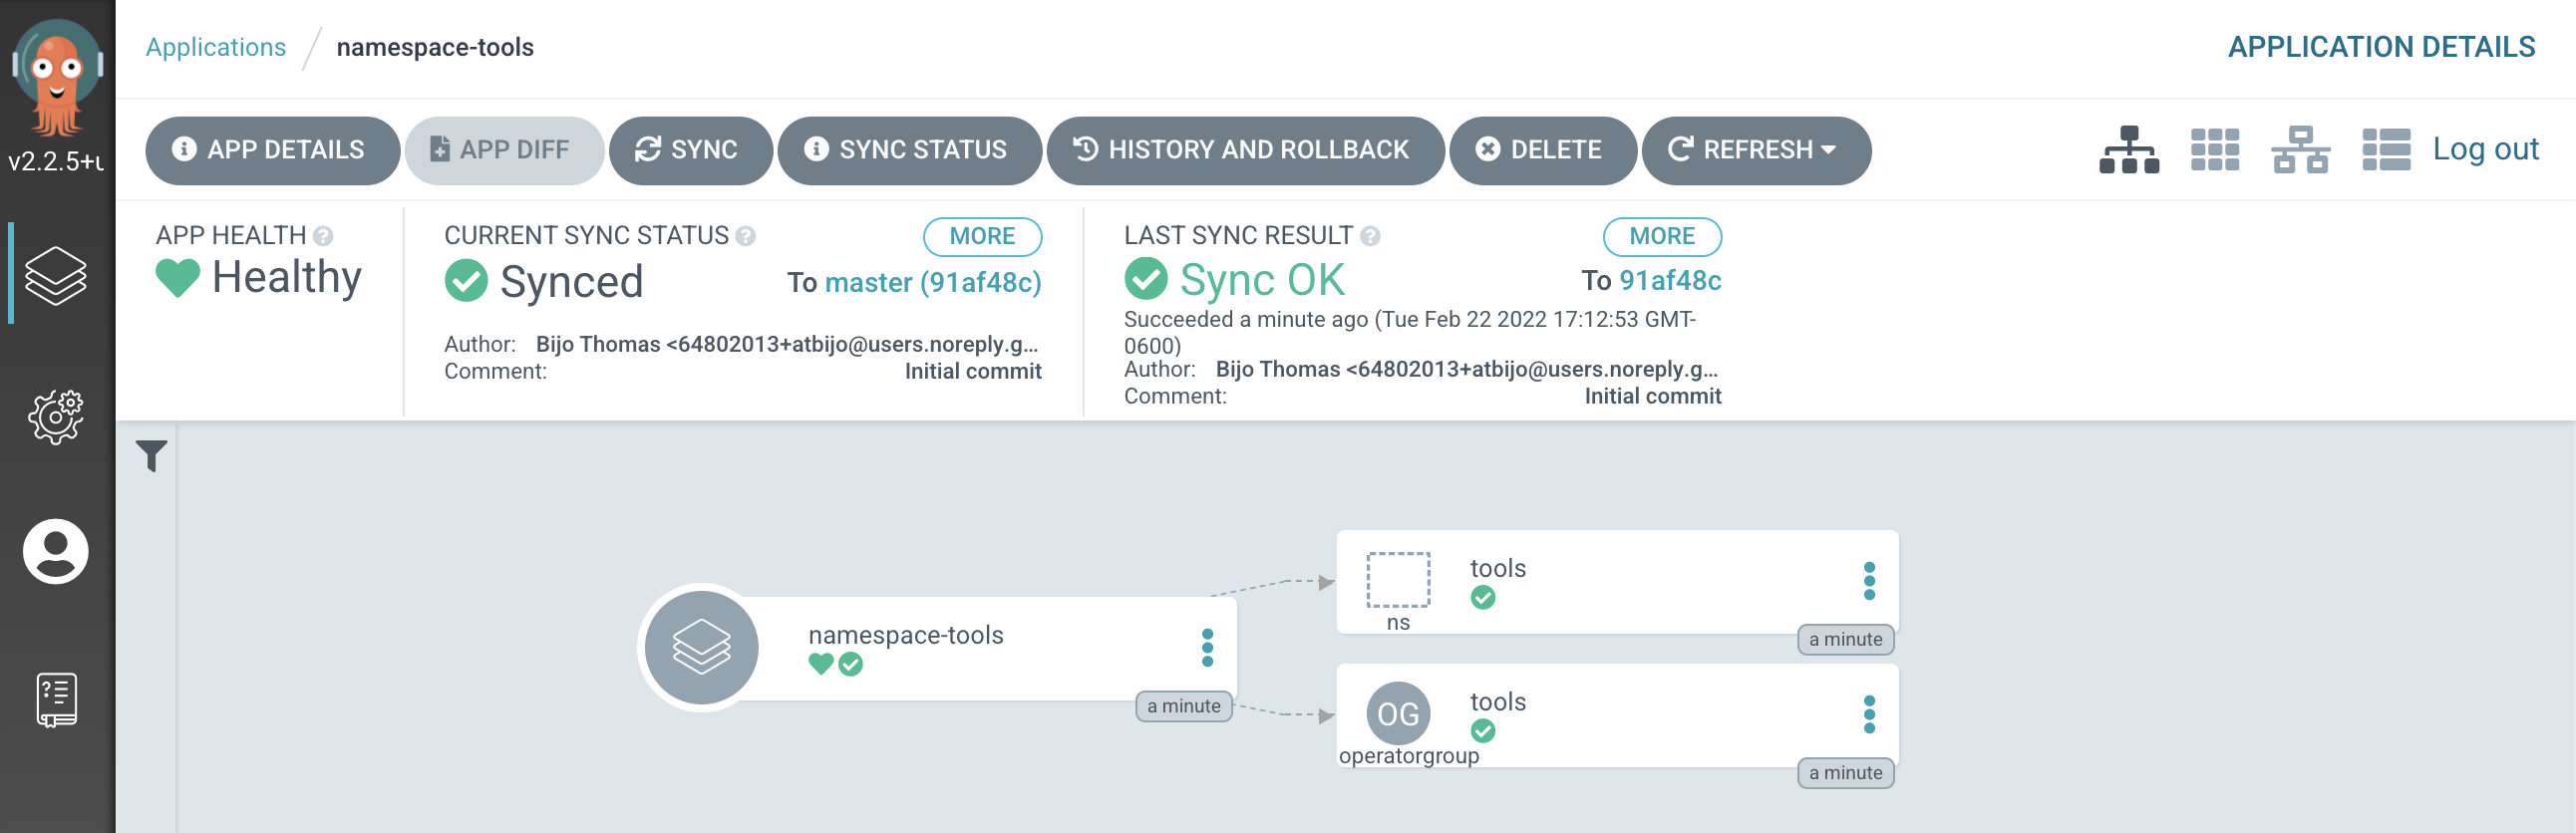
(You may need to
clear filtersto see this screenshot.)The directed graph shows that the
namespace-toolsArgoCD app has created 2 Kubernetes resources; ourtoolsnamespace and one operatorgroup. -
Verify the namespace using the
ocCLIWe've seen the new namespace definition in the GitOps repository and visually in the ArgoCD UI. Let's also verify it via the command line:
Type the following command:
oc get namespace tools -o yamlIf you have a newer version of oc cli and want to view the managed fields:
oc get namespace tools -o yaml --show-managed-fields=trueThis will list the full details of the
toolsnamespace:apiVersion: v1 kind: Namespace metadata: annotations: kubectl.kubernetes.io/last-applied-configuration: | {"apiVersion":"v1","kind":"Namespace","metadata":{"annotations":{},"labels":{"app.kubernetes.io/instance":"namespace-tools"},"name":"tools"}} openshift.io/sa.scc.mcs: s0:c26,c15 openshift.io/sa.scc.supplemental-groups: 1000680000/10000 openshift.io/sa.scc.uid-range: 1000680000/10000 creationTimestamp: "2022-01-23T04:23:38Z" labels: app.kubernetes.io/instance: namespace-tools olm.operatorgroup.uid/a74fb725-eb30-4a32-98d8-9f9913854bf5: "" managedFields: - apiVersion: v1 fieldsType: FieldsV1 fieldsV1: f:metadata: f:annotations: .: {} f:kubectl.kubernetes.io/last-applied-configuration: {} f:labels: .: {} f:app.kubernetes.io/instance: {} f:status: f:phase: {} manager: argocd-application-controller operation: Update time: "2022-01-23T04:23:38Z" - apiVersion: v1 fieldsType: FieldsV1 fieldsV1: f:metadata: f:annotations: f:openshift.io/sa.scc.mcs: {} f:openshift.io/sa.scc.supplemental-groups: {} f:openshift.io/sa.scc.uid-range: {} manager: cluster-policy-controller operation: Update time: "2022-01-23T04:23:38Z" - apiVersion: v1 fieldsType: FieldsV1 fieldsV1: f:metadata: f:labels: f:olm.operatorgroup.uid/a74fb725-eb30-4a32-98d8-9f9913854bf5: {} manager: olm operation: Update time: "2022-01-23T04:23:39Z" name: tools resourceVersion: "773049" selfLink: /api/v1/namespaces/tools uid: 8edcda20-b9a8-45e9-9c32-81d663658e65 spec: finalizers: - kubernetes status: phase: ActiveNotice how
manager: argocd-application-controlleridentifies that this namespace was created by ArgoCD.It's important to understand the sequence of actions. We simply deployed the
bootstrap-single-clusterArgoCD application, and it ultimately resulted in the creation of thenamespace-toolsArgoCD application which created thetoolsnamespace.We don't directly apply resources to the cluster once the
bootstrap-single-clusterArgoCD application has been applied; the cluster state is determined by an ArgoCD application YAML in the corresponding application, service or infrastructure related folders. It's these ArgoCD applications that create and manage the underlying Kubernetes resources using the GitOps repository as the source of truth. -
Understanding the
namespace-toolsArgoCD applicationLet's examine the ArgoCD application
namespace-toolsto see how it created thetoolsnamespace and one operatorgroup in the cluster.Issue the following command to examine its YAML:
cat 0-bootstrap/single-cluster/1-infra/argocd/namespace-tools.yamlNotice that
apiVersionandkindidentify this as an ArgoCD application:apiVersion: argoproj.io/v1alpha1 kind: Application metadata: name: namespace-tools labels: gitops.tier.layer: infra annotations: argocd.argoproj.io/sync-wave: "100" spec: destination: namespace: tools server: https://kubernetes.default.svc project: infra source: path: namespaces/tools syncPolicy: automated: prune: true selfHeal: trueMost importantly, see how this
namespace-toolsArgoCD application monitors the folderpath: namespaces/toolsinhttps://github.com/tutorial-org-123/multi-tenancy-gitops-infra.git; it then applies the contents of this folder to the cluster whenever its content changes.Notice the
SyncPolicyofautomated; any changes to this folder will automatically be applied to the cluster; we do not need to perform a manualSyncoperation from the ArgoCD UI. -
Examine the
toolsnamespace YAMLTo examine this, navigate to
multi-tenancy-gitops-infrarepository you cloned previously.cd $GIT_ROOT cd multi-tenancy-gitops-infraLet's examine the
toolsnamespace YAML in thenamespaces/toolsfolder:cat namespaces/tools/namespace.yamlIt's a very simple YAML:
apiVersion: v1
kind: Namespace
metadata:
  name: tools
This is a YAML that we would normally apply to the cluster manually or via a script. However, when we use GitOps, we push the ArgoCD application that uses this YAML to GitHub, and it applies the
toolsnamespace YAML to the cluster. This is the essence of GitOps; we declare what we want to appear in the cluster using Git and ArgoCD synchronizes the cluster with this declaration. -
Examine the
toolsoperatorgroup YAMLNow that we've seen how the namespace was created, let's see how the operatorgroup was created by the
namespace-toolsArgoCD application.In the same
namespace/toolsfolder as thetoolsnamespace YAML, there is aoperatorgroup.yamlfile. This file will be also applied to the cluster by thenamespace-toolsArgoCD application which is continuously watching this folder.Examine this file with the following command:
cat namespaces/tools/operatorgroup.yamlThis YAML is quite straightforward.
apiVersion: operators.coreos.com/v1
kind: OperatorGroup
metadata:
  name: tools
spec:
  targetNamespaces:
    - tools
You'll see that there is an OperatorGroup named
toolsdefined in this YAML.This confirms why we saw two resources created by the
namespace-toolsArgoCD application in the ArgoCD UI: one namespace and one operatorgroup.Again, notice the pattern: a single ArgoCD application manages one or more Kubernetes resources in the cluster -- using one or more YAML files in which those resources are defined.
-
The
bootstrap-single-clusterArgoCD application in more detailIn the ArgoCD UI Applications view, click on the
bootstrap-single-clusterapplication: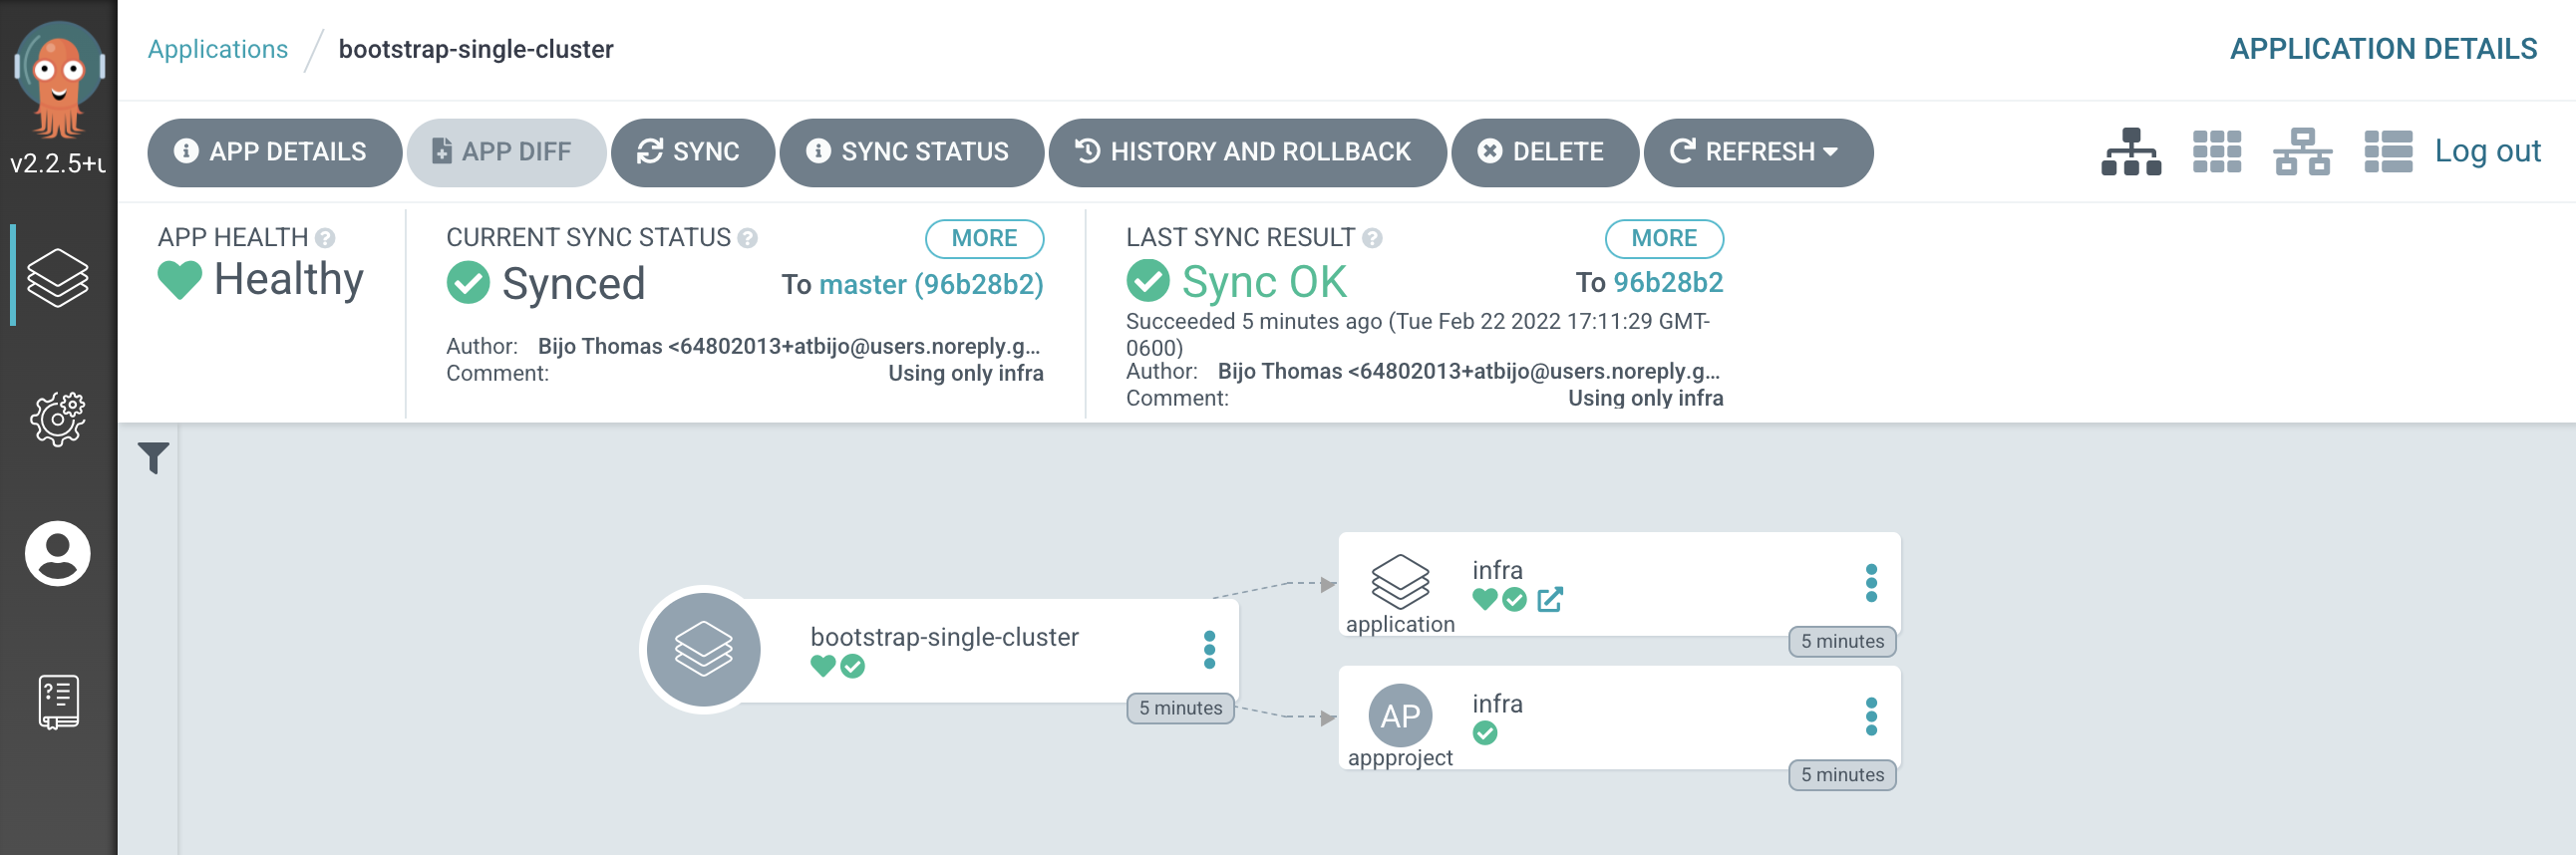
You can see the bootstrap application creates two Kubernetes resources, the
infraArgoCD application and theinfraArgoCD project.An ArgoCD project is a mechanism by which we can group related resources; we keep all our ArgoCD applications that manage infrastructure in the
infraproject. Later, we'll create aservicesproject for the ArgoCD applications that manage the services we want deployed to the cluster such as the Cloud Pak operators and services. -
The
infraArgoCD applicationLet's examine the
infraArgoCD application in more detail to see how it works.In the ArgoCD UI Applications view, click on the
open applicationicon for theinfraapplication: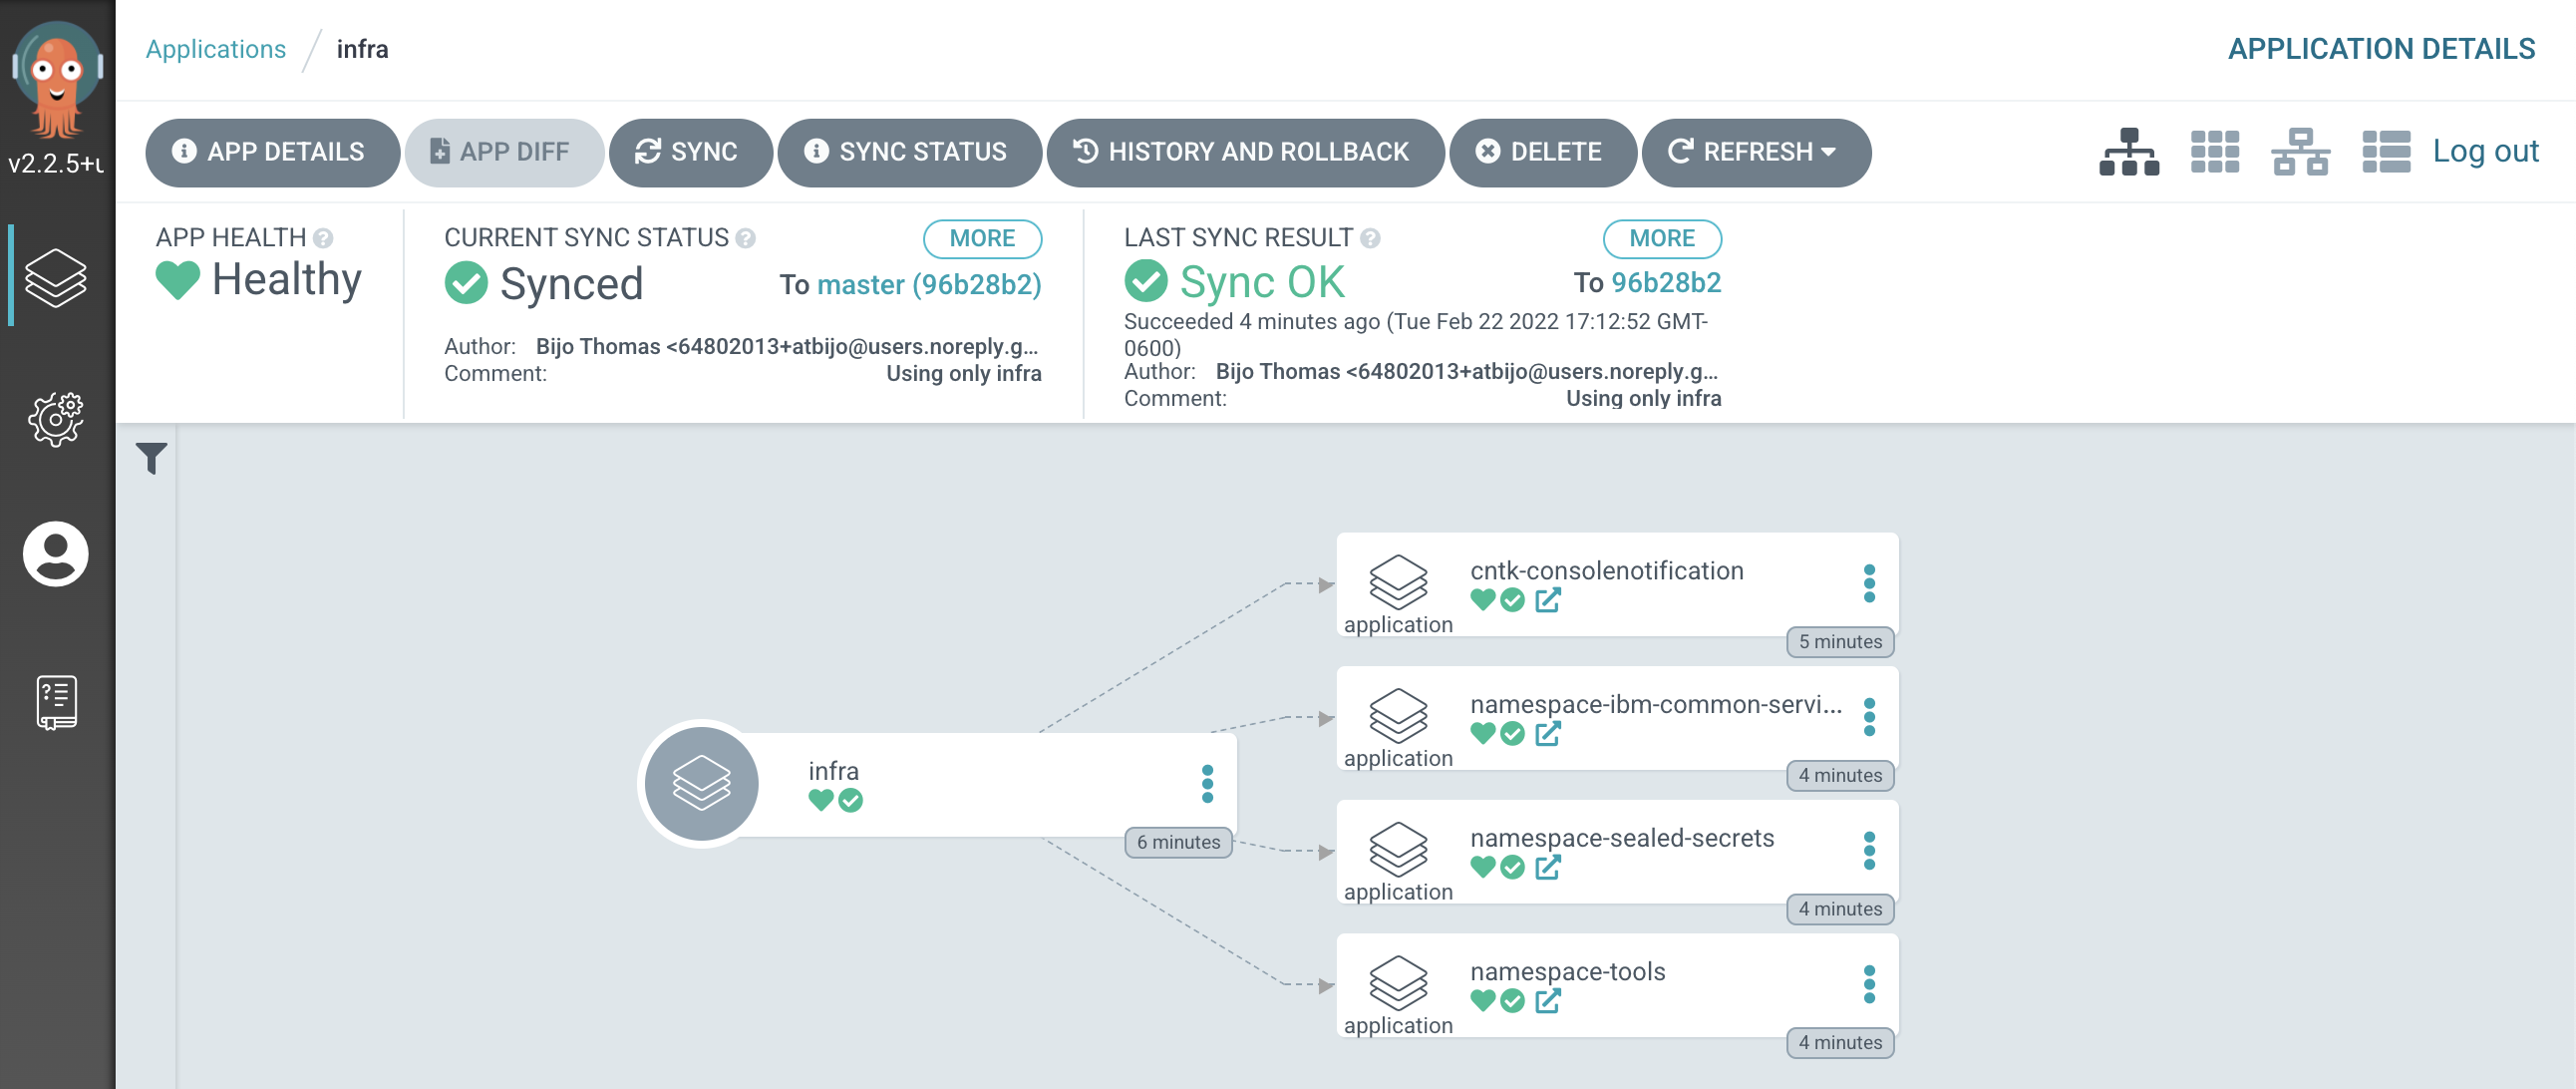
We can see that the
infraArgoCD application creates four ArgoCD applications, each of which is responsible for applying specific YAMLs to the cluster according to the folder the ArgoCD application is watching.It's the
infraArgoCD application that watches the0-bootstrap/single-cluster/1-infrafolder for ArgoCD applications that apply infrastructure resources to our cluster. It was theinfraapplication that created thenamespace-toolsArgoCD application which manages thetoolsnamespace that we've been exploring in this section of the tutorial.We'll continually reinforce these relationships as we work through the tutorial. You might like to spend some time exploring the ArgoCD UI and ArgoCD YAMLs before you proceed, though it's not necessary, as you'll get lots of practice as we proceed.
ArgoCD change management and governance
In this final section about managing infrastructure resources, let's explore how ArgoCD provides some advanced resource management features:
Dynamic
Monitored
-
Locate your GitOps repository
If necessary, change to the root of your GitOps repository, which is stored in the
$GIT_ROOTenvironment variable.Issue the following command to change to your GitOps repository:
cd $GIT_ROOT cd multi-tenancy-gitops -
Customize the web console banner
Examine the banner in the OpenShift web console:

We're going to use GitOps to modify this banner dynamically.
-
The banner YAML
This banner properties are defined by the YAML in
/0-bootstrap/single-cluster/1-infra/argocd/consolenotification.yaml. This YAML is currently being used by thecntk-consolenotificationArgoCD application that was deployed earlier.We can examine the YAML with the following command:
cat 0-bootstrap/single-cluster/1-infra/argocd/consolenotification.yamlwhich shows the banner properties are part of the
ConsoleNotificationcustom resource:apiVersion: argoproj.io/v1alpha1 kind: Application metadata: name: cntk-consolenotification labels: gitops.tier.layer: infra annotations: argocd.argoproj.io/sync-wave: "100" finalizers: - resources-finalizer.argocd.argoproj.io spec: syncPolicy: automated: prune: true selfHeal: true destination: namespace: openshift-gitops server: https://kubernetes.default.svc project: infra source: path: consolenotification helm: values: | ocp-console-notification: ## The name of the ConsoleNotification resource in the cluster name: "banner-env" ## The background color that should be used for the banner backgroundColor: teal ## The color of the text that will appear in the banner color: "'#fff'" ## The location of the banner. Options: BannerTop, BannerBottom, BannerTopBottom location: BannerTop ## The text that should be displayed in the banner. This value is required for the banner to be created text: "Cluster Description"See how the banner at the top of the screen:
- contains the text
Cluster Description - is located at top of the screen
- has the color
teal
- contains the text
-
Modify the YAML for this banner
Let's now change this YAML
In your editor, modify this YAML and change the below fields as follows:
ocp-console-notification:
  ## The name of the ConsoleNotification resource in the cluster
  name: "banner-env"

  ## The background color that should be used for the banner
  backgroundColor: red
  ## The color of the text that will appear in the banner
  color: "'#fff'"
  ## The location of the banner. Options: BannerTop, BannerBottom, BannerTopBottom
  location: BannerTop
  ## The text that should be displayed in the banner. This value is required for the banner to be created
  text: "Production Reference Guide"
It's clear that our intention is to modify the banner's
backgroundColor:redandtext: Production Reference Guideto the newly specified values. If you look at thediff:git diffyou should see the following
diff --git a/0-bootstrap/single-cluster/1-infra/argocd/consolenotification.yaml b/0-bootstrap/single-cluster/1-infra/argocd/consolenotification.yaml index 30adf1a..596e821 100644 --- a/0-bootstrap/single-cluster/1-infra/argocd/consolenotification.yaml +++ b/0-bootstrap/single-cluster/1-infra/argocd/consolenotification.yaml @@ -26,10 +26,10 @@ spec: name: "banner-env" ## The background color that should be used for the banner - backgroundColor: teal + backgroundColor: red ## The color of the text that will appear in the banner color: "'#fff'" ## The location of the banner. Options: BannerTop, BannerBottom, BannerTopBottom location: BannerTop ## The text that should be displayed in the banner. This value is required for the banner to be created - text: "Cluster Description" + text: "Production Reference Guide" -
Make the web console YAML change active
Let's make these changes visible to the
cntk-consolenotificationArgoCD application via GitHub.Add all changes in the current folder to a git index, commit them, and push them to GitHub:
git add .
git commit -s -m "Modify console banner"
git push origin $GIT_BRANCH
You'll see the changes being pushed to GitHub:
[master decb684] Modify console banner
 1 file changed, 2 insertions(+), 2 deletions(-)
Enumerating objects: 13, done.
Counting objects: 100% (13/13), done.
Delta compression using up to 8 threads
Compressing objects: 100% (7/7), done.
Writing objects: 100% (7/7), 670 bytes | 670.00 KiB/s, done.
Total 7 (delta 5), reused 0 (delta 0)
remote: Resolving deltas: 100% (5/5), completed with 5 local objects.
To https://github.com/tutorial-org-123/multi-tenancy-gitops.git
   a1e8292..decb684  master -> master
Let's see what effect they have on the web console.
-
A dynamic change to the web console
You can either wait for ArgoCD to automatically sync the
cntk-consolenotificationapplication or manuallySyncit yourself: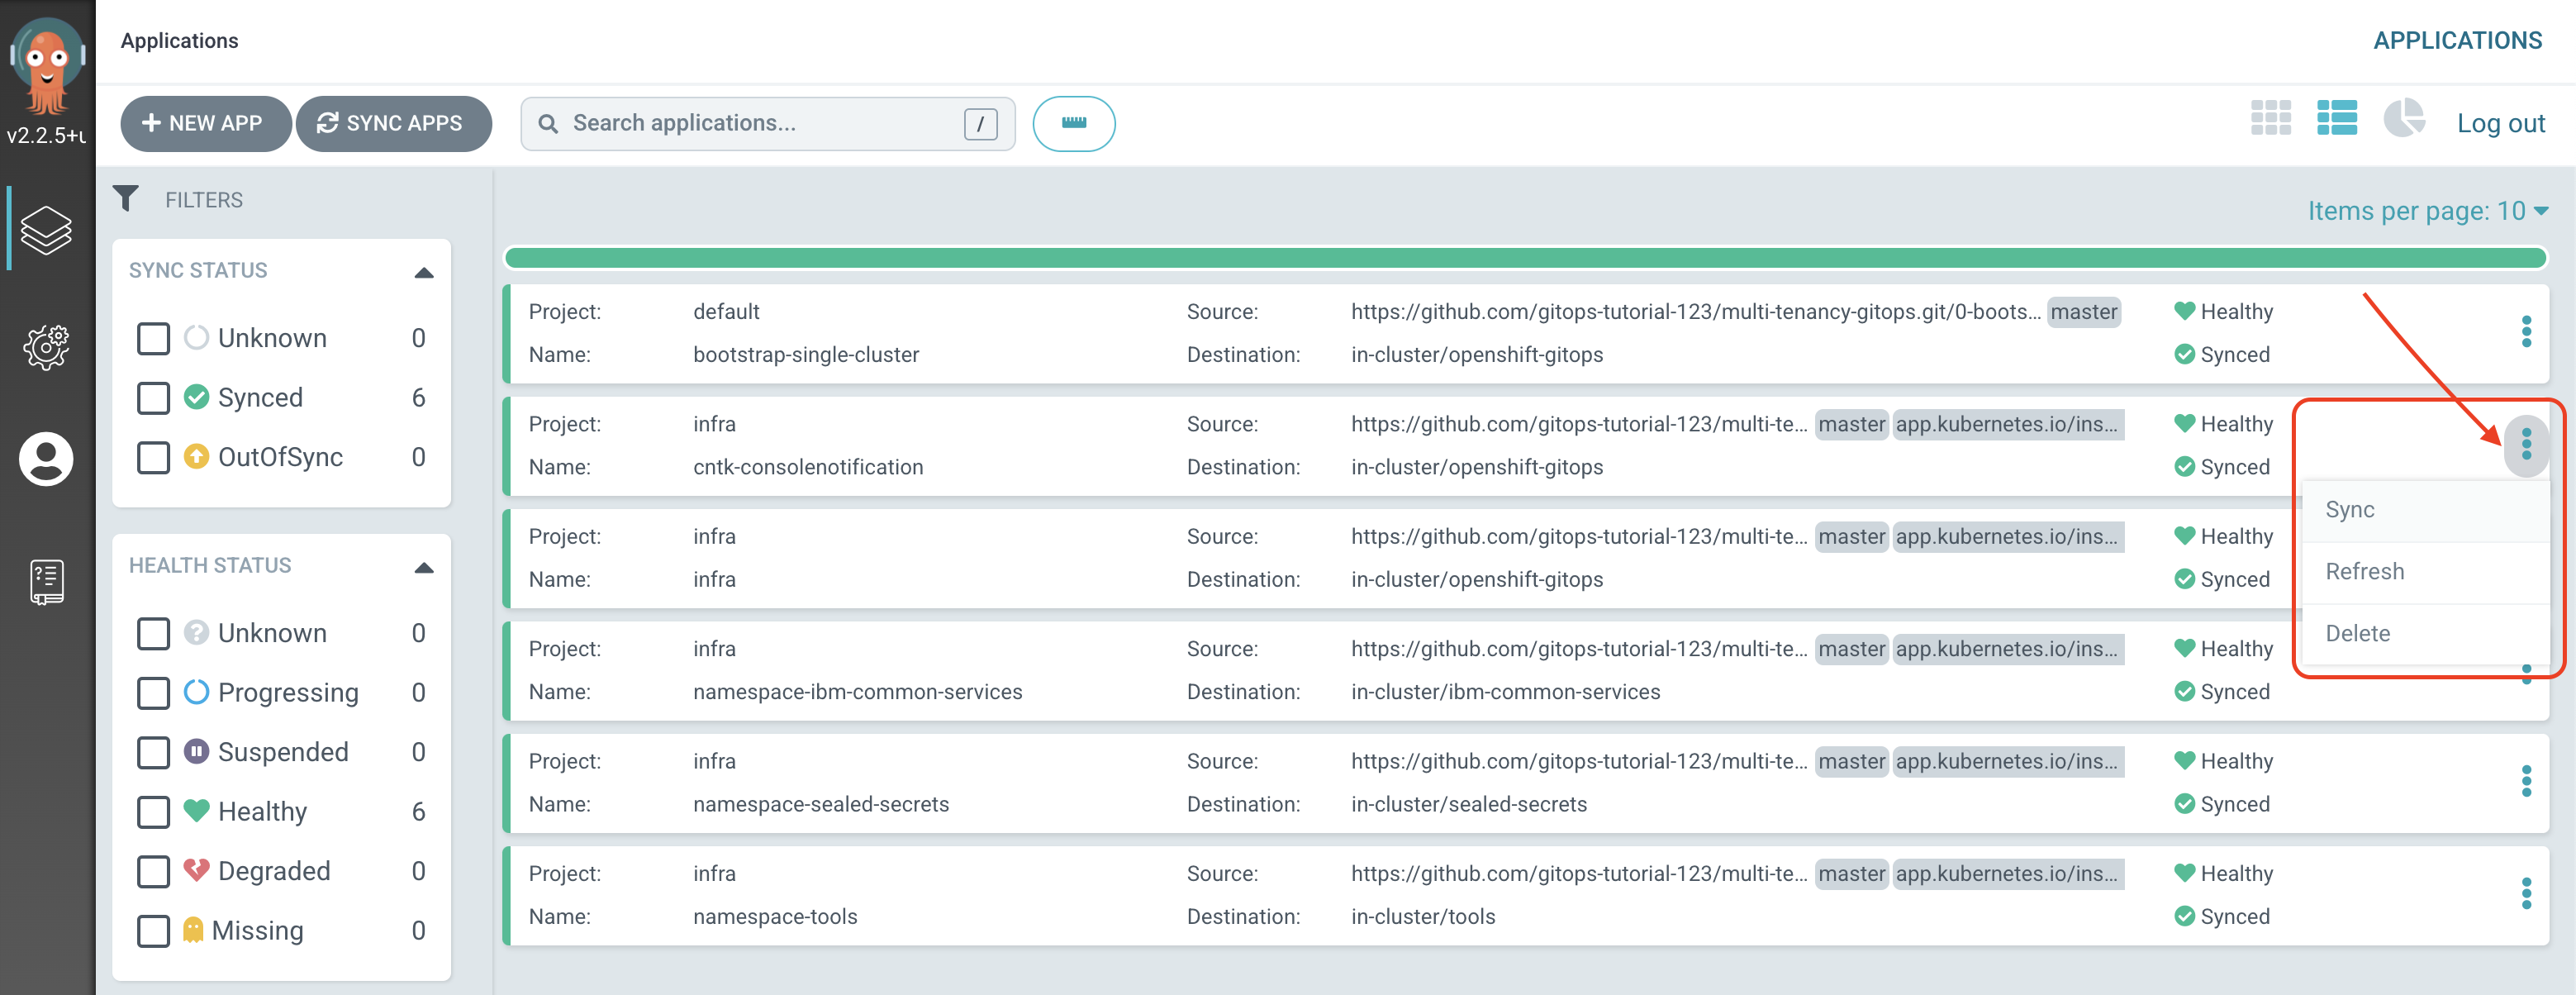
Returning to the OpenShift web console, you'll notice changes.

Notice the dynamic nature of these changes; we updated the console YAML, pushed our changes to our GitOps repository and everything else happened automatically.
As a result, our OpenShift console has a new banner color and text.
-
Governing changes to the
toolsoperatorgroupLet's now look at how ArgoCD monitors Kubernetes resources for configuration drift, and what happens if it detects an unexpected change to a monitored resource.
Don't worry about the following command; it might seem drastic and even reckless, but as you'll see, everything will be OK.
Let's delete the
toolsoperatorgroup in thetoolsnamespace from the cluster:oc get operatorgroup tools -n tools oc delete operatorgroup tools -n toolsSee how the operatorgroup:
NAME    AGE
tools   28m
is deleted:
operatorgroup.operators.coreos.com "tools" deletedWe can see that the
toolsoperatorgroup has been manually deleted from the cluster. -
GitOps repository as a source of truth
If you switch back to the ArgoCD UI Applications view, click on the
namespace-toolsapplication, you may see that ArgoCD has detected a configuration drift:- a resource is
Missing(thetoolsoperatorgroup) innamespace-toolsapplication namespace-toolsapplication therefore isOutOfSyncnamespace-toolsapplication is thereforeSyncingwith the GitOps repository

After a while we'll see that
namespace-toolsapplication isHealthyandSynced: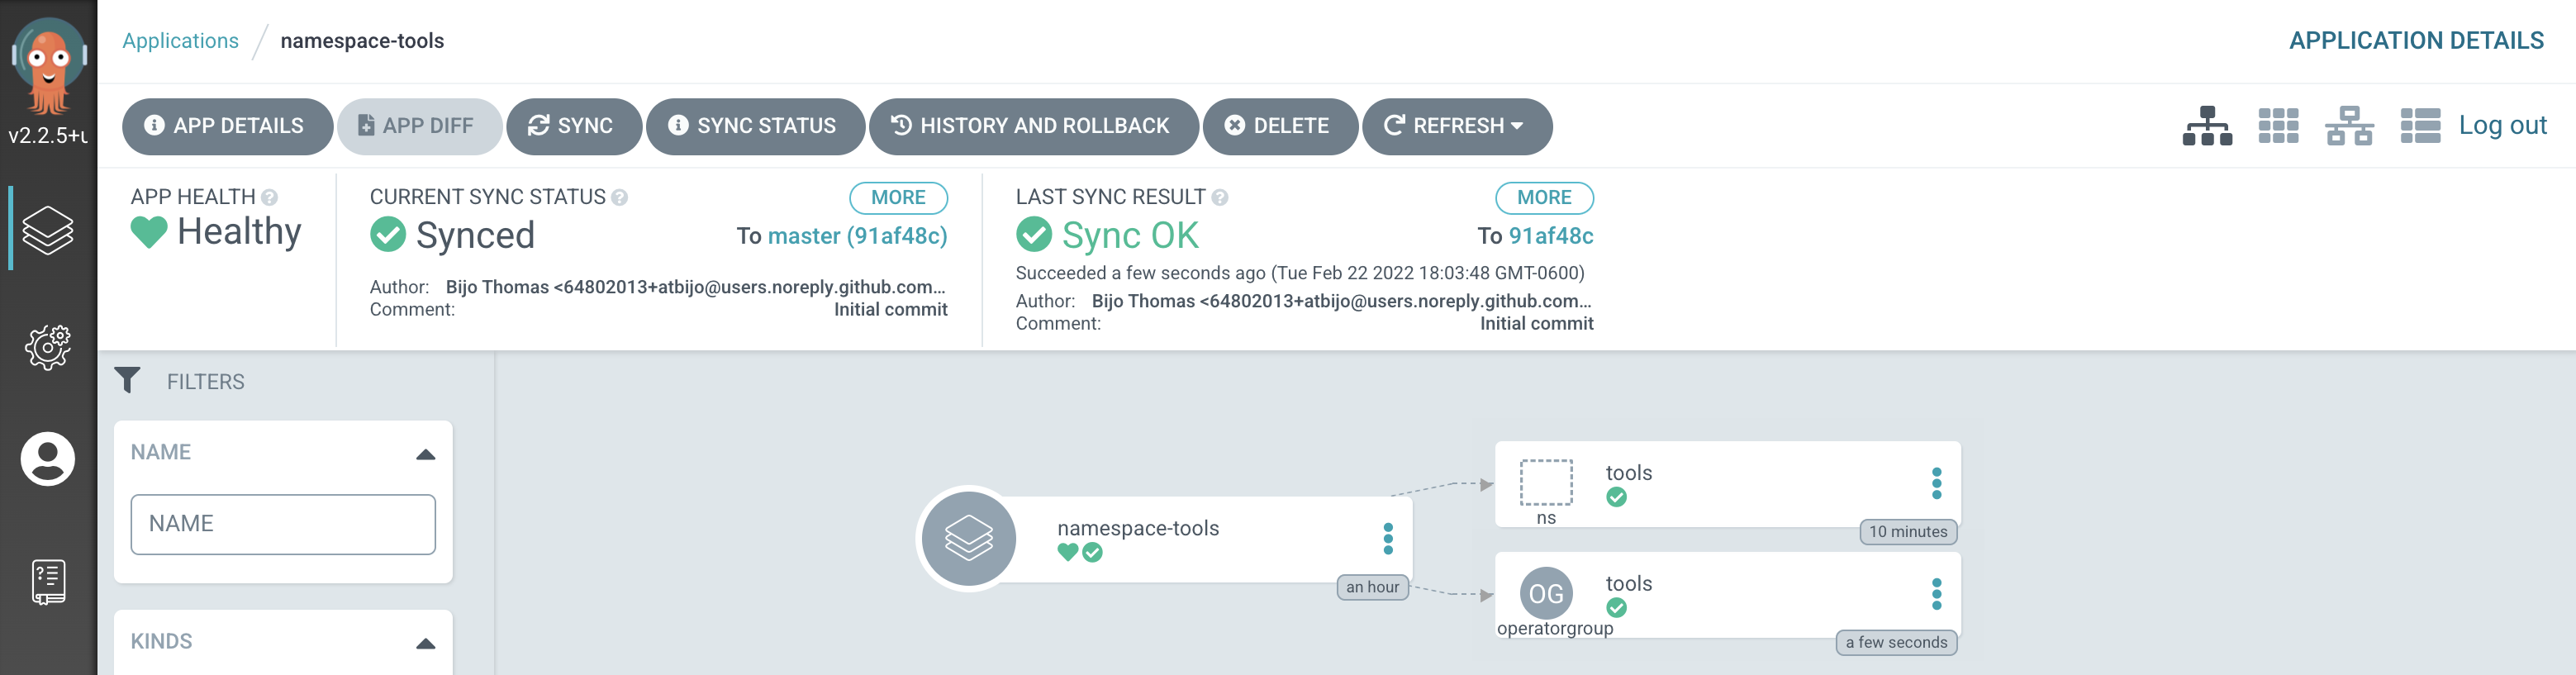
ArgoCD has detected a configuration drift, and resynched with GitOps repository, re-applying the
toolsoperatorgroup to the cluster.Note
You may miss seeing the first screenshot if ArgoCD detects and corrects the missing
toolsoperatorgroup before you get a chance to switch to the ArgoCD UI. Don't worry, you can try this operation again! - a resource is
-
The restored
toolsoperatorgroupIssue the following command to determine the status of the
toolsnamespace:oc get operatorgroup tools -n toolswhich confirms that the
toolsoperatorgroup has been re-instated:NAME AGE tools 101sNote that it is a different instance of the
toolsoperatorgroup; as indicated by itsAGEvalue.Notice the governed nature of these changes; GitOps is our source of truth about the resources deployed to the cluster. ArgoCD restores any resources that suffer from configuration drift to their GitOps-defined configuration.
Congratulations!
You've used ArgoCD and the GitOps repository to set up tools and ibm-common-services namespaces. You've seen how to create ArgoCD applications that watch their respective GitOps namespace folders for details of the namespace resources they should apply to the cluster. You've seen how you can dynamically change deployed resources by updating the resource definition in the GitOps repository. Finally, you've experience how ArgoCD keeps the cluster synchronized with the GitOps repository as a source of truth; any unexpected configuration drift will be corrected without intervention.