Deployment on IBM Cloud
Overview
In the previous chapter of this tutorial, you have worked with ArgoCD and the GitOps repositories to understand what these are and how these work together and interact amongst them. You have seen how to create ArgoCD applications that watch their respective GitOps repository folders for details of the resources they should apply to the cluster. You have seen how you can dynamically change deployed resources by updating the resource definition in their GitOps repository. Finally, you've experienced how ArgoCD keeps the cluster synchronized with the GitOps repository as the source of truth; any unexpected configuration drift will be corrected without intervention.
Now, in this section, you are going to look at what changes you need to do to that GitOps repository so that you get IBM Process Mining and all the components it needs/depends on deployed in your cluster.
Pre-requisites
There is one pre-requisite you must comply with before being able to install IBM Process Mining on RedHat OpenShift if you are using the IBM RedHat OpenShift Kubernetes Service (IBM ROKS).
Important
If your cluster was created through IBM Technology Zone, as described in the Create the cluster section here, you are using the IBM RedHat OpenShift Kubernetes Service (IBM ROKS) and therefore need to comply with the pre-requisite explained below.
The pre-requisite is, in fact, an IBM DB2 pre-requisite. Since IBM Process Mining relies, depends and uses IBM DB2, you will need to comply with this IBM DB2 pre-requisite: the no root squash command for DB2 must be applied to your RedHat OpenShift worker nodes. To do that, execute the following command on your terminal:
oc get no -l node-role.kubernetes.io/worker --no-headers -o name | xargs -I {} \
   -- oc debug {} \
   -- chroot /host sh -c 'grep "^Domain = slnfsv4.coms" /etc/idmapd.conf || ( sed -i "s/.*Domain =.*/Domain = slnfsv4.com/g" /etc/idmapd.conf; nfsidmap -c; rpc.idmapd )'
Services
You have seen in the previous chapter of this tutorial that in the 0-bootstrap/single-cluster/kustomization.yaml file you have defined what layers out of infra, services and apps you want the main bootstrap-single-cluster ArgoCD application to watch. Before, you had it set up to watch only the infra layer. However, you now need it to watch the services and apps layers too in order to deploy IBM Process Mining and all the components it needs/depends on.
-
Ensure you are logged in to the cluster
Start a terminal window and log into your OCP cluster, substituting the
--tokenand--serverparameters with your values:oc login --token=<token> --server=<server>If you are unsure of these values, click your user ID in the OpenShift web console and select "Copy Login Command".
-
Locate your GitOps repository
If necessary, change to the root of your GitOps repository, which is stored in the
$GIT_ROOTenvironment variable.Issue the following command to change to your GitOps repository:
cd $GIT_ROOT cd multi-tenancy-gitops -
Make sure the
infra,servicesandappslayers are un-commented, and therefore active, for the mainbootstrap-single-clusterArgoCD application to watch them in the file0-bootstrap/single-cluster/kustomization.yamlresources: - 1-infra/1-infra.yaml - 2-services/2-services.yaml - 3-apps/3-apps.yaml -
Add all changes in the current folder to a git index, commit them, and push them to GitHub:
git add . git commit -s -m "Adding services and applications layers" git push origin $GIT_BRANCH -
If you go to your ArgoCD UI, you will see two new ArgoCD applications, one that will watch for resources on the
serviceslayer and another that will watch for resources on theappslayer.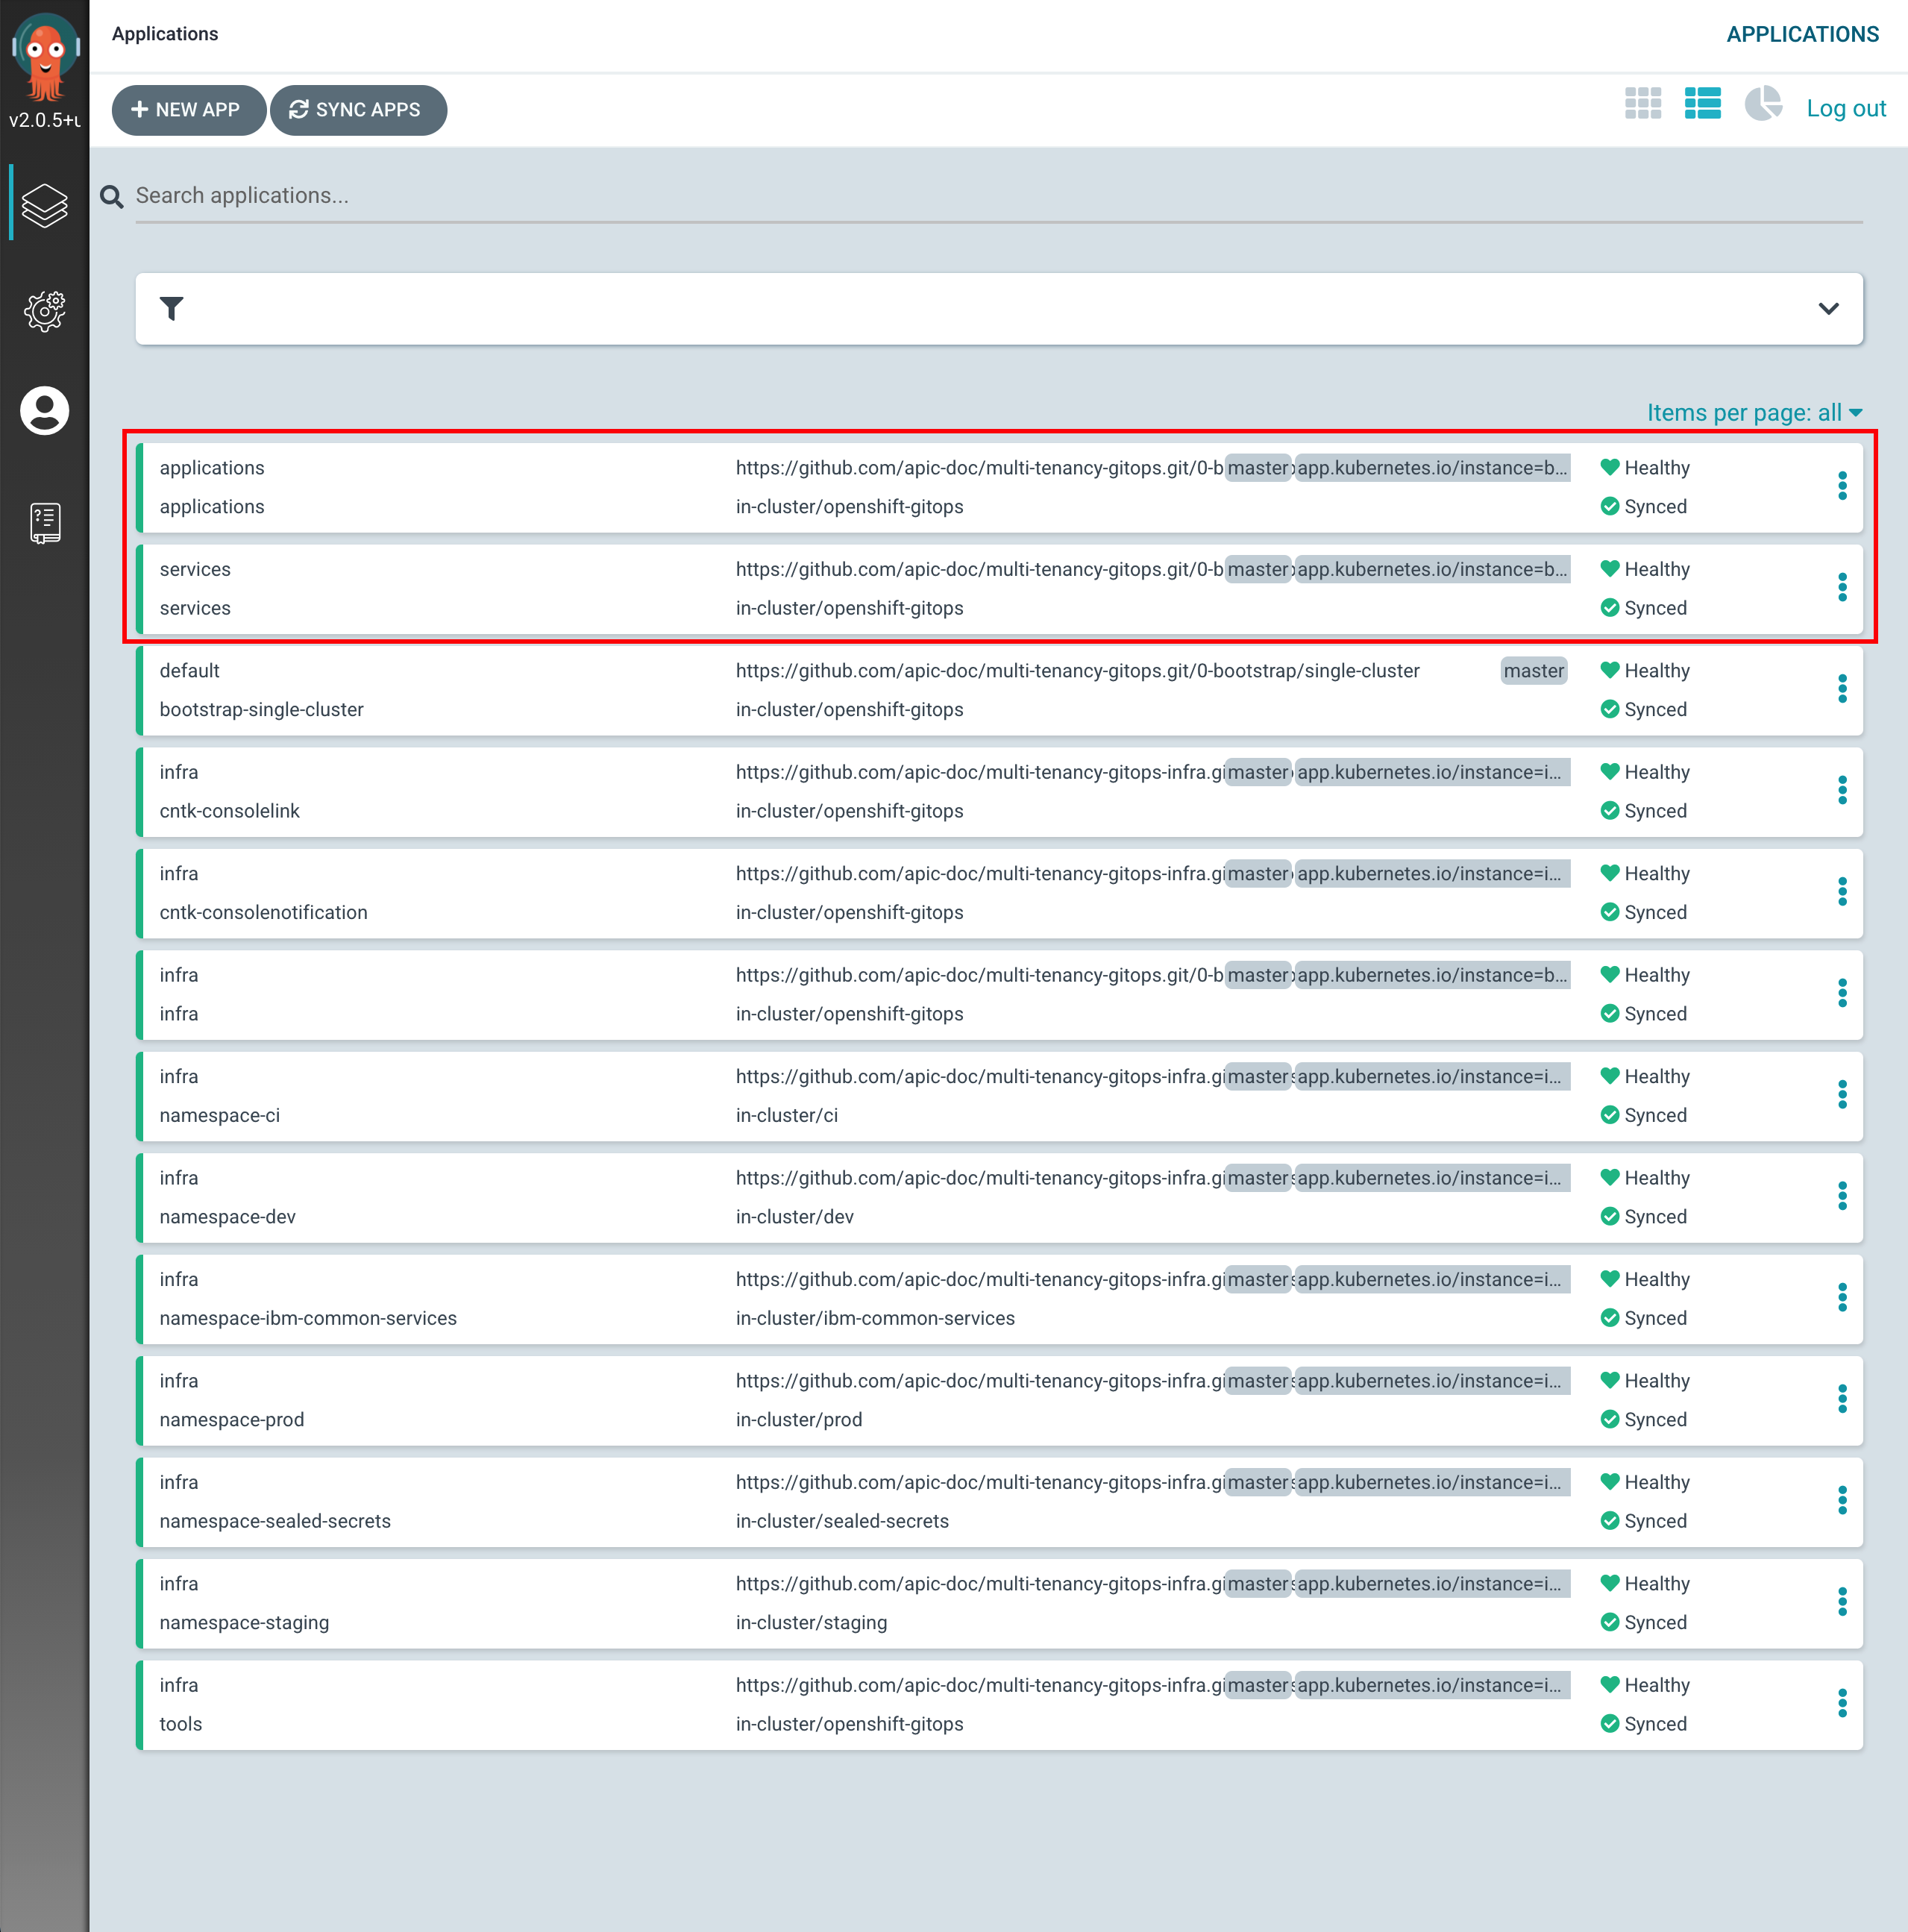
Tip
You might want to manually sync your ArgoCD applications, instead of waiting for changes to get automatically picked up. For manually synchronize ArgoCD applications, you can click on the
SYNC APPSbutton at the top. Then, select all the ArgoCD applications you want to get synched (or all for easiness) and clickSYNC
Before being able to deploy any IBM capability we must have an IBM Entitlement Key to be able to pull IBM software down from IBM's software registry available in the Red Hat OpenShift project where we are deploying such IBM capability.
- Log in to MyIBM Container Software Library with an IBMid and password associated with the entitled software.
- Select the View library option to verify your entitlement(s).
- Select the Get entitlement key to retrieve the key.
-
Create a secret containing your IBM Entitlement Key in the
toolsnamespace (which is where the IBM Process Mining operator has been installed/deployed into and where the IBM Process Mining instance it will create afterwards will end up into as a result).oc create secret docker-registry ibm-entitlement-key -n tools \ --docker-username=cp \ --docker-password="<entitlement_key>" \ --docker-server=cp.icr.io -
Link that
docker-registrysecret containing your IBM Entitlement Key with the default secret for pulling Docker images within your Red Hat OpenShift projectoc secrets link default ibm-entitlement-key --for=pull
You are now all set to start deploying IBM Process Mining and all the components it needs/depends on. However, you will do it in two steps. In the first step, you will deploy all of the components that IBM Process Mining needs/depends on. These are things like the IBM Operators catalog to be able to install IBM Operators, the IBM Foundations, IBM DB2 and IBM Process Mining operators where the first three are a dependency of the IBM Process Mining operator.
To get all of that installed, all you need to do, in the same fashion you did for the components you wanted to get installed on the infra layer, is to un-comment these from the 0-bootstrap/single-cluster/2-services/kustomization.yaml file.
-
Open the
0-bootstrap/single-cluster/2-services/kustomization.yamlfile and un-comment the following resources:- argocd/operators/ibm-process-mining-operator.yaml - argocd/operators/ibm-db2u-operator.yaml - argocd/operators/ibm-foundations.yaml - argocd/operators/ibm-catalogs.yaml -
Add all changes in the current folder to a git index, commit them, and push them to GitHub:
git add . git commit -s -m "Installing services" git push origin $GIT_BRANCH -
If you go to your ArgoCD UI and filter by
servicesproject on the left hand side, you will now see the new ArgoCD applications you have just specified in your code above to be created.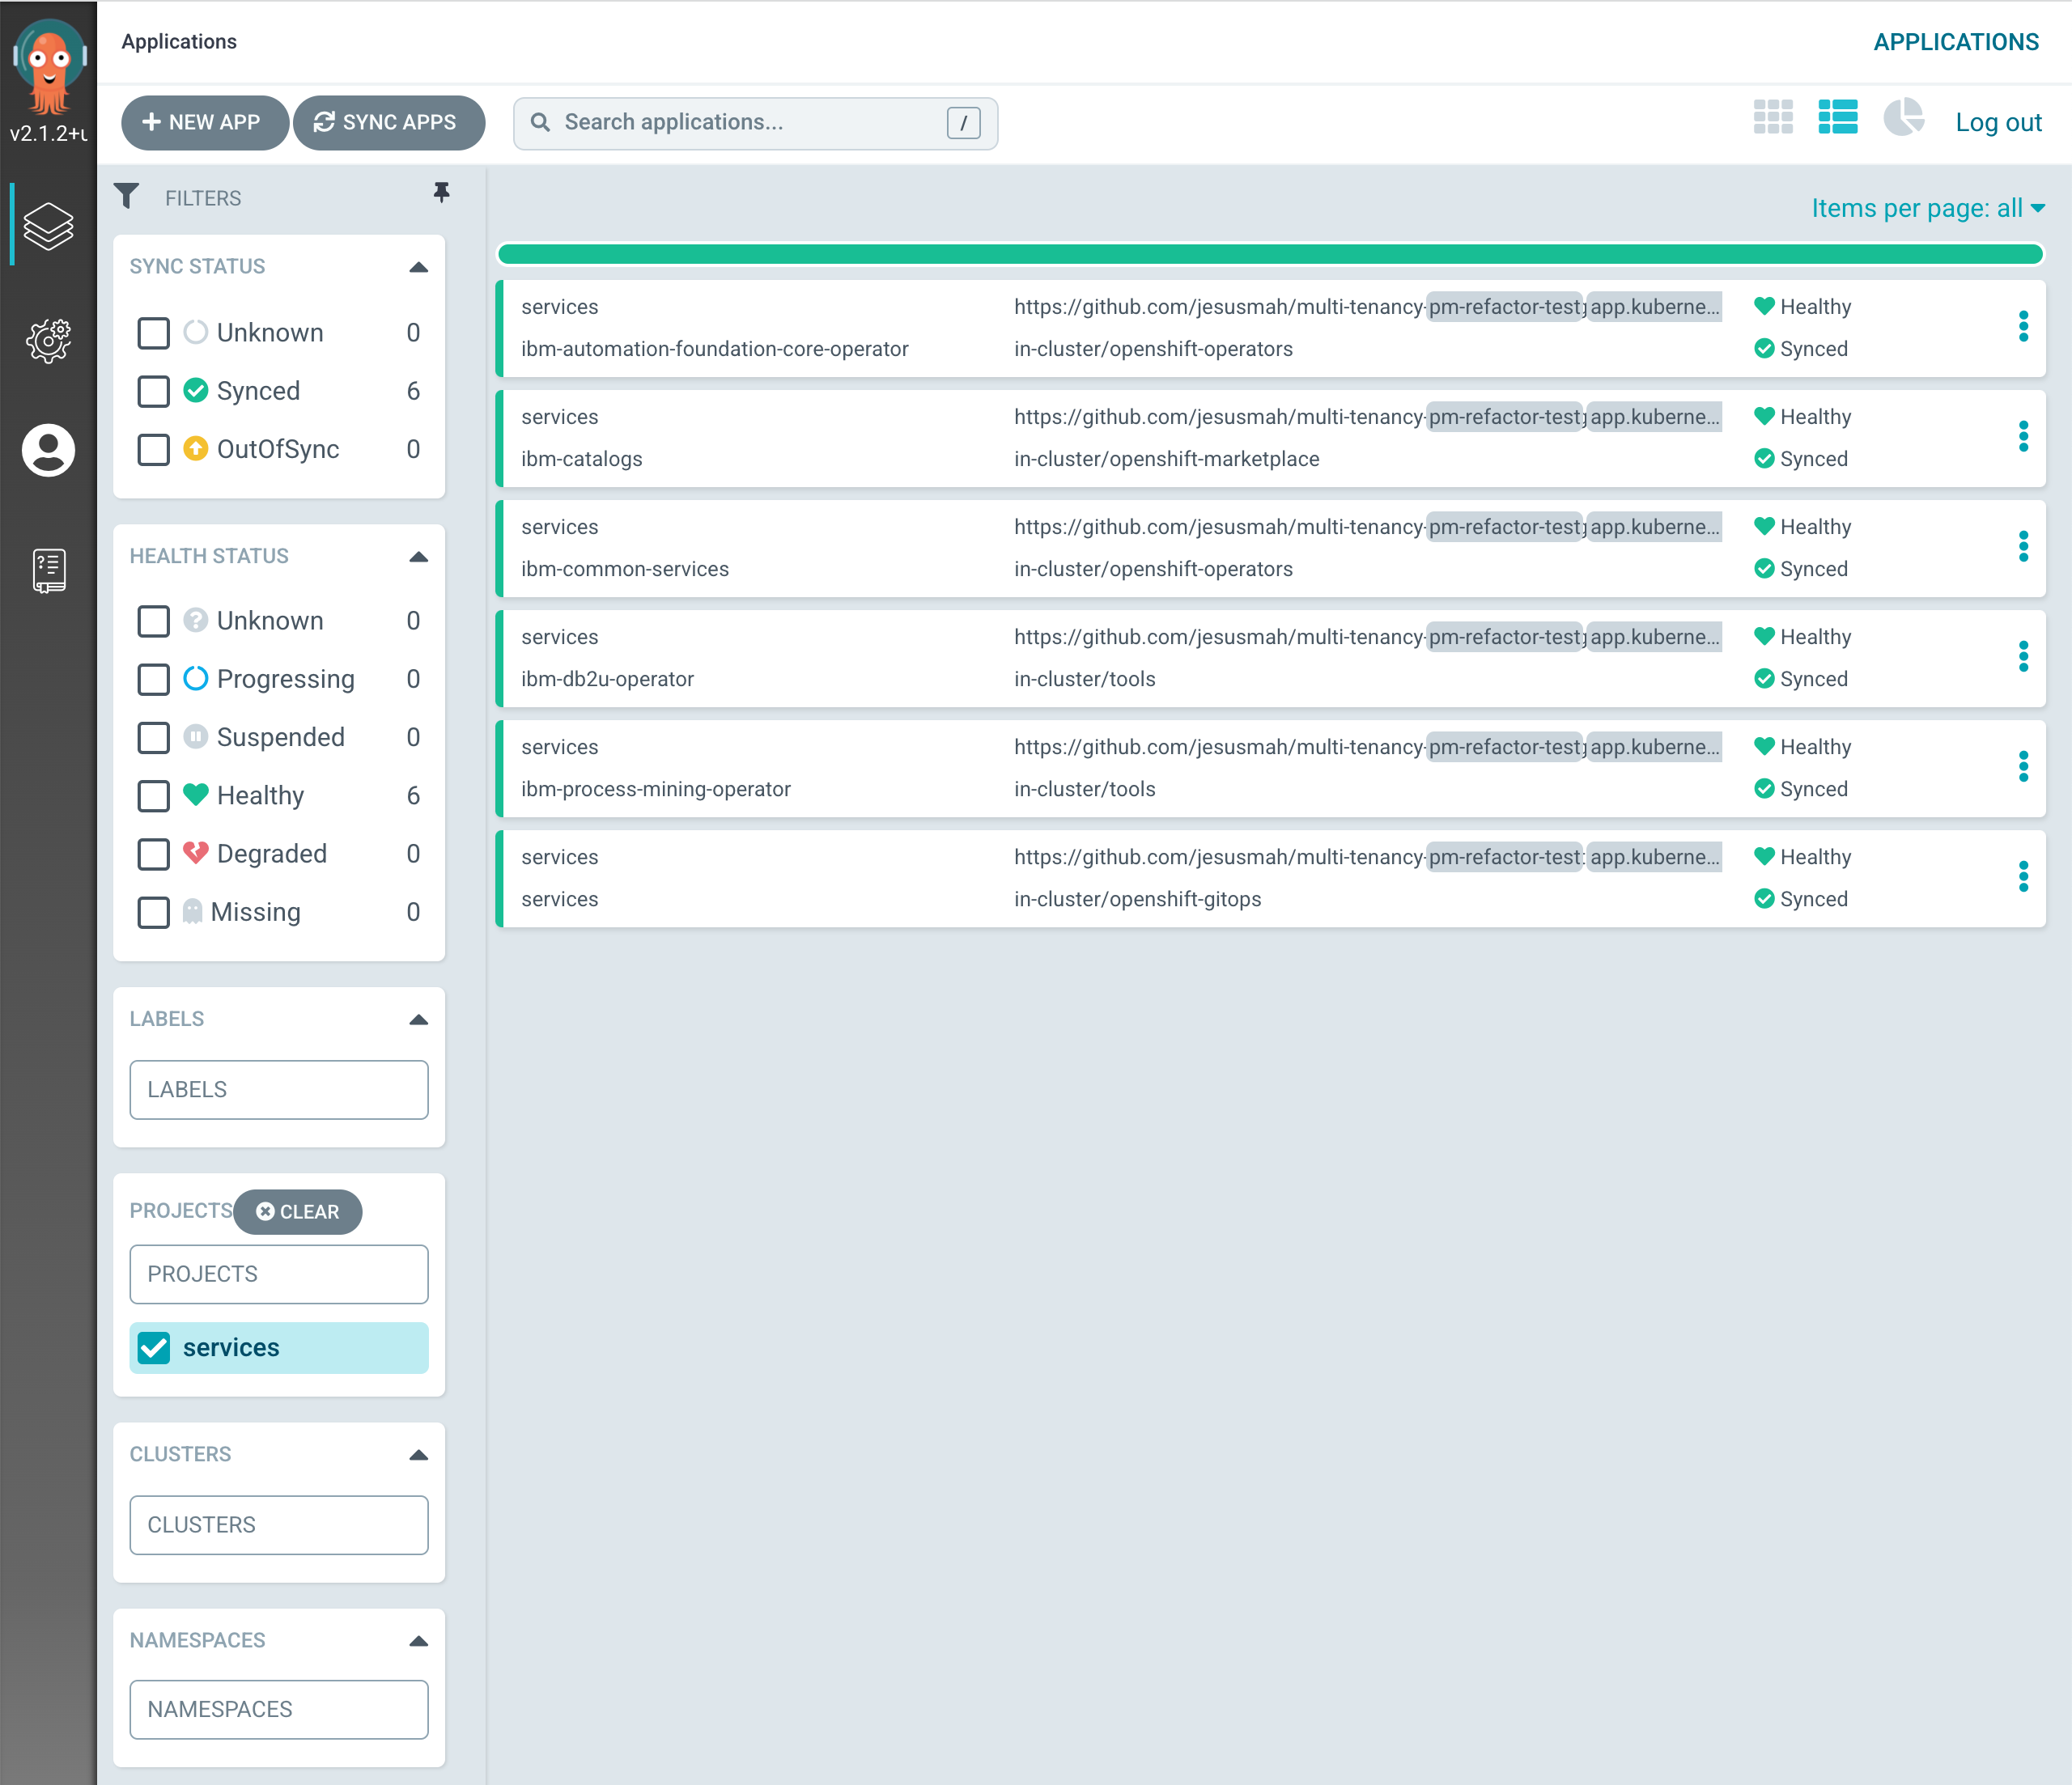
-
If you click on the
servicesmain ArgoCD application, you will see that it has created five new ArgoCD applications that correspond to each of the components we have un-commented and therefore bring to active state in the0-bootstrap/single-cluster/2-services/kustomization.yamlfile.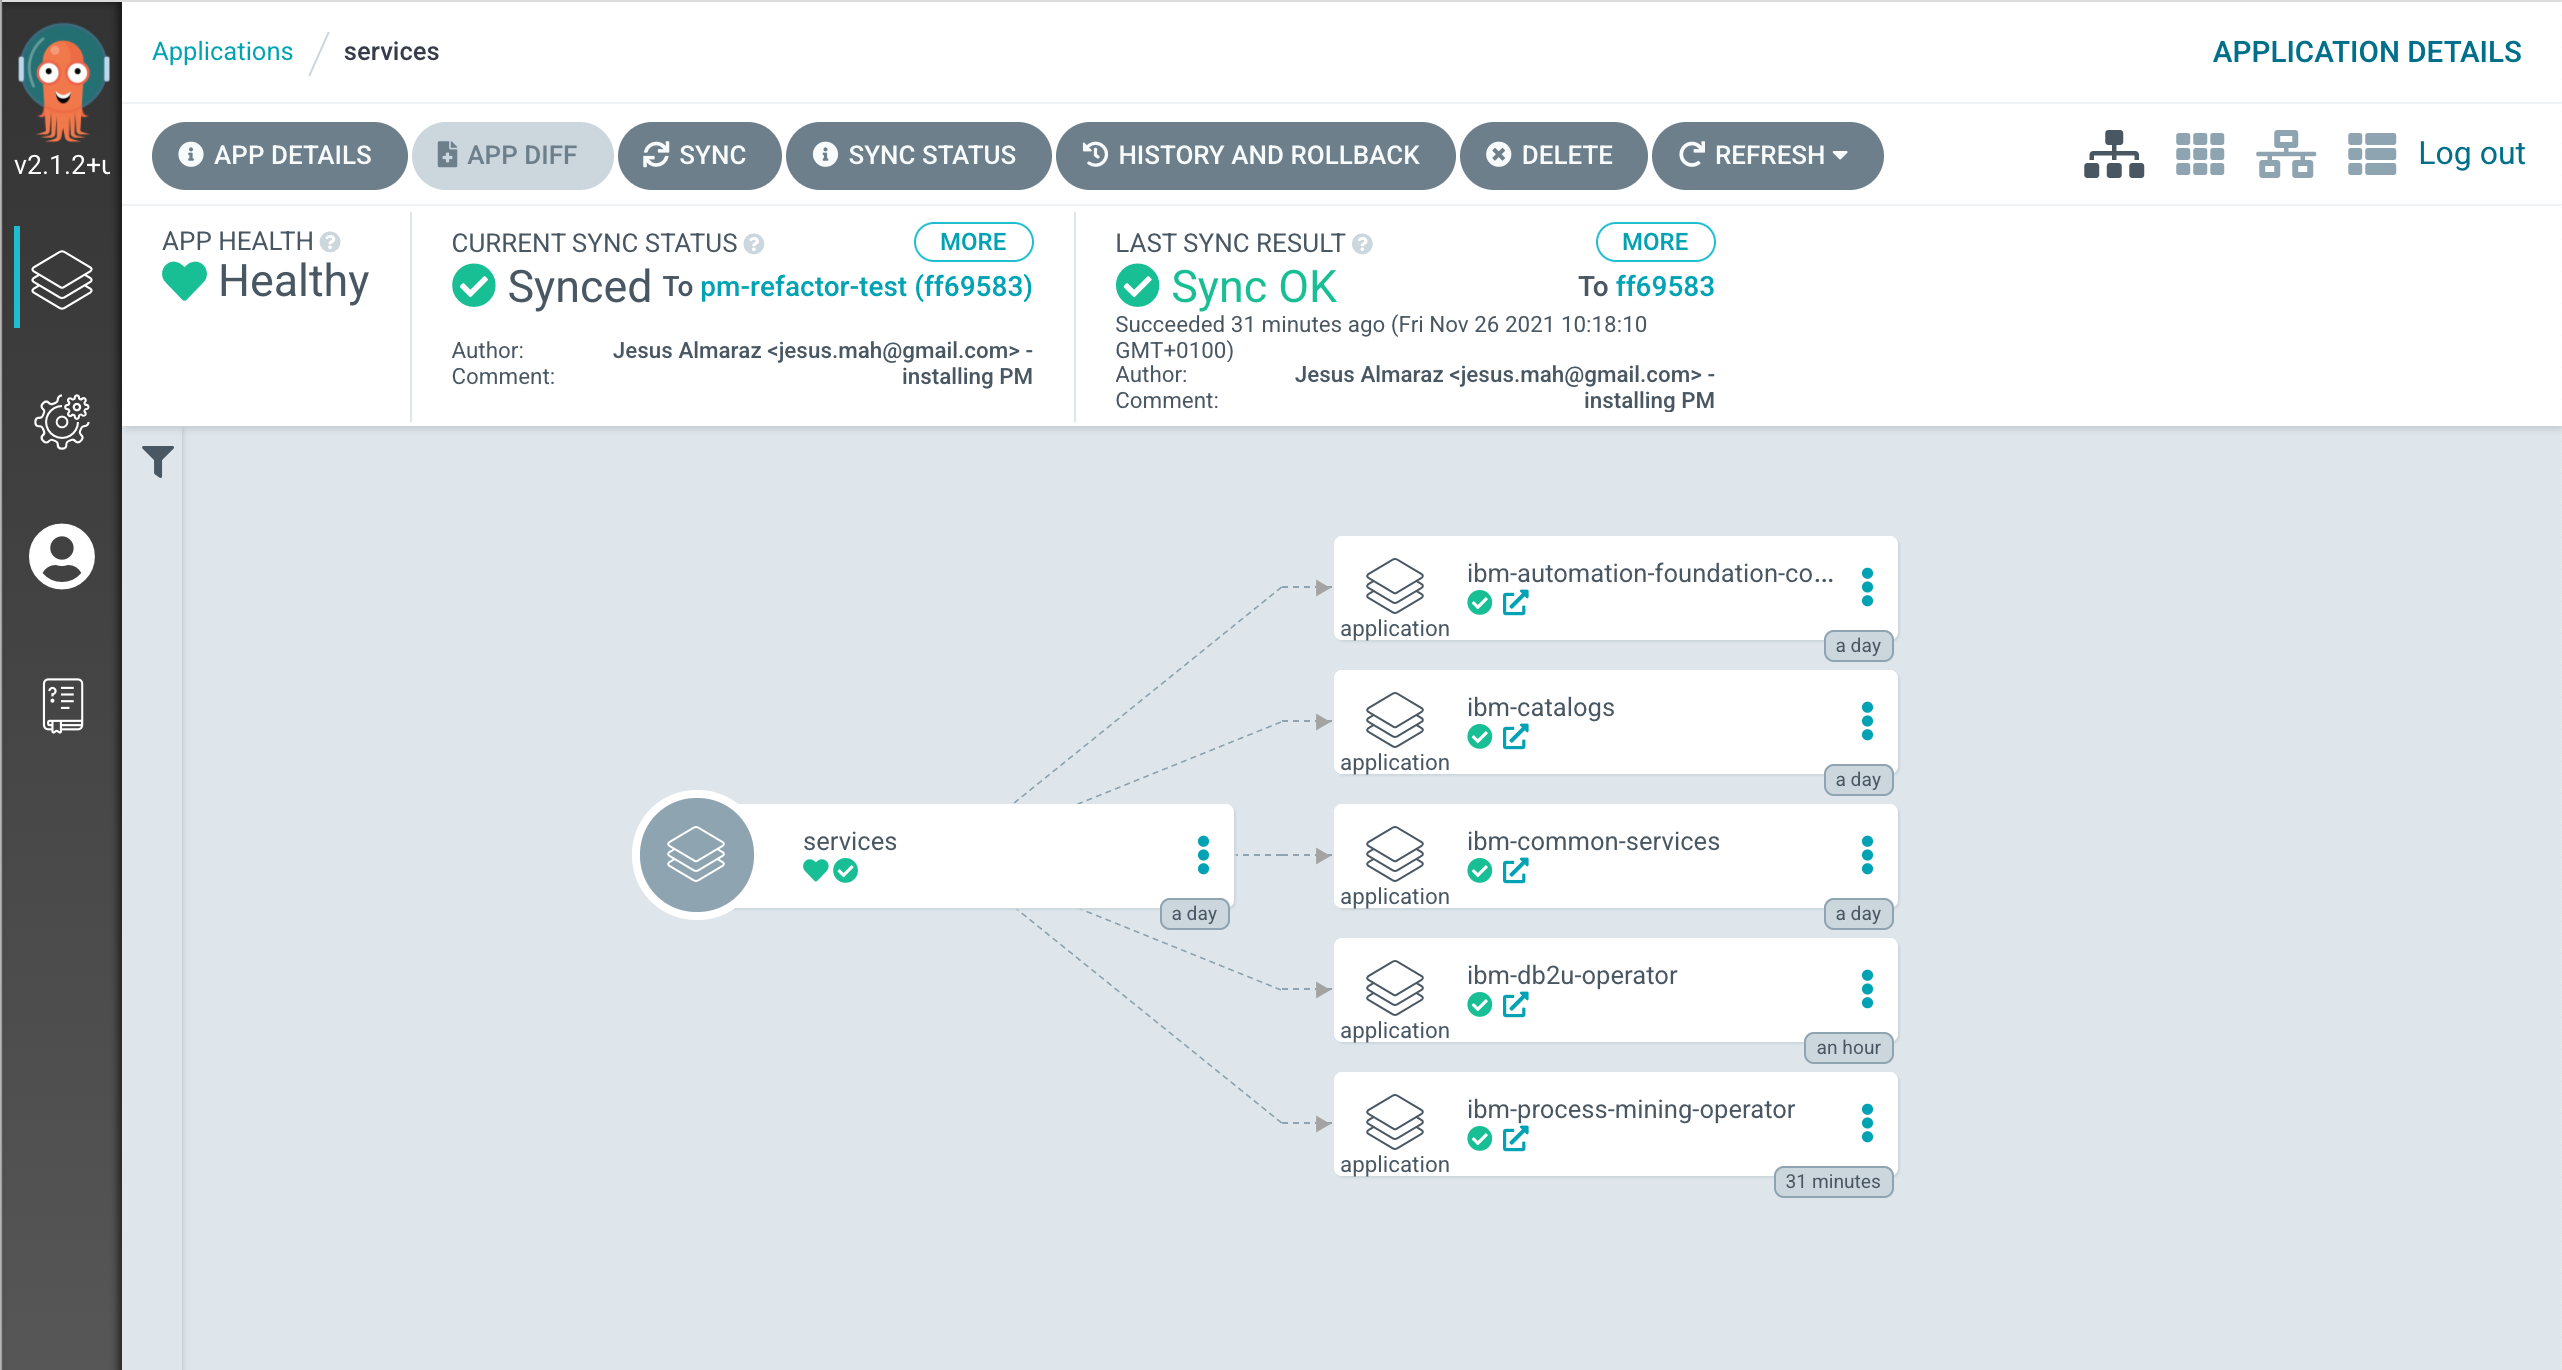
-
After 5-10 mins, if you go to your Red Hat OpenShift web console and click on
Operators --> Installed Operatorson the right hand side menu and select the thetoolsproject on the pull down menu at the top bar, you will see that the IBM Db2, IBM Automation Foundation Core, IBM Process Mining and IBM Cloud Pak foundational services have been successfully installed already (apart from the OpenShift GitOps operator that was installed previously). Not only that but should also be able to realize that the IBM Db2 and IBM Process Mining operators have been installed on thetoolsnamespace as opposed to in all namespaces like the rest of the operators and this is, as already explained, a limitation of the IBM Db2 operator that must be installed per namespace.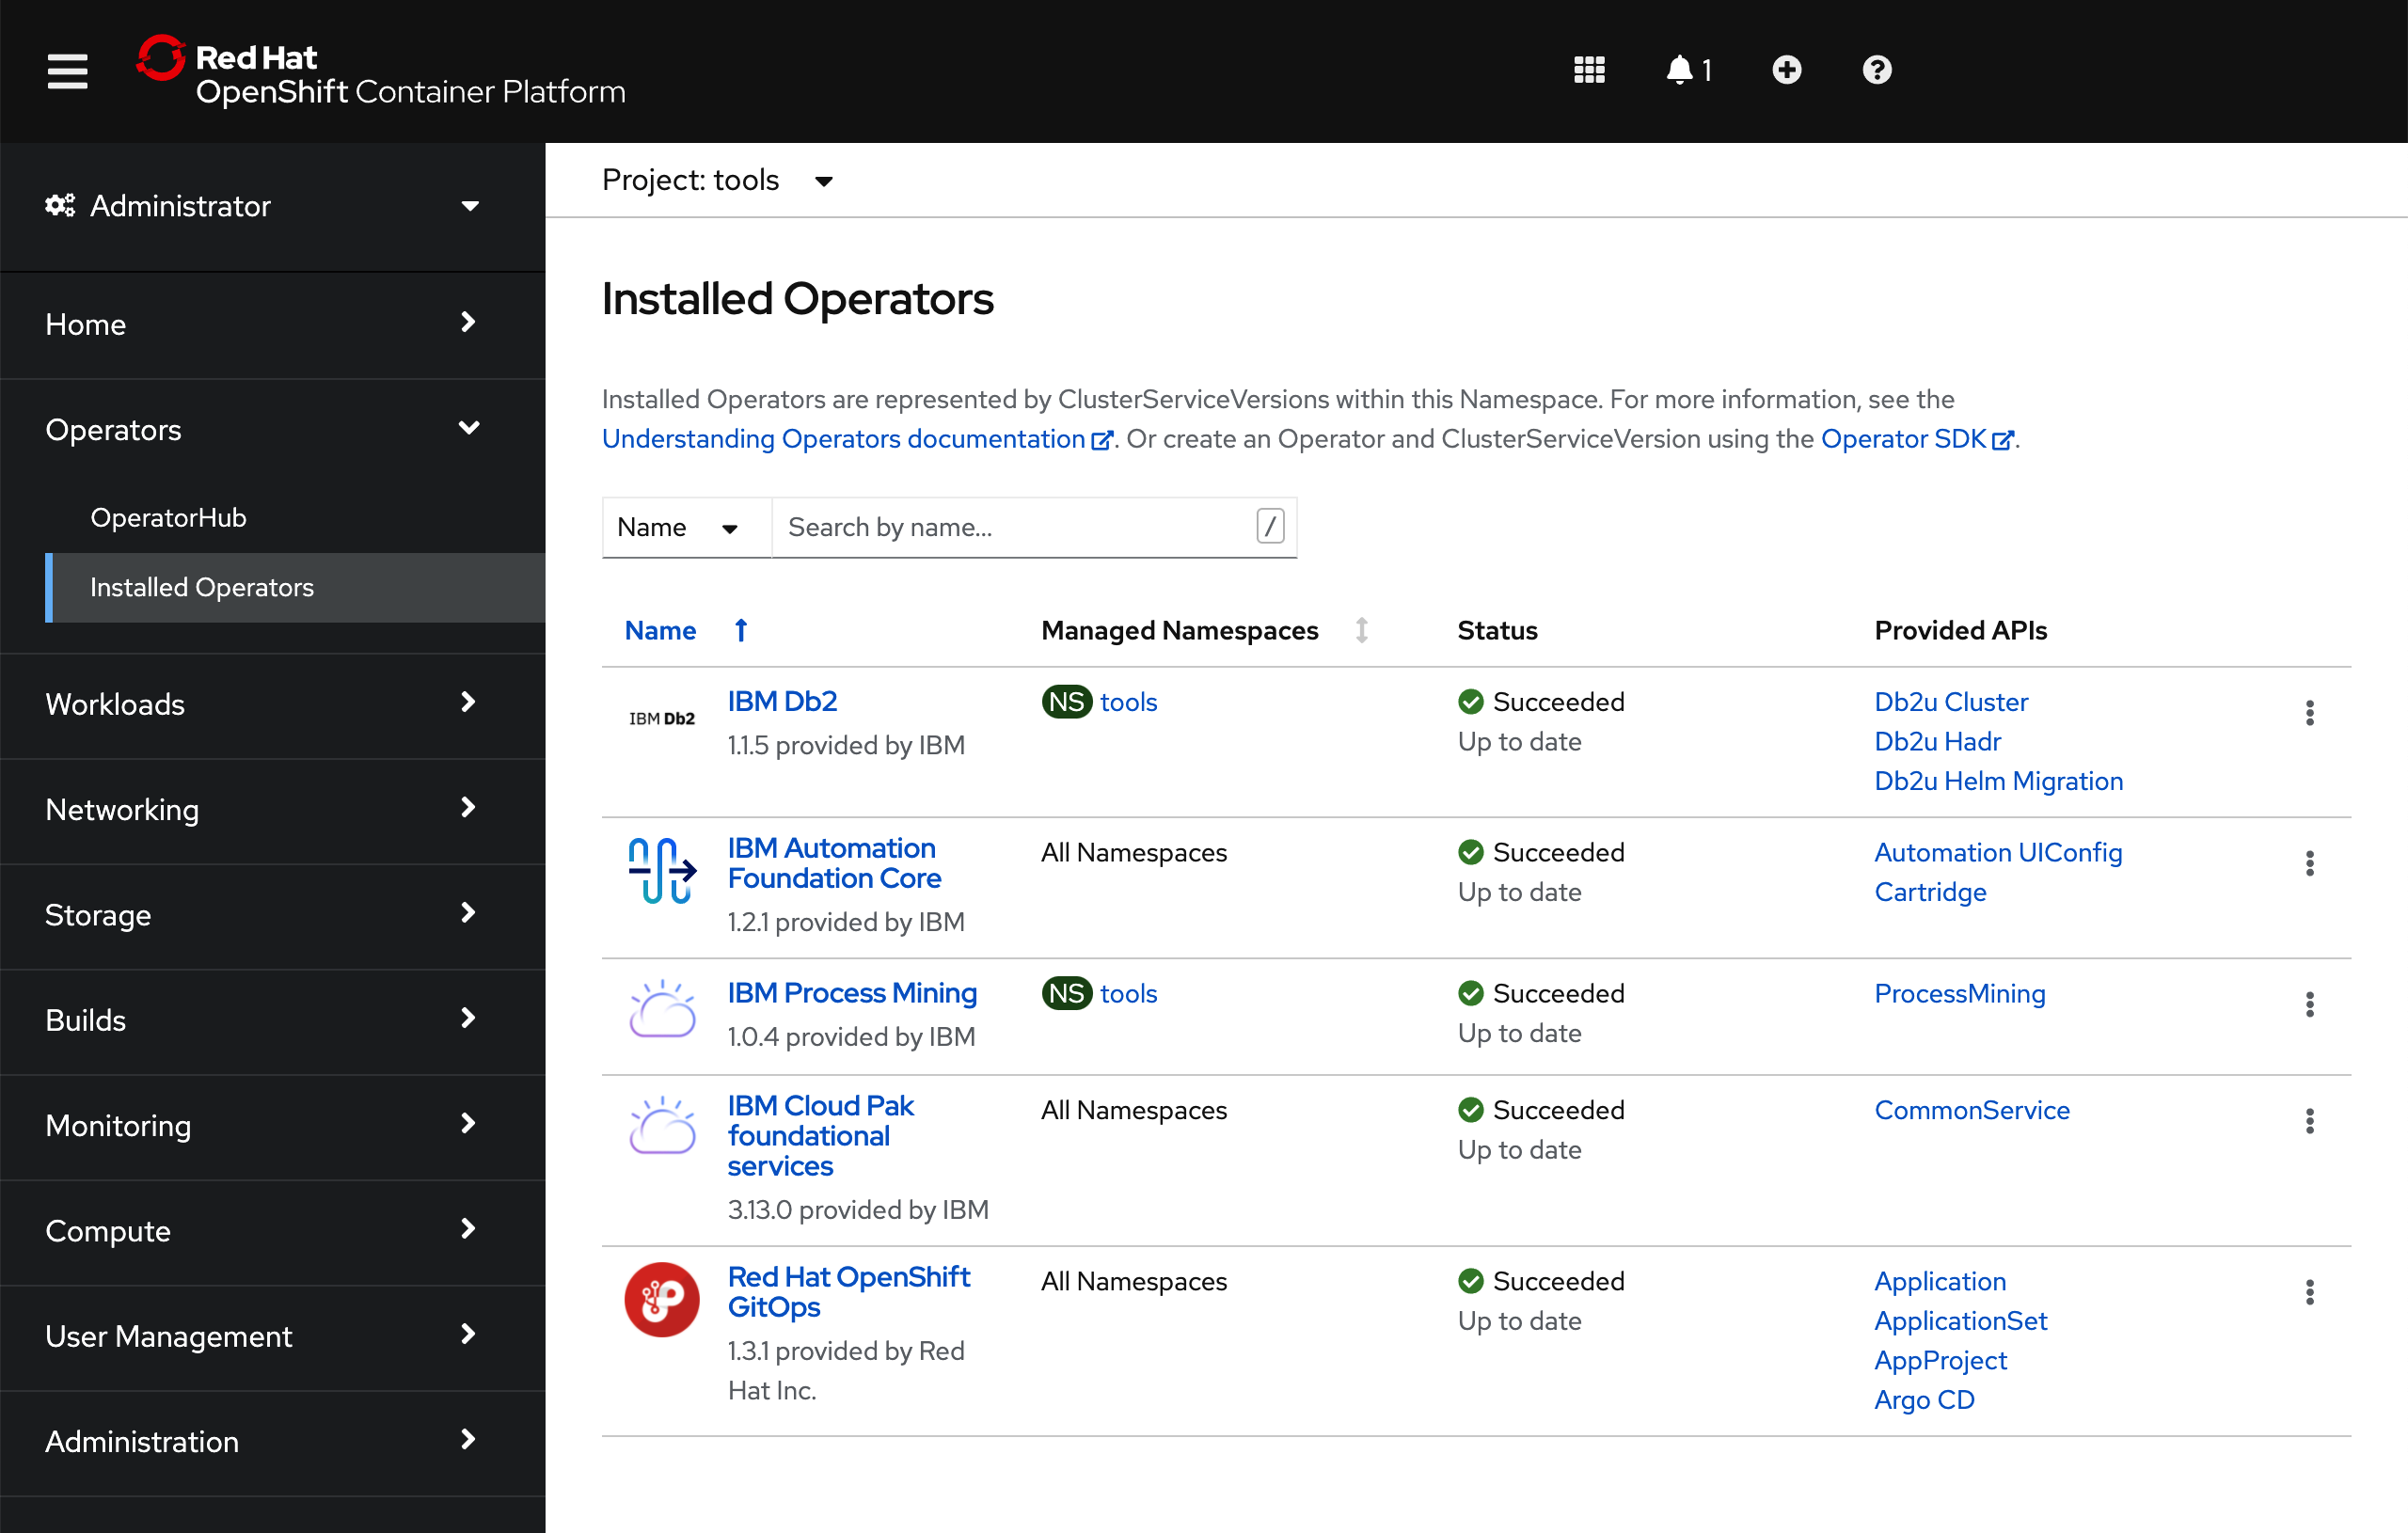
IBM Process Mining
Last step, is to get an IBM Process Mining instance created through the IBM Process Mining operator. All you need to do is to make sure that the definition of the IBM Process Mining instance you want to deploy is correct on your GitOps repository and then, once again, tell the ArgoCD application that is watching over the services layer to activate such resource. This resource will, in turn, create another ArgoCD application that will watch over the resources specified in your definition of the IBM Process Mining instance.
-
Open the
0-bootstrap/single-cluster/2-services/kustomization.yamlfile and un-comment the following resource:- argocd/instances/ibm-process-mining-instance.yaml -
Make sure the storage settings for your IBM Process Mining instance you are about to deploy are correct based on where you requested/created your Red Hat OpenShift cluster on IBM Cloud. Please, review the Create the cluster section to understand what storage class you must ensure your IBM Process Mining instance definition is configured with. You can adjust storage settings in
0-bootstrap/single-cluster/2-services/argocd/instances/ibm-process-mining-instance.yamlwith thedefaultStorageClassNameproperty. -
Add all changes in the current folder to a git index, commit them, and push them to GitHub:
git add . git commit -s -m "Installing an IBM Process Mining instance" git push origin $GIT_BRANCH -
If you go to your ArgoCD UI, you will now see the new
ibm-process-mining-instanceArgoCD application.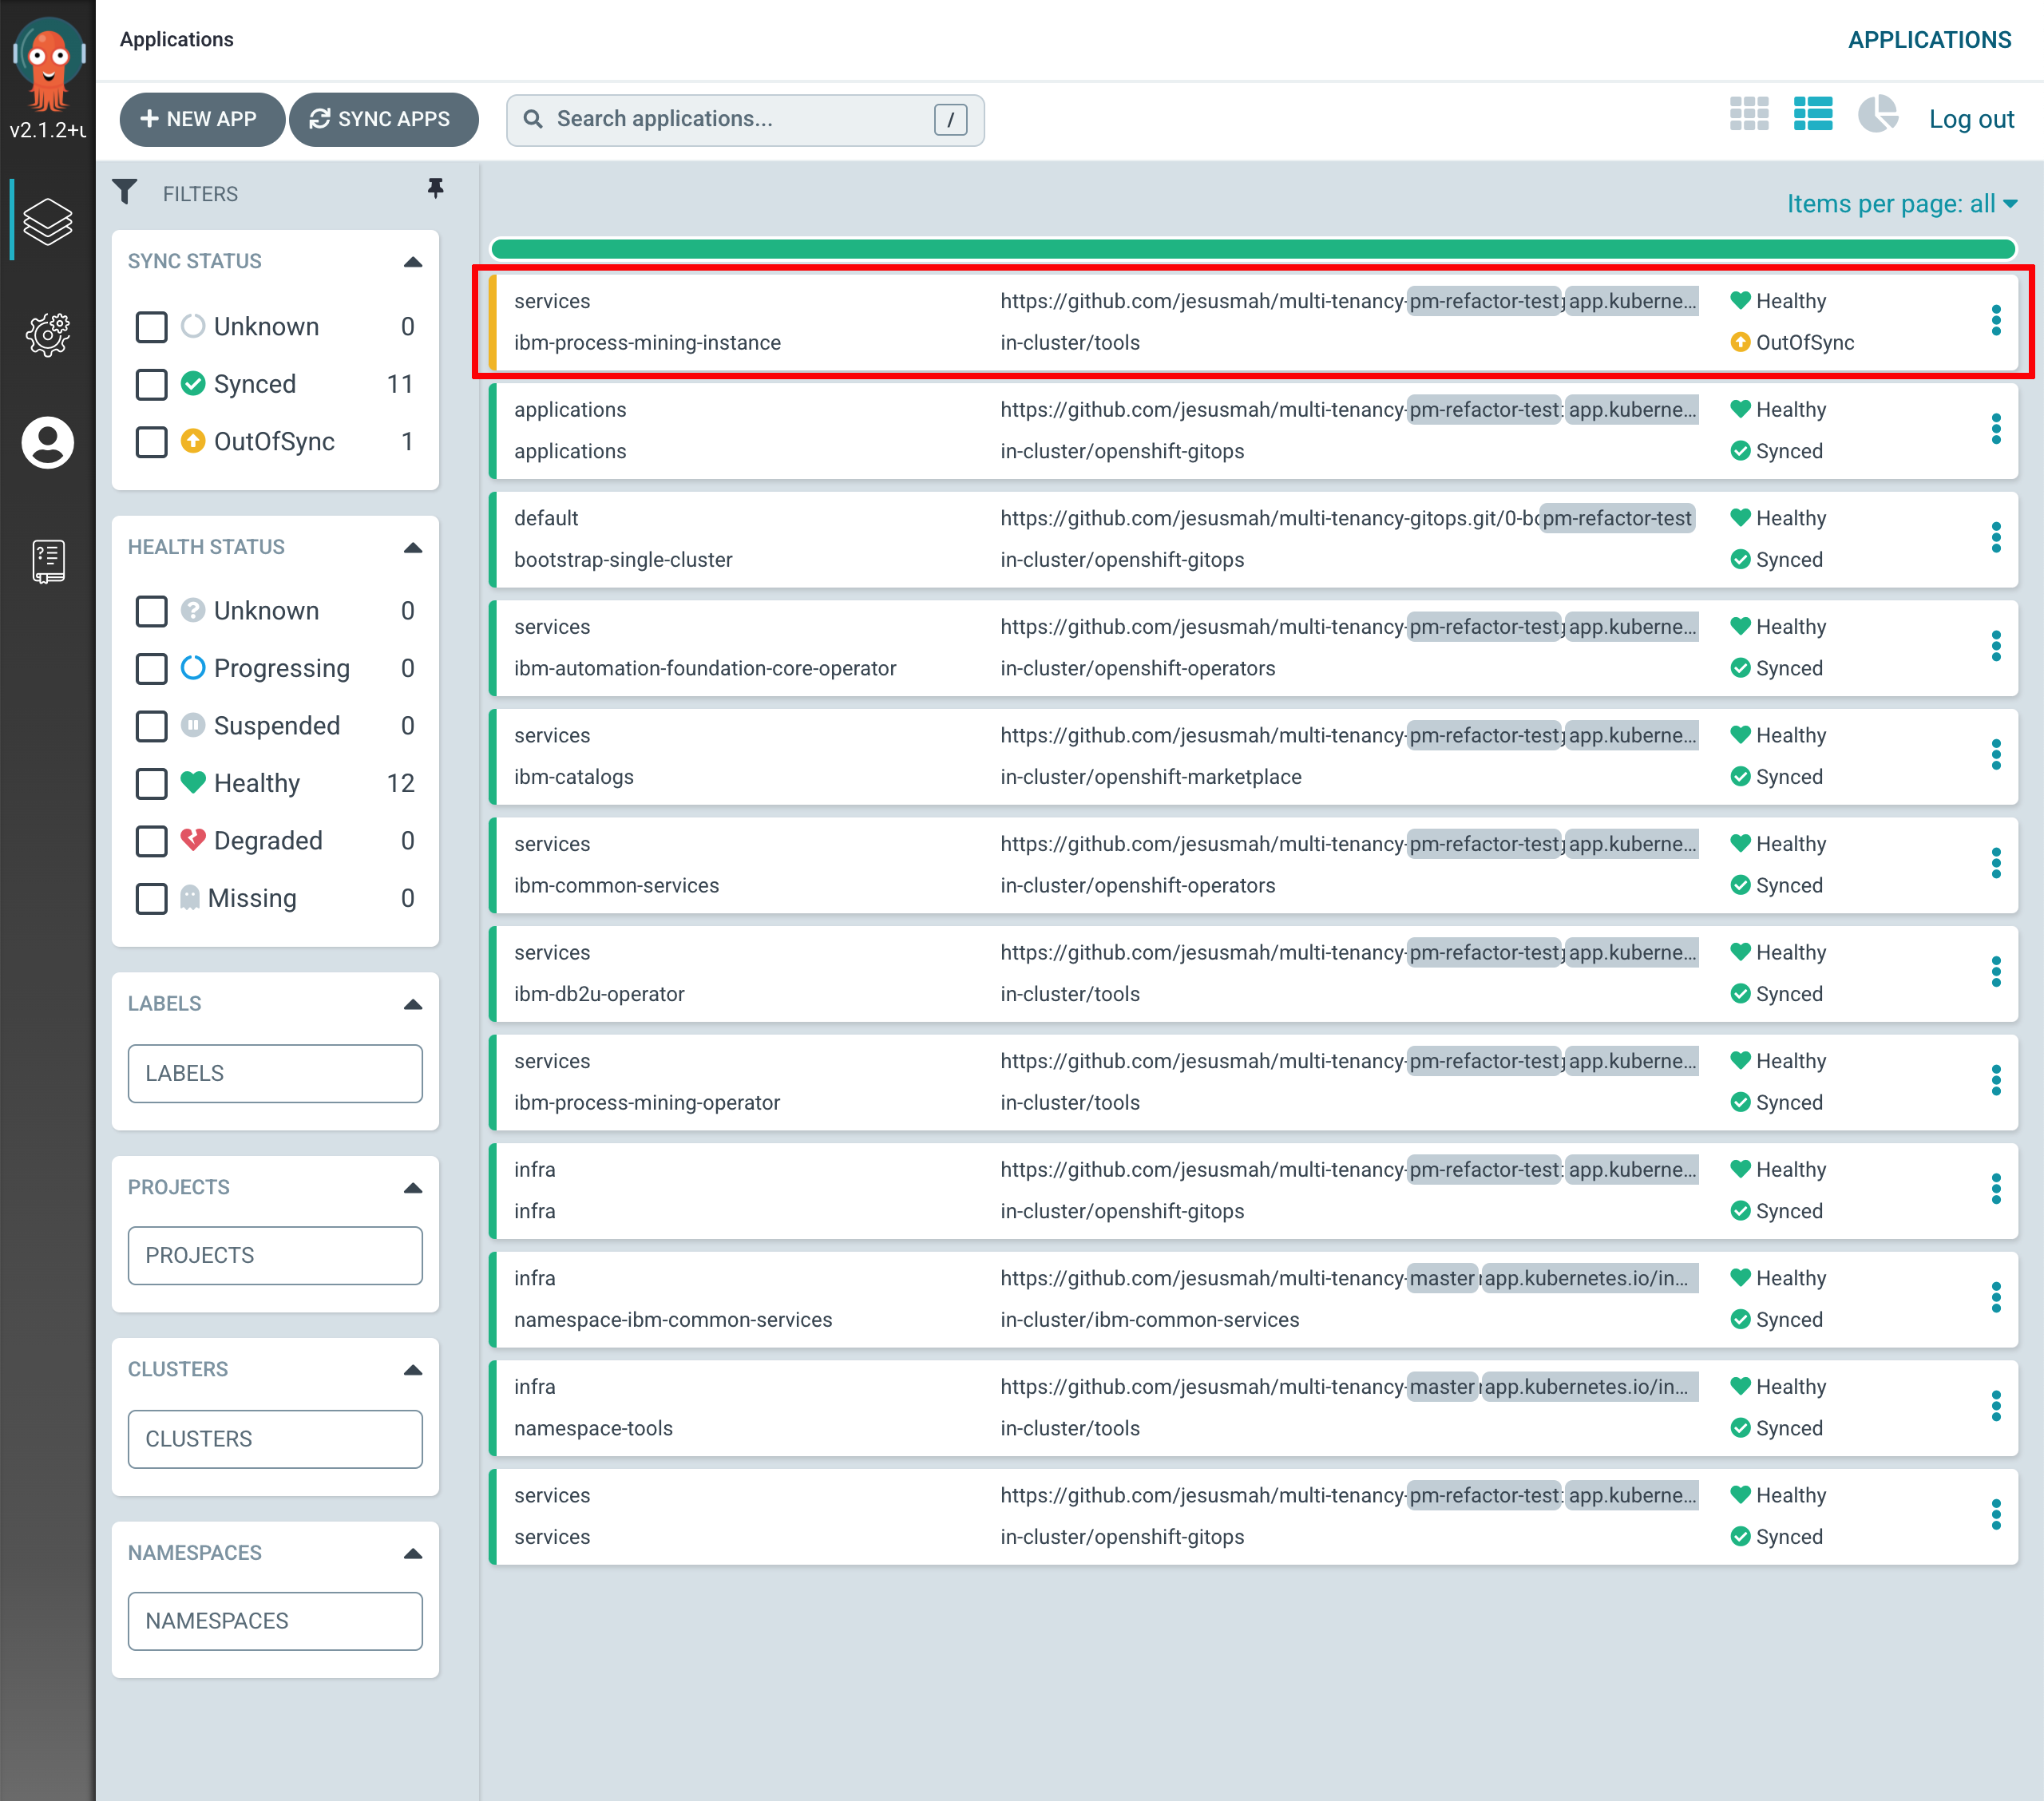
-
If you go into that ArgoCD application, you can monitor the IBM Process Mining instance installation. You will see how Red Hat OpenShift resources are being created as a result of having the
ibm-process-mining-instanceArgoCD application created the initialProcessMiningresource, which was then picked up by the IBM Process Mining operator.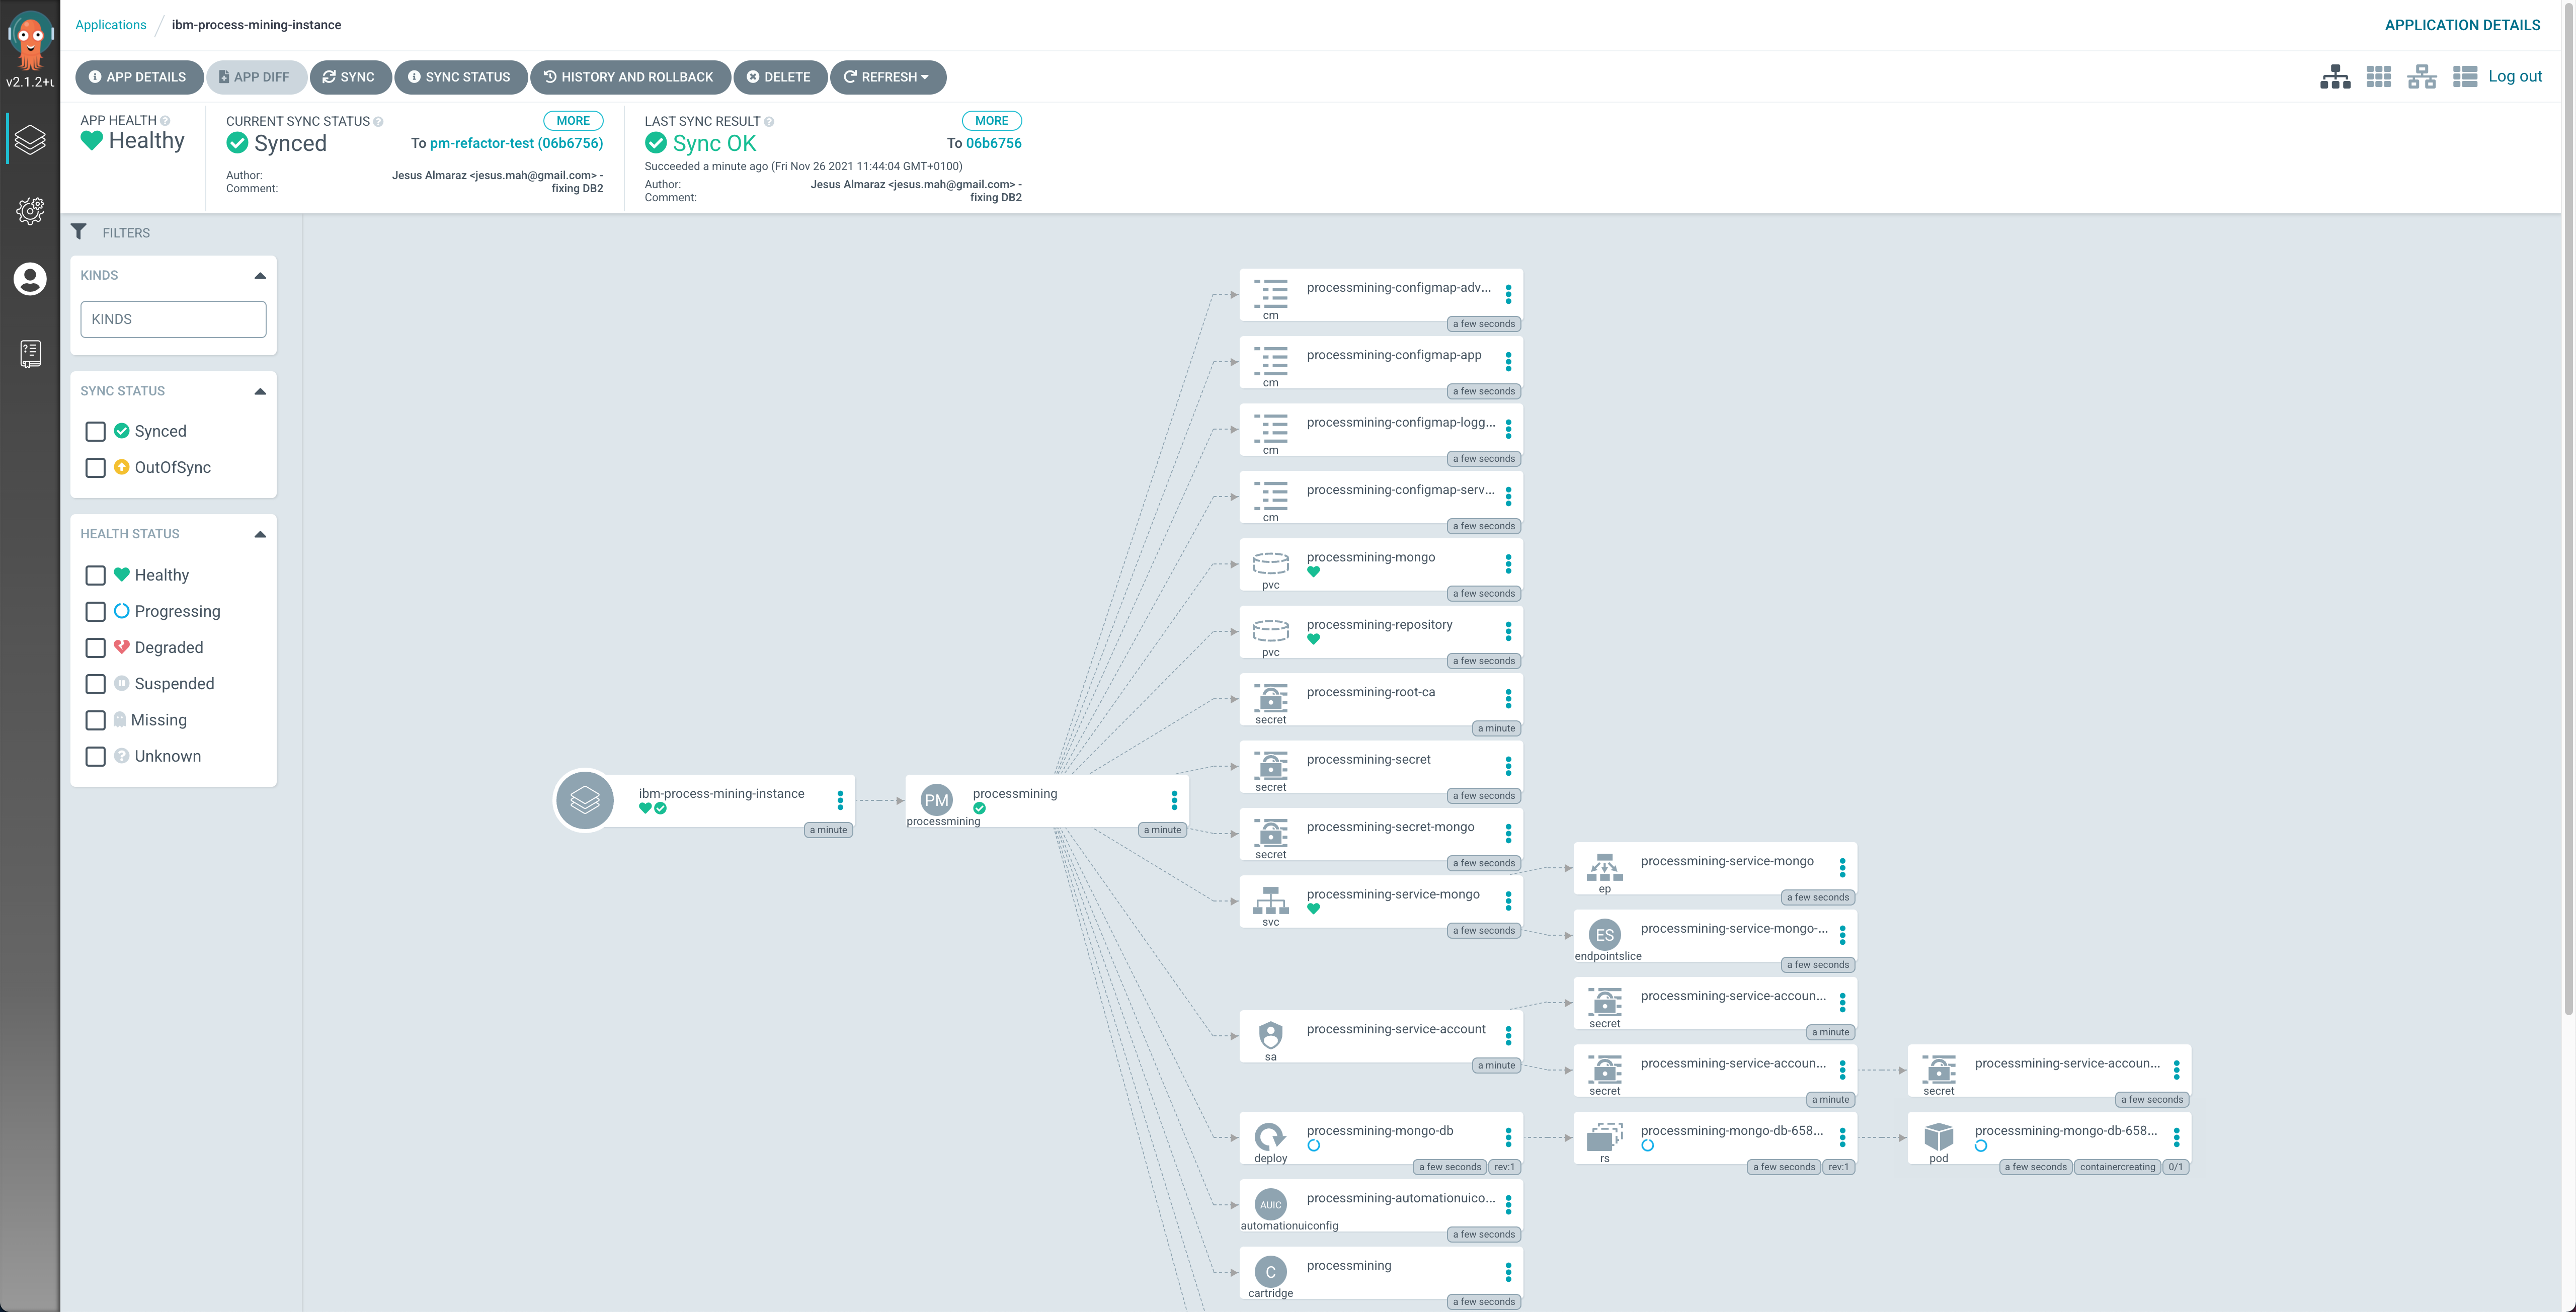
-
If you go to
Operators --> Installed Operatorsunder thetoolsproject, click on theIBM Process Miningoperator and then on theProcessMiningtab, you should see theprocessminingProcessMiningobject.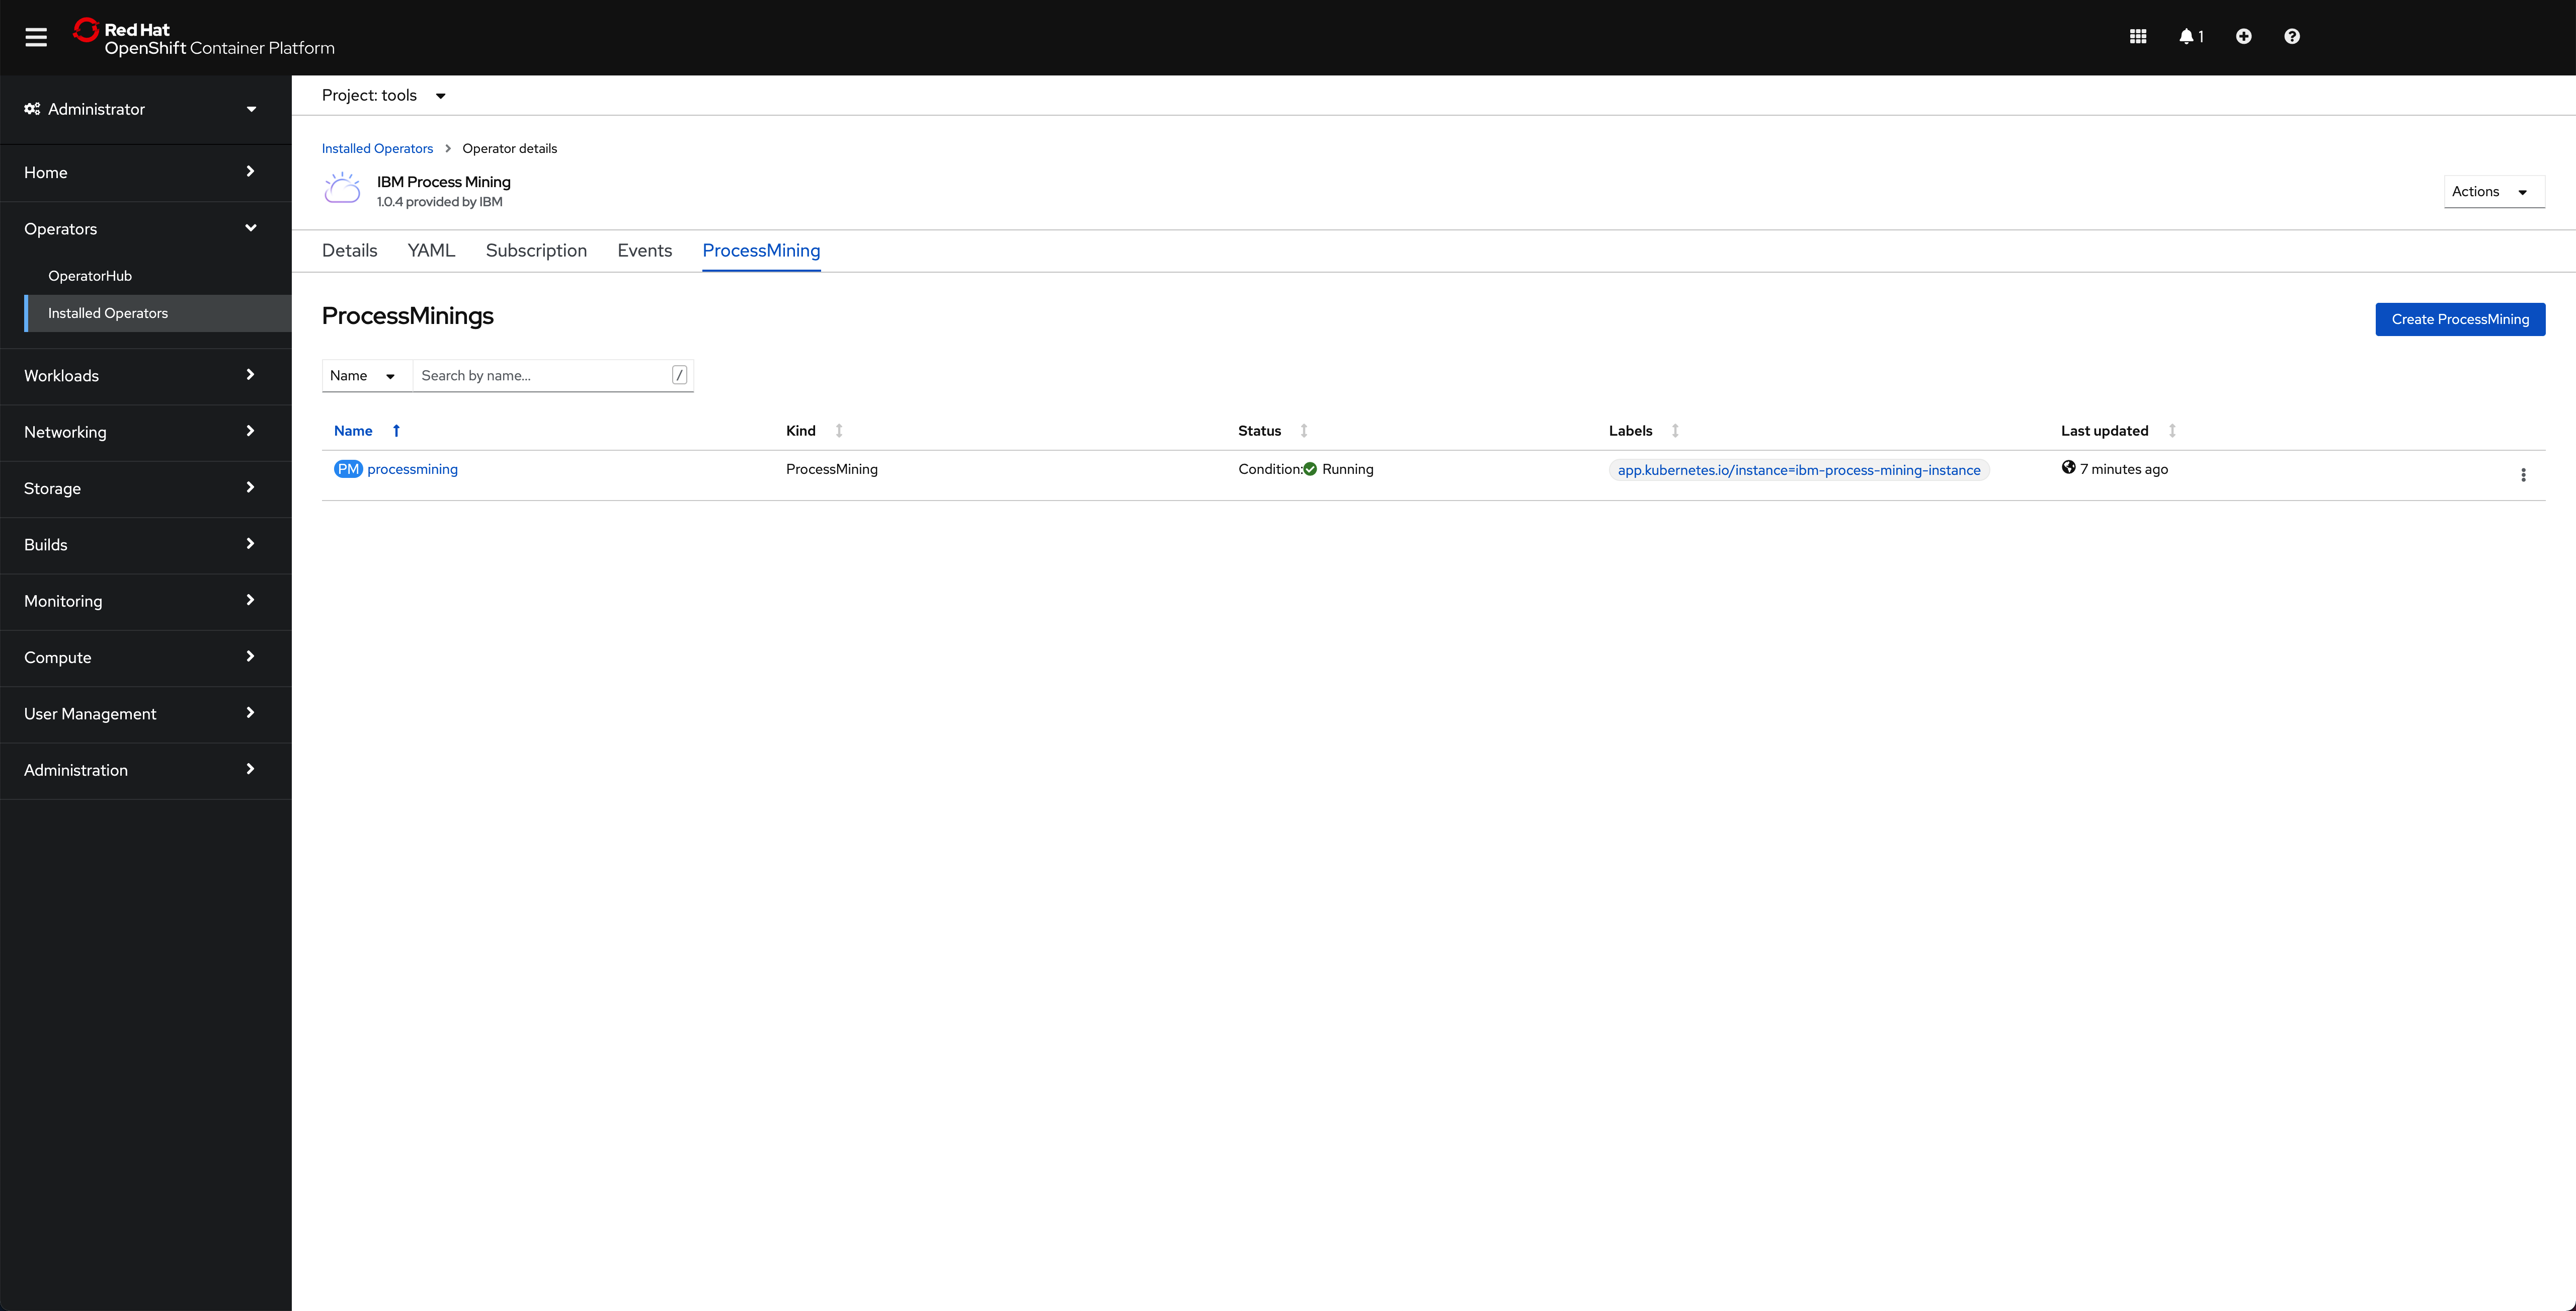
After some time (20-30 mins), you should see all your pods running fine:
$ oc get pods -n tools

NAME                                                         READY   STATUS             RESTARTS   AGE
c-processmining-db2-db2u-0                                   1/1     Running            0          41h
c-processmining-db2-etcd-0                                   1/1     Running            0          41h
c-processmining-db2-instdb-xz2pg                             0/1     Completed          0          41h
c-processmining-db2-ldap-69b69cd69c-grjtd                    1/1     Running            0          41h
c-processmining-db2-restore-morph-bm6l8                      0/1     Completed          0          41h
c-processmining-redis-m-0                                    4/4     Running            0          41h
c-processmining-redis-m-1                                    4/4     Running            0          41h
c-processmining-redis-m-2                                    4/4     Running            0          41h
c-processmining-redis-s-0                                    4/4     Running            0          41h
c-processmining-redis-s-1                                    4/4     Running            0          41h
c-processmining-redis-s-2                                    4/4     Running            0          41h
create-secrets-job-hdfn6                                     0/1     Completed          0          41h
db2u-operator-manager-7d95c8875c-8nqsp                       1/1     Running            0          41h
iaf-zen-tour-job-pq49c                                       0/1     Completed          0          41h
iam-config-job-2v2jk                                         0/1     Completed          0          41h
ibm-cloud-databases-redis-operator-6d4df44f68-2z44v          1/1     Running            0          41h
ibm-nginx-78fbf5789c-cdg4t                                   1/1     Running            0          41h
ibm-nginx-78fbf5789c-cfqr7                                   1/1     Running            0          41h
processmining-analytics-79bd7d76-xrxtn                       1/1     Running            0          41h
processmining-bpa-766d4fcdd5-8x8rh                           1/1     Running            0          41h
processmining-connectors-f8798d759-5lwnt                     1/1     Running            0          41h
processmining-dr-5d67787764-6kmjh                            1/1     Running            0          41h
processmining-engine-598dc7bfd7-b6wfp                        1/1     Running            0          41h
processmining-mongo-db-bdfbc856f-tqjgp                       1/1     Running            0          41h
processmining-operator-controller-manager-6ccd8b5849-cndtm   1/1     Running            0          41h
processmining-processmining-nginx-bcb7889b-wjw2h             1/1     Running            0          41h
processmining-processmining-um-7767c6b6c4-8sbt6              1/1     Running            0          41h
processmining-taskbuilder-66cd95b6d6-66fhk                   1/1     Running            0          41h
processmining-taskminer-nginx-658979c577-jgb75               2/2     Running            0          41h
processmining-taskprocessor-77cfd45f84-m2887                 1/1     Running            1          41h
setup-nginx-job-9b8q9                                        0/1     Completed          0          41h
usermgmt-6df64d77d8-5p5zn                                    1/1     Running            0          41h
usermgmt-6df64d77d8-fl2sw                                    1/1     Running            0          41h
zen-audit-bbb7584df-lkd2q                                    1/1     Running            0          41h
zen-core-api-94dcd5c79-47b4l                                 1/1     Running            0          41h
zen-core-api-94dcd5c79-tbw7c                                 1/1     Running            0          41h
zen-core-bddbff7b7-4972q                                     1/1     Running            0          41h
zen-core-bddbff7b7-5nc6w                                     1/1     Running            0          41h
zen-metastoredb-0                                            1/1     Running            0          41h
zen-metastoredb-1                                            1/1     Running            0          41h
zen-metastoredb-2                                            1/1     Running            0          41h
zen-metastoredb-certs-lmhmf                                  0/1     Completed          0          41h
zen-metastoredb-init-sfws5                                   0/1     Completed          0          41h
zen-post-requisite-job-zngwz                                 0/1     Completed          0          41h
zen-pre-requisite-job-9tqwj                                  0/1     Completed          0          41h
zen-watcher-7bf695bd4b-gfgg4                                 1/1     Running            0          41h
Tip
As you can see you have not deployed a highly available instance of IBM Process Mining. The reason for this is the amount of resources that it requires. However, the GitOps process and steps would exactly be the same for a highly available deployment of IBM Process Mining. If you wanted a highly available deployment of IBM Process Mining, you can find the ProcessMining Custom Resource Definition for it in the IBM Process Mining official documentation in the IBM Knowledge Center here and you would need to apply that in 0-bootstrap/single-cluster/2-services/argocd/instances/ibm-process-mining-instance.yaml
Accessing IBM Process Mining
You can access the IBM Process Mining User Interface by first accessing the IBM Cloud Pak Dashboard. To find your IBM Cloud Pak Dashboard url you simple get the Red Hat OpenShift Routes in your tools Red Hat OpenShift Project, which is where you have deployed your IBM Process Mining Instance:
$ oc get routes -n tools

NAME               HOST/PORT                                                PATH   SERVICES                         PORT                   TERMINATION            WILDCARD
cpd                cpd-tools.xxxx.containers.appdomain.cloud                       ibm-nginx-svc                    ibm-nginx-https-port   passthrough/Redirect   None
processmining-pm   processmining-pm-tools.xxxx.containers.appdomain.cloud          processmining-service-web        7443-tcp               reencrypt/Redirect     None
processmining-tm   processmining-tm-tools.xxxx.containers.appdomain.cloud          processmining-service-tm-nginx   8443-tcp               reencrypt/Redirect     None
The route you are interested on that you should point your browser to is called cpd. Open that url on your web browser:
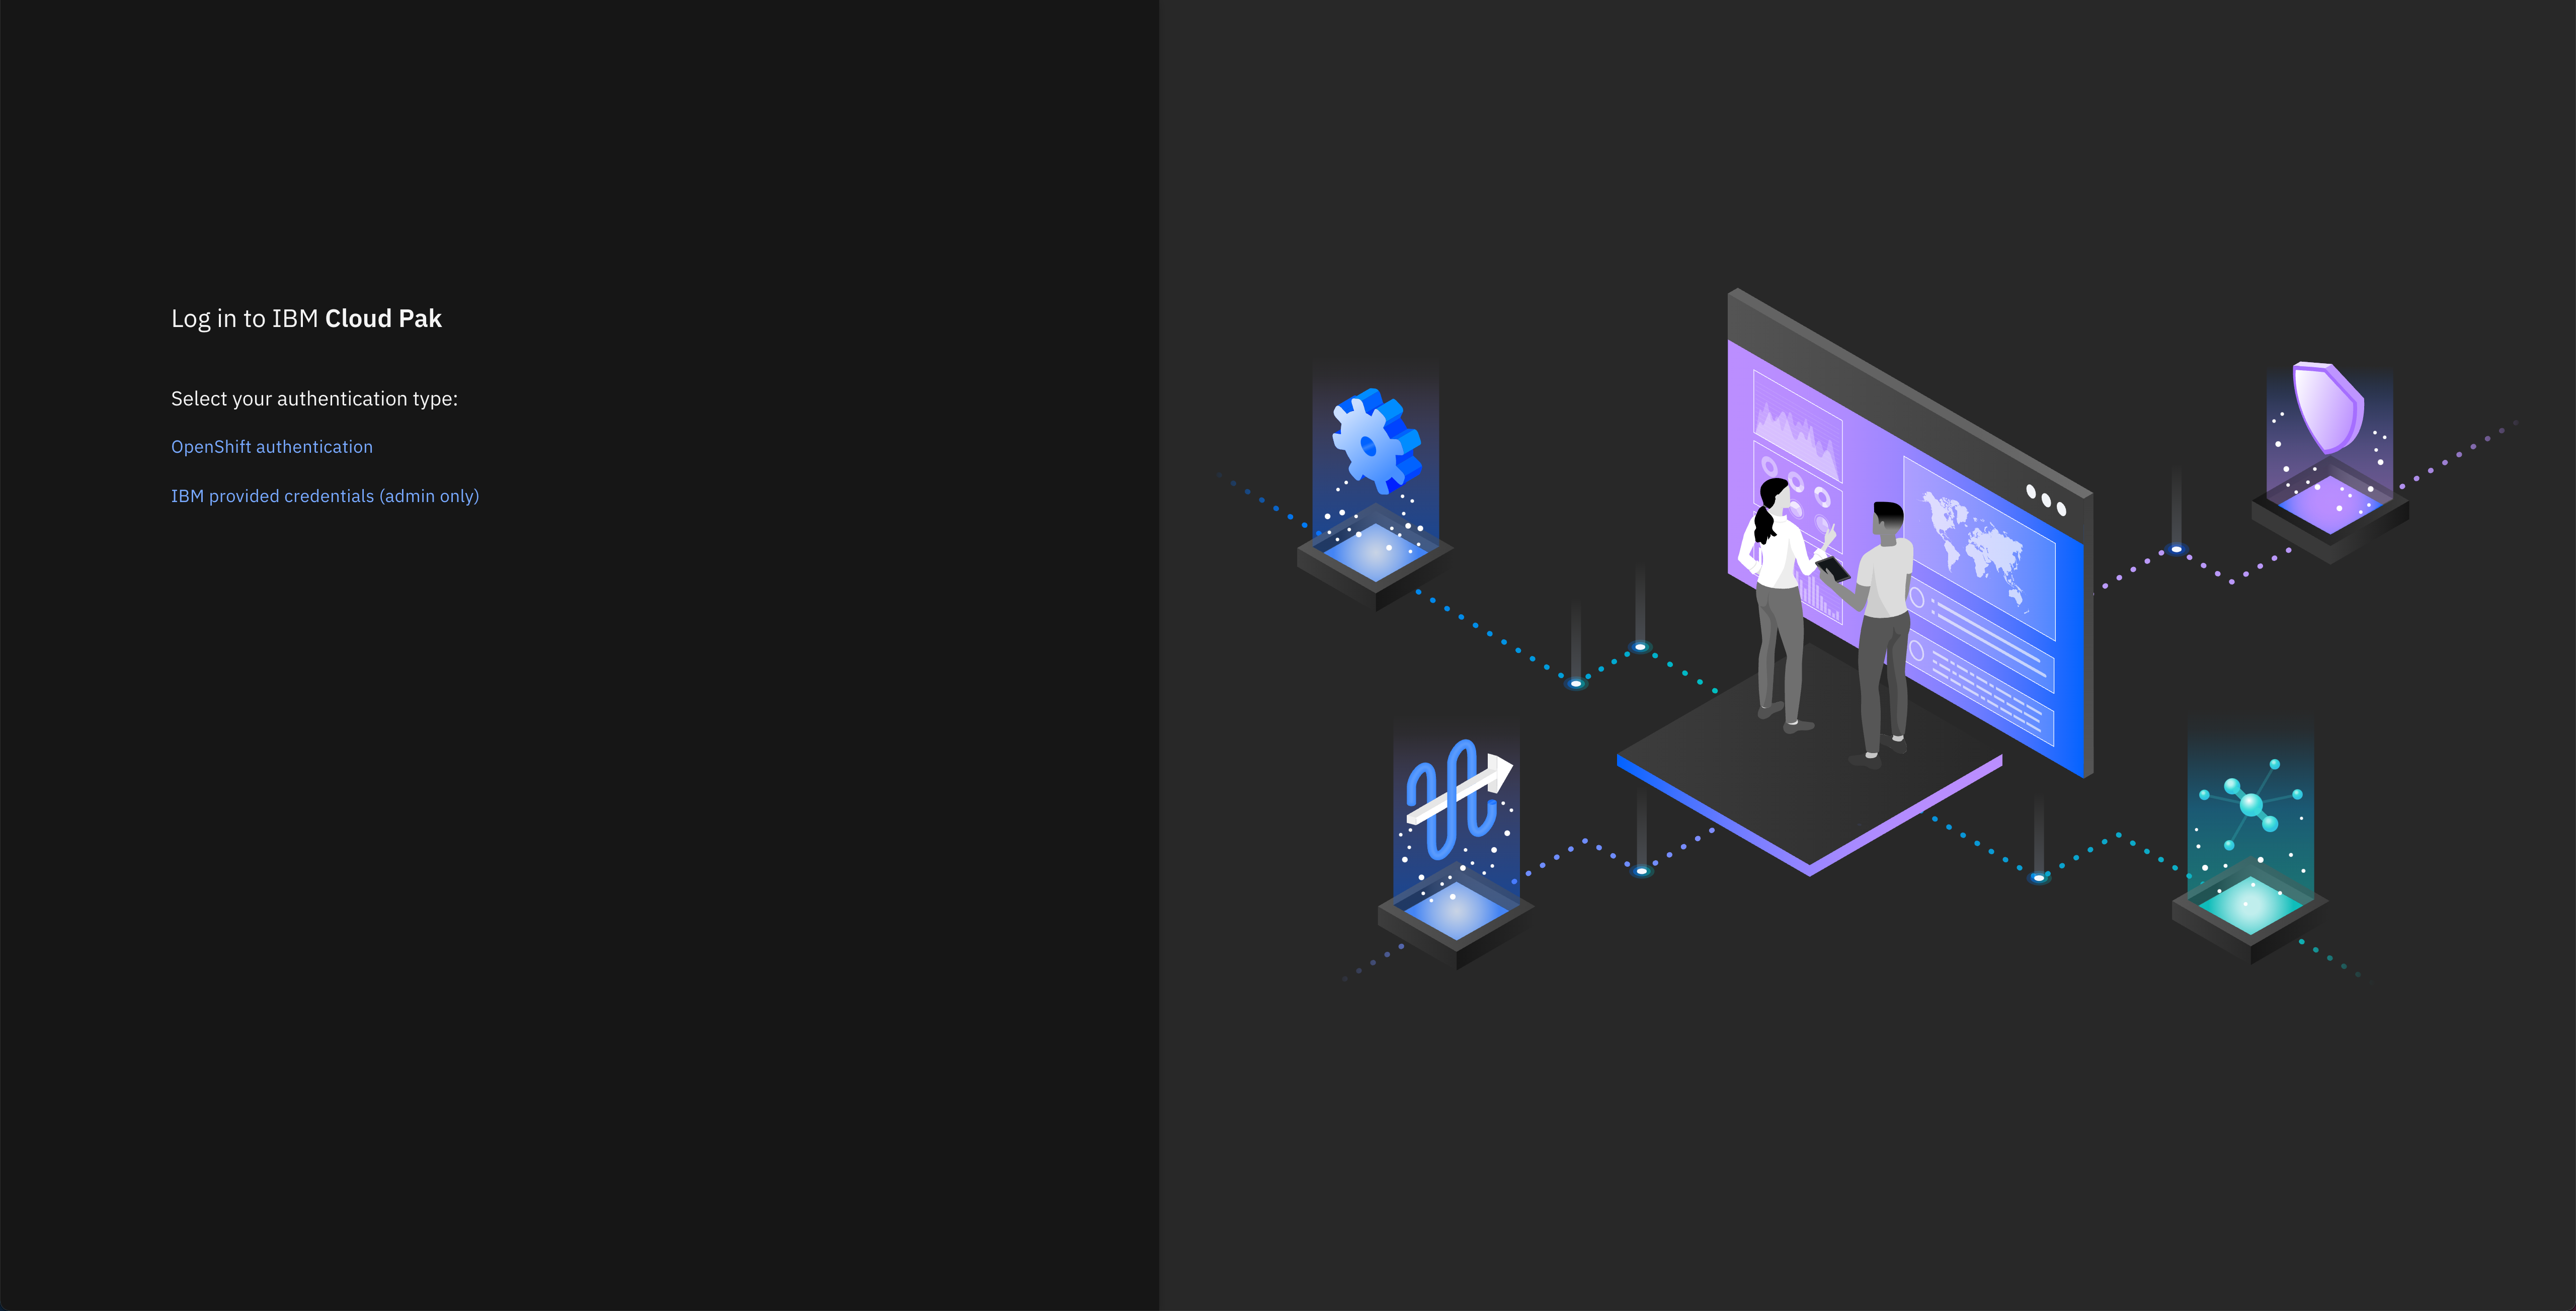
Click on IBM provided credentials (admin only) to log in with your IBM Cloud Pak credentials. Your username will be admin and you can find the password with the following command:
oc -n ibm-common-services get secret platform-auth-idp-credentials -o jsonpath='{.data.admin_password}' | base64 -d && echo
Once you are in the IBM Cloud Pak Dashboard, click on the hamburger icon on the top left corner to open the Navigation Menu. In there, click on Analyze and then in Process Mining.
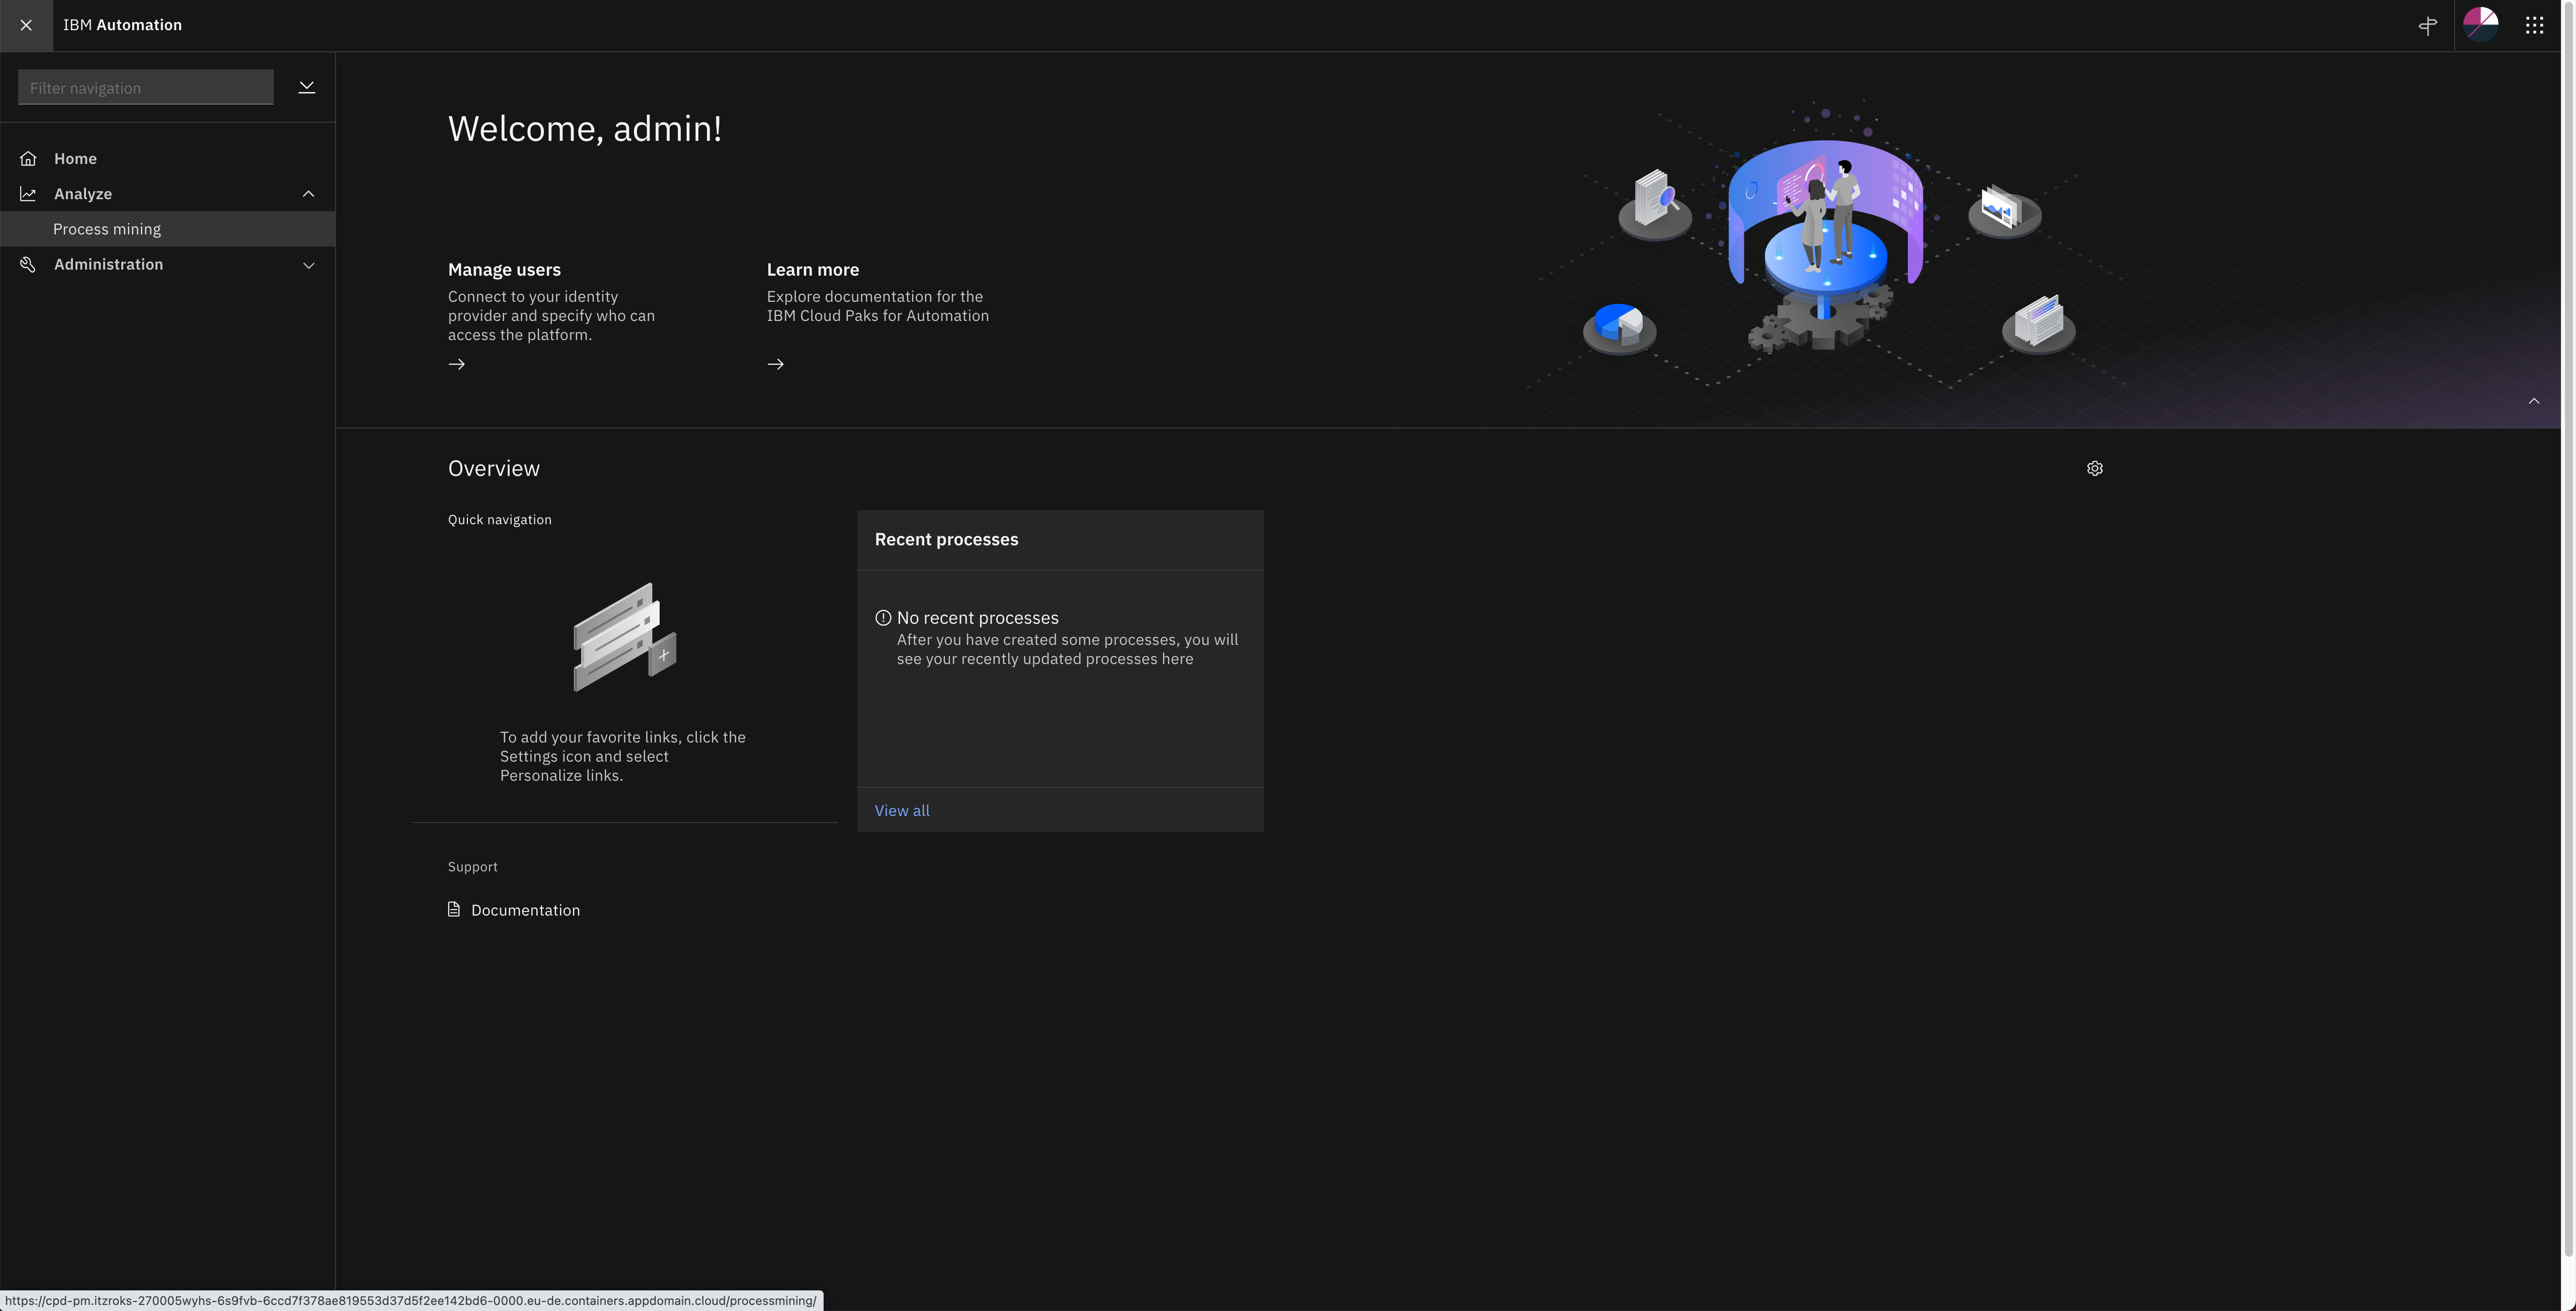
You should get redirected to your IBM Process Mining instance User Interface.

Mining some data
The process mining UI maybe up and running, but nothing worth the ingestion of some data to be sure that all components are in a working state.
In order to have the engine processing data, you must:
- Create a new process
- Have in your possession a CSV file that can be ingested in a process as a Data Source
- Define a Data Source in the process and upload a data file
- After the data is accepted, you must map some columns that the mining engine expects to the columns in the CSV
- Then see the magic happens!
Tip
The CSV file must be prepared to be ingested by the process mining to have valuable results. As quickly shown when logging into the Process Mining web console, the 3 following fields are mandatory, no mining can be done without:
- Process Id
- Activity type
- Activity Start time
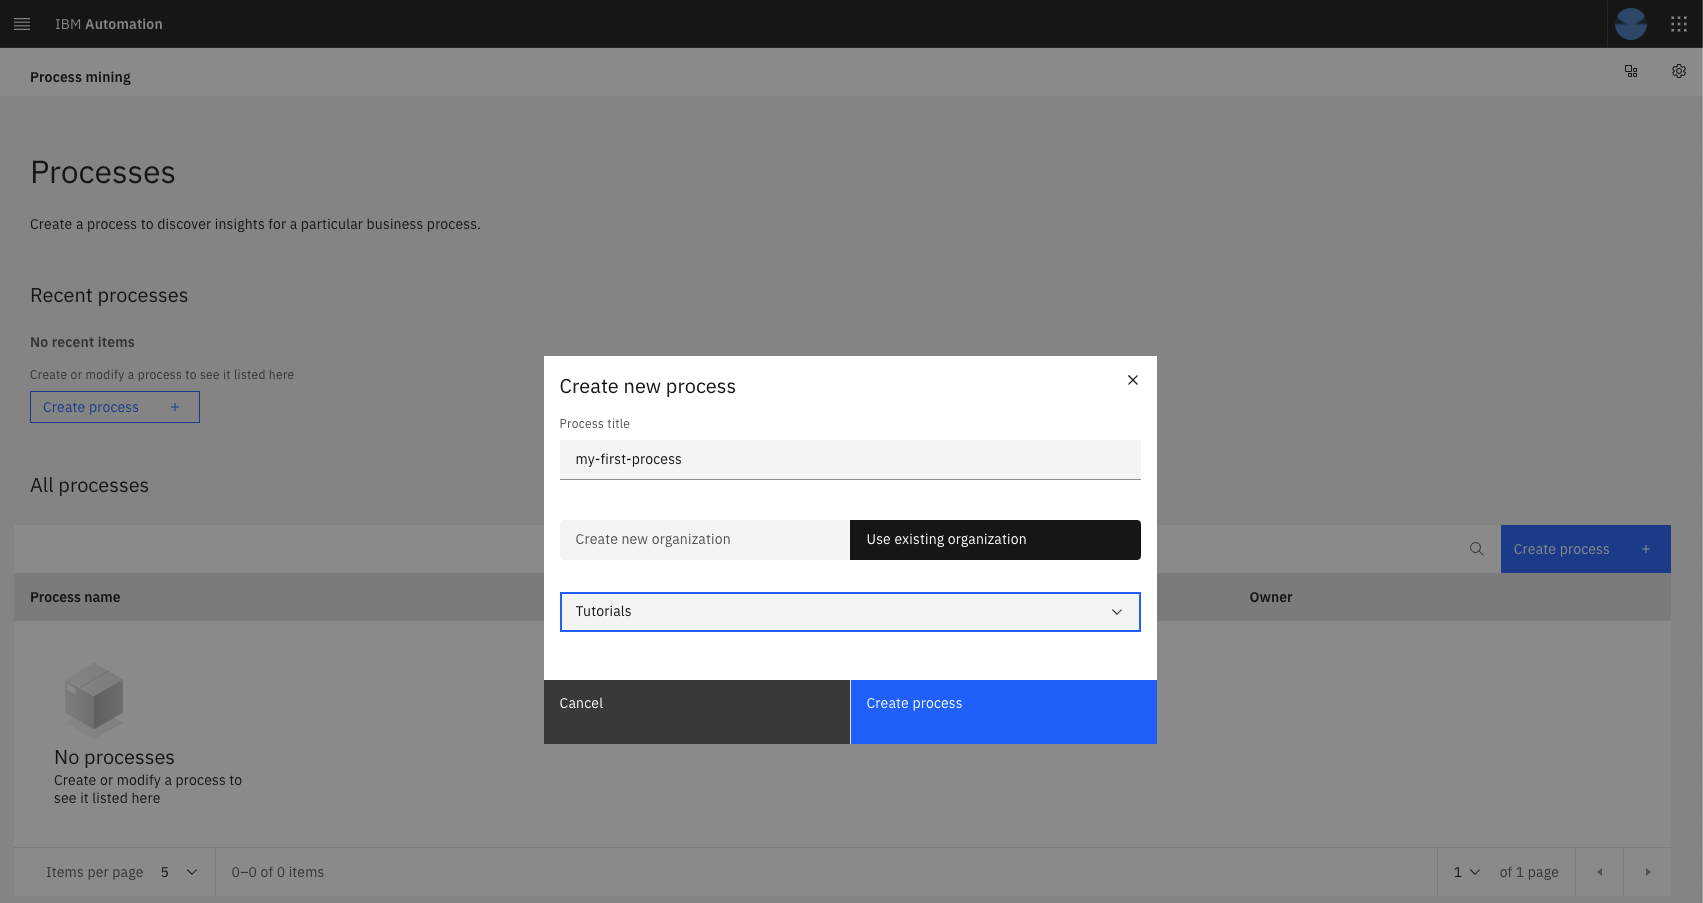
Click on the "Create process" button. This will show a dialog in which you must supply a name for your process and associate it with an organization.
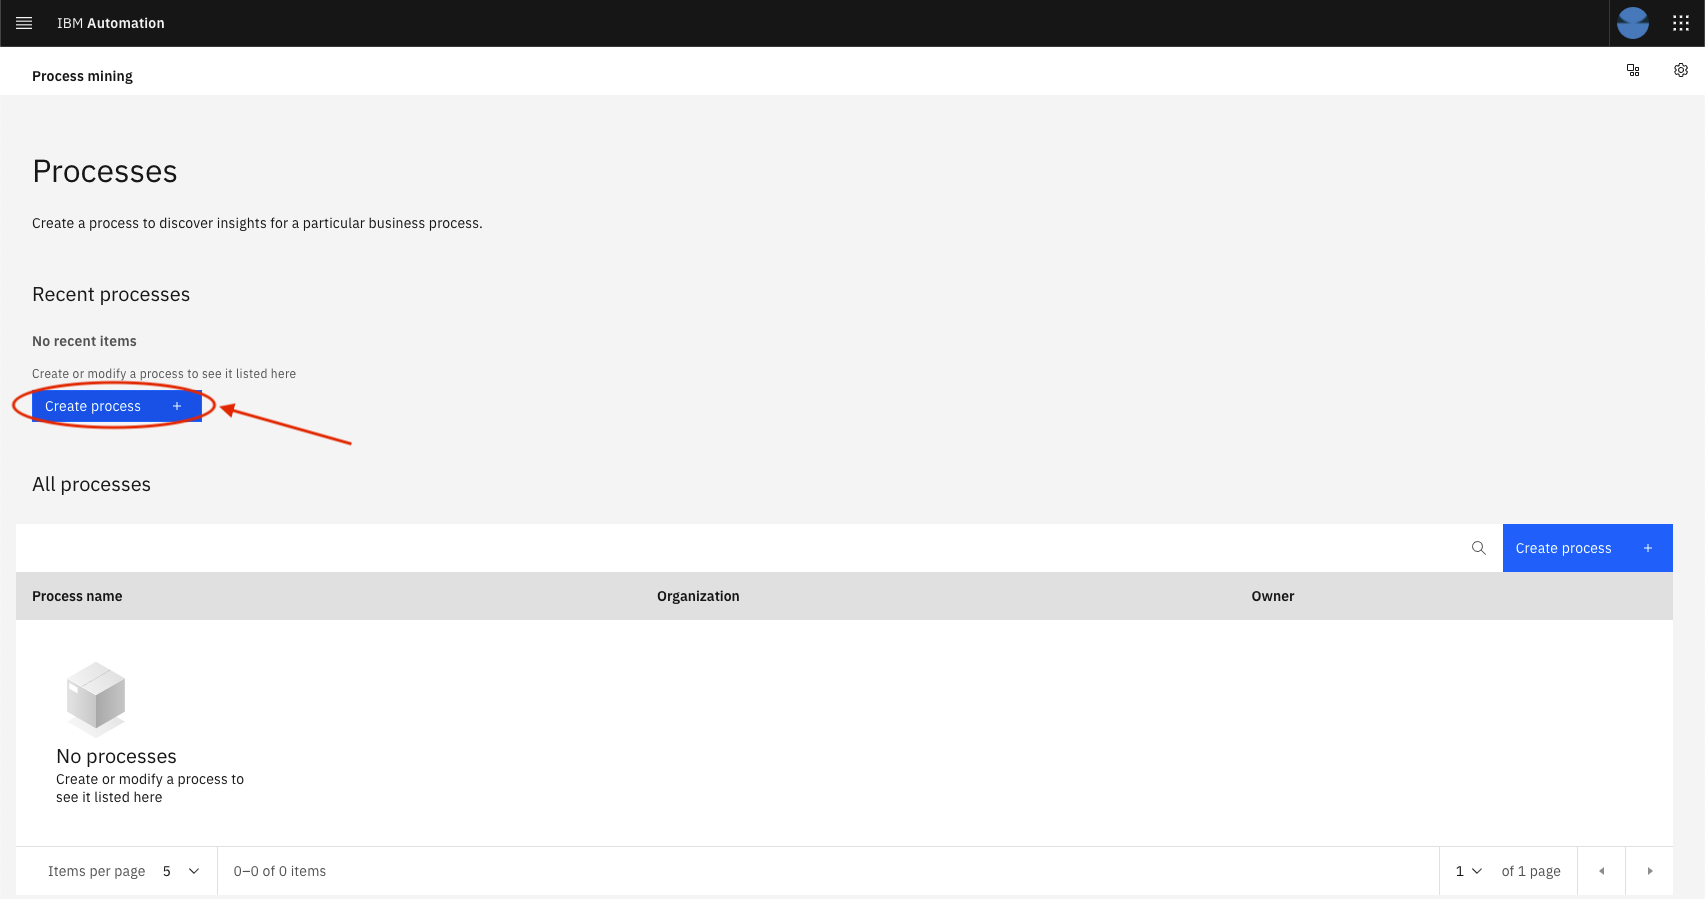
Choose the existing organization "Tutorial" and give a name to your process, confirm creation by clicking: Create process
Your newly created process will show up as a tile under the Recent processes section and also as a list item in the list: All processes. Click on either the tile of the item in the list to bring up the details of this process.
Load Data into the process
Tip
The CSV file herein mentioned as been integrated into the gitops repository but it has been recovered from another Process Mining training done by Paul Pacholski and is still available on Box at: Box@IBM Process and Task Mining Environment and Labs 1.12
-
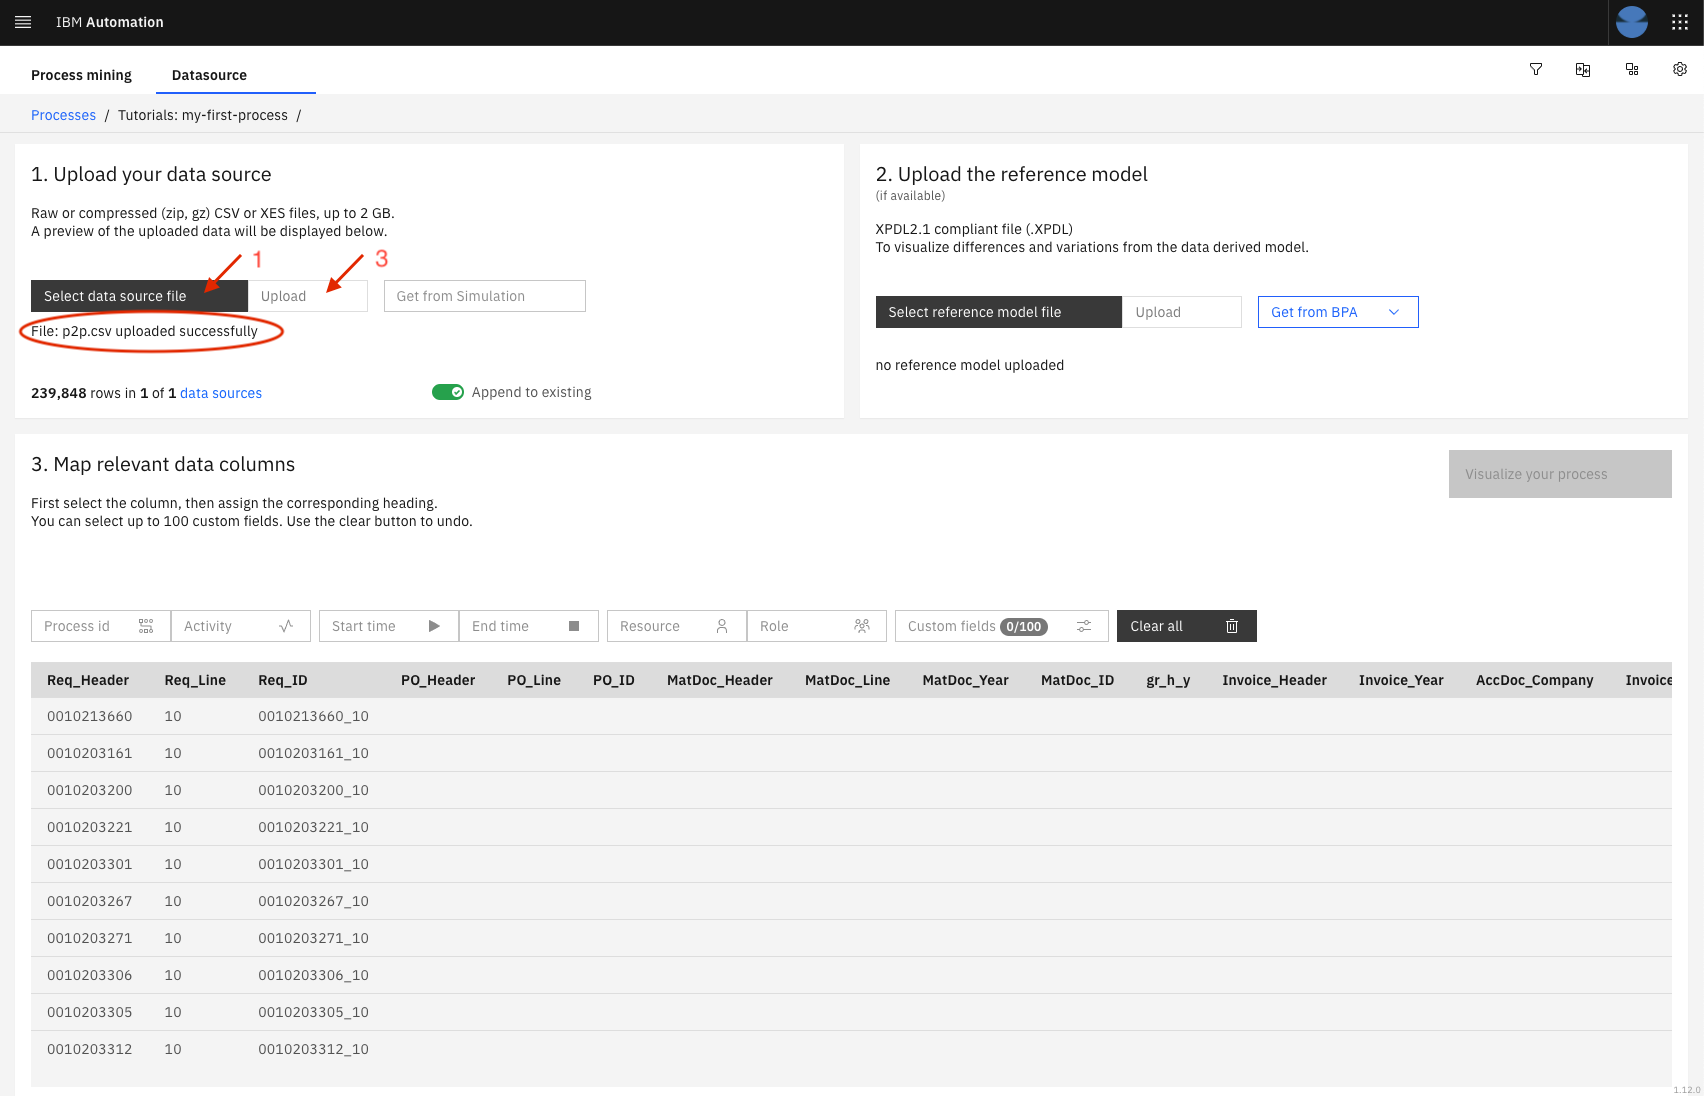
From the Process details screen, click on the Select data source button
-
Select the p2p.csv.zip file that can be found HERE and unzip it on your machine
-
Click on the upload button. When done, you will see the message File: p2p.csv uploaded successfully under the buttons.
-
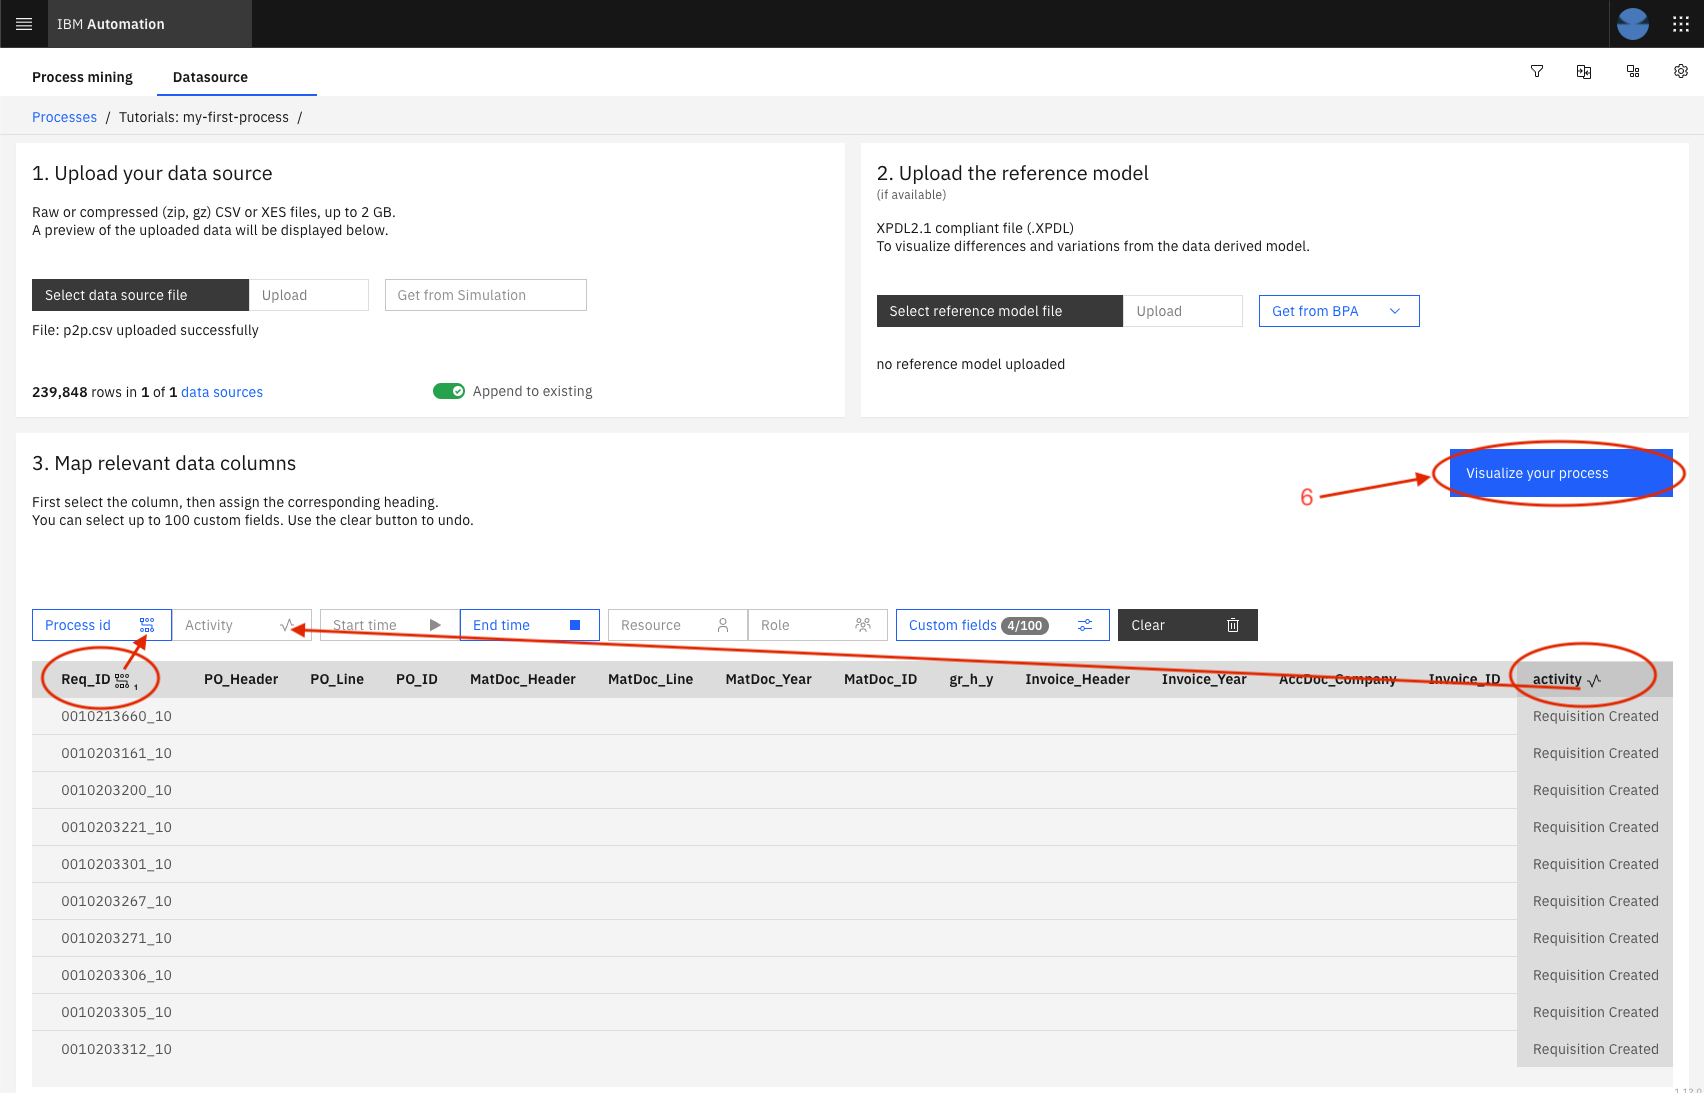
Then, you must map some columns to the required fields expected by the Process Mining to perform its analysis. To do so, you select (highlight) the column from the data preview table by clicking in the title and click on the Process Mining field to associate with this column. The PM fields are identified by the boxes on top of that table. In this example, you must do the following mappings:
Column Name Process Mining field Req_ID Process Id activity Activity datetime Start time user Resource role Role usertype Custom fields Requisition_Type Custom fields Requisition_Vendor Custom fields Req_Header Custom fields -
Once the mapping of required fields is done, the button Visualize your process will be enabled. Notice also that each column that is mapped with show beside its name the icon representing the Process Mining field that is mapped with it. Also, some PM fields only support 1 mapping, as for others, you can put many.
-
Click on Visualize your process, and have fun navigating through the capabilities of the IBM Process Mining on OpenShift!
Success
You have now completed the in-depth IBM Process Mining tutorial. You have successfully deployed IBM Process Mining on a RedHat OpenShift Kubernetes Service (ROKS) cluster using GitOps